
Chihuahua cheese, or queso menonita, is a beloved Mexican cheese known for its smooth, creamy texture and mild, slightly tangy flavor. Originating from the northern Mexican state of Chihuahua, this semi-soft, cow’s milk cheese has become a staple in Mexican cuisine. Its excellent melting properties make Chihuahua cheese the go-to choice for dishes like quesadillas, tacos, and nachos, where its gooey consistency enhances the eating experience. Unlike crumblier cheeses like Cotija or firmer varieties like Monterey Jack, Chihuahua cheese melts seamlessly, offering a velvety finish to every bite. Whether you’re making a classic Mexican dish or adding a cheesy twist to your favorite meals, Chihuahua cheese offers a perfect balance of texture and flavor that’s hard to beat.
1. Chihuahua Cheese in Tacos: A Flavor Explosion
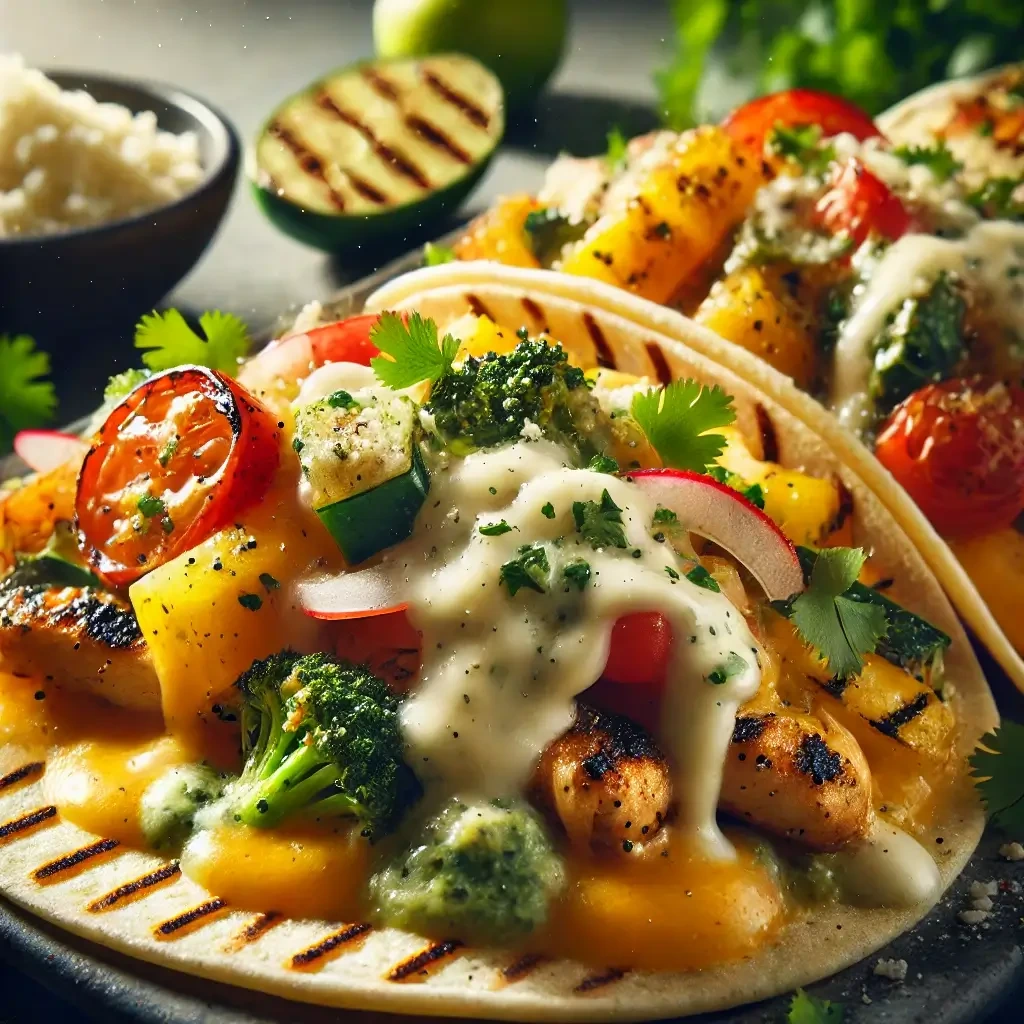
Soft Tacos with Chihuahua Cheese and Grilled Veggies
Soft tacos are a popular and versatile dish, perfect for showcasing the creamy, melt-in-your-mouth texture of Chihuahua cheese combined with the smoky, charred flavors of grilled vegetables. This recipe is an excellent choice for those seeking a lighter, veggie-packed option while still enjoying the rich and satisfying taste that Chihuahua cheese adds to each bite.
Preparing the Grilled Vegetables
The grilled vegetables in these tacos are key to bringing out bold and smoky flavors that pair perfectly with the melted cheese. Here’s how to prepare the vegetables for grilling:
- Choose Your Vegetables: Select a mix of vegetables that hold up well on the grill. Bell peppers, onions, zucchini, and mushrooms are ideal options because they caramelize beautifully while retaining their texture.
- Slice and Season: Slice the vegetables into uniform pieces so they cook evenly. Drizzle them with olive oil and season with salt, pepper, and a dash of cumin, paprika, or chili powder for added flavor.
- Grill the Vegetables: Preheat the grill to medium heat and place the vegetables on the grill. Grill them until they’re tender and nicely charred on the edges, allowing the smoky flavor to infuse the veggies. This process enhances their natural sweetness and gives them a deliciously robust taste.
Assembling the Tacos
Once your vegetables are grilled to perfection, it’s time to assemble the tacos. This is where you can get creative with the layers of flavor.
- Choose Your Tortillas: Soft flour tortillas are ideal for this recipe. Their delicate texture complements the soft, melty cheese and grilled veggies. You can warm the tortillas on the grill for a few seconds to give them a slight crispiness.
- Layer the Grilled Veggies: Start by placing the grilled veggies in the center of each tortilla. Spread them evenly to ensure each bite has a balanced amount of vegetables.
- Melt the Chihuahua Cheese: Top the grilled veggies with a generous helping of Chihuahua cheese. The heat from the grilled vegetables will melt the cheese, transforming it into a creamy, gooey layer that binds the tacos together. Chihuahua cheese melts beautifully and provides a smooth texture that elevates the dish.
Customizing Your Tacos with Toppings
The toppings are what make these soft tacos truly special. Add a variety of fresh, flavorful ingredients to enhance the taste and texture of your tacos.
- Fresh Cilantro: Finely chopped cilantro adds a burst of freshness and color to the tacos.
- Sour Cream: A dollop of sour cream balances the richness of the cheese and veggies with a cooling, creamy texture.
- Lime: A squeeze of fresh lime juice offers a zesty, tangy kick that complements the smoky flavors of the grilled vegetables.
- Chipotle Sauce or Salsa Verde: For those who enjoy a bit of spice, a drizzle of chipotle sauce or tangy salsa verde will add an extra layer of flavor and heat.
- Pico de Gallo: Add a spoonful of pico de gallo to introduce fresh and juicy ingredients like tomatoes, onions, and cilantro, which brighten the overall taste.
Why Chihuahua Cheese Is the Perfect Choice for This Dish
Chihuahua cheese is ideal for these tacos because of its superb meltability and mild, creamy flavor. When melted, it becomes smooth and velvety, providing a luscious texture that coats the grilled veggies without overpowering their flavor. Unlike firmer cheeses that may crumble or become greasy when heated, Chihuahua cheese maintains its creamy consistency, making it perfect for dishes like tacos where you want the cheese to melt evenly and complement the other ingredients. The mildness of Chihuahua cheese allows the smoky flavors of the grilled veggies to take center stage, while still adding a deliciously rich, cheesy element to every bite.
Crunchy Taco Shells with Chihuahua Cheese
For taco lovers who enjoy a little crunch in their bite, crunchy taco shells filled with the creamy goodness of Chihuahua cheese are a perfect choice. The combination of a crispy shell with melted cheese creates a delightful contrast of textures, making each taco both satisfying and flavorful.
Preparing the Taco Shells
The first step in this recipe is preparing the taco shells to ensure they achieve the perfect crunch. You can either buy pre-made crunchy taco shells or make your own by baking soft tortillas into crispy shells:
- Preheat the Oven: If you’re making your own shells, preheat your oven to 375°F (190°C).
- Shape the Tortillas: Brush both sides of soft corn tortillas with a small amount of oil, then drape them over the rungs of an oven-safe rack (or place them in taco shell holders) to form a “U” shape.
- Bake the Shells: Bake the tortillas for 8-10 minutes, or until golden brown and crispy. This method ensures a light, crunchy texture without deep-frying.
Adding the Chihuahua Cheese
Chihuahua cheese is the key ingredient that brings the tacos together. Here’s how to incorporate it:
- Melt the Cheese: Before filling the taco shells, you can pre-melt the Chihuahua cheese by heating it gently on the stove or in the microwave. If you want a bit more flavor, mix it with a small amount of sour cream or cream cheese to create a smooth, cheesy sauce.
- Fill the Taco Shells: Generously spoon the melted Chihuahua cheese into the bottom of each crunchy taco shell. The cheese acts as a delicious base, ensuring that every bite is cheesy and rich.
Filling the Tacos
Now it’s time to fill your taco shells with delicious toppings that pair perfectly with Chihuahua cheese:
- Protein Choices: For a hearty taco, add seasoned ground beef, shredded chicken, or grilled shrimp. Alternatively, for a vegetarian version, use black beans, sautéed vegetables, or roasted cauliflower.
- Grilled Veggies: If you’re using grilled veggies, such as peppers and onions, place them on top of the melted cheese. Their smoky flavor adds depth to the tacos.
- Fresh Toppings: Add fresh ingredients such as lettuce, tomatoes, avocado slices, and cilantro for crunch and vibrancy.
Customizing the Crunchy Tacos
To take your crunchy tacos to the next level, experiment with different sauces and seasonings:
- Hot Sauce or Salsa: A drizzle of hot sauce, salsa verde, or salsa roja can add the perfect amount of spice.
- Guacamole: For a creamy, flavorful twist, add a spoonful of fresh guacamole.
- Pickled Jalapeños: For a tangy and spicy kick, consider adding pickled jalapeños or other pickled vegetables.
- Lime Wedges: Serve with lime wedges to add a fresh, zesty finish to each bite.
Why Chihuahua Cheese Works Best for Crunchy Tacos
Chihuahua cheese is the perfect cheese for crunchy tacos due to its exceptional meltability. As the cheese melts, it becomes gooey and stretchy, enveloping the fillings inside the crunchy shell and binding all the ingredients together. The mild flavor of Chihuahua cheese enhances the other flavors without overwhelming them, making it a perfect pairing for both savory and spicy taco fillings. Whether you’re making classic beef tacos or exploring creative veggie options, Chihuahua cheese adds a creamy, rich texture that complements the crispy taco shell.
Chihuahua Cheese and Carnitas Tacos
When it comes to tacos, carnitas (slow-cooked, tender pork) is one of the most flavorful choices for filling. Pairing it with Chihuahua cheese creates a perfect harmony of rich, savory, and creamy flavors. The melt-in-your-mouth texture of Chihuahua cheese balances beautifully with the juicy, flavorful carnitas, creating a taco experience that’s truly unforgettable.
Preparing the Carnitas
To make carnitas for your tacos, the slow-cooking method is key to achieving that melt-in-your-mouth tenderness. Here’s how to prepare the carnitas:
- Season the Pork: Begin by selecting a pork shoulder or pork butt. Season it with a mixture of garlic, onion, cumin, oregano, chili powder, and a dash of lime juice. These spices will infuse the pork with a deep, savory flavor.
- Slow Cook the Pork: In a slow cooker or Dutch oven, cook the seasoned pork at a low temperature for about 4-6 hours (or until the meat is tender and easily shredded). You can add orange juice and a bay leaf for extra flavor during the cooking process. The slow-cooking method allows the pork to become incredibly tender, perfect for shredding.
- Shred the Pork: Once the pork is cooked and tender, shred it with two forks. For a crispy texture, you can sear the shredded carnitas in a hot pan with a little oil for 2-3 minutes, allowing it to become crispy and caramelized on the outside.
Assembling the Tacos
Now it’s time to build your tacos, layering the carnitas and Chihuahua cheese to create a cheesy, flavorful masterpiece:
- Choose Your Tortillas: Soft corn or flour tortillas are great choices for these tacos. Warm them slightly on a skillet or grill to enhance their softness and bring out their flavor.
- Layer the Carnitas: Spoon the shredded carnitas into each taco shell, creating a generous base. The juicy, flavorful pork will serve as the perfect foundation for the cheese and other toppings.
- Melt the Chihuahua Cheese: Add a generous amount of shredded Chihuahua cheese over the carnitas. If you want a cheesy experience, place the tacos under a broiler or in a warm skillet for a minute or two to melt the cheese until it’s gooey and bubbly. The cheese will melt perfectly, forming a creamy layer over the pork that enhances the taco’s richness.
Topping Your Carnitas Tacos
To complement the flavors of the carnitas and Chihuahua cheese, add a variety of fresh toppings:
- Fresh Cilantro: Chopped cilantro adds a refreshing, herbaceous note that cuts through the richness of the cheese and pork.
- Onion and Lime: Finely diced onion and a squeeze of lime juice will brighten the dish with their sharp, tangy flavors.
- Salsa Verde: A tangy, green salsa made with tomatillos and cilantro pairs perfectly with the savory carnitas, adding a refreshing contrast to the rich cheese.
- Pickled Red Onions: For an added pop of flavor, pickled red onions bring a sweet and tangy kick that complements the pork and cheese.
- Avocado or Guacamole: For extra creaminess and richness, top with fresh avocado slices or a dollop of guacamole.
Why Chihuahua Cheese Enhances Carnitas Tacos
Chihuahua cheese’s creamy, meltable texture makes it the ideal pairing for carnitas tacos. The mild flavor of the cheese allows the flavors of the carnitas to shine, while its meltability creates a deliciously gooey layer that binds the fillings together. Chihuahua cheese also adds a richness that perfectly complements the tenderness and savory flavors of the slow-cooked pork. The mild, slightly tangy flavor profile of the cheese enhances the carnitas without overpowering them, creating a taco that is both satisfying and balanced.

2. Enchiladas with Chihuahua Cheese: A Must-Try Dish
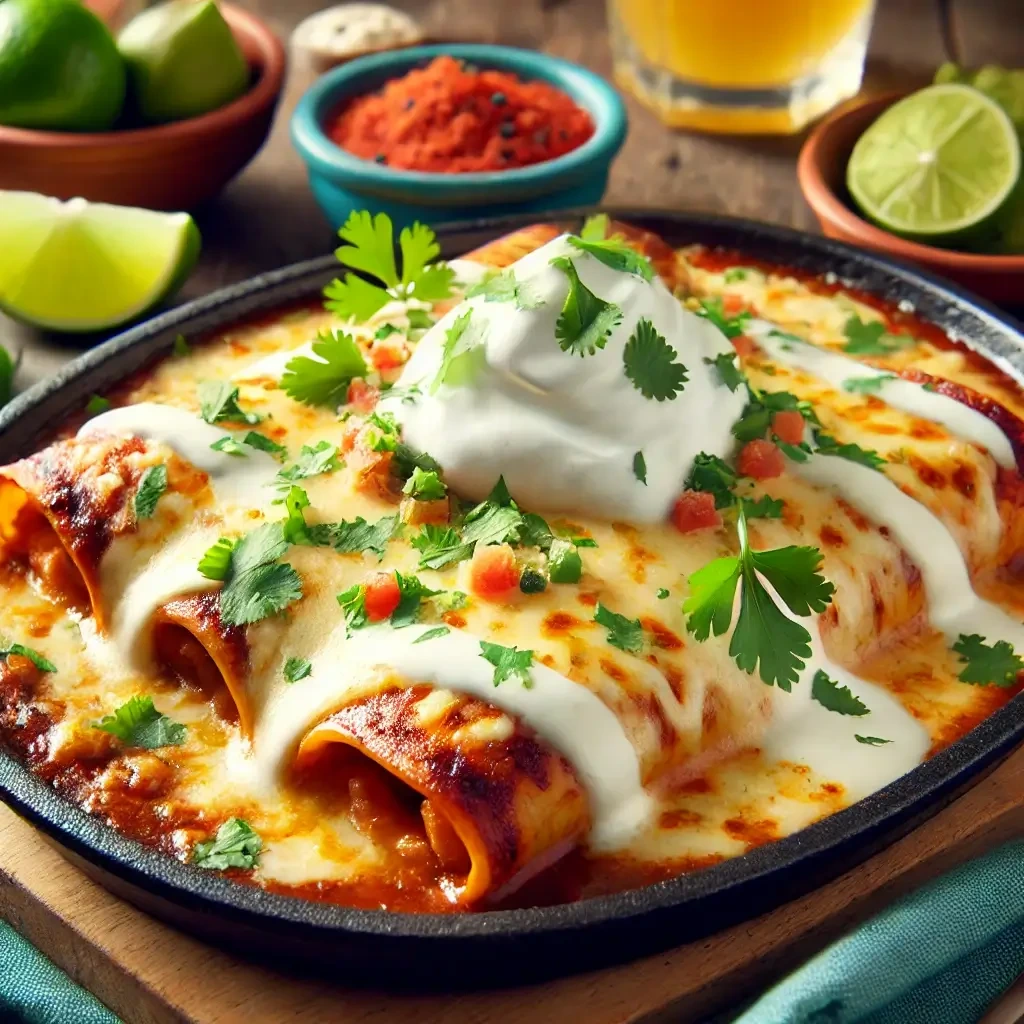
Classic Red Enchiladas with Chihuahua Cheese
Red enchiladas are a beloved Mexican dish, and adding Chihuahua cheese takes them to the next level. The cheese’s meltability makes it perfect for these saucy, cheesy enchiladas. Here’s how to make them.
Preparing the Enchiladas
- Make the Red Sauce: Start by preparing a flavorful red enchilada sauce. Combine tomatoes, chili powder, garlic, and onion. Simmer the mixture until it’s rich and fragrant.
- Fill the Tortillas: For the tortillas, choose corn tortillas. Warm them briefly to prevent tearing. Next, dip each tortilla into the red sauce, then fill with shredded chicken or ground beef. Roll the tortillas tightly and place them in a baking dish.
- Add Chihuahua Cheese: Generously sprinkle Chihuahua cheese over the rolled tortillas. The cheese will melt beautifully and create a creamy, smooth texture.
Baking the Enchiladas
- Top with Sauce: Pour the remaining red sauce over the tortillas. Make sure they are well-coated for maximum flavor.
- Bake the Enchiladas: Preheat the oven to 350°F (175°C). Bake the enchiladas for 20-25 minutes, or until the cheese is melted and bubbly. You’ll see the cheese turn golden brown and slightly crisp at the edges.
Garnishing and Serving
Once the enchiladas are baked, it’s time to garnish and serve. Top them with fresh cilantro, onion, and a squeeze of lime. You can also add a dollop of sour cream or guacamole for extra creaminess. Serve with a side of Mexican rice or refried beans for a complete meal.
Why Chihuahua Cheese Is Perfect for Enchiladas
Chihuahua cheese is ideal for enchiladas due to its smooth melt and mild, creamy flavor. When melted, it coats the tortillas perfectly and balances the rich flavor of the red sauce. Unlike other cheeses, Chihuahua cheese doesn’t overpower the dish. Instead, it enhances the enchiladas, making each bite satisfying and flavorful.
Spinach and Mushroom Enchiladas
For a lighter, vegetarian twist on classic enchiladas, try spinach and mushroom enchiladas. These enchiladas are flavorful, satisfying, and easy to make. Plus, the creamy melt of Chihuahua cheese complements the earthy mushrooms and fresh spinach perfectly.
Preparing the Filling
- Sauté the Vegetables: Begin by heating a little olive oil in a pan. Add sliced mushrooms and sauté until tender. Then, add the spinach and cook until wilted. Season with salt, pepper, and a pinch of garlic powder for extra flavor.
- Combine the Filling: Once the spinach has wilted, remove the pan from the heat. Add a handful of Chihuahua cheese to the vegetable mixture and stir until melted. This creates a creamy, cheesy filling that will melt into the tortillas perfectly.
Assembling the Enchiladas
- Prepare the Tortillas: Warm corn tortillas in a dry skillet or microwave until soft. This step helps prevent them from tearing when rolled.
- Fill the Tortillas: Spoon the spinach and mushroom mixture into each tortilla. Roll the tortillas tightly and place them in a baking dish. Pour a generous amount of red enchilada sauce over the top.
Baking the Enchiladas
- Top with Cheese: Sprinkle more Chihuahua cheese on top of the enchiladas. This creates a beautiful, melty layer that binds the dish together.
- Bake the Enchiladas: Preheat the oven to 350°F (175°C). Bake for 20-25 minutes, or until the cheese is golden brown and bubbly.
Serving and Garnishing
Once out of the oven, let the enchiladas cool for a few minutes. Then, garnish with fresh cilantro, a squeeze of lime, and a dollop of sour cream. Serve with a side of rice or beans for a complete meal.
Why Chihuahua Cheese Works in Spinach and Mushroom Enchiladas
Chihuahua cheese is the perfect choice for these vegetarian enchiladas. Its smooth melting properties create a rich, creamy filling that binds the mushrooms and spinach together. The cheese’s mild flavor allows the vegetables to shine, while still providing a velvety texture that enhances the entire dish. Unlike sharp cheeses, Chihuahua cheese is mild enough to complement the earthy mushrooms without overpowering the delicate flavors of the spinach.
Enchiladas Suizas
Enchiladas Suizas offer a creamy, rich twist on traditional enchiladas. The name “suizas” refers to the Swiss-inspired cream sauce that gives these enchiladas their signature flavor. When paired with Chihuahua cheese, the dish becomes even more indulgent, with the cheese melting perfectly into the sauce.
Preparing the Chicken and Sauce
- Cook the Chicken: Start by cooking shredded chicken. You can use rotisserie chicken for convenience or cook your own chicken breast. Once cooked, shred the chicken into bite-sized pieces.
- Make the Creamy Sauce: The sauce is the heart of Enchiladas Suizas. In a blender, combine tomatillos, onions, garlic, and cilantro. Blend until smooth. Then, heat the mixture in a saucepan with heavy cream or half-and-half. Simmer until the sauce thickens. Add salt and pepper to taste.
Assembling the Enchiladas
- Prepare the Tortillas: Lightly fry corn tortillas in a small amount of oil. This step adds flavor and helps prevent the tortillas from becoming soggy once the sauce is added.
- Fill the Tortillas: Spoon the shredded chicken into each tortilla. Roll the tortillas tightly and place them in a baking dish.
- Pour the Sauce: Generously pour the creamy tomatillo sauce over the rolled tortillas. Be sure to cover them completely so the tortillas absorb the sauce and stay moist.
Adding the Cheese
- Top with Chihuahua Cheese: Sprinkle a generous amount of Chihuahua cheese on top of the enchiladas. This cheese is perfect for Enchiladas Suizas due to its meltability, creating a smooth, creamy topping.
- Melt the Cheese: Place the baking dish in the oven and bake at 350°F (175°C) for 20-25 minutes. The cheese should melt and bubble, becoming golden and slightly crispy at the edges.
Garnishing and Serving
Once out of the oven, allow the enchiladas to cool for a few minutes. Then, garnish with fresh cilantro, sour cream, and a squeeze of lime for extra brightness. Serve with a side of Mexican rice or refried beans for a complete meal.
Why Chihuahua Cheese is Perfect for Enchiladas Suizas
Chihuahua cheese is the ideal choice for Enchiladas Suizas because it melts beautifully, blending into the creamy tomatillo sauce. The cheese’s mild flavor enhances the richness of the cream sauce, without overpowering the dish. Additionally, Chihuahua cheese adds the perfect amount of creaminess to each bite, creating a satisfying, indulgent experience. Its smooth texture and subtle flavor make it the perfect complement to the tangy tomatillo sauce and tender chicken.
3. Melted Chihuahua Cheese Dips
Chihuahua Cheese Queso Dip
Chihuahua cheese is the perfect base for a creamy, flavorful queso dip. Its excellent meltability ensures a smooth, velvety texture that’s ideal for dipping. Whether you’re serving it at a party or enjoying it as a snack, this dip is sure to impress.
Preparing the Queso Dip
- Melt the Cheese: Start by shredding Chihuahua cheese. In a saucepan, combine the cheese with a little milk or cream over medium heat. Stir constantly until the cheese is completely melted and smooth.
- Add the Seasonings: Once the cheese has melted, add chopped jalapeños (for heat), garlic powder, onion powder, and a pinch of cumin for a boost of flavor. You can also stir in a bit of salsa or tomato paste to add some tanginess to the dip.
- Thicken the Dip: If you prefer a thicker dip, you can mix in a small amount of cornstarch or flour dissolved in water. Stir until the dip reaches your desired consistency.
Serving the Queso Dip
- Transfer to a Serving Dish: Once the queso dip is smooth and creamy, pour it into a bowl or a small serving dish. This will make it easy for everyone to scoop and enjoy.
- Add Toppings: For extra flavor, top the dip with chopped cilantro, a squeeze of lime juice, or a handful of diced tomatoes. You can also sprinkle some extra Chihuahua cheese on top and let it melt into the dip.
Pairing with Dippers
- Tortilla Chips: Serve the queso dip with crispy tortilla chips for the ultimate dipping experience. The salty crunch of the chips pairs wonderfully with the creamy cheese.
- Fresh Veggies: For a healthier option, consider pairing the dip with sliced bell peppers, carrot sticks, or celery. These fresh veggies provide a nice contrast to the richness of the cheese.
- Soft Pretzels: For a fun twist, try serving the dip with soft pretzels. The slight chewiness of the pretzel complements the smoothness of the queso dip perfectly.
Why Chihuahua Cheese is Ideal for Queso Dip
Chihuahua cheese is the best choice for queso dip due to its exceptional meltability. When melted, it becomes smooth and creamy, without separating or becoming greasy. The cheese’s mild, slightly tangy flavor blends beautifully with the spices and seasonings in the dip. Whether served warm or at room temperature, Chihuahua cheese queso dip stays silky and indulgent, making it the perfect appetizer for any occasion.
Baked Cheese Dip with Jalapeños
This Baked Cheese Dip with Jalapeños is the perfect combination of creamy cheese, spicy jalapeños, and savory goodness. Baked until golden and bubbling, it’s an irresistible appetizer that will have everyone coming back for more. Using Chihuahua cheese makes the dip extra creamy and smooth, ensuring the perfect consistency.
Preparing the Dip
- Sauté the Jalapeños: Start by finely chopping fresh jalapeños. If you prefer less heat, remove the seeds before chopping. Sauté the jalapeños in a little olive oil over medium heat until they soften and become fragrant. This helps mellow the spice while enhancing their flavor.
- Mix the Cheese: In a separate bowl, combine Chihuahua cheese (shredded) with cream cheese and a bit of sour cream for extra creaminess. Stir in some garlic powder and onion powder for added flavor. The cream cheese will ensure the dip is extra smooth and rich.
- Combine Ingredients: Add the sautéed jalapeños into the cheese mixture. Stir everything together until well combined. If you’d like a tangier flavor, you can also mix in a small amount of lime juice or salsa.
Baking the Dip
- Prepare the Baking Dish: Preheat your oven to 350°F (175°C). Grease a small baking dish with a little butter or non-stick spray. Then, transfer the cheese and jalapeño mixture into the dish, spreading it evenly.
- Bake Until Bubbly: Place the dip in the oven and bake for 15-20 minutes, or until the top is golden brown and the dip is bubbling. The cheese should be fully melted, with the edges slightly crisped.
Serving the Dip
- Garnish: After baking, remove the dip from the oven and let it cool for a minute. Top the dip with chopped cilantro for freshness, and maybe even a few more jalapeño slices if you love extra heat.
- Serve: Serve the dip with a variety of dippers such as tortilla chips, sliced veggies, or soft pretzels. For a more substantial option, consider offering pita bread or crusty bread for dipping.
Why Chihuahua Cheese is Perfect for This Dip
Chihuahua cheese is an ideal choice for this baked dip because of its fantastic melting properties. It melts smoothly and evenly, creating a creamy texture that blends perfectly with the cream cheese and sour cream. The mild, slightly tangy flavor of Chihuahua cheese also balances the heat from the jalapeños, providing a smooth, rich backdrop to the spicy kick. The cheese helps bind the ingredients together while keeping the dip velvety and indulgent, making it the perfect comfort food.
Nacho Cheese Sauce for Your Favorite Snacks
This Nacho Cheese Sauce is creamy, cheesy, and perfect for drizzling over your favorite snacks. Whether you’re making nachos, cheese fries, or even dipping soft pretzels, this sauce will elevate any dish. Made with Chihuahua cheese, it has a smooth texture that melts beautifully, making it the ideal choice for a rich, velvety cheese sauce.
Preparing the Cheese Sauce
- Melt the Butter: Start by melting butter in a saucepan over medium heat. Once melted, add a small amount of flour to create a roux. Stir constantly for about a minute to ensure the flour cooks and doesn’t clump.
- Add the Milk: Slowly pour in milk, whisking continuously to prevent lumps. Continue to cook the mixture, stirring frequently, until it thickens slightly.
- Add the Cheese: Once the milk has thickened, it’s time to add the star ingredient—Chihuahua cheese. Gradually add the shredded cheese, stirring constantly until it melts completely into the sauce. This will create a smooth, creamy texture.
Enhancing the Flavor
- Season the Sauce: Add garlic powder, onion powder, and a pinch of paprika for extra flavor. If you like a bit of heat, include some chopped jalapeños or a dash of cayenne pepper.
- Make It Thicker: If you prefer a thicker sauce, simply let it simmer for a few extra minutes. You can also add a bit more cheese to achieve your desired consistency.
Serving the Nacho Cheese Sauce
- Pour Over Snacks: Drizzle the warm cheese sauce over a plate of tortilla chips for classic nachos. Alternatively, pour it over fries for a cheesy twist on cheese fries or serve with soft pretzels for dipping.
- Top with Toppings: For added flavor and texture, top your nachos or fries with diced tomatoes, green onions, and cilantro. You can also add a dollop of sour cream or guacamole for extra creaminess.
Why Chihuahua Cheese is Perfect for Nacho Cheese Sauce
Chihuahua cheese is the perfect cheese for nacho cheese sauce because of its amazing melting properties. When melted, it becomes smooth and creamy without becoming greasy or separating. Its mild, slightly tangy flavor allows the spices to shine, making it ideal for a variety of dishes. Chihuahua cheese also helps create a velvety texture that coats your chips, fries, or pretzels beautifully, making every bite rich and indulgent.
4. Creative Uses for Chihuahua Cheese in Breakfast Dishes
Breakfast Burritos with Chihuahua Cheese
Breakfast burritos are a delicious and satisfying way to start the day. When made with Chihuahua cheese, they become extra creamy and flavorful. This dish combines fluffy scrambled eggs, savory fillings, and melty cheese, all wrapped in a soft tortilla for the ultimate breakfast experience.
Preparing the Filling
- Scramble the Eggs: Start by whisking eggs in a bowl. Season with salt and pepper. In a non-stick skillet, melt a bit of butter over medium heat. Pour in the eggs and cook, stirring gently, until scrambled and cooked through. Remove from heat.
- Add the Fillings: For a heartier burrito, add sautéed onions, bell peppers, and potatoes to the eggs. You can also include bacon, sausage, or black beans for extra protein.
- Melt the Cheese: While the eggs are still warm, stir in a generous amount of Chihuahua cheese. The cheese will melt smoothly into the eggs, adding creaminess and flavor.
Assembling the Burritos
- Warm the Tortillas: Heat flour tortillas in a dry skillet or microwave them until soft. This step helps the tortillas stay pliable and easier to roll.
- Fill the Tortillas: Spoon the cheesy egg mixture into the center of each tortilla. Add some additional fillings, like avocado slices, fresh salsa, or cilantro, if desired.
- Roll the Burritos: Carefully fold in the sides of the tortilla and roll it up tightly, securing the filling inside.
Serving the Breakfast Burritos
- Grill the Burritos: For a crispy, golden exterior, place the rolled burritos in a hot skillet. Grill on each side for 1-2 minutes, until lightly browned and crispy.
- Garnish: Once the burritos are ready, serve with a side of salsa, guacamole, or a dollop of sour cream. You can also top with some extra Chihuahua cheese for added richness.
Why Chihuahua Cheese is Ideal for Breakfast Burritos
Chihuahua cheese is perfect for breakfast burritos because of its smooth melting quality. As it melts into the scrambled eggs, it creates a creamy, velvety texture that elevates the dish. The mild, slightly tangy flavor of Chihuahua cheese enhances the eggs and other fillings without overpowering them. Whether you add veggies, meat, or beans, the cheese acts as a delicious binding ingredient, making each bite rich and satisfying.
Chilaquiles with Chihuahua Cheese
Chilaquiles are a classic Mexican breakfast dish made with crispy tortilla chips, flavorful sauce, and melted cheese. Adding Chihuahua cheese enhances the dish with a creamy, rich texture that perfectly complements the tangy sauce and crunchy chips.
Preparing the Sauce
- Make the Red or Green Sauce: Start by preparing either a red or green salsa. For a red sauce, blend tomatoes, chilies, onion, and garlic. For a green sauce, blend tomatillos, jalapeños, and cilantro. Cook the sauce in a saucepan until it’s slightly thickened.
- Season the Sauce: Add a pinch of salt, pepper, and a dash of cumin to taste. You can also add a splash of lime juice for extra brightness.
Assembling the Chilaquiles
- Fry the Tortilla Chips: Cut corn tortillas into triangles and fry them in oil until golden and crispy. If you prefer a lighter version, you can bake the tortillas in the oven until they crisp up.
- Combine the Chips and Sauce: Pour the warm sauce over the fried tortilla chips. Stir gently to coat all the chips without breaking them. Let them soak in the sauce for a few minutes until they become tender but still crispy in places.
Adding Chihuahua Cheese
- Melt the Cheese: While the chips are soaking in the sauce, sprinkle a generous amount of Chihuahua cheese over the top. As the sauce heats, the cheese will begin to melt, creating a creamy texture.
- Top with More Cheese: For extra creaminess, sprinkle more Chihuahua cheese on top just before serving, allowing it to melt even further.
Serving and Garnishing
- Add Toppings: Top the chilaquiles with fried eggs, cilantro, and sour cream. You can also add avocado slices and radishes for a fresh crunch.
- Serve with a Side: Serve the chilaquiles with refried beans or a side of Mexican rice for a complete meal.
Why Chihuahua Cheese Works for Chilaquiles
Chihuahua cheese is the perfect cheese for chilaquiles because it melts beautifully into the sauce, creating a creamy texture that binds the dish together. Its mild, slightly tangy flavor complements the rich, savory sauce without overpowering the other ingredients. Unlike sharper cheeses, Chihuahua cheese enhances the dish’s flavors, making it a comforting and satisfying breakfast.
Cheese-Stuffed Breakfast Omelette
A Cheese-Stuffed Breakfast Omelette is a perfect way to start the day. It’s quick, satisfying, and packed with rich, melty cheese. Adding Chihuahua cheese gives the omelette a smooth, creamy texture that melts beautifully inside, making each bite indulgent and flavorful.
Preparing the Ingredients
- Whisk the Eggs: Begin by cracking eggs into a bowl and whisking them until fully combined. Season with salt, pepper, and a pinch of herbs like parsley or chives for extra flavor.
- Sauté the Fillings: In a hot skillet, add a bit of butter or olive oil. Sauté your choice of fillings, such as mushrooms, spinach, onions, or bell peppers. Cook until tender and set aside.
- Grate the Cheese: Grate a generous amount of Chihuahua cheese. The smooth melting texture of this cheese will create a delicious, gooey filling when added to the omelette.
Cooking the Omelette
- Cook the Eggs: Heat a non-stick skillet over medium-low heat. Pour the egg mixture into the skillet, swirling the pan to evenly coat the bottom. Cook until the edges begin to set but the center is still slightly runny.
- Add the Fillings: Once the eggs are nearly set, add the sautéed fillings to one half of the omelette. Sprinkle the grated Chihuahua cheese on top of the fillings, allowing it to melt as the omelette finishes cooking.
- Fold and Serve: Carefully fold the omelette in half over the cheese and fillings. Let it cook for another minute or two until the cheese is fully melted inside.
Garnishing and Serving
- Top with Fresh Herbs: Garnish the omelette with freshly chopped cilantro, parsley, or a sprinkle of chives. This adds a burst of freshness to balance the richness of the cheese.
- Serve with Sides: Pair the omelette with toast, avocado slices, or a side of fruit for a balanced breakfast.
Why Chihuahua Cheese is Ideal for Omelettes
Chihuahua cheese is the perfect cheese for omelettes because of its exceptional meltability. It becomes wonderfully creamy when melted, adding a rich texture to the omelette. The mild, slightly tangy flavor of Chihuahua cheese complements the other ingredients without overwhelming them. Whether you add vegetables, meats, or just cheese, Chihuahua cheese makes every bite creamy, flavorful, and indulgent.

5. Chihuahua Cheese in Other Surprising Dishes
Chihuahua cheese isn’t just for tacos and enchiladas – it’s perfect for all sorts of unexpected dishes! From stuffed jalapeños to cheese-stuffed mushrooms, there are many creative ways to incorporate this versatile cheese into your meals.
For some inspiration, check out this Chihuahua Cheese recipe collection to explore even more ways to use this creamy cheese in your kitchen!
Cheese-Stuffed Jalapeños
Cheese-Stuffed Jalapeños are the perfect appetizer or snack. They combine the spicy kick of jalapeños with the creamy, rich texture of Chihuahua cheese. Whether baked or grilled, these stuffed jalapeños are sure to be a hit at any gathering.
Preparing the Jalapeños
- Slice the Jalapeños: Begin by cutting the jalapeños in half lengthwise. Use a spoon to carefully remove the seeds and membranes. If you prefer less heat, remove more of the membranes.
- Prepare the Cheese Filling: In a bowl, mix Chihuahua cheese with cream cheese to create a smooth, creamy filling. Add a pinch of garlic powder, onion powder, and a little lime juice for extra flavor.
Stuffing the Jalapeños
- Fill the Jalapeños: Spoon the cheese mixture into each jalapeño half. Pack the filling in tightly, ensuring each jalapeño is generously stuffed with cheese. You can also sprinkle some additional Chihuahua cheese on top for a cheesy crust when baked.
- Wrap with Bacon (Optional): For extra flavor, wrap each stuffed jalapeño with a slice of bacon. Secure the bacon with toothpicks, ensuring it stays in place while cooking.
Cooking the Jalapeños
- Bake or Grill: Preheat your oven to 375°F (190°C). Arrange the stuffed jalapeños on a baking sheet and bake for about 20-25 minutes, or until the jalapeños are tender and the cheese is melted and bubbly. Alternatively, you can grill them over medium heat for a smokier flavor.
- Check for Crispiness: If you wrapped the jalapeños in bacon, check that the bacon is crispy and golden before removing the peppers from the heat.
Serving and Garnishing
- Serve Hot: Serve the cheese-stuffed jalapeños immediately while they’re warm and melty. They make a great appetizer or snack.
- Garnish: Garnish with freshly chopped cilantro or a drizzle of sour cream for added creaminess and flavor. A squeeze of lime juice can also add a refreshing contrast to the spiciness.
Why Chihuahua Cheese is Perfect for Stuffed Jalapeños
Chihuahua cheese is the ideal choice for stuffing jalapeños because of its amazing meltability. When heated, it becomes wonderfully creamy, creating a smooth filling that complements the spicy heat of the peppers. The cheese’s mild flavor also balances out the boldness of the jalapeños, allowing the cheese to shine without overpowering the dish. Whether grilled or baked, Chihuahua cheese gives these stuffed jalapeños a rich, indulgent texture that’s hard to resist.
Chihuahua Cheese in Pizza
Chihuahua cheese is an excellent choice for pizza, offering a smooth melt and mild, creamy flavor. Its ability to stretch and blend seamlessly with other ingredients makes it a top pick for pizza lovers looking to try something new. Whether you’re making a classic pizza or experimenting with unique toppings, Chihuahua cheese can elevate the flavor and texture.
Preparing the Pizza Dough
- Make or Buy Dough: Begin by preparing your pizza dough. You can either make your own from scratch or buy pre-made dough for convenience. Roll the dough out on a floured surface to your desired thickness.
- Preheat the Oven: Preheat your oven to 475°F (245°C). This high temperature helps create a crispy crust while ensuring the cheese melts perfectly.
Assembling the Pizza
- Spread the Sauce: Spread a thin layer of your favorite pizza sauce, whether it’s tomato sauce, pesto, or white sauce. Make sure the sauce is evenly distributed over the dough.
- Add the Chihuahua Cheese: Generously sprinkle shredded Chihuahua cheese over the sauce. The cheese will melt beautifully and create a creamy, gooey layer that binds the pizza toppings together.
- Add Toppings: Top the pizza with your favorite ingredients. For a classic pizza, try pepperoni, sausage, and mushrooms. For a more creative twist, add grilled vegetables, chicken, or even pineapple.
Baking the Pizza
- Bake the Pizza: Place the pizza in the preheated oven and bake for 12-15 minutes, or until the crust is golden brown and the cheese is bubbly and slightly browned. Keep an eye on the pizza to prevent it from burning.
- Check the Cheese: Once baked, the Chihuahua cheese should be perfectly melted, with a smooth, velvety texture that coats the toppings. It will add a rich, creamy layer that enhances the overall flavor.
Serving and Garnishing
- Slice and Serve: Once the pizza is done, remove it from the oven and let it cool for a couple of minutes. Then, slice and serve.
- Garnish: For extra flavor, sprinkle some fresh basil or oregano on top. You can also drizzle a little olive oil or add a few chili flakes for a spicy kick.
Why Chihuahua Cheese is Ideal for Pizza
Chihuahua cheese is the perfect cheese for pizza because it melts beautifully, creating a smooth, creamy texture that pairs well with the crispy crust. Its mild, slightly tangy flavor complements the sauce and toppings without overpowering them. Unlike other cheeses, Chihuahua cheese stays creamy and doesn’t become greasy, making it an excellent choice for a delicious pizza experience.
Grilled Cheese Sandwich with Chihuahua Cheese
A Grilled Cheese Sandwich made with Chihuahua cheese is a comforting, indulgent meal. The creamy, melt-in-your-mouth texture of Chihuahua cheese makes it the ideal cheese for this classic sandwich. Whether you’re enjoying it for lunch or a quick dinner, this sandwich is sure to satisfy.
Preparing the Ingredients
- Choose the Bread: Start by selecting your favorite bread. Sourdough and whole wheat work particularly well, but you can use any bread you prefer. Make sure it’s sturdy enough to hold the melted cheese.
- Butter the Bread: Spread a thin layer of butter or mayo on the outside of each slice of bread. This will help the sandwich crisp up and turn golden brown when grilled.
Assembling the Sandwich
- Layer the Cheese: Generously layer Chihuahua cheese on one slice of bread. For a melty, cheesy sandwich, use a good amount of cheese, making sure the entire surface is covered.
- Close the Sandwich: Place the second slice of bread on top, buttered side facing out. Press down lightly to help the bread stick together.
Grilling the Sandwich
- Heat the Pan: Heat a non-stick skillet over medium heat. Once the pan is hot, place the sandwich in the skillet.
- Grill the Sandwich: Grill the sandwich for about 3-4 minutes on one side, or until it’s golden brown and crispy. Flip the sandwich and grill the other side for an additional 3-4 minutes. The cheese should be perfectly melted inside.
- Check for Crispiness: Keep an eye on the sandwich to ensure it doesn’t burn. If the bread is browning too quickly, reduce the heat slightly.
Serving the Sandwich
- Slice and Serve: Once the sandwich is golden and the cheese is melted, remove it from the pan. Let it cool for a minute before slicing.
- Garnish (Optional): For extra flavor, serve with a side of tomato soup or a sprinkle of fresh herbs on top of the sandwich.
Why Chihuahua Cheese Works for Grilled Cheese
Chihuahua cheese is perfect for grilled cheese sandwiches due to its excellent meltability. When grilled, it melts smoothly, creating a rich, creamy interior. Its mild, slightly tangy flavor complements the crispy, buttery bread without overpowering it. The cheese creates the ideal gooey texture that makes each bite satisfying and indulgent.
Conclusion
Chihuahua cheese is a versatile and delicious ingredient that can elevate any dish, from tacos and enchiladas to queso dip and grilled cheese sandwiches. Its meltability and mild flavor make it the perfect choice for adding richness and creaminess to your favorite meals. Now that you’ve learned how to use this amazing cheese in a variety of dishes, it’s time to get cooking!
Why not try one of these recipes today and experience the incredible flavor of Chihuahua cheese for yourself? Whether you’re making chilaquiles, stuffing jalapeños, or preparing a cozy breakfast burrito, Chihuahua cheese is sure to make every meal extra special.
Ready to get started? Grab some Chihuahua cheese from your local store and begin experimenting with these recipes. Don’t forget to share your creations and tag us on social media – we’d love to see how you incorporate this delicious cheese into your meals!