
There’s something quietly magical about the smell of freshly baked pastries curling through your kitchen in the morning. But when that pastry is a Gipfeli the Swiss croissant known for its tender layers, buttery heart, and delicate golden crust you’re not just baking, you’re honoring a tradition.
While croissants may steal the spotlight in Paris, Gipfeli hold their own in Swiss cafés, bakery counters, and breakfast tables. Slightly heartier than their French cousin and far less fussy to make, these crescent-shaped pastries are a beloved staple of Swiss life and now, you can bring them into your own home.
In this post, I’ll guide you through the perfect Gipfeli recipe step by step from mixing your dough to mastering that soft interior and crisp finish. Whether you’re a seasoned baker or just looking to use up your butter stash in the most delicious way possible, this recipe is simple, versatile, and impressively irresistible.
So preheat your oven and dust off that rolling pin. Switzerland’s best-kept breakfast secret is about to become your new baking obsession.

What Is a Gipfeli? The Swiss Take on Croissants
A Brief History of the Gipfeli
The Gipfeli may look like the quiet cousin of the French croissant, but this humble Swiss pastry has a story all its own. Though not as internationally famous, the Gipfeli is a beloved staple of Swiss breakfast tables one with deep cultural roots and a personality shaped by practicality and tradition.
Let’s dive into the layered history behind Switzerland’s favorite crescent-shaped creation.
1. Origins of the Crescent Shape
The origins of the crescent-shaped pastry are often traced back to 17th-century Europe, where the croissant’s iconic form is said to have celebrated victories over Ottoman forces. While France took the concept and turned it into the buttery, laminated croissant, Switzerland adapted the shape into something more modest and accessible. The name “Gipfeli” comes from the Swiss-German word for “little peak,” which perfectly captures its familiar form.
2. A Pastry for the People
Unlike the croissant, which evolved into a luxurious and often labor-intensive treat, the Swiss Gipfeli was built for everyday life. Made with a soft, yeasted dough and less butter than its French counterpart, the Gipfeli became a practical pastry easy to bake, easy to carry, and perfect for the Swiss pace of life. It’s the kind of pastry you grab with your morning coffee on the way to work, or enjoy quietly with jam and butter on a Sunday morning.
3. Regional Adaptations and Daily Rituals
Across Switzerland, Gipfeli has taken on many forms. In some regions, it’s enjoyed plain; in others, it’s stuffed with chocolate, cheese, or ham. You’ll find it on train station counters, in rustic alpine cafés, and at nearly every local bakery. Its simplicity and adaptability have made it a central part of the Swiss breakfast ritual deeply rooted in culture but open to variation.
4. From Local Favorite to Global Curiosity
Though traditionally a local delight, Gipfeli is gaining international attention as more home bakers and food lovers seek out authentic European recipes beyond the usual suspects. With the rise of sourdough culture and the renewed interest in regional bakes, the Gipfeli is quietly stepping into the spotlight praised for its balance of ease, flavor, and tradition.
Gipfeli vs. Croissants: Key Differences
At first glance, Gipfeli and croissants appear to be cousins crescent-shaped, golden on the outside, and ready to crumble into buttery flakes at the slightest touch. But bite into each, and you’ll quickly realize: these pastries may look similar, but their soul is very different.
Let’s break it down.
1. Dough & Butter Content
Croissants are famously rich, made using a classic laminated dough technique, where butter is folded multiple times into the dough to create those signature flaky layers. They’re light, airy, and indulgently buttery sometimes even greasy (in the best way).
Gipfeli, on the other hand, often use a simplified yeast dough with far less butter. While some versions like the Buttergipfeli do lean toward richness, most Swiss bakers keep the dough leaner, aiming for a pastry that’s slightly denser, more structured, and better suited for everyday eating.
2. Texture & Mouthfeel
A croissant practically melts in your mouth, with each crisp layer dissolving into tender butter bliss. Gipfeli are chewier, with a heartier bite that pairs perfectly with coffee or jam. Think of it as the weekday version of the croissant still delicious, but less dramatic.
3. Shape & Size
While both are crescent-shaped, Gipfeli tend to be smaller and more compact. Croissants often have more exaggerated curves and flaky tips, while Gipfeli are a bit more subdued in form neat, tidy, and classically Swiss.
4. Cultural Identity
Croissants are a symbol of French culinary elegance, often associated with leisurely brunches and Parisian cafés. Gipfeli, by contrast, are everyday essentials in Switzerland a staple of busy mornings, Alpine train stations, and cozy Sunday breakfasts. They’re less about flair, and more about functional pleasure.
5. Filling & Variations
Both pastries can be filled—but while croissants tend to go sweet (think almond or chocolate), Gipfeli offer more savory variations, like cheese, ham, or even herb butter. This versatility makes them a perfect base for both sweet and savory breakfast creations.
Sweet or Savory? Types of Gipfeli You’ll Find in Switzerland
In Switzerland, Gipfeli aren’t just one thing—they’re a whole category of crescent-shaped pastry joy. While the classic plain Buttergipfeli remains a breakfast icon, Swiss bakeries offer a surprising range of sweet and savory variations, each designed to suit different moods, meals, and regional tastes.
Let’s take a mouthwatering tour of the most popular types of Gipfeli you’ll find across the Swiss Alps and beyond.
1. Buttergipfeli (Classic Butter Gipfeli)
This is Switzerland’s answer to the French croissant though it’s less flaky and more tender. Made with a touch of butter folded into a yeasted dough, the Buttergipfeli is the go-to choice for a traditional Swiss breakfast, often served with coffee and a pat of jam. It’s rich, but not overpowering, perfect for daily indulgence without the guilt.
2. Schoggi-Gipfeli (Chocolate-Filled)
Swiss chocolate meets Swiss pastry? Yes, please. The Schoggi-Gipfeli is typically filled with one or two batons of high-quality chocolate and gently rolled into its crescent form. It’s a favorite among kids and commuters alike, offering a quick hit of sweetness in every bite. Think pain au chocolat but Swiss-style and a little more grounded.
3. Käse-Gipfeli (Cheese-Filled)
For savory lovers, the Käse-Gipfeli is where it’s at. Filled with melted Swiss cheese, often Emmental or Gruyère, this version delivers satisfying saltiness wrapped in a soft, golden crust. It’s ideal for lunchboxes, midday snacks, or anyone who prefers cheese over chocolate.
4. Ham and Cheese Gipfeli
Sometimes you’ll find an elevated version of the Käse-Gipfeli with the addition of smoked ham or prosciutto. It’s essentially a portable croque monsieur, and it’s wildly popular in train station bakeries across Switzerland. It’s hearty enough to count as lunch and elegant enough for a brunch platter.
5. Almond or Honey Glazed Gipfeli
Some artisan bakeries in Switzerland add a sweet almond paste or honey glaze to their Gipfeli, making them closer in flavor to a Danish or almond croissant. These aren’t as common as the classics, but when you spot one grab it. They’re flaky, aromatic, and slightly sticky in the best way possible.
Pro Tip
Many Gipfeli variations can also be made at home with just a few adjustments to your base dough. Want sweet? Add chocolate or almond paste. Craving savory? Cheese or herbs do the trick. The beauty of the Gipfeli recipe is that it’s a canvas for flavor experimentation, rooted in tradition but open to innovation.
Ingredients for the Perfect Gipfeli Recipe
Core Ingredients You’ll Need
Making Gipfeli at home doesn’t require fancy techniques or specialty ingredients just a few high-quality basics and a little patience. Each component in this recipe plays a specific role in creating the soft, slightly chewy texture and golden finish that make Swiss croissants so beloved.
1. All-Purpose Flour
A reliable staple in most kitchens, all-purpose flour provides the structure and elasticity needed for Gipfeli dough. It strikes the right balance between tenderness and strength, allowing the dough to rise without becoming too soft or too dense.
2. Active Dry Yeast
Yeast is the leavening agent that gives Gipfeli their soft, pillowy rise. Active dry yeast needs to be activated in warm liquid typically water or milk with a pinch of sugar to get it going. Be sure the liquid is lukewarm, not hot, to avoid killing the yeast.
3. Unsalted Butter
While Gipfeli don’t require full lamination like French croissants, butter is still essential. It enriches the dough and contributes to that classic golden color and soft interior. Use cold, unsalted butter for better control over the flavor and texture.
4. Milk
Milk helps soften the dough and creates a more tender crumb. It also encourages browning during baking, giving your Gipfeli that bakery-style look. Whole milk is preferred for richness, but 2% will work in a pinch.
5. Sugar and Salt
Sugar feeds the yeast and adds a gentle sweetness to the dough, while salt provides balance and enhances the overall flavor. Both are essential even in savory versions of Gipfeli.
6. Egg (for the Wash)
A simple egg wash, brushed on before baking, gives Gipfeli their signature sheen and a slightly crisp outer layer. It’s a small step with a big visual payoff.
These ingredients come together to form a dough that’s easy to work with and reliably delicious perfect for beginners and experienced bakers alike.
Optional Add-Ins for Sweet or Savory Twists
One of the best things about Gipfeli is how easily they adapt to both sweet and savory variations. Once you’ve mastered the base dough, you’re free to get creative adding flavor, texture, and surprise to every bite. Whether you’re in the mood for something indulgent or prefer a more savory touch, these optional add-ins offer countless ways to customize your pastries.
1. Chocolate
To start, chocolate is a timeless favorite. For a sweet indulgence, tuck a piece or two of dark or milk chocolate into the center of the dough before shaping. As the Gipfeli bakes, the chocolate melts into a rich, gooey core. The result is a Swiss-style Schoggi-Gipfeli warm, melty, and perfect with coffee. For best results, use baking bars rather than chips, as they fold more neatly and melt more smoothly.
2. Cheese
On the savory side, cheese is a simple yet flavorful choice. Grated Swiss cheese such as Gruyère or Emmental can be folded into the dough or sprinkled on top before baking. In addition, a pinch of black pepper or a dash of paprika can enhance the flavor profile. This version pairs beautifully with brunch spreads or a midday espresso.
3. Ham or Prosciutto
If you’re looking for something heartier, consider adding thin slices of smoked ham or prosciutto. Not only does this elevate the savory flavor, but it also turns your Gipfeli into a light meal. When combined with cheese, this filling creates a portable croque monsieur-style pastry. However, be sure to pat your meats dry before using them to avoid sogginess in the dough.
4. Almond Paste or Nut Butter
For a nutty, slightly sweet variation, almond paste or nut butter works wonders. Simply spread a thin layer inside the dough before rolling. You could also sprinkle chopped almonds or hazelnuts over the top after brushing with egg wash. As a result, you’ll get a rich, slightly crunchy finish that balances sweetness and texture.
5. Fruit Jam or Preserves
When you want to keep things light and fruity, jam is an excellent option. A spoonful of apricot, raspberry, or cherry preserves adds a pop of color and sweetness to your pastry. However, be mindful of how much you add too much can lead to leaks during baking. For best results, seal the dough edges tightly.
6. Fresh Herbs or Garlic Butter
If savory herbs are more your style, brush the inside of your dough with garlic butter or fold in finely chopped fresh herbs such as rosemary, thyme, or chives. This variation is especially delicious when served warm alongside soups or savory brunch dishes. Moreover, it’s a great way to use up leftover herbs from other meals.
From sweet to savory, subtle to bold, these add-ins can elevate your homemade Gipfeli from simple to spectacular. Ultimately, it’s all about experimenting with what you love. Depending on the season, your cravings, or what you have in your kitchen, you can create a version that’s uniquely your own.
Kitchen Tools to Make Your Life Easier
Although you don’t need a professional bakery setup to make Gipfeli at home, having a few reliable kitchen tools on hand can make a big difference. These simple items won’t just improve the quality of your final product they’ll also help streamline the entire process, making your time in the kitchen easier and more enjoyable from start to finish.
1. Large Mixing Bowls
To begin with, you’ll need a few mixing bowls. One for dry ingredients, one for wet, and one large enough for proofing your dough. Stainless steel or glass is ideal, since they hold warmth better and are easy to clean. As your dough rises, a roomy bowl allows it space to expand without sticking or overflowing.
2. Rolling Pin
Next, a rolling pin will help you shape the dough evenly. Whether you prefer a classic wooden pin or a modern silicone model, the goal is to gently roll your dough without tearing or overworking it. Uniform thickness leads to better baking results, and a good rolling pin can help make that happen effortlessly.
3. Pastry Brush
Once your Gipfeli are shaped, a pastry brush will come in handy for applying the egg wash. This step gives your pastries that golden, glossy finish you see in bakery windows. While any brush will work, silicone ones are easier to clean and more hygienic for repeated use.
4. Baking Sheet and Parchment Paper
When it’s time to bake, a flat, sturdy baking sheet is essential. Line it with parchment paper or a silicone baking mat to prevent sticking and promote even browning. Not only will your Gipfeli release cleanly after baking, but cleanup will also be much quicker.
5. Kitchen Scale (Optional)
If you’re aiming for precision, a kitchen scale is a helpful tool especially when dividing your dough into equal portions. Although it’s not strictly required, weighing your ingredients can give more consistent results than relying on measuring cups alone.
6. Kitchen Towel or Plastic Wrap
Finally, during the rising phase, you’ll want to keep your dough covered to prevent it from drying out. A clean kitchen towel works well, though plastic wrap provides a tighter seal. Either option will help maintain a slightly warm, humid environment ideal for yeast activation.
While none of these tools are difficult to find, each one plays a key role in creating smooth, well-shaped, and perfectly baked Gipfeli. When your equipment works with you not against you your baking process becomes far more enjoyable and the results far more reliable.
How to Make Gipfeli at Home (Step-by-Step Guide)
Mixing and Proofing the Dough
The foundation of any great Gipfeli lies in its dough. While the ingredients are simple, the way you bring them together matters just as much as what’s in the bowl. Taking your time during mixing and proofing will give your pastries the softness, light chew, and gentle rise that set them apart.
1. Start with Activating the Yeast
Begin by dissolving active dry yeast in lukewarm milk or water—around 100°F (38°C) is ideal. To encourage the yeast to wake up, add a teaspoon of sugar and let the mixture sit for about 5 to 10 minutes. During this time, you should see bubbles form on the surface, which means the yeast is active and ready to go. If nothing happens, it’s best to start over with fresh yeast.
2. Combine the Dry Ingredients
While the yeast is activating, mix your flour, salt, and any additional dry ingredients in a large bowl. Stir well to evenly distribute everything. At this stage, it helps to make a well in the center of your dry mixture, which makes it easier to combine with the wet ingredients later on.
3. Mix the Dough
Next, pour the activated yeast mixture and melted butter into the flour. Using a wooden spoon or your hands, stir until the dough begins to come together. Once it forms a rough mass, transfer it to a clean surface and knead for about 8 to 10 minutes. You’ll know it’s ready when it becomes smooth, elastic, and slightly tacky but not sticky. If the dough feels too dry, add a splash of milk; if it’s too wet, sprinkle in a bit more flour.
4. Let the Dough Rise
After kneading, place the dough in a lightly greased bowl and cover it with a clean towel or plastic wrap. For the best results, let it rise in a warm, draft-free spot for 60 to 90 minutes, or until it doubles in size. During this phase, the yeast works its magic creating air bubbles and building structure. Keep in mind that proofing time can vary depending on the temperature of your kitchen, so be patient and check the dough visually rather than relying only on the clock.
Proofing isn’t just a waiting game it’s when the flavor and texture of your Gipfeli begin to develop. By giving the dough time to rest and rise properly, you’re setting yourself up for a light, tender crumb and a beautiful bake.
Shaping the Perfect Crescent
Now that your dough has risen beautifully, it’s time to shape your Gipfeli into those signature crescents. This is the moment where your kitchen starts to look like a cozy Swiss bakery and where technique meets creativity. While the process is simple, a few thoughtful steps can help you create pastries that are both uniform and bakery-worthy.
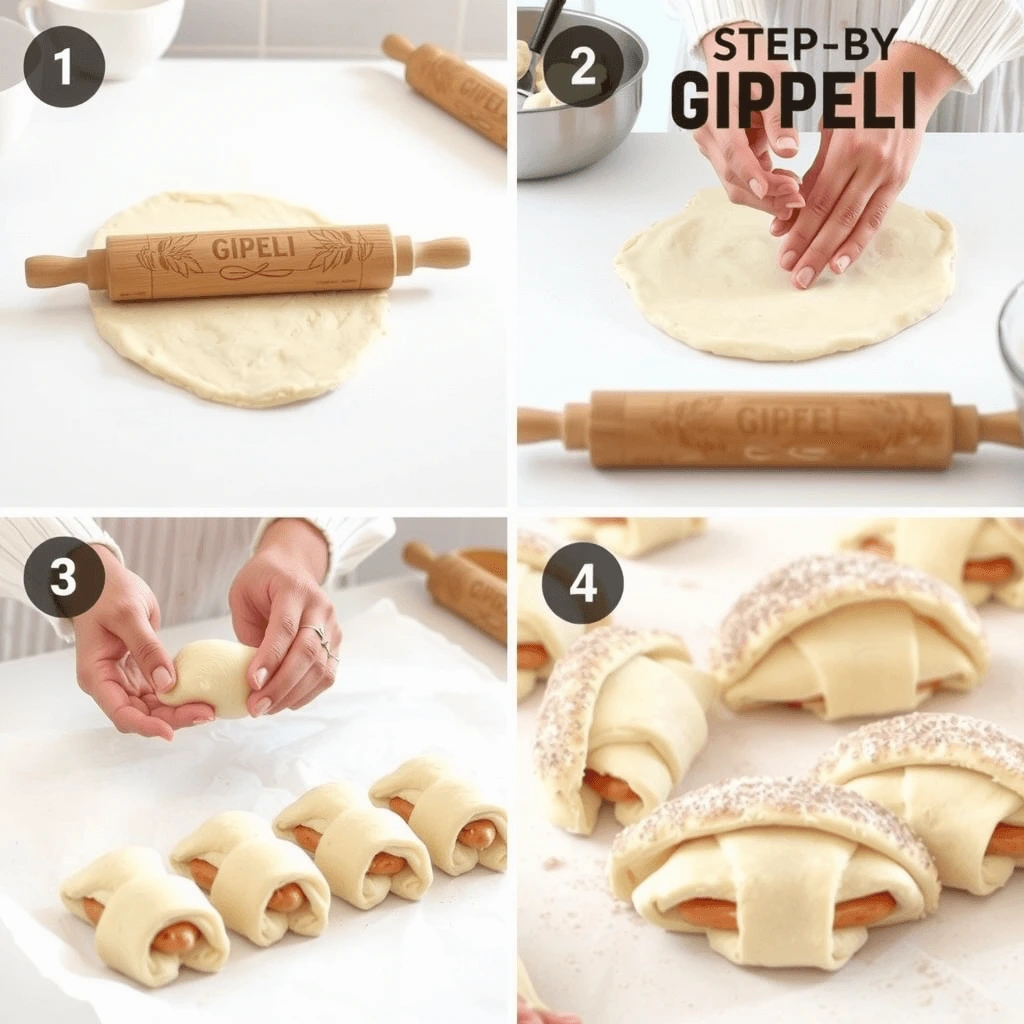
1. Roll the Dough Evenly
First, gently punch down the dough to release any excess air. Then transfer it to a lightly floured surface. Using a rolling pin, roll it out into a large rectangle aiming for about ¼ inch (6 mm) thickness. Try to maintain an even surface throughout, as this will help your crescents bake uniformly. If the dough resists or springs back, let it rest for 5 to 10 minutes before rolling again.
2. Cut Triangles for Rolling
Next, cut the dough into long triangles, similar to how you’d prepare croissants. Each triangle should be roughly 4 to 5 inches wide at the base and taper to a point. For best results, use a pizza cutter or sharp knife for clean, precise lines. If you want to add a filling like chocolate, cheese, or jam place a small spoonful near the base before rolling.
3. Roll into Crescent Shapes
Starting at the base of each triangle, gently roll the dough toward the pointed tip, stretching slightly as you go to create tension and form a tight spiral. Curve the ends inward slightly to create a crescent shape. While shaping, try to tuck the tip underneath to prevent unrolling during baking. This small detail gives your Gipfeli a clean, professional finish.
4. Let Them Proof Again
After shaping, place the Gipfeli on a parchment-lined baking sheet, leaving space between each one. Cover lightly with a towel or plastic wrap and let them rest for another 20 to 30 minutes. This second proof allows the dough to relax and rise just enough to ensure a light, airy interior once baked. During this time, preheat your oven so it’s fully ready when you are.
Shaping Gipfeli may take a little practice, but once you get the hang of it, it becomes second nature. Besides, the beauty of homemade pastries is that each one carries its own personality even if it’s not perfectly symmetrical. What matters most is that they’re made with care and baked to golden perfection.
Egg Wash, Baking, and Final Touches
Now that your Gipfeli are shaped and proofed, it’s time for the final stretch the step that transforms humble dough into glossy, golden pastries. While baking may seem straightforward, a few small details here can take your results from good to exceptional.
1. Apply the Egg Wash
Before placing your tray in the oven, brush each Gipfeli gently with an egg wash. This simple mix of beaten egg (and a splash of milk, if you like) creates that irresistible golden sheen on the surface. Using a pastry brush, apply the wash evenly across the top and sides of each crescent. Be careful not to let it pool underneath, as this can lead to uneven browning or sticking.
2. Bake to Golden Perfection
Preheat your oven to 375°F (190°C) and make sure it’s fully heated before baking. Bake the Gipfeli on the middle rack for 15 to 20 minutes, or until they’re puffed up and deeply golden. If you’re baking a second tray, rotate them halfway through for even browning. Keep a close eye in the final few minutes ovens vary, and you want crisp edges without over-baking.
3. Cool Slightly Before Serving
Once baked, remove the tray from the oven and let the Gipfeli cool for 5 to 10 minutes. While it’s tempting to bite into them right away, giving them a moment to rest helps the structure settle and keeps the texture from becoming gummy. That said, they’re best enjoyed warm when the butter is still fragrant and the texture is at its softest.
4. Add Optional Finishing Touches
For sweet versions, consider dusting the tops lightly with powdered sugar once they’ve cooled. If you’ve made a savory batch, a sprinkle of flaky sea salt or grated cheese just before baking can add an extra punch of flavor and visual appeal. Small extras like these give your homemade Gipfeli that polished, bakery-style finish.
From the first brush of egg wash to the last golden bite, this final stage brings all your effort together. Every step has built toward this moment and when your kitchen smells like a European café, and your tray glistens with warm, fresh pastries, you’ll know it was all worth it.

Tips for Perfecting Your Homemade Gipfeli
Getting that bakery-quality texture and flavor at home is totally possible—especially with a few tried-and-true techniques. From dough handling to baking temperature, the details matter. Here are some expert tips to help your Gipfeli turn out golden, soft, and reliably delicious every time.
Want to level up your dough technique?
Check out this guide on how to knead dough like a pro from King Arthur Baking for tips on developing the perfect structure without overworking it.
Troubleshooting Common Dough Issues
Dough can be unpredictable, especially if you’re new to working with yeasted pastries. However, most problems are easy to identify and even easier to fix. Whether your dough is too sticky, not rising, or just behaving oddly, here are a few common issues and how to handle them with confidence.
1. The Dough Didn’t Rise
If your dough hasn’t puffed up after resting, the first thing to check is the yeast. It might be expired or inactive. Additionally, the liquid used to activate the yeast may have been too hot or too cold. Aim for lukewarm not hot liquid to gently wake up the yeast. Also, make sure the dough is resting in a warm, draft-free space. A cold room can slow or completely stop the rising process.
2. The Dough Is Too Sticky
A little stickiness is normal, but if the dough clings to your hands or surface too much, it probably needs a bit more flour. Add it gradually just a small spoonful at a time—until the texture becomes manageable. Be careful not to add too much, though, or the dough will become stiff and dry instead of soft and pliable.
3. The Dough Feels Dry or Crumbly
On the flip side, if your dough is cracking or doesn’t hold together well, it may be lacking moisture. This can happen if your flour was over-measured or the air is very dry. To correct it, knead in a little extra milk or water, just a teaspoon at a time, until the dough feels smooth and elastic.
4. The Dough Snaps Back While Rolling
When the dough keeps shrinking back as you try to roll it out, it usually means the gluten is too tight. This often happens if the dough hasn’t had enough time to rest after kneading. To fix it, cover the dough and let it sit for 10 to 15 minutes before trying again. The short rest will help the gluten relax and make rolling much easier.
5. The Dough Rose Unevenly
If some parts of your dough look more puffed than others, uneven proofing may be the reason. This could be due to inconsistent kneading or an unevenly warm proofing environment. Make sure your dough is kneaded until it’s smooth and let it rest in a spot with steady warmth. Covering the bowl properly also helps keep the temperature and humidity even.
Every baker runs into dough issues now and then, so don’t let small setbacks throw you off. With a little practice, you’ll start to recognize what your dough needs and how to adjust in the moment. The key is to stay flexible, stay patient, and trust the process.
How to Store or Freeze Gipfeli
If you want to enjoy fresh, homemade pastries without baking from scratch every time, you’re in luck. Gipfeli are not only delicious they’re also highly freezer-friendly. Whether you’re planning ahead for brunch or saving leftovers, these storage tips will help keep your pastries soft, golden, and worth every bite.
Make-Ahead Tips for Busy Days
One of the best things about Gipfeli is how well they fit into your schedule. You can make the dough a day in advance, store it in the refrigerator overnight, and shape and bake in the morning. If you’re hosting a brunch or want fresh pastries for breakfast without the early wake-up call, this method saves time and stress while still giving you that just-baked feel.
Alternatively, shape the Gipfeli and place them on a tray, cover lightly, and store them in the fridge overnight. Let them come to room temperature and finish rising before baking the next day.
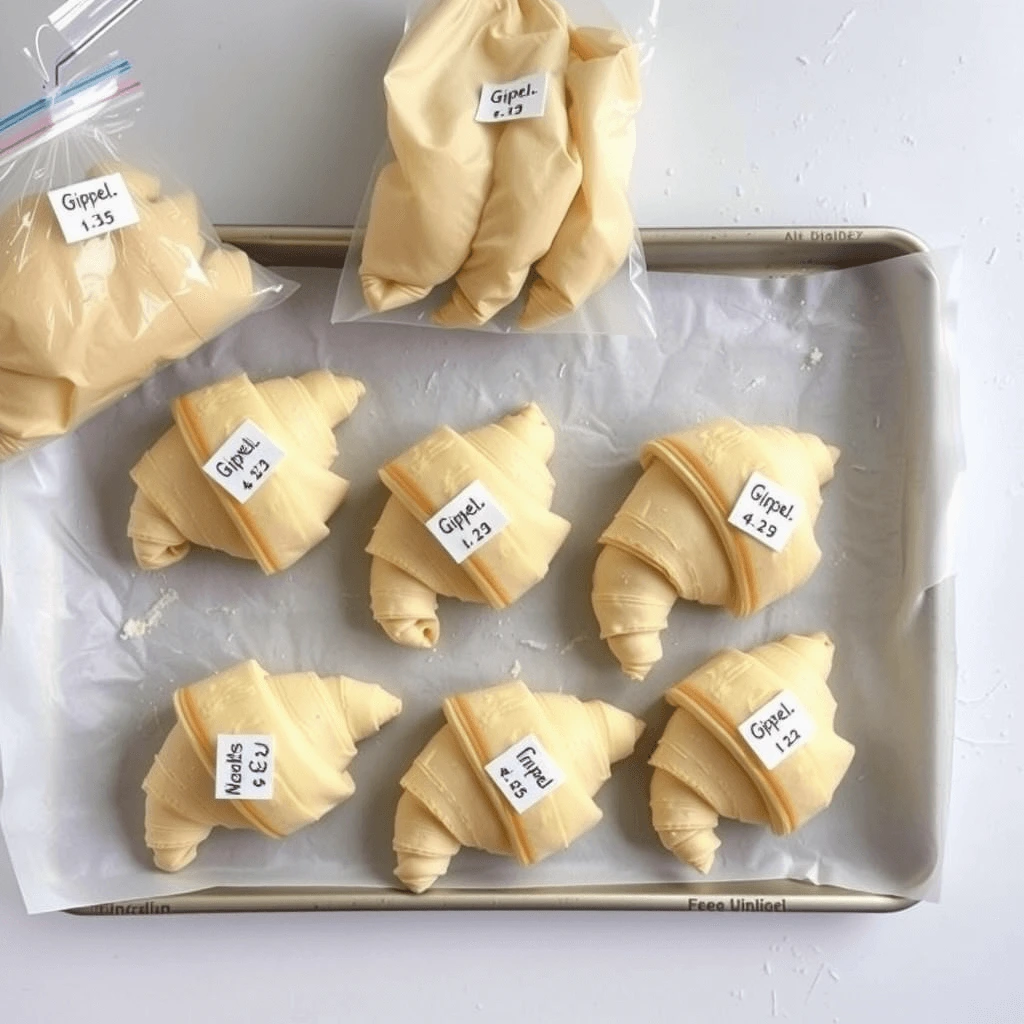
Freezing Unbaked Gipfeli
To make truly freezer-friendly Gipfeli, shape them as usual and place them on a parchment-lined baking sheet. When you’re ready to bake, simply remove the number you need, let them thaw and rise at room temperature for a few hours, then continue with the egg wash and baking process. This is the ultimate prep-ahead solution perfect for surprise guests or lazy weekend mornings.
Freezing Baked Gipfeli
If you’ve already baked your batch and want to save a few, let them cool completely first. Wrap each pastry tightly in parchment paper or foil, then store them in an airtight container or freezer bag. Properly wrapped, these freezer-friendly Gipfeli will keep for up to one month. To reheat, thaw at room temperature and warm in a 325°F (165°C) oven for 8 to 10 minutes to restore their crisp edges and soft interior.
Quick Storage for Short-Term Enjoyment
If you’re planning to eat your Gipfeli within a day or two, you can simply store them at room temperature. Keep them in a paper bag or lightly covered container to maintain their softness. To refresh, warm them briefly in the oven before serving.
From meal prep to last-minute cravings, freezer-friendly Gipfeli make it easy to serve something homemade and satisfying no matter what your schedule looks like.
Serving Suggestions for Brunch or Breakfast
While Gipfeli are a delight on their own, how you serve them can turn a simple pastry into a full, memorable experience. Whether you’re hosting a brunch or grabbing a quick breakfast, these Swiss-style croissants can be dressed up or down depending on the occasion. Here are a few ways to make them shine on the table.
1. Keep It Classic with Butter and Jam
Sometimes, the simplest approach is the best. Warm your Gipfeli slightly and serve with softened butter, fruit preserves, or honey on the side. Apricot and raspberry jam pair beautifully with the buttery crumb, offering a perfect balance of richness and brightness. For an extra touch, include small ramekins of each spread so guests can choose their favorite.
2. Build a Savory Breakfast Plate
If you’ve made cheese-filled or ham-stuffed Gipfeli, consider building a full plate around them. Add soft-boiled eggs, a wedge of Emmental or Gruyère, and some fresh-cut vegetables like cucumber and tomato. This European-style breakfast is satisfying without being heavy and works well for both everyday mornings and casual brunches.
3. Create a Pastry Board for Guests
When you’re entertaining, presentation goes a long way. Arrange a mix of plain, sweet, and savory Gipfeli on a wooden board alongside seasonal fruits, nuts, cheeses, and small jars of spreads. Not only does this look impressive, but it also gives guests plenty of variety. Add coffee or tea on the side, and you’ve got a no-fuss brunch setup that feels luxurious.
4. Pair with Hot or Cold Beverages
Gipfeli naturally complement coffee, especially a rich dark roast or a smooth cappuccino. For those who prefer something lighter, herbal teas or freshly squeezed juice work just as well. During warmer months, consider serving them with iced lattes or fruit-infused water for a refreshing contrast to the pastry’s richness.
Whether you’re serving one or a dozen, Gipfeli can easily adapt to the moment. By adding a few thoughtful pairings or sides, you’ll turn a simple pastry into a complete and satisfying start to the day.
Frequently Asked Questions About Gipfeli
Can I Make Gipfeli Without Yeast?
Yes, you can make Gipfeli without yeast but it’s important to understand how it changes the result. Traditional Gipfeli rely on yeast for that soft, pillowy texture and subtle rise. However, if you’re short on time or simply want a quicker version, there are ways to create a yeast-free dough that still delivers satisfying results.
One common alternative is to use baking powder as a leavening agent. This shortcut version won’t have the same light, airy crumb as the original, but it will bake into a tender, biscuit-like pastry with a crisp edge and soft center. It’s a great option when you’re looking for a freezer-friendly Gipfeli that can be made on the fly.
To make a no-yeast Gipfeli, you can swap the yeasted dough for a rich, quick dough using flour, butter, baking powder, a pinch of salt, and just enough milk to bring it together. Once shaped, these can go straight into the oven no rising time required.
That said, if you’re after the classic flavor and texture of authentic Swiss croissants, yeast-based dough is still the gold standard. But for a fast and easy twist, the no-yeast method is a worthy backup.
Is Gipfeli Dough the Same as Croissant Dough?
Not exactly. While Gipfeli and croissants look similar at first glance with their iconic crescent shape and golden layers their doughs are quite different in structure, richness, and technique.
Croissant dough is made using a lamination process, where cold butter is folded into the dough over multiple rounds to create dozens of thin, flaky layers. It’s time-consuming, delicate, and requires precision. The end result is a pastry that’s airy, crisp on the outside, and melt-in-your-mouth tender inside.
Gipfeli dough, on the other hand, is much simpler. While it still uses yeast for lift, it skips the elaborate lamination steps. Instead, the dough is typically softer, less rich in butter, and easier to handle. This makes Gipfeli more practical for everyday baking and a common part of breakfast in many Swiss households.
Some Gipfeli recipes (like the Buttergipfeli) may include more fat for added tenderness, but overall, the dough is meant to be more approachable and less indulgent than the French croissant.
In short:
Croissants are flaky and buttery because of lamination.
Gipfeli are soft, slightly chewy, and easier to make perfect for everyday enjoyment.
What’s the Best Flour for Gipfeli?
The best flour for making Gipfeli is unbleached all-purpose flour, thanks to its balanced protein content and versatility. It offers just enough gluten strength to give the dough structure, while still keeping the final pastry soft and tender exactly what you want in a homemade Swiss croissant.
If you prefer a slightly chewier texture or want to mimic bakery-style results, you can blend all-purpose flour with a small amount of bread flour. The added protein in bread flour will help the dough hold its shape and create a bit more elasticity, which can be helpful during shaping and rolling.
However, it’s best to avoid flours that are too high in protein (like 100% bread flour) or too low (like cake flour). The former can make your dough tough, while the latter may cause it to collapse or bake up too soft.
If you’re aiming for freezer-friendly Gipfeli, using all-purpose flour also holds up well during freezing and reheating so you’ll still get that satisfying bite after storing them ahead of time.
For best results:
- Use unbleached all-purpose flour for the base recipe
- Sift before mixing to avoid lumps
- Measure by weight if possible, for consistent results every time
Ultimately, the flour you choose sets the stage for everything else so starting with the right one means you’re already halfway to buttery, golden perfection.
Is Gipfeli Dough the Same as Croissant Dough?
Not exactly. While Gipfeli and croissants look similar at first glance with their iconic crescent shape and golden layers their doughs are quite different in structure, richness, and technique.
Croissant dough is made using a lamination process, where cold butter is folded into the dough over multiple rounds to create dozens of thin, flaky layers. It’s time-consuming, delicate, and requires precision. The end result is a pastry that’s airy, crisp on the outside, and melt-in-your-mouth tender inside.
Gipfeli dough, on the other hand, is much simpler. While it still uses yeast for lift, it skips the elaborate lamination steps. Instead, the dough is typically softer, less rich in butter, and easier to handle. This makes Gipfeli more practical for everyday baking and a common part of breakfast in many Swiss households.
Ready to Bake Your Own Gipfeli?
Now that you know the ins and outs of making authentic Swiss Gipfeli from the dough and shaping to proofing, freezing, and serving it’s your turn to bring these soft, golden crescents to life in your own kitchen.
📌 Try the recipe, snap a photo, and tag us on Pinterest or Instagram using #TasteBlissGipfeli. We’d love to see how your batch turns out and how you make it your own with sweet or savory twists.
📝 Want a copy for your kitchen?
[Click here to download the printable Gipfeli recipe card (PDF)] and keep it on hand for cozy mornings, weekend brunches, or anytime you want a little taste of Switzerland.
✨ Looking for more recipes like this one?
Here are a few you might love:
From slow weekend bakes to freezer-friendly prep, this recipe is here for all of it and now so are you. Happy baking, and don’t forget to share the love.