
If you love cheesy, crispy, and flavor-packed quesadillas, then you’re in for a treat! Chihuahua cheese quesadillas are a delicious and easy-to-make dish that brings the best of Mexican flavors right to your kitchen. Known for its smooth, creamy texture and exceptional melting quality, Chihuahua cheese is the perfect choice for achieving that gooey, stretchy bite inside a golden, crispy tortilla.
In this guide, we’ll walk you through everything you need to know about making the perfect Chihuahua cheese quesadilla—from selecting the best ingredients to mastering the ideal cooking technique for a crispy, golden-brown finish. Whether you’re a quesadilla lover or just discovering authentic Mexican cheese, this step-by-step guide will help you create a restaurant-quality dish at home.
Ready to make your quesadillas extra cheesy and delicious? Let’s dive in!

What Makes Chihuahua Cheese the Best Choice for Quesadillas?
The Origin and History of Chihuahua Cheese (Mexican Cheese Background)
A Traditional Cheese from Northern Mexico
Chihuahua cheese, also known as queso menonita, originates from northern Mexico, particularly in the state of Chihuahua. The cheese is deeply rooted in the region’s agricultural and dairy traditions, influenced by Mennonite settlers who arrived in Mexico in the 1920s. These settlers, known for their cheese-making skills, played a crucial role in developing this semi-soft, pale yellow cheese that has since become a staple in Mexican cuisine.
Why Is It Called Chihuahua Cheese?
The name “Chihuahua cheese” comes from the Mexican state where it was first produced. However, in local communities, it is still widely referred to as queso menonita, honoring the Mennonite settlers who introduced the cheese-making techniques. Over time, the cheese gained popularity throughout Mexico and beyond, becoming a preferred choice for dishes that require a smooth, melt-in-your-mouth texture.
Traditional Cheese-Making Process
The production of Chihuahua cheese follows traditional methods that have been passed down for generations. The cheese is typically made from pasteurized cow’s milk, which is carefully curdled, drained, and aged for a few weeks to develop its signature mild yet slightly tangy flavor. The aging process can vary, with some varieties developing a sharper taste over time, making them versatile for both melting and slicing.
Chihuahua Cheese in Mexican Cuisine
Beyond quesadillas, Chihuahua cheese is a key ingredient in many classic Mexican dishes, such as queso fundido (melted cheese dip), chiles rellenos (stuffed peppers), and enchiladas. Its ability to melt smoothly without becoming greasy makes it one of the most sought-after cheeses for both home cooks and professional chefs.
Global Popularity and Availability
Although Chihuahua cheese was once only found in northern Mexico, its popularity has expanded globally. Today, it is commonly available in Mexican grocery stores and international markets, particularly in the United States, where it is used as a preferred cheese for Tex-Mex and Mexican-inspired dishes.
Flavor Profile: Mild, Creamy, and Perfect for Melting
A Mild Yet Rich Taste
Chihuahua cheese is known for its mild yet slightly tangy flavor, making it an ideal choice for both simple and complex dishes. Unlike sharp cheeses that overpower a dish, Chihuahua cheese has a buttery and slightly nutty taste that enhances the other ingredients it is paired with. Its balanced flavor profile allows it to work well in both traditional Mexican dishes and modern fusion recipes.
A Smooth and Creamy Texture
One of the defining characteristics of Chihuahua cheese is its soft, creamy texture. When fresh, it has a semi-soft consistency, making it easy to slice or shred. As it ages, it becomes firmer and develops a slightly stronger taste, though it never loses its characteristic smoothness and rich dairy flavor. This texture is what makes it so versatile in cooking, whether melted, grated, or eaten as is.
Superior Melting Properties
Chihuahua cheese is particularly prized for its exceptional melting ability. When heated, it melts evenly without becoming oily or stringy, creating a smooth and stretchy consistency that is perfect for quesadillas, nachos, and cheese dips. Unlike some cheeses that harden quickly after melting, Chihuahua cheese maintains its gooey, creamy consistency for longer, making it ideal for dishes that require a rich, melty texture.
Comparison to Other Melting Cheeses
Chihuahua cheese is often compared to Oaxaca cheese, Monterey Jack, and Mozzarella due to its excellent melting quality. However, it has a richer and slightly saltier taste than mozzarella, a creamier consistency than Monterey Jack, and a firmer texture than Oaxaca cheese. These qualities make it a top choice for dishes that require a cheese that melts smoothly while still holding its shape.
Best Cooking Uses for Its Flavor and Texture
The mild yet creamy nature of Chihuahua cheese makes it a staple in many Mexican dishes. It is perfect for quesadillas, enchiladas, chiles rellenos, and queso fundido, as well as soups, casseroles, and grilled cheese sandwiches. Because it absorbs flavors well, it also pairs beautifully with spicy salsas, roasted vegetables, and seasoned meats, enhancing the overall taste of the dish.
How It Compares to Other Cheeses (Oaxaca, Monterey Jack, Cheddar)
Chihuahua Cheese vs. Oaxaca Cheese
Oaxaca cheese, also known as queso Oaxaca, is another popular Mexican cheese often compared to Chihuahua cheese due to its melting properties. However, there are several key differences between the two:
Texture and Structure
Oaxaca cheese has a stringy, pull-apart texture, similar to mozzarella, because it is made using the pasta filata technique, where the curd is stretched and kneaded. Chihuahua cheese, on the other hand, is smoother and more cohesive, making it easier to slice and shred.
Melting Quality
Both cheeses melt exceptionally well, but Chihuahua cheese melts more evenly and smoothly, without becoming stringy like Oaxaca cheese. This makes Chihuahua cheese a better choice for quesadillas and baked dishes, where a creamy consistency is preferred.
Flavor Differences
Oaxaca cheese has a mild, slightly salty taste, similar to mozzarella, while Chihuahua cheese offers a richer, more buttery flavor with a subtle tang. This makes Chihuahua cheese more versatile in dishes where a bolder cheese flavor is desired.
Chihuahua Cheese vs. Monterey Jack
Monterey Jack is a widely used cheese in Mexican and Tex-Mex cuisine, often considered an alternative to Chihuahua cheese. While they share similarities, there are notable differences in texture, flavor, and use.
Texture and Firmness
Monterey Jack is softer and more crumbly than Chihuahua cheese, which has a slightly firmer, more elastic texture. This makes Chihuahua cheese easier to slice and hold its shape in dishes like quesadillas and sandwiches.
Flavor Profile
Monterey Jack has a very mild and slightly sweet flavor, while Chihuahua cheese has a richer, nuttier taste with a light tanginess. This difference means that Chihuahua cheese can stand out more in recipes, whereas Monterey Jack blends more subtly with other ingredients.
Best Uses in Cooking
Monterey Jack works well in dishes where a mild, creamy cheese is needed, such as nachos and burritos. Chihuahua cheese, however, is better for quesadillas, chiles rellenos, and baked Mexican dishes, as it provides a stronger, more distinct cheese flavor.
Chihuahua Cheese vs. Cheddar Cheese
Cheddar cheese is one of the most widely used cheeses globally and is sometimes used as a substitute for Chihuahua cheese in Mexican recipes. However, these cheeses have significant differences in taste, texture, and behavior when melted.
Firmness and Aging Process
Cheddar cheese is typically firmer and drier than Chihuahua cheese, especially as it ages. Chihuahua cheese remains smooth and semi-soft, even when aged, making it better suited for melting applications.
Flavor Intensity
Cheddar cheese has a sharper, more pronounced flavor, particularly in aged varieties. Chihuahua cheese, on the other hand, has a milder, buttery taste that complements a wide range of ingredients without overpowering them.
Melting Behavior
Cheddar cheese can become oily and grainy when melted, particularly in aged varieties. Chihuahua cheese melts into a smooth, creamy consistency that remains stable and rich, making it the preferred option for quesadillas, cheese dips, and baked dishes.
Which Cheese is Best for Different Dishes?
- For quesadillas: Chihuahua cheese is the best choice due to its perfect melt and creamy flavor.
- For nachos: Monterey Jack or cheddar may be used, but Chihuahua cheese provides a smoother melt without greasiness.
- For baked dishes: Chihuahua cheese outperforms Monterey Jack and cheddar in casseroles, chiles rellenos, and stuffed tortillas, thanks to its rich, non-oily melt.
- For cheese dips (queso fundido): Oaxaca and Chihuahua cheeses work well, but Chihuahua cheese offers a creamier, more flavorful experience.
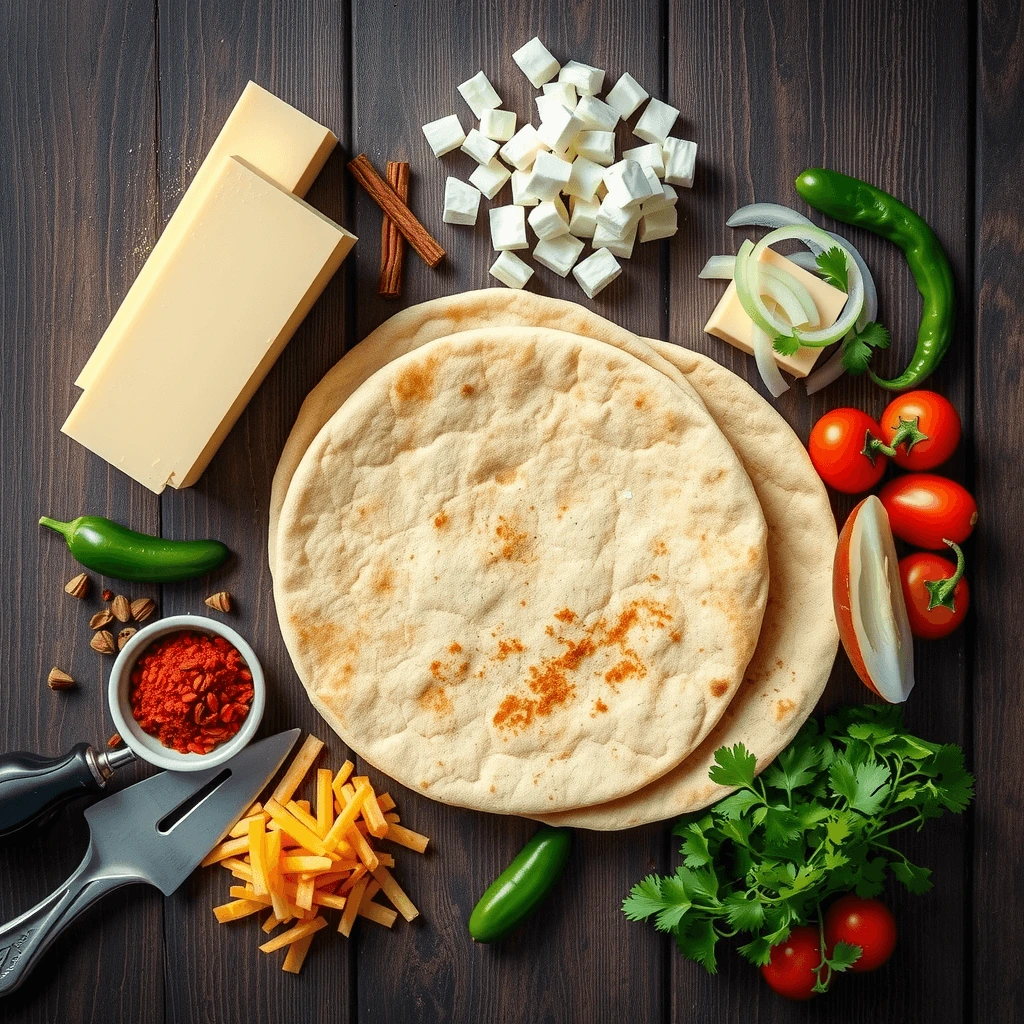
Ingredients You Need for the Perfect Chihuahua Cheese Quesadilla
Choosing the Right Tortilla: Corn vs. Flour
Understanding the Difference Between Corn and Flour Tortillas
When making quesadillas, choosing the right type of tortilla is essential for achieving the perfect texture, flavor, and crispiness. Both corn and flour tortillas have unique characteristics that influence the final texture and flavor of the dish. While corn tortillas provide a firmer, more traditional crunch, flour tortillas crisp up more evenly and develop a golden-brown exterior. Choosing the right type depends on the desired level of crispiness and the ability to hold fillings without breaking.
Corn Tortillas: Traditional and Flavorful
Corn tortillas are the authentic choice for many Mexican dishes, including tacos and enchiladas. Made primarily from masa harina (nixtamalized corn flour) and water, they have a distinct earthy, slightly nutty flavor that pairs well with Chihuahua cheese.
Advantages of Corn Tortillas
- Rich, traditional flavor that enhances the taste of Chihuahua cheese
- Naturally gluten-free, making them a great option for those with dietary restrictions
- Firm texture that holds up well with minimal ingredients
Challenges of Using Corn Tortillas
- More delicate and prone to breaking when overfilled
- Require preheating or softening before use to prevent cracking
- Smaller in size, making them ideal for street-style quesadillas rather than large portions
Flour Tortillas: Soft, Flexible, and Crispy
Flour tortillas are softer and more pliable than corn tortillas, making them a popular choice for quesadillas. They are made from wheat flour, water, fat (such as lard or oil), and salt, resulting in a mild, slightly chewy texture.
Advantages of Flour Tortillas
- Easier to fold and handle without tearing
- Larger surface area, making them perfect for fully loaded quesadillas
- More moisture retention, leading to a softer texture when cooked
Challenges of Using Flour Tortillas
- Less traditional in Mexican cuisine compared to corn tortillas
- Can become soggy if not cooked properly
- Milder flavor, which may not complement Chihuahua cheese as well as corn tortillas
Which Tortilla is Best for Chihuahua Cheese Quesadillas?
The choice between corn and flour tortillas depends on personal preference and desired texture.
For a Traditional and Authentic Quesadilla
- Use corn tortillas for a firm, slightly crispy texture with a rich, earthy taste.
- Ideal for lighter quesadillas with simple ingredients, allowing the cheese flavor to shine.
For a Soft and Cheesy Quesadilla
- Use flour tortillas if you prefer a larger, more flexible base that can hold more ingredients.
- Best for thicker, heartier quesadillas with additional fillings such as meat or vegetables.
Achieving the Ultimate Crispy Quesadilla
- Opt for flour tortillas cooked in butter or oil to achieve an extra golden, crispy crust.
- If using corn tortillas, lightly toast them before assembling the quesadilla to enhance their firmness and flavor.
Would you like any additional details or variations included?
Essential Ingredients: Chihuahua Cheese and Butter/Oil
Chihuahua Cheese: The Key to a Perfectly Melty Quesadilla
Chihuahua cheese is the most important ingredient in a Chihuahua cheese quesadilla. Its smooth, creamy texture and superior melting properties make it ideal for achieving a gooey, flavorful filling.
Why Chihuahua Cheese is the Best Choice
- Rich, buttery flavor that enhances the taste of the quesadilla
- Exceptional melting quality, creating a smooth and stretchy consistency
- Mild yet slightly tangy taste, making it versatile for pairing with different tortillas and fillings
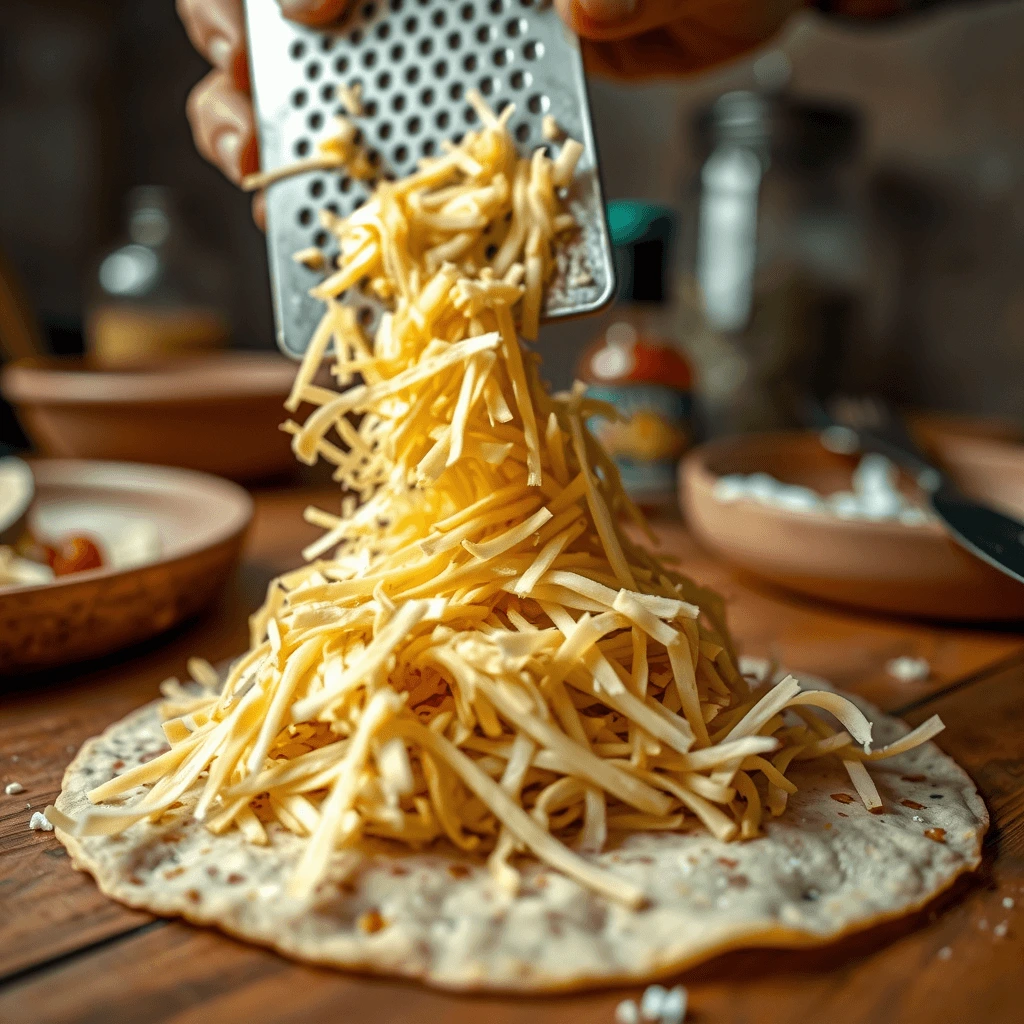
How to Prepare Chihuahua Cheese for Quesadillas
- Shred or slice the cheese to ensure even melting. Shredding works best for quick and consistent melting, while slices may take longer to melt evenly.
- Use fresh Chihuahua cheese whenever possible, as aged versions may have a firmer texture that takes longer to melt.
- Avoid pre-packaged shredded cheese, as it often contains anti-caking agents that can affect the meltability.
Alternatives to Chihuahua Cheese
If Chihuahua cheese is unavailable, consider using other Mexican cheeses or melting cheeses with similar properties:
- Oaxaca cheese: Has a similar mild flavor but a stringier texture, making it ideal for a stretchier quesadilla.
- Monterey Jack: A good substitute with a mild, creamy taste, though slightly less rich than Chihuahua cheese.
- Mozzarella: Works well for melting but lacks the buttery, slightly tangy taste of Chihuahua cheese.
Butter vs. Oil: Which is Best for Quesadillas?
The choice between butter and oil significantly affects the texture and flavor of the quesadilla. Both options offer different benefits, depending on the desired outcome.
Using Butter for a Richer Flavor
Butter enhances the flavor and texture of the quesadilla by adding a slight crispiness and a rich, buttery taste.
- Creates a golden-brown, crispy tortilla with slightly caramelized edges.
- Infuses a rich, savory flavor into the quesadilla, complementing the creamy cheese.
- Works best when used in small amounts, as too much can make the tortilla greasy.
Using Oil for an Extra Crisp Finish
Oil is an excellent alternative if a lighter, crispier texture is preferred.
- Provides even heat distribution, preventing the tortilla from burning.
- Helps create an extra crunchy exterior without adding a heavy, buttery taste.
- Works well for corn tortillas, as it prevents them from becoming too dry and brittle.
Best Oils for Cooking Quesadillas
- Vegetable oil: Neutral in flavor and ideal for crisping up tortillas.
- Olive oil: Adds a slight richness but can overpower the delicate flavor of Chihuahua cheese.
- Avocado oil: A great choice for high-heat cooking, providing a mild, buttery taste.
Which One Should You Use?
The decision between butter and oil depends on personal preference and desired texture.
- For a richer, slightly softer quesadilla, use butter.
- For a crisper, crunchier exterior, use oil.
- For a balance of flavor and texture, consider using a combination of both, brushing the tortilla lightly with butter while cooking it in a small amount of oil.
Would you like any additional details or suggestions on cooking techniques?
Optional Add-Ins: Chicken, Vegetables, Spices for Extra Flavor
Enhancing Quesadillas with Additional Ingredients
While a simple Chihuahua cheese quesadilla is delicious on its own, adding complementary ingredients can take it to the next level. Incorporating protein, vegetables, and spices enhances both the flavor and texture, making the quesadilla more filling and dynamic.
Chicken: A Protein-Packed Addition
Chicken is one of the most popular additions to quesadillas because it pairs well with Chihuahua cheese and adds a savory, juicy texture.
Best Types of Chicken for Quesadillas
- Shredded Rotisserie Chicken: Pre-cooked and seasoned, making it a quick and easy option.
- Grilled Chicken Strips: Adds a smoky, slightly charred flavor that enhances the quesadilla.
- Spicy Pulled Chicken: Cooked with seasonings such as cumin, paprika, and chili powder for extra depth.
How to Prepare Chicken for Quesadillas
- Season the chicken well before adding it to the quesadilla to avoid a bland filling.
- Use pre-cooked or leftover chicken for a quick preparation process.
- Avoid large chunks, as finely shredded or sliced chicken ensures even distribution and better melting of the cheese.
Vegetables: Adding Texture and Freshness
Vegetables provide a crunchy contrast to the gooey cheese while introducing extra nutrients and flavors.
Best Vegetables for Quesadillas
- Bell Peppers: Add a slight sweetness and vibrant color, especially when sautéed.
- Onions: Caramelized or grilled onions provide a rich, slightly sweet depth of flavor.
- Mushrooms: Offer an umami-rich, meaty texture, making them a great option for vegetarian quesadillas.
- Spinach or Kale: Introduces a mild, earthy taste and pairs well with melted cheese.
- Jalapeños or Poblano Peppers: Bring a spicy kick for those who enjoy heat.
How to Prepare Vegetables for Quesadillas
- Sauté vegetables before adding them to prevent excess moisture from making the quesadilla soggy.
- Chop vegetables into small, uniform pieces to ensure even cooking and distribution.
- Layer vegetables evenly between the cheese and tortilla for the best balance of flavors.
Spices and Seasonings: Elevating the Flavor Profile
Using the right spices and seasonings can enhance the overall taste of the quesadilla without overpowering the creamy, mild flavor of Chihuahua cheese.
Best Spices for Quesadillas
- Cumin: Adds a warm, earthy depth.
- Chili Powder: Provides a mild heat that complements the cheese.
- Smoked Paprika: Enhances the quesadilla with a subtle smokiness.
- Garlic Powder: Gives a bold, savory note without overpowering the other ingredients.
- Oregano: Offers a mild, herbal taste that works well with cheese and chicken.
How to Use Spices in Quesadillas
- Season the chicken or vegetables before cooking to allow flavors to develop fully.
- Sprinkle spices lightly to avoid overwhelming the delicate taste of the cheese.
- Combine multiple spices for a layered, more complex flavor.
Balancing Ingredients for the Perfect Quesadilla
When adding ingredients, it is important to maintain a balance so that the cheese remains the main focus while the other elements enhance the dish.
Tips for Creating a Well-Balanced Quesadilla
- Use moderate amounts of fillings to prevent the quesadilla from becoming too heavy.
- Pair mild vegetables with bolder spices to create contrast.
- Ensure the cheese fully coats the other ingredients for better melting and cohesion.
Would you like more suggestions on ingredient pairings or variations?
Step-by-Step Guide to Making Crispy Chihuahua Cheese Quesadillas
Step 1: Preparing the Ingredients for Even Cooking
Ensuring Even Distribution for the Perfect Quesadilla
Proper preparation of ingredients is essential for achieving a balanced texture, consistent melting, and an evenly cooked quesadilla. Preparing each component correctly ensures that the cheese melts smoothly, the tortilla crisps up evenly, and any additional ingredients blend harmoniously.
Choosing the Right Chihuahua Cheese
Chihuahua cheese is the foundation of the quesadilla, and its preparation plays a crucial role in the final texture and flavor.
Shredding vs. Slicing the Cheese
- Shredded Cheese: Melts faster and more evenly, creating a smooth, creamy consistency.
- Sliced Cheese: Takes slightly longer to melt but can provide thicker, more distinct layers of cheese.
Tips for Prepping the Cheese
- Use freshly shredded cheese instead of pre-packaged shredded cheese, which contains anti-caking agents that can affect melting.
- Store the cheese at room temperature for 10 to 15 minutes before use to allow for quicker, more even melting.
- If using sliced cheese, ensure thin, even slices to prevent uneven melting.
Prepping the Tortillas for Better Cooking
Tortillas serve as the base of the quesadilla, and properly preparing them helps achieve a crispy, golden-brown exterior while keeping the inside soft and cheesy.
Softening Corn Tortillas
- Corn tortillas tend to be more fragile than flour tortillas and may break if used straight from the package.
- To soften them, lightly warm them on a dry skillet for 10–15 seconds per side before assembling the quesadilla.
Choosing the Right Size
- Smaller tortillas (6 inches): Best for single-serving quesadillas with minimal fillings.
- Larger tortillas (8 to 10 inches): Ideal for folded quesadillas or for making multiple servings at once.
Preparing Additional Ingredients for Even Cooking
If using proteins, vegetables, or spices, ensuring they are properly prepped will prevent uneven cooking or excessive moisture buildup.
Pre-Cooking Proteins for Faster Assembly
- Use pre-cooked chicken, beef, or shrimp to ensure the quesadilla cooks quickly without burning the tortilla.
- If using raw protein, fully cook and season it separately before adding it to the quesadilla.
Draining Excess Moisture from Vegetables
- High-moisture vegetables like mushrooms, onions, and peppers should be sautéed beforehand to release excess water.
- Once cooked, pat them dry with a paper towel before adding them to the quesadilla to avoid a soggy texture.
Balancing Spices for Even Flavor
- Season meats and vegetables before assembly to ensure even distribution of flavor.
- Sprinkle spices lightly to avoid overpowering the cheese’s natural creaminess.
- Mix spices with a small amount of oil or butter before cooking to enhance their aroma and depth.
Organizing Ingredients for Quick Assembly
A well-organized workspace makes the quesadilla assembly process efficient and smooth.
Arranging Ingredients in Order of Use
- Place shredded or sliced cheese in an accessible bowl to ensure even layering.
- Keep tortillas stacked nearby for easy handling.
- Arrange any additional ingredients, such as cooked chicken, sautéed vegetables, or seasonings, in separate bowls for quick assembly.
Preheating the Skillet for Even Cooking
- Use medium heat to prevent burning the tortilla before the cheese melts.
- Lightly coat the pan with butter or oil to ensure a crisp, golden texture.
- Allow the skillet to reach the right temperature before assembling the quesadilla to create an even, well-cooked result.
Would you like any additional preparation techniques or ingredient variations included?
Step 2: Heating Your Skillet to Get a Perfectly Crisped Tortilla
The Importance of Proper Skillet Heating
Achieving a crispy, golden-brown tortilla starts with properly heating your skillet. If the skillet is too cold, the tortilla will absorb excess fat and become greasy instead of crispy. If it is too hot, the tortilla may burn before the cheese fully melts. The key is to find the right balance of heat and timing to ensure an evenly crisped tortilla while allowing the filling to warm through.
Choosing the Right Skillet for Cooking Quesadillas
The type of skillet you use plays a significant role in how well your quesadilla cooks. Different materials retain and distribute heat differently, impacting the final texture.
Cast-Iron Skillet
- Best for achieving a crisp exterior due to its ability to retain high heat.
- Provides even heating, reducing the risk of hot spots that could burn the tortilla.
- Requires preheating for at least 5 minutes before cooking to ensure consistent results.
Nonstick Skillet
- Prevents tortillas from sticking, making it a good option for low-fat cooking with minimal oil or butter.
- Heats quickly but may not retain heat as well as cast iron, requiring slightly longer cooking times to develop crispiness.
Stainless Steel Skillet
- Heats quickly and evenly but requires careful monitoring to prevent burning.
- Works best with a small amount of oil or butter to prevent sticking.
How to Preheat Your Skillet for the Best Results
Properly preheating the skillet ensures that the tortilla cooks evenly, crisps up well, and does not absorb excess oil or butter.
Setting the Right Heat Level
- Use medium heat to allow gradual browning without burning.
- Avoid high heat, as it can scorch the tortilla before the cheese melts properly.
- If using a cast-iron skillet, allow it to preheat for 4 to 5 minutes before adding the tortilla.
Testing the Heat Before Cooking
- Sprinkle a few drops of water onto the skillet; if they sizzle and evaporate immediately, the skillet is ready.
- For added accuracy, place a small tortilla piece on the skillet; if it sizzles gently and browns within 30 seconds, the heat is ideal.
Using Butter or Oil for a Crispier Finish
Adding a thin layer of butter or oil before placing the tortilla in the skillet enhances its texture, flavor, and color.
Butter for a Rich, Golden Crisp
- Adds a rich, slightly nutty flavor to the tortilla.
- Helps develop a golden-brown, crispy texture.
- Should be brushed lightly onto the skillet or tortilla to prevent excess grease.
Oil for a Crunchier Texture
- Creates a lighter, extra-crispy crust without adding strong flavors.
- Works well for corn tortillas, helping them stay pliable while crisping up.
- A small amount of avocado oil, vegetable oil, or olive oil should be spread evenly across the skillet.
Combination of Butter and Oil
- Using both butter and oil combines the rich flavor of butter with the high heat stability of oil.
- Prevents burning while maintaining a golden, crispy exterior.
- Best for achieving maximum crunch and flavor balance.
Ensuring Even Cooking While Heating the Tortilla
- Place the tortilla onto the preheated skillet and let it cook undisturbed for 30 to 45 seconds.
- If using butter, allow it to lightly bubble under the tortilla, creating a crispier surface.
- Rotate the tortilla slightly while cooking to ensure even heat distribution.
- Flip when the bottom is golden brown and slightly crispy, ensuring that both sides develop an even crust.
Would you like more details on cooking techniques or troubleshooting common issues?
Step 3: Cooking and Flipping for a Golden, Melty Quesadilla
The Key to Even Cooking
Once the tortilla is placed in the preheated skillet, proper cooking techniques ensure that the cheese melts evenly while the tortilla develops a crispy, golden-brown texture. Controlling heat and timing is essential to prevent burning while ensuring the cheese achieves the perfect gooey consistency.
Layering the Cheese and Other Ingredients
For the best results, ingredients should be arranged properly to allow even melting and distribution.
Evenly Spreading the Cheese
- Sprinkle Chihuahua cheese evenly across the tortilla, covering the surface but leaving a half-inch border around the edges to prevent overflow.
- Use a moderate amount of cheese to ensure proper melting without overwhelming the tortilla.
- If using sliced cheese, place the slices evenly to prevent gaps in the melt.
Adding Other Ingredients Without Overloading
- Distribute any additional ingredients thinly and evenly over the cheese to ensure they heat through.
- Avoid piling on too many toppings, as excessive filling can prevent proper folding and flipping.
- If using meats or vegetables, pre-cook them to avoid excess moisture release during cooking.
Letting the Quesadilla Cook Before Flipping
Once assembled, the quesadilla should be allowed to cook undisturbed to achieve the best texture.
Cooking the First Side
- Allow the quesadilla to cook for one to two minutes over medium heat.
- Monitor the bottom tortilla for golden-brown spots as a sign of even crisping.
- If the cheese is not melting quickly enough, lower the heat slightly and cover the skillet for 30 seconds to trap heat.
Checking for Readiness to Flip
- Slide a spatula under the quesadilla and lift slightly to check for browning.
- If the tortilla still feels soft, give it another 30 seconds to firm up.
- If the tortilla crisps too quickly while the cheese is still unmelted, lower the heat to prevent burning.
The Best Way to Flip a Quesadilla
Flipping requires care to avoid spilling the filling or breaking the tortilla. Using the right technique ensures that the quesadilla stays intact while achieving even cooking on both sides.
Using the Right Tool for Flipping
- A wide, flat spatula works best for single tortilla quesadillas to lift and flip without tearing.
- If cooking a folded quesadilla, a second spatula or tongs can help support the top while flipping.
Flipping Techniques for a Perfect Turn
- For a whole tortilla quesadilla: Place a second plate or pan over the quesadilla, invert it onto the plate, then slide it back onto the skillet.
- For a folded quesadilla: Carefully lift the edge with the spatula and flip it over in a quick, controlled motion.
Cooking the Second Side
Once flipped, the second side requires a slightly shorter cooking time to achieve crispiness without overcooking.
Ensuring an Even Cook on the Second Side
- Cook for one to one and a half minutes, checking for even browning.
- If needed, press down lightly with a spatula to ensure direct contact with the skillet, which helps with crisping.
- Rotate the quesadilla slightly if one side is browning faster than the other.
Final Melt Check
- Gently press the top of the quesadilla to see if the cheese is fully melted.
- If additional melting is needed, lower the heat and cover the skillet for another 30 seconds.
Removing and Resting the Quesadilla Before Serving
Once the quesadilla reaches the desired crispness, it should be removed from the skillet carefully to maintain its shape.
Allowing the Quesadilla to Rest
- Let the quesadilla sit for one to two minutes before slicing, which helps the cheese set slightly and prevents it from spilling out.
- Place the quesadilla on a cutting board rather than a plate to avoid trapping steam underneath.
Cutting and Serving Suggestions
- Use a sharp knife or pizza cutter to slice into triangles or squares.
- Serve immediately while the cheese is at its peak gooey texture.
Would you like any additional details on troubleshooting common cooking issues?
Pro Tips to Make Your Quesadillas Extra Crispy and Delicious
The Secret to Melting Chihuahua Cheese Evenly
Why Proper Melting Matters
Chihuahua cheese is known for its smooth, creamy melt, but improper melting techniques can result in uneven textures, clumping, or overcooked spots. Achieving a perfectly melted consistency requires careful attention to heat, preparation, and cooking method to enhance the flavor and texture of the quesadilla.
Choosing the Right Form of Chihuahua Cheese
The way Chihuahua cheese is prepared before cooking plays a crucial role in how evenly it melts.
Shredded vs. Sliced Cheese
- Shredded cheese melts faster and more evenly because it has a greater surface area exposed to heat.
- Sliced cheese takes slightly longer to melt but provides a thicker, creamier texture when heated properly.
Avoiding Pre-Packaged Shredded Cheese
- Many store-bought shredded cheeses contain anti-caking agents that can hinder smooth melting.
- Freshly shredded cheese melts more consistently and avoids a grainy or dry texture.
Optimizing Heat Levels for Proper Melting
Chihuahua cheese melts best at a moderate, controlled temperature to avoid burning the tortilla before the cheese is fully melted.
Using Low to Medium Heat
- Too high heat can cause the tortilla to burn while the cheese remains unmelted.
- Too low heat can result in a soft, undercooked tortilla without achieving the desired crispiness.
- Cooking on medium heat allows for gradual, even melting while crisping the tortilla to perfection.
Using a Lid for Faster Melting
- Covering the skillet with a lid or foil for 30 seconds to 1 minute helps trap heat, encouraging the cheese to melt fully.
- If using a lid, periodically check to prevent condensation from making the tortilla soggy.
Layering Techniques for Even Melting
Proper cheese placement in the quesadilla ensures that it melts uniformly without pooling or clumping in one area.
Distributing Cheese Evenly
- Spread the cheese in a thin, even layer across the tortilla, leaving a small border around the edges to prevent overflow.
- If using sliced cheese, slightly overlap the slices to prevent gaps while melting.
Layering Cheese Around Other Ingredients
- If adding proteins or vegetables, place half of the cheese below the fillings and the other half on top to ensure complete coverage.
- Avoid overloading the quesadilla with thick layers of cheese, which can cause uneven melting and make flipping difficult.
Preventing Common Melting Issues
Even with the right technique, Chihuahua cheese may sometimes melt unevenly, become oily, or fail to melt properly. Understanding these common issues helps in adjusting the method for a perfectly melted quesadilla.
Why Does Cheese Melt Unevenly?
- Uneven heat distribution in the skillet may cause some areas to melt faster than others.
- Overly thick cheese layers take longer to melt and may not heat through completely.
- Dry, pre-shredded cheese may contain starches that interfere with smooth melting.
How to Fix It
- Rotate the quesadilla in the pan to evenly expose all sides to heat.
- Lower the heat slightly and cover the pan if the cheese is melting too slowly.
- Use a small amount of butter or oil to help conduct heat and aid in smooth melting.
Would you like additional troubleshooting tips or alternative melting methods?
How to Prevent a Soggy Quesadilla
Understanding the Causes of a Soggy Quesadilla
A well-made quesadilla should have a crispy, golden exterior with a gooey, melted cheese filling. However, improper cooking techniques or ingredient choices can result in a soggy, unappetizing texture. Identifying the causes of excess moisture and learning how to control them is essential for achieving a perfect quesadilla.
Controlling Moisture from Ingredients
Excess moisture from certain ingredients can make the tortilla damp, preventing it from crisping properly.
Draining Cooked Vegetables Properly
- Vegetables like mushrooms, onions, and bell peppers release water when cooked, which can seep into the tortilla.
- Sauté vegetables separately before adding them to the quesadilla to evaporate excess moisture.
- After cooking, pat vegetables dry with a paper towel to remove any remaining liquid.
Using Pre-Cooked Proteins
- Raw meats release juices during cooking, making the quesadilla soggy.
- Use fully cooked and properly drained meats to prevent excess moisture.
- Shredded or grilled chicken, beef, or shrimp should be dried slightly before adding to the quesadilla.
Avoiding Overuse of Watery Sauces
- Ingredients like salsa, sour cream, or guacamole can introduce extra moisture if added inside the quesadilla.
- Instead, serve these as dipping sauces on the side to keep the tortilla crisp.
Achieving the Right Cooking Temperature
Cooking at the correct heat level ensures that the tortilla crisps up while preventing steam buildup.
Using Medium Heat for Even Cooking
- Cooking on low heat can cause the quesadilla to absorb too much fat, resulting in a soft texture.
- Cooking on high heat can burn the tortilla before the cheese fully melts.
- Medium heat allows gradual crisping while evenly melting the cheese inside.
Preheating the Skillet Before Cooking
- A cold skillet causes the tortilla to soak up oil or butter, making it greasy.
- Preheat the skillet for at least 2 minutes before placing the tortilla in it.
- Test readiness by sprinkling a few drops of water onto the skillet—if they sizzle and evaporate quickly, the pan is hot enough.
Using the Right Amount of Fat for Crispiness
The type and amount of fat used in cooking can determine whether the quesadilla turns out crispy or greasy.
Avoiding Too Much Butter or Oil
- While butter adds flavor, excessive use can create a greasy, soggy tortilla.
- Use just enough to lightly coat the skillet, about ½ teaspoon per quesadilla.
Using the Right Type of Fat
- Butter: Adds a rich flavor but should be used sparingly to prevent greasiness.
- Vegetable or canola oil: Provides even browning and a crisp texture.
- Avocado oil: A good high-heat option that prevents sogginess while maintaining crispiness.
Cooking Techniques to Maintain Crispness
How the quesadilla is assembled and flipped during cooking affects its final texture.
Flipping at the Right Time
- Flip only once, after the bottom side has turned golden brown and the cheese has started melting.
- Flipping too soon prevents the tortilla from crisping, while flipping too late can cause burning.
Letting the Quesadilla Rest Before Cutting
- Cutting the quesadilla immediately after removing it from the skillet releases steam, softening the tortilla.
- Allow the quesadilla to rest for 1 to 2 minutes before slicing to preserve its crispiness.
Would you like additional troubleshooting tips or alternative cooking methods?
Best Cooking Methods: Cast-Iron Skillet vs. Nonstick Pan
Choosing the Right Pan for Cooking Quesadillas
The type of pan used for cooking quesadillas significantly affects the texture, crispiness, and even cooking of the tortilla and cheese. Cast-iron skillets and nonstick pans are the most commonly used options, each offering distinct advantages and drawbacks. Selecting the best one depends on heat retention, durability, and cooking technique.
Cooking with a Cast-Iron Skillet
A cast-iron skillet is widely regarded as the best choice for making crispy, evenly browned quesadillas due to its ability to retain and distribute heat effectively.
Advantages of Using a Cast-Iron Skillet
- Superior heat retention ensures even browning and crispiness.
- Naturally nonstick surface when properly seasoned, reducing the need for excessive oil or butter.
- Heavy construction allows for pressing the quesadilla down without warping the pan.
- Versatile for high-heat cooking, making it suitable for various fillings and cheese types.
Challenges of Using a Cast-Iron Skillet
- Requires preheating for at least 5 minutes to ensure even cooking.
- Heavyweight makes flipping the quesadilla slightly more challenging.
- Needs regular seasoning and maintenance to maintain its nonstick properties.
Best Practices for Cooking Quesadillas in a Cast-Iron Skillet
- Preheat the skillet on medium heat for even heat distribution.
- Use a small amount of butter or oil to create a golden, crisp exterior.
- Cook each side for 1 to 2 minutes, ensuring the cheese melts evenly without burning the tortilla.
- Avoid washing with soap; instead, wipe clean with a dry towel after cooking to maintain seasoning.
Cooking with a Nonstick Pan
A nonstick pan is a more convenient and beginner-friendly option for making quesadillas. It allows for easy flipping and minimal sticking, making it a practical choice for quick preparation.
Advantages of Using a Nonstick Pan
- No seasoning or maintenance required, making it easier to clean.
- Lightweight and easy to handle, allowing for effortless flipping.
- Requires less butter or oil, making it a good option for lighter quesadillas.
- Heats up quickly, reducing overall cooking time.
Challenges of Using a Nonstick Pan
- Less heat retention than cast iron, which can result in an unevenly crisped tortilla.
- Cannot withstand high-heat cooking, limiting browning potential.
- Nonstick coating can wear off over time, requiring replacement.
Best Practices for Cooking Quesadillas in a Nonstick Pan
- Preheat the pan on medium-low heat to prevent burning while allowing the cheese to melt fully.
- Use a thin layer of oil or butter to enhance crispiness without over-greasing.
- Cook each side for 2 to 3 minutes, flipping only once for even browning.
- Use silicone or wooden utensils to prevent scratching the nonstick surface.
Which Cooking Method is Best?
Both cast-iron skillets and nonstick pans can be used for cooking quesadillas, but the choice depends on the desired texture and ease of use.
Use a Cast-Iron Skillet If:
- You prefer extra-crispy, restaurant-style quesadillas.
- You want even browning and a more traditional cooking method.
- You do not mind preheating and maintaining the pan properly.
Use a Nonstick Pan If:
- You want a quicker and easier cooking process.
- You prefer less fat in your cooking without sacrificing texture.
- You need a lightweight pan for easier flipping.
Would you like additional details on alternative cooking methods, such as griddles or oven-baking?
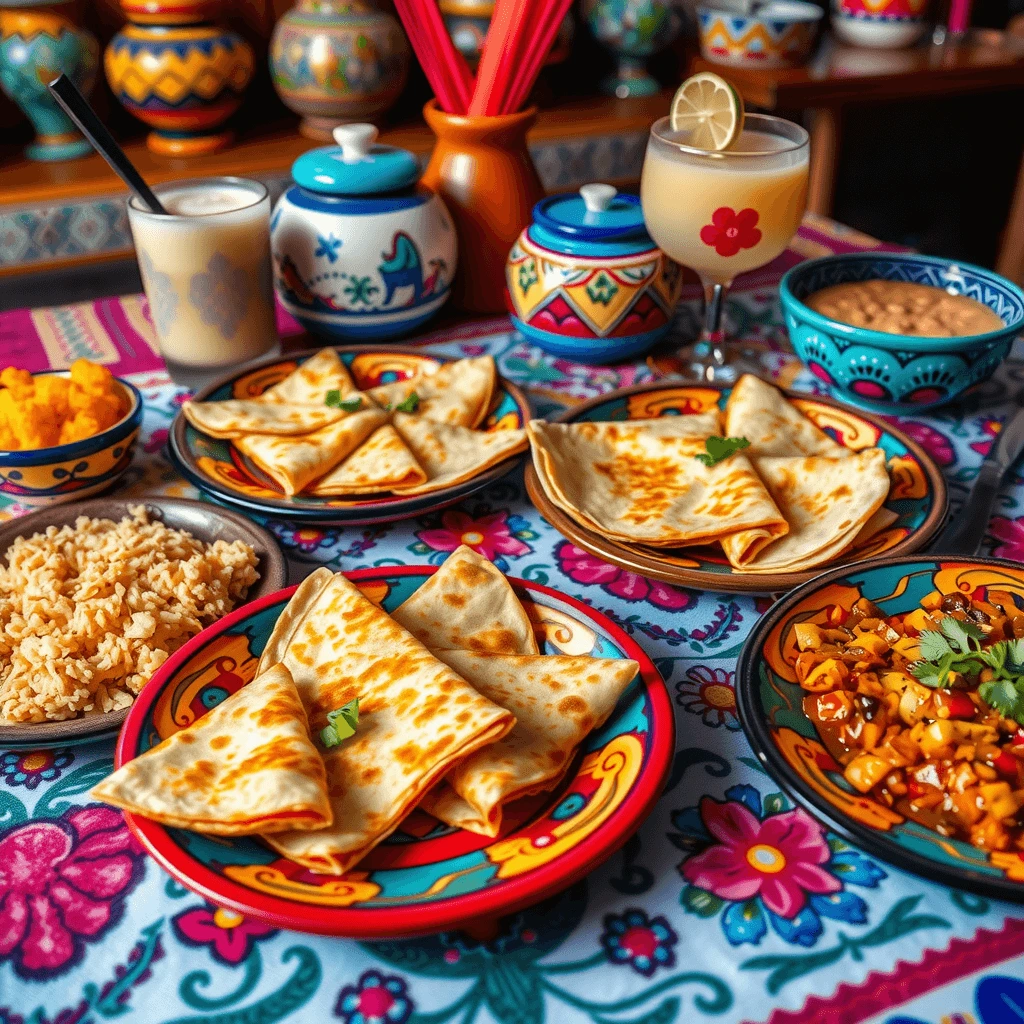
What to Serve with Chihuahua Cheese Quesadillas
To complement the crispy, cheesy goodness of Chihuahua cheese quesadillas, consider pairing them with traditional sides like Mexican rice, refried beans, or fresh guacamole. For a refreshing beverage, try making homemade horchata, a lightly sweetened rice-based drink that balances the rich flavors of the quesadillas. Adding a side of fire-roasted salsa or pickled jalapeños can also enhance the meal with a touch of spice.
Best Dipping Sauces: Salsa, Guacamole, and Sour Cream
Why Dipping Sauces Enhance Quesadillas
A well-made quesadilla has a crispy exterior and a gooey, flavorful cheese filling, but pairing it with the right dipping sauce enhances both the taste and texture. The contrast between the warm, cheesy quesadilla and the cool, tangy, or spicy dipping sauce creates a more dynamic and satisfying eating experience.
Salsa: A Classic and Flavorful Option
Salsa is one of the most traditional accompaniments to quesadillas. Made from fresh ingredients like tomatoes, onions, cilantro, and chili peppers, it provides a balance of acidity, spice, and freshness.
Types of Salsa to Pair with Quesadillas
- Salsa Roja: A traditional red salsa made with tomatoes, garlic, onions, and chili peppers. It has a slightly tangy and smoky flavor that pairs well with the creamy texture of Chihuahua cheese.
- Salsa Verde: Made from tomatillos, green chilies, and cilantro, this salsa has a slightly tart and herby taste that complements the richness of a cheese quesadilla.
- Pico de Gallo: A fresh salsa made with chopped tomatoes, onions, cilantro, and lime juice. It provides a crunchy texture and a bright, citrusy flavor.
- Fire-Roasted Salsa: This salsa is made by charring tomatoes and peppers over an open flame before blending, creating a deep, smoky taste that enhances the quesadilla’s flavors.
How to Serve Salsa with Quesadillas
- Serve warm or chilled, depending on the flavor contrast desired.
- Drizzle over the quesadilla or serve on the side for dipping.
- Adjust the spice level by adding more or fewer chili peppers.
Guacamole: A Creamy and Flavorful Addition
Guacamole is a rich and creamy avocado-based dip that adds a buttery texture to quesadillas. It balances the crispiness of the tortilla with a smooth, slightly tangy, and mildly spicy taste.
Key Ingredients for the Best Guacamole
- Ripe avocados: The base of the dip, providing a creamy texture.
- Lime juice: Enhances freshness and prevents the avocados from browning.
- Cilantro and onions: Add a subtle herbaceous and slightly sharp flavor.
- Jalapeños or serrano peppers: Give the guacamole a mild heat that pairs well with the cheese.
- Tomatoes (optional): Add extra texture and a hint of sweetness.
Best Ways to Serve Guacamole with Quesadillas
- Serve as a side dip for each bite of quesadilla.
- Spread a thin layer inside the quesadilla before folding for extra creaminess.
- Use as a topping along with fresh herbs or additional cheese.
Sour Cream: A Cooling and Tangy Contrast
Sour cream is one of the simplest yet most effective dips for quesadillas. Its cool, tangy flavor cuts through the richness of the cheese, balancing the overall taste.
Why Sour Cream Works Well with Quesadillas
- Adds a smooth, cooling contrast to spicy or savory fillings.
- Enhances the creaminess of melted Chihuahua cheese without overpowering it.
- Can be combined with herbs or spices to create flavored sour cream dips.
Variations of Sour Cream-Based Dips
- Lime Crema: A mix of sour cream, lime juice, and zest for a citrusy, refreshing dip.
- Chipotle Sour Cream: Blended with chipotle peppers for a smoky and slightly spicy touch.
- Garlic and Herb Sour Cream: Infused with garlic powder, chives, and parsley for a richer flavor.
How to Serve Sour Cream with Quesadillas
- Spoon a small dollop on each quesadilla slice before serving.
- Offer as a side dip along with guacamole and salsa for variety.
- Mix with shredded cheese and spread inside the quesadilla before cooking for extra creaminess.
Pairing Different Sauces for Maximum Flavor
While each dip is delicious on its own, combining them can create a layered and well-rounded flavor profile.
Best Sauce Combinations
- Salsa and Sour Cream: The acidity of salsa pairs well with the cooling effect of sour cream.
- Guacamole and Salsa Verde: The creaminess of guacamole balances the tartness of green salsa.
- Chipotle Sour Cream and Fire-Roasted Salsa: A smoky, spicy pairing that enhances grilled quesadillas.
Would you like additional details on homemade salsa or guacamole recipes?
Side Dishes to Complete Your Meal: Mexican Rice, Refried Beans
The Importance of Side Dishes in a Quesadilla Meal
Quesadillas are a satisfying dish on their own, but pairing them with the right side dishes enhances the meal, providing additional textures, flavors, and nutritional balance. As two of the most traditional and complementary sides, Mexican rice and refried beans bring savory depth and heartiness to the meal. Their rich flavors enhance the crispy, cheesy quesadilla, creating a well-rounded and satisfying dining experience.
Mexican Rice: A Flavorful and Aromatic Companion
Mexican rice, also known as arroz rojo, is a staple in Mexican cuisine. It is cooked with tomatoes, onions, garlic, and spices, giving it a distinct flavor that enhances any meal.
Key Ingredients in Mexican Rice
- Long-grain white rice: The base of the dish, chosen for its ability to absorb flavors.
- Tomato sauce or fresh tomatoes: Adds a slightly sweet and tangy taste.
- Garlic and onions: Provide a savory depth that balances the dish.
- Chicken or vegetable broth: Infuses the rice with rich, seasoned flavors.
- Cumin and chili powder: Give the rice its warm, slightly smoky essence.
- Peas, carrots, or bell peppers (optional): Add color and texture to the dish.
How to Prepare Authentic Mexican Rice
- Toast the rice in a small amount of oil over medium heat until it turns golden brown.
- Blend tomatoes, garlic, and onions into a smooth sauce or use store-bought tomato sauce.
- Simmer the rice with the tomato mixture and broth until fully absorbed.
- Fluff with a fork before serving to maintain a light, airy texture.
Best Ways to Serve Mexican Rice with Quesadillas
- Serve as a side dish with a garnish of fresh cilantro.
- Mix with black beans or corn for added variety.
- Use as a filling inside the quesadilla for a heartier meal.
Refried Beans: A Creamy and Hearty Side Dish
Refried beans, or frijoles refritos, are another traditional Mexican side that pairs well with quesadillas. They offer a creamy, savory contrast to the crispy tortilla and melted cheese.
Key Ingredients in Refried Beans
- Pinto or black beans: The main ingredient, providing a rich, earthy flavor.
- Lard or vegetable oil: Helps develop a creamy texture and enhances taste.
- Onions and garlic: Add depth and aromatic qualities.
- Cumin and chili powder: Infuse warmth and a mild spice.
- Cheese (optional): Adds extra richness and flavor when melted into the beans.
How to Prepare Traditional Refried Beans
- Cook the beans until tender, using dried or canned beans.
- Sauté onions and garlic in oil or lard for additional flavor.
- Mash the beans while cooking, adding broth or water for a creamy consistency.
- Simmer and stir until the beans reach the desired thickness.
Best Ways to Serve Refried Beans with Quesadillas
- Spread a thin layer of beans inside the quesadilla before cooking.
- Serve as a side dish with crumbled queso fresco or cheddar cheese on top.
- Use as a dip for the quesadilla, paired with salsa or guacamole.
Pairing Mexican Rice and Refried Beans for a Complete Meal
Serving both Mexican rice and refried beans alongside quesadillas creates a balanced meal with a mix of textures and flavors.
Why This Combination Works
- The fluffiness of the rice complements the creaminess of the beans.
- The seasoned rice enhances the mild flavor of the quesadilla.
- The fiber and protein in beans make the meal more filling and nutritious.
Would you like additional details on variations of Mexican rice or refried beans?
Perfect Drink Pairings: Aguas Frescas, Margaritas, and More
Why Drink Pairings Matter
The right drink can enhance the flavors of a quesadilla, balancing its cheesy richness, crispy texture, and savory fillings. Whether you prefer a refreshing non-alcoholic option or a bold, spirited cocktail, choosing the right beverage can elevate the dining experience.
Aguas Frescas: A Refreshing Non-Alcoholic Option
Aguas frescas are light, naturally sweetened fruit-based beverages that pair well with the warm, crispy flavors of quesadillas. Their cooling effect and bright flavors make them a popular choice in Mexican cuisine.
Popular Aguas Frescas to Pair with Quesadillas
- Horchata: A rice-based drink flavored with cinnamon and vanilla, offering a creamy contrast to the crispiness of a quesadilla.
- Agua de Jamaica: A hibiscus flower infusion with a tart, slightly sweet taste that complements the richness of Chihuahua cheese.
- Agua de Tamarindo: A tamarind-based drink with a balance of sweet and tangy flavors that pairs well with spicy or savory quesadillas.
- Cucumber Lime Agua Fresca: A light and hydrating option that enhances the fresh elements of the meal.
Best Way to Serve Aguas Frescas with Quesadillas
- Serve chilled over ice for maximum refreshment.
- Add a slice of lime or a sprig of mint for extra freshness.
- Sweeten with natural sweeteners like honey or agave syrup instead of processed sugar.
Margaritas: A Classic Cocktail Pairing
Margaritas are one of the most iconic Mexican cocktails, offering a balance of citrus acidity, slight sweetness, and a hint of tequila. They provide a refreshing contrast to the warm, cheesy quesadilla.
Best Margarita Variations for Quesadillas
- Classic Lime Margarita: A blend of tequila, lime juice, and triple sec, offering a bright, zesty flavor that cuts through the richness of cheese.
- Spicy Jalapeño Margarita: Infused with fresh jalapeño slices, adding a touch of heat that pairs well with bold quesadilla fillings.
- Mango Margarita: A slightly sweeter option that complements quesadillas with chicken or vegetables.
- Frozen Strawberry Margarita: A blended cocktail with a fruity and refreshing taste, perfect for pairing with a crispy quesadilla.
How to Serve Margaritas for the Best Flavor
- Use freshly squeezed lime juice instead of bottled versions for a brighter taste.
- Rim the glass with salt or Tajín seasoning for an extra flavor boost.
- Serve over crushed ice or blended with ice for a smoother, chilled experience.
Other Great Beverage Options
For those looking for alternative drink options, there are several traditional and modern choices that enhance the quesadilla experience.
Mexican Beer Pairings
- Corona or Pacifico: Light lagers that offer a crisp, refreshing contrast to the cheesy filling.
- Negra Modelo: A darker beer with caramel notes, pairing well with heartier quesadilla fillings like beef or mushrooms.
- Dos Equis Amber: A balanced beer with a mild maltiness that enhances the smoky flavors of grilled quesadillas.
Non-Alcoholic Mexican Sodas
- Jarritos (Various Flavors): Fruity, lightly carbonated drinks available in flavors like tamarind, pineapple, and guava.
- Topo Chico: A sparkling mineral water that cleanses the palate between bites.
- Mexican Coke: Sweetened with cane sugar, offering a richer, more authentic cola flavor.
Tequila or Mezcal for a Bold Pairing
- Straight Tequila (Reposado or Añejo): Sipped slowly, it enhances the depth of flavors in the quesadilla.
- Mezcal with Citrus Garnish: A smoky, complex spirit that pairs well with quesadillas featuring roasted vegetables or meats.
Choosing the Best Drink Based on the Quesadilla Type
The best drink pairing can depend on the style and ingredients of the quesadilla.
Classic Cheese Quesadillas
- Aguas frescas like horchata or hibiscus tea complement the creamy texture.
- A classic lime margarita provides a refreshing contrast.
Spicy or Meat-Filled Quesadillas
- A spicy jalapeño margarita enhances the heat.
- Mexican beer like Dos Equis Amber balances the savory flavors.
Vegetarian Quesadillas with Grilled Vegetables
- Tamarind agua fresca offers a sweet and tangy balance.
- A mango margarita complements the natural sweetness of vegetables.
Would you like additional details on homemade beverage recipes or more pairing suggestions?