
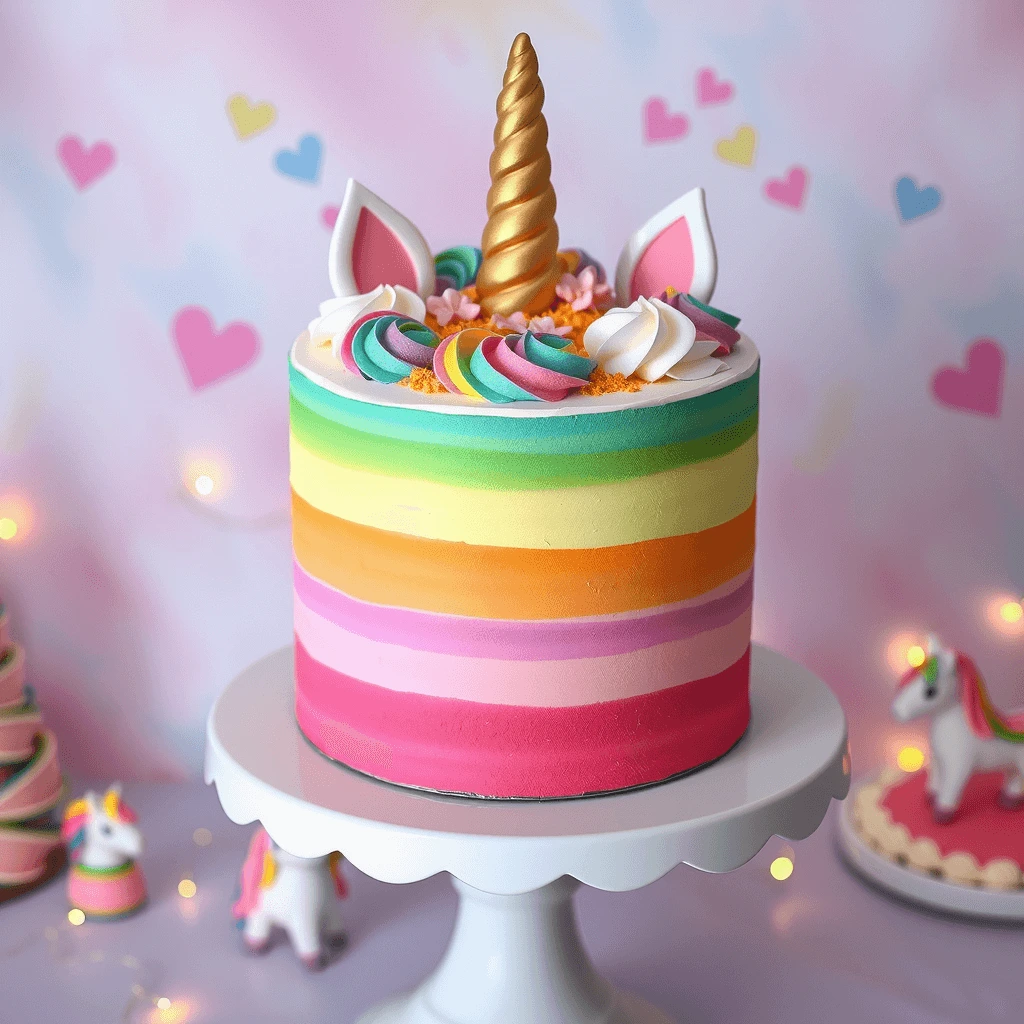
Few desserts bring as much joy and magic to a celebration as a fluffy and colorful unicorn cake. With its fluffy layers, vibrant colors, and whimsical decorations, it’s the perfect centerpiece for a kid’s birthday party, baby shower, or any event that calls for a touch of enchantment. But for many home bakers, the idea of creating a show-stopping unicorn cake can feel daunting. That’s where this no-fail recipe for a fluffy and colorful unicorn cake comes in—designed to make your baking journey fun, stress-free, and completely magical.
This guide will walk you through every step of the process, from preparing fluffy, delicious cake layers to decorating with colorful frosting and glittery accents. Whether you’re a beginner in the kitchen or an experienced baker looking to add a bit of whimsy to your repertoire, you’ll find all the tips and tricks you need to create a stunning unicorn cake that’s as delightful to look at as it is to eat.
Get ready to unleash your creativity, impress your guests, and make memories as you craft a dessert that’s truly one-of-a-kind. Let’s dive in and start baking your fluffy, colorful unicorn masterpiece!
What Makes a Fluffy and Colorful Unicorn Cake?
A perfect unicorn cake combines vibrant colors, fluffy layers, and magical decorations. From mastering even layers to stunning buttercream designs, every detail matters. For expert tips, check out King Arthur Baking’s cake baking guide, Wilton’s buttercream frosting tricks, or The Spruce Eats’ guide to vibrant cake colors.
The Importance of Fluffiness and Texture in a Fluffy and Colorful Unicorn Cake
Achieving the perfect fluffy and colorful unicorn cake requires more than just a good recipe. The texture plays a crucial role in creating a cake that is light, airy, and visually stunning. Understanding the science behind fluffiness and the factors that influence texture will ensure success in baking the perfect unicorn cake.
Why Fluffiness Matters in a Unicorn Cake
Fluffiness enhances the overall experience of a unicorn cake, making each bite soft and delicate. A well-textured cake absorbs flavors better, holds its structure while remaining light, and complements the creamy richness of the frosting. The right balance of airiness and moisture ensures that the cake is not too dense or dry.
The Science of Cake Fluffiness
Fluffiness in cakes is achieved through a combination of proper ingredient selection, precise mixing techniques, and controlled baking conditions. The key lies in creating and maintaining air pockets throughout the batter, which expand during baking to give the cake its signature light texture.
The Role of Air Incorporation
Incorporating air into the batter is fundamental to achieving a light and fluffy unicorn cake. Air pockets expand during baking, creating the characteristic soft crumb. Proper aeration techniques ensure that the cake rises evenly without becoming too dense or collapsing.
- Creaming butter and sugar traps air bubbles, helping to create a light texture.
- Whipping eggs separately before folding them into the batter adds additional air.
- Overmixing can deflate air pockets, resulting in a denser cake.
Selecting the Right Ingredients for Fluffiness
Choosing the right ingredients is essential to achieving the desired texture. The balance between fat, protein, and leavening agents determines how light and airy the cake will be.
Choosing the Best Flour for a Soft Crumb
Flour provides the structure of the cake, but the type of flour used affects its texture.
- Cake flour has a lower protein content, reducing gluten formation and creating a softer crumb.
- All-purpose flour contains more protein, which can make the cake denser if overmixed.
- A homemade cake flour substitute can be made by replacing two tablespoons of all-purpose flour with cornstarch per cup.
The Importance of Sifting Flour
Sifting flour aerates it, making it lighter and easier to incorporate into the batter. This simple step prevents lumps and ensures even mixing, contributing to a finer crumb.
- Sift flour at least twice for the best results.
- Combine flour with leavening agents before sifting to ensure even distribution.
The Role of Eggs in Achieving a Fluffy Cake
Eggs provide structure, moisture, and richness while contributing to the cake’s fluffiness.
- Beating eggs separately before adding them to the batter increases aeration.
- Using room-temperature eggs helps them incorporate more evenly into the batter.
- Egg whites can be whipped to stiff peaks and folded in for an extra-light texture.
Whole Eggs vs. Whipped Egg Whites
- Whole eggs add richness and structure, preventing the cake from becoming too fragile.
- Whipped egg whites create an airy texture, making the cake exceptionally light.
- A combination of both methods results in a balanced, fluffy texture.
Understanding the Impact of Leavening Agents
Leavening agents play a critical role in how much the cake rises. Properly measuring and incorporating these ingredients ensures an even, fluffy texture.
Baking Powder vs. Baking Soda
Both baking powder and baking soda contribute to the rise of the cake, but they work in different ways.
- Baking powder provides a steady, controlled rise and is best for neutral batters.
- Baking soda reacts with acidic ingredients such as buttermilk or yogurt, giving an extra lift.
- Some recipes use both to achieve the perfect balance of structure and fluffiness.
Ensuring Proper Leavening
- Always check the expiration date of baking powder and baking soda, as expired agents lose effectiveness.
- Measure precisely, as too much leavening can cause the cake to rise too quickly and then collapse.
- Sift leavening agents with the flour to distribute them evenly throughout the batter.
Mastering Mixing Techniques for a Light Cake
Mixing plays a crucial role in determining the final texture of the cake. The method used affects how much air remains in the batter.
The Importance of Creaming Butter and Sugar
Creaming butter and sugar together incorporates air into the batter, helping to create a light texture.
- Beat butter and sugar together for at least three to five minutes until pale and fluffy.
- Use room-temperature butter to allow for better air incorporation.
- Over-creaming can cause the cake to collapse, while under-creaming can result in a dense texture.
Avoiding Overmixing
Once the flour is added, mixing should be done with care to avoid overdeveloping gluten.
- Use a gentle folding technique to combine dry and wet ingredients.
- Stop mixing as soon as the ingredients are incorporated.
- Overmixing leads to a tough, chewy cake instead of a soft, fluffy one.
Baking Techniques for the Perfect Texture
The baking process itself greatly influences the final outcome. Even with the best batter, improper baking can lead to a dry or dense cake.
Controlling the Oven Temperature
- Bake at 325-350°F (163-177°C) to ensure even rising and prevent overcooking.
- Use an oven thermometer to check accuracy, as some ovens run hotter or colder than their settings.
- Avoid opening the oven door frequently, as temperature fluctuations can cause the cake to sink.
Choosing the Right Cake Pan
The type of pan used affects how the cake bakes and rises.
- Aluminum cake pans distribute heat evenly and prevent over-browning.
- Dark-colored or glass pans absorb more heat, which can cause uneven baking.
- Greasing and flouring the pans properly ensures easy cake release without disrupting the texture.
Cooling and Storing the Cake to Maintain Fluffiness
Even after baking, how the cake is cooled and stored impacts its texture. Proper cooling prevents excess moisture loss, while correct storage keeps it fresh for longer.
Proper Cooling Techniques
- Allow the cake to cool in the pan for 10 minutes before transferring it to a wire rack.
- Cooling too quickly can cause the cake to contract and become dense.
- Covering the cake loosely with a towel while cooling helps retain moisture.
Storing for Maximum Freshness
- Wrap cake layers in plastic wrap before storing to prevent drying out.
- If frosting later, store the layers at room temperature for up to a day or in the refrigerator for up to three days.
- To freeze, wrap each layer in plastic wrap and place in an airtight container for up to three months.
The Visual and Structural Benefits of a Fluffy Cake
Fluffiness affects more than just taste—it also plays a role in the final presentation of the unicorn cake.
Easier Stacking and Decorating
- A stable, fluffy cake allows for smooth stacking without sinking.
- Even layers create a professional-looking finish.
- A lighter cake absorbs food coloring more evenly, resulting in vibrant hues.
Enhancing the Frosting and Decoration
- A fluffy cake provides a better surface for buttercream frosting.
- The airy texture balances the richness of the frosting, preventing the cake from feeling too heavy.
- Proper texture ensures that decorations stay in place without sinking.
Mastering how to make a fluffy and colorful unicorn cake requires attention to every detail, from ingredient selection to baking and storage. By following these expert techniques, a unicorn cake can be both visually enchanting and irresistibly light. Whether for a birthday celebration or a whimsical event, the perfect fluffy unicorn cake will impress and delight every guest.rance. After all, a cake that looks magical deserves to feel magical with every bite!
The Role of Vibrant, Magical Colors in a Fluffy and Colorful Unicorn Cake
When learning how to make a fluffy and colorful unicorn cake, the colors play just as vital a role as the texture. A unicorn cake is not just a dessert—it is an edible masterpiece that brings joy, creativity, and magic to any celebration. The combination of fluffy cake layers and bright, vivid colors transforms an ordinary cake into an extraordinary creation. Understanding how to incorporate vibrant colors effectively will take your unicorn cake from simple to spectacular.
Why Color Matters in a Fluffy and Colorful Unicorn Cake
The essence of a unicorn cake lies in its eye-catching, whimsical colors. Whether it’s a pastel rainbow effect or a bold and dramatic ombré look, the colors set the stage for an enchanting design. The way colors are infused into the cake batter, frosting, and decorations can make a significant difference in the final result.
How Color Enhances the Theme of a Unicorn Cake
- Bright, airy colors add a sense of magic and fantasy.
- Layered hues create a stunning visual effect when the cake is sliced.
- Properly blended shades ensure the cake remains vibrant and appealing.
Psychological Impact of Color in a Unicorn Cake
Colors evoke emotions and can influence how a cake is perceived. A fluffy and colorful unicorn cake should be fun, exciting, and visually engaging.
- Soft pastel shades create a dreamy, fairytale-like quality.
- Bright, neon colors give a modern and playful feel.
- A well-balanced combination of colors ensures the cake is visually striking without being overwhelming.
Choosing the Best Food Coloring for a Fluffy and Colorful Unicorn Cake
Selecting the right type of food coloring is essential to achieving bold, lasting colors that won’t fade or affect the cake’s texture. Different types of food colorings have unique properties that determine how well they integrate into the batter and frosting.
Gel vs. Liquid vs. Powder Food Coloring
- Gel food coloring is highly concentrated, requiring only a small amount for vibrant results.
- Liquid food coloring is easier to mix but can thin out the batter if overused.
- Powdered food coloring provides the most intense shades without altering the consistency of the batter or frosting.
Best Food Colorings for Cake Batter and Frosting
- For cake batter: Gel or powdered food coloring is preferred to maintain consistency.
- For frosting: Gel food coloring ensures smooth blending without thinning the buttercream.
- For decorations: Oil-based food coloring works best for chocolate-based decorations.
How to Layer Colors in a Fluffy and Colorful Unicorn Cake
Creating a beautifully layered unicorn cake involves more than just adding color to the batter. Strategic layering techniques ensure a professional and polished appearance.
Rainbow Layers vs. Ombré Effect
- Rainbow Layers: Each layer of cake features a different color, creating a stunning effect when sliced.
- Ombré Effect: Gradually transitioning shades of one color blend seamlessly for a sophisticated look.
Techniques for Evenly Colored Cake Layers
- Divide the batter evenly into separate bowls before adding food coloring.
- Use a kitchen scale to ensure equal amounts of batter for each layer.
- Add food coloring in small increments, mixing thoroughly to achieve the desired shade.
Preventing Color Fading During Baking
- Use gel or powdered food coloring, which is less likely to fade with heat.
- Cover the cake loosely with foil in the final minutes of baking to preserve vibrancy.
- Avoid overbaking, as prolonged heat exposure can dull the colors.
Coloring Buttercream for a Fluffy and Colorful Unicorn Cake
Frosting plays a crucial role in enhancing the visual appeal of a unicorn cake. A smooth, vibrant buttercream finish ties together the magical theme.
Best Methods for Coloring Buttercream
- Start with a white buttercream base for the most vivid color payoff.
- Use gel food coloring to achieve deep, rich hues without altering consistency.
- Allow the frosting to sit for 10-15 minutes after mixing to let the colors develop fully.
Achieving a Multicolor Swirl Effect
- Divide the buttercream into different bowls and add food coloring to each.
- Fill a piping bag with multiple colors placed side by side to create a rainbow effect.
- Pipe in circular motions for a seamless color transition.
Using Edible Decorations to Enhance Color
Beyond colored batter and frosting, edible decorations add the finishing touch to a fluffy and colorful unicorn cake.
Best Edible Decorations for a Unicorn Cake
- Edible Glitter: Adds a shimmering, magical effect.
- Colorful Sprinkles: Provides texture and pops of additional color.
- Gold or Silver Leaf: Enhances elegance and luxury.
How to Apply Decorations for Maximum Impact
- Gently press decorations into the frosting before it sets to ensure they adhere.
- Use a fine brush to apply edible glitter or metallic dust for a precise look.
- Arrange sprinkles in specific patterns or gradients for a more refined aesthetic.
Avoiding Common Color Mistakes in a Fluffy and Colorful Unicorn Cake
Even with the best intentions, mistakes in coloring can affect the final presentation. Understanding how to avoid these issues will help maintain a flawless design.
Preventing Muted or Uneven Colors
- Always mix food coloring thoroughly to prevent streaks.
- Use a toothpick to add small amounts of gel coloring gradually.
- If colors appear too dull, let the batter or frosting sit for a few minutes before adjusting.
Ensuring Consistency Across Layers and Frosting
- Measure food coloring carefully to ensure uniform shades.
- Mix all colors in natural light to see their true tones.
- Refrigerate colored buttercream for 10-15 minutes if it becomes too soft.
Final Touches for a Perfectly Fluffy and Colorful Unicorn Cake
Bringing all the elements together, the final decorations should highlight the vibrancy and fluffiness of the cake.
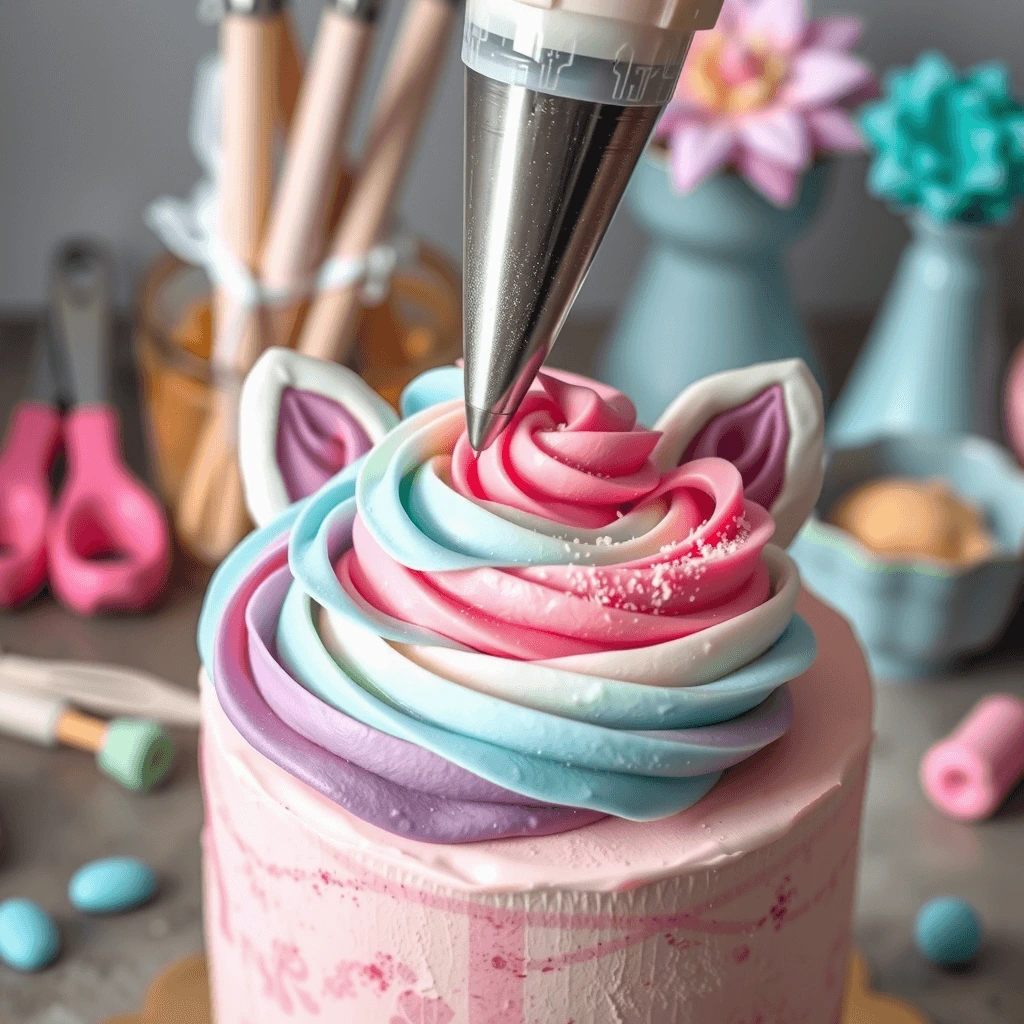
Adding the Unicorn Horn and Ears
- Use fondant or modeling chocolate to craft the unicorn horn and ears.
- Paint with edible gold dust or luster spray for an enchanted look.
- Insert securely into the cake to ensure stability.
Piping the Unicorn Mane with Multicolored Buttercream
- Use star and rosette piping tips for a flowing, whimsical mane.
- Blend pastel and bright colors for depth and contrast.
- Arrange swirls in a cascading pattern to mimic a real mane.
Mastering the role of vibrant, magical colors in a fluffy and colorful unicorn cake takes careful planning and execution. By using the right food colorings, layering techniques, and decorations, it is possible to create a visually stunning and deliciously airy unicorn cake. Whether for a birthday, party, or special event, a perfectly colored unicorn cake will always be the highlight of any celebration.k of the party!
Why This No-Fail Recipe for a Fluffy and Colorful Unicorn Cake Is Perfect for Beginners and Pros Alike
Baking a unicorn cake might seem intimidating at first, but this no-fail recipe ensures success for both beginners and experienced bakers. From achieving a perfectly fluffy texture to mastering vibrant colors and professional-level decorations, this recipe is designed to be approachable yet impressive. Whether you’re making a unicorn cake for the first time or looking to refine your skills, this step-by-step guide guarantees a cake that looks magical and tastes incredible.
The Simplicity of the No-Fail Method
The key to this recipe’s success lies in its foolproof techniques, which eliminate common baking mistakes while maximizing flavor, texture, and visual appeal. Even if you’ve never baked a cake before, following these structured steps will make the process easy and enjoyable.
Easy-to-Follow Instructions for Stress-Free Baking
- Every step is broken down into manageable sections, ensuring clarity.
- Simple techniques are used to create a professional finish without requiring advanced skills.
- The recipe is designed to minimize errors, preventing dry cake, uneven layers, or fading colors.
Baking with Confidence from Start to Finish
- Clear guidelines on measuring ingredients accurately prevent common texture issues.
- A structured mixing method guarantees a fluffy and evenly risen cake.
- Troubleshooting tips help correct any mistakes before they impact the final product.
Why Beginners Will Love This Recipe
If you’re new to baking, this recipe is the perfect introduction to making a fluffy and colorful unicorn cake. It simplifies what could be an overwhelming process into easy, actionable steps that ensure a magical outcome.
Step-by-Step Instructions for Flawless Results
- Straightforward mixing techniques prevent over- or under-mixing, ensuring the ideal cake texture.
- The best food coloring methods are included to achieve bright, fade-resistant colors.
- Easy layering techniques help create a stunning unicorn cake without frustration.
Avoiding Common Beginner Mistakes
- A detailed baking temperature guide prevents burning or undercooking.
- Tips for evenly cooling cake layers ensure a smooth frosting application.
- Storage instructions keep the cake fresh for longer, even if made in advance.
Why Experienced Bakers Will Appreciate This Recipe
For those with baking experience, this recipe offers the opportunity to refine skills and add creative flair. The focus on advanced techniques allows experienced bakers to perfect their unicorn cake while ensuring consistent, high-quality results.
Advanced Techniques for a Professional Finish
- The best mixing methods for maximum fluffiness create an ultra-light texture.
- Professional layering and frosting techniques ensure a bakery-style presentation.
- Customization options allow for unique color palettes and decorative styles.
Perfecting the Art of Cake Decoration
- Detailed piping techniques for a flawless unicorn mane provide creative inspiration.
- Tips for sculpting fondant unicorn horns and ears ensure an elegant finish.
- Guidance on balancing flavors and textures helps create a well-rounded cake.
How This Recipe Guarantees a Fluffy and Colorful Unicorn Cake Every Time
One of the standout features of this no-fail recipe is its reliability. By following each step precisely, the cake will turn out perfectly fluffy, vibrantly colored, and beautifully decorated every single time.
Science-Backed Baking Techniques for Consistency
- Carefully balanced ingredient ratios ensure a light yet stable cake.
- Proper air incorporation techniques prevent a dense texture.
- The best baking and cooling methods preserve moisture and freshness.
Foolproof Methods to Prevent Cake Mishaps
- A structured layering approach keeps the cake from leaning or collapsing.
- Frosting consistency adjustments prevent sliding or melting decorations.
- Easy color-mixing techniques guarantee bold, even shades in every layer.
The Magic of a No-Fail Recipe: Bringing Joy to Every Occasion
A fluffy and colorful unicorn cake is more than just a dessert—it’s a showstopper that creates excitement and delight at any event. Whether baking for a birthday, a celebration, or just for fun, this no-fail recipe ensures that the final result will impress both visually and in taste.
Making Every Occasion Extra Special
- Bright, happy colors make this cake a centerpiece for any party.
- A perfectly balanced flavor ensures that every bite is as delicious as it is beautiful.
- The light, fluffy texture makes it enjoyable for all ages.
Why This Recipe Stands Out Among the Rest
- Unlike many unicorn cake recipes, this one is carefully designed to be both beautiful and easy to execute.
- It balances beginner-friendly simplicity with advanced techniques, making it accessible to all.
- The result is a bakery-quality unicorn cake that can be recreated in any home kitchen.
Mastering the art of how to make a fluffy and colorful unicorn cake has never been easier. With this no-fail recipe, both beginners and experienced bakers can create a stunning, delicious masterpiece with confidence. Whether it’s your first time or your hundredth, this recipe guarantees success every single time.ct for everyone because it strikes the ideal balance between simplicity and creativity. Beginners can follow the steps with confidence, knowing they’ll achieve a magical result, while pros can use the reliable base to unleash their imagination and take the unicorn theme to the next level. Whether it’s your first cake or your fiftieth, this recipe promises a delightful experience and a stunning dessert every time!
Essential Tools and Ingredients for Baking a Fluffy and Colorful Unicorn Cake
When learning how to make a fluffy and colorful unicorn cake, the right tools and ingredients are just as important as the technique. Without them, achieving the perfect light and airy texture, along with the vibrant colors that make a unicorn cake so magical, can be challenging. Therefore, preparing ahead of time ensures that the baking process runs smoothly from start to finish. Whether you are a beginner or an experienced baker, having everything ready will make the process enjoyable and stress-free.
Must-Have Tools for Baking a Fluffy and Colorful Unicorn Cake
To create a stunning and well-structured unicorn cake, certain tools are essential. Using the correct equipment not only simplifies the baking process but also ensures professional-looking results.
Measuring and Mixing Equipment
Precise measurements and proper mixing techniques are crucial when making a fluffy and colorful unicorn cake. Even a small miscalculation can affect the cake’s texture, causing it to be too dense or too dry.
- Measuring Cups and Spoons – These help ensure accuracy, which is critical when following a recipe.
- Digital Kitchen Scale – This tool is useful for weighing ingredients precisely, leading to more consistent results.
- Mixing Bowls – Having multiple bowls makes it easier to mix different colors of batter.
Best Tools for Achieving a Perfect Batter
- Electric Mixer or Stand Mixer – This helps incorporate air into the batter, making the cake extra fluffy.
- Whisk – Useful for blending dry ingredients evenly before adding them to the wet ingredients.
- Spatula – Essential for folding ingredients gently to maintain the airy texture.
Cake Baking Essentials
To make a fluffy and colorful unicorn cake, even baking is key. Unevenly baked layers can lead to an unstable cake, making stacking and decorating more difficult.
- Cake Pans (6-inch or 8-inch round) – These ensure uniform cake layers that can be stacked neatly.
- Parchment Paper – Prevents the cake from sticking to the pan, allowing for easy removal.
- Oven Thermometer – Ensures that the cake bakes at the correct temperature, since oven settings can be inaccurate.
Techniques to Prevent Uneven Baking
- Use Cake Strips – Wrapping these around the cake pans helps the batter bake evenly.
- Preheat the Oven Properly – This ensures that the temperature is stable before placing the cakes inside.
- Rotate the Pans Halfway Through Baking – Doing this prevents one side from baking faster than the other.
Decorating Tools for a Stunning Unicorn Cake
After baking the perfect fluffy and colorful unicorn cake, the next step is decorating. The right tools will make the process easier, allowing for smooth, vibrant, and magical decorations.
- Offset Spatula – Helps spread buttercream evenly over the cake layers.
- Bench Scraper – Ensures that the frosting is smooth and polished.
- Piping Bags and Tips – Essential for creating the unicorn mane and adding intricate designs.
Additional Tools for a Magical Finish
- Gel Food Coloring – Provides intense color without affecting the consistency of the batter or frosting.
- Edible Glitter and Sprinkles – These enhance the whimsical look of the cake.
- Fondant or Modeling Chocolate – Used for creating unicorn ears, horns, and decorative accents.
Key Ingredients for a Fluffy and Colorful Unicorn Cake
While tools are necessary, the quality and type of ingredients used directly impact the cake’s texture and flavor. Selecting the right ingredients ensures that the cake is not only beautiful but also light and delicious.
Core Ingredients for a Perfect Cake Base
The foundation of a fluffy and colorful unicorn cake starts with high-quality ingredients. Using the right flour, fats, and leavening agents helps create a soft and airy crumb.
- Cake Flour – With a lower protein content than all-purpose flour, it results in a softer texture.
- Baking Powder and Baking Soda – These work together to give the cake a beautiful rise.
- Granulated Sugar – When creamed with butter, it helps create an airy structure.
How to Choose the Best Ingredients for Maximum Fluffiness
- Unsalted Butter – Allows for better flavor control while keeping the cake rich and moist.
- Room-Temperature Eggs – Incorporate more easily into the batter, ensuring an even texture.
- Buttermilk or Whole Milk – These ingredients add moisture without making the cake too heavy.
Achieving Bright, Vibrant Colors in a Unicorn Cake
A fluffy and colorful unicorn cake isn’t complete without bright, magical hues. However, using the wrong type of food coloring can result in faded or dull shades.
- Gel Food Coloring – This is highly concentrated and ensures bold colors without adding excess liquid.
- Powdered Food Coloring – Provides even more intense hues and works well for both batter and frosting.
- Edible Metallic Dust – Perfect for creating a shimmering unicorn horn or golden accents.
Tips for Keeping Colors Bold and Long-Lasting
- Use a white cake base to prevent colors from appearing muted.
- Mix colors in small increments, adding more if needed for a deeper shade.
- Let the colored batter rest for a few minutes before baking to allow the colors to develop fully.
Adding Flavor for a More Delicious Unicorn Cake
While appearance is important, a fluffy and colorful unicorn cake should also taste incredible. Choosing complementary flavors enhances the overall experience.
Best Flavor Combinations for a Unicorn Cake
- Vanilla Bean – A classic choice that highlights the cake’s fluffy texture.
- Almond Extract – Adds a subtle nutty flavor that pairs well with buttercream.
- Lemon or Orange Zest – Provides a hint of citrus for a refreshing taste.
Customizing the Cake for Unique Flavor Profiles
- Combine vanilla and almond extract for a delicate yet rich flavor.
- Add a bit of coconut extract to give the cake a tropical twist.
- Mix fresh fruit puree into the buttercream for a naturally flavored frosting.
How to Set Up Your Kitchen for Baking Success
Before starting, it’s helpful to prepare the workspace and have all ingredients and tools within reach. This ensures a smooth and efficient baking process.
Organizing Your Workstation
- Pre-measure all ingredients to avoid last-minute errors.
- Preheat the oven at least 15 minutes before baking for consistent heat.
- Grease and line the cake pans in advance to prevent sticking.
Creating a Step-by-Step Workflow
- Divide the batter into separate bowls before adding food coloring for even mixing.
- Set up decorating tools ahead of time to streamline the process.
- Keep a damp towel nearby to clean up spills quickly.
Mastering how to make a fluffy and colorful unicorn cake begins with selecting the best tools and ingredients. By following these expert tips, the baking process becomes easier, more enjoyable, and more successful. Whether creating this cake for a birthday, a celebration, or just for fun, having everything ready beforehand will lead to a stunning, delicious masterpiece that is both light and visually enchanting.edients, making a fluffy and colorful unicorn cake becomes an enjoyable and successful experience. Whether you are baking for a birthday, a special occasion, or just for fun, having everything prepared in advance will ensure a stunning and delicious cake every time. but also a true delight to bake, decorate, and share!
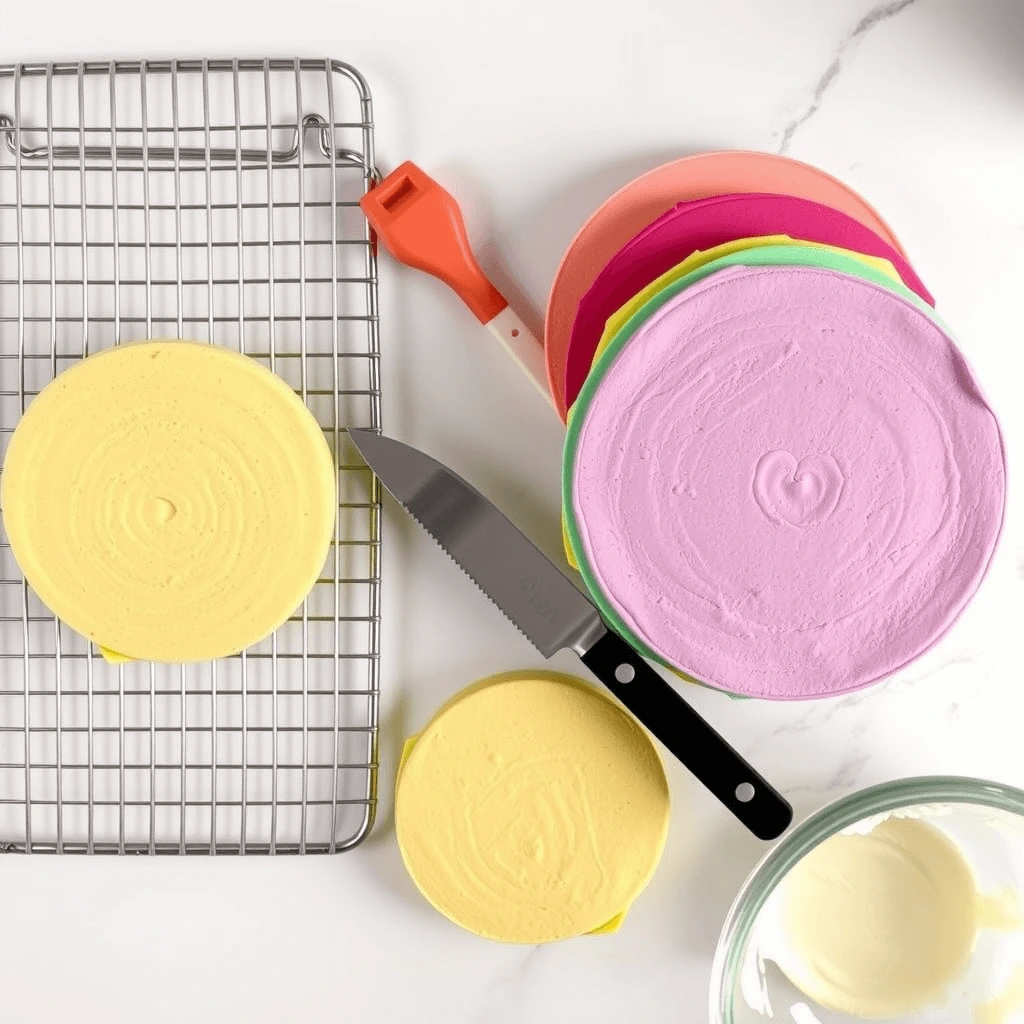
Preparing Your Cake Base: Fluffy and Colorful Unicorn Cake Layers
Choosing the Right Cake Recipe for a Fluffy and Colorful Unicorn Cake: Vanilla, Chocolate, or Rainbow Sponge
When learning how to make a fluffy and colorful unicorn cake, selecting the right cake recipe is the first and most crucial step. The flavor and texture of the cake base will determine how well it complements the vibrant decorations and creamy frosting. Since a unicorn cake is known for its magical appearance, the cake layers should be soft, light, and flavorful. But which recipe is best? Should you choose classic vanilla, rich chocolate, or a whimsical rainbow sponge? Each option has its unique qualities, so understanding the benefits of each will help you make the best decision for your unicorn cake.
Why the Cake Base Matters in a Fluffy and Colorful Unicorn Cake
The foundation of any unicorn cake is its cake base. Without the right texture and structure, even the most beautifully decorated cake can fall flat. Since unicorn cakes are often layered and stacked, the cake must be sturdy enough to hold its shape while remaining soft and fluffy. The key is to achieve a balance between structure and lightness.
The Importance of a Fluffy and Moist Cake Texture
- A fluffy texture ensures that each bite is light and airy.
- Moist cake layers prevent the cake from becoming dry or crumbly.
- The right balance of structure and softness makes stacking easier.
How to Ensure the Best Cake Texture
- Use cake flour instead of all-purpose flour for a softer crumb.
- Incorporate room-temperature ingredients to blend smoothly.
- Cream the butter and sugar properly to trap air and create a light texture.
The Classic Choice: Vanilla Cake for a Fluffy and Colorful Unicorn Cake
Vanilla cake is one of the most popular choices for a unicorn cake because of its light, delicate flavor and versatility. It pairs well with various fillings and frostings, allowing the vibrant colors to stand out beautifully.
Why Vanilla Cake Works Well for a Unicorn Cake
- It has a neutral flavor, making it a great base for colorful designs.
- The texture is typically light and fluffy, perfect for layering.
- Vanilla complements almost any buttercream or filling.
Tips for Achieving a Perfect Vanilla Cake
- Use pure vanilla extract or vanilla bean paste for a rich, aromatic flavor.
- Add a touch of buttermilk to keep the cake moist and tender.
- Avoid overmixing the batter, as this can lead to a dense cake.
Decadent and Rich: Chocolate Cake for a Fluffy and Colorful Unicorn Cake
Chocolate cake offers a more indulgent option while still being a great base for a unicorn cake. Though darker in color, it can still be paired with vibrant decorations, making it a unique and delicious alternative.
Why Chocolate Cake Can Work for a Unicorn Cake
- It provides a deep, rich flavor that contrasts beautifully with sweet buttercream.
- The moist texture ensures that the cake remains soft even after refrigeration.
- It can be made with different types of cocoa for varying levels of chocolate intensity.
Best Techniques for a Moist Chocolate Cake
- Use high-quality cocoa powder for an intense chocolate flavor.
- Add hot coffee or boiling water to enhance the chocolate depth.
- Incorporate sour cream or yogurt to keep the cake extra moist.
Adjusting Chocolate Cake for a More Colorful Unicorn Cake
- Use white chocolate cake for a lighter color while keeping a chocolate flavor.
- Tint the batter with food coloring to create pastel chocolate layers.
- Pair chocolate cake with colorful vanilla buttercream for a striking contrast.
The Most Magical Choice: Rainbow Sponge for a Fluffy and Colorful Unicorn Cake
A rainbow sponge cake is the ultimate choice for a unicorn cake. Each layer is a different color, creating a mesmerizing effect when the cake is sliced. This visually stunning option is perfect for special celebrations.
Why a Rainbow Sponge Is Ideal for a Unicorn Cake
- It enhances the whimsical and magical theme of a unicorn cake.
- The layers look stunning when stacked, making the cake extra impressive.
- Each layer can be flavored differently for added variety.
Steps to Create a Perfect Rainbow Sponge Cake
- Divide the batter evenly into separate bowls before adding food coloring.
- Use gel food coloring instead of liquid to prevent adding too much moisture.
- Bake the layers in separate pans to ensure even baking.
Tips for Achieving Vibrant and Even Layers
- Start with a white cake base to ensure the colors appear bright.
- Mix colors gradually, adding small amounts of food coloring until the desired shade is reached.
- Let the layers cool completely before stacking to prevent bleeding colors.
Which Cake Recipe Is Best for a Fluffy and Colorful Unicorn Cake?
Choosing between vanilla, chocolate, and rainbow sponge depends on personal preference and the occasion. However, each option can be modified to fit the theme of a unicorn cake while maintaining the necessary fluffiness and vibrant appeal.
Deciding Factors When Choosing a Cake Recipe
- For a traditional unicorn cake → Choose a classic vanilla sponge for its versatility.
- For a more indulgent unicorn cake → Opt for a chocolate base with colorful frosting.
- For a show-stopping unicorn cake → A rainbow sponge will create the most magical effect.
Customizing the Recipe for a Unique Unicorn Cake
- Combine two or more flavors for an unexpected twist.
- Add flavored extracts like almond or coconut for an extra dimension.
- Use ombre or pastel variations for a softer, elegant look.
Final Thoughts on Choosing the Right Recipe
No matter which recipe you choose, the key to making a fluffy and colorful unicorn cake is using the right ingredients and techniques. By ensuring a light and airy texture, vibrant colors, and a delicious flavor, the unicorn cake will be a true masterpiece that delights both the eyes and the taste buds.
Mastering how to make a fluffy and colorful unicorn cake starts with choosing the perfect recipe. Whether it’s a classic vanilla cake, a rich chocolate sponge, or a breathtaking rainbow layer cake, each option brings something special to the table. By following the right baking techniques and incorporating bold, vibrant colors, the result will be a unicorn cake that is not only visually stunning but also irresistibly delicious.
Tips for Achieving a Light and Airy Texture in a Fluffy and Colorful Unicorn Cake
When learning how to make a fluffy and colorful unicorn cake, achieving the perfect light and airy texture is essential. A unicorn cake should not only be visually stunning but also irresistibly soft and delicate with every bite. However, without the right techniques, the cake can turn out dense, dry, or unevenly baked. To ensure the perfect texture, several factors must be considered, from ingredient selection to baking methods and cooling techniques.
Why a Light and Airy Texture Matters in a Fluffy and Colorful Unicorn Cake
A unicorn cake is all about creating a magical experience. While the bright, bold colors make it visually exciting, the texture plays an equally important role. If the cake is too dense, it can feel heavy and overwhelming. On the other hand, a cake that is too dry lacks the indulgent, melt-in-your-mouth quality that makes desserts memorable.
The Benefits of a Fluffy and Light Texture
- Enhances the overall eating experience, making the cake more enjoyable.
- Ensures the cake layers stack easily without becoming too compact.
- Allows the flavors to blend seamlessly with buttercream and fillings.
- Provides the ideal contrast to rich frosting and decorative elements.
Common Mistakes That Lead to a Dense Cake
- Overmixing the batter, which results in excessive gluten formation.
- Using the wrong type of flour, making the cake too firm.
- Not incorporating enough air during the mixing process.
- Baking at an incorrect temperature, causing uneven rising.
Selecting the Right Ingredients for a Fluffy and Colorful Unicorn Cake
Every ingredient in a cake recipe plays a crucial role in determining its texture. To make a fluffy and colorful unicorn cake, it is important to choose high-quality ingredients that contribute to lightness and moisture.
The Best Flour for a Light and Fluffy Cake
Flour provides the structure of the cake, but choosing the right type can make all the difference.
- Cake Flour – This has a lower protein content than all-purpose flour, resulting in a softer crumb.
- All-Purpose Flour – While this can be used, it may create a denser texture unless mixed carefully.
- Homemade Cake Flour Substitute – Replace two tablespoons of all-purpose flour with cornstarch per cup to create a softer blend.
Why Sifting Flour Improves Texture
- Aerates the flour, making it lighter and easier to incorporate into the batter.
- Removes any clumps that might cause an uneven texture.
- Helps distribute leavening agents evenly throughout the batter.
The Importance of Eggs in a Fluffy and Colorful Unicorn Cake
Eggs contribute to structure, moisture, and aeration. However, how they are used in the recipe affects the final texture.
- Whole Eggs – Provide stability and moisture to prevent the cake from becoming dry.
- Egg Whites – Beaten separately and folded into the batter, they introduce extra air, making the cake lighter.
- Room-Temperature Eggs – Blend more evenly into the batter, preventing curdling.
How to Use Eggs for Maximum Fluffiness
- Whip the egg whites separately to stiff peaks and gently fold them into the batter before baking.
- Beat whole eggs with sugar until pale and thick for extra aeration.
- Avoid overmixing after adding eggs to prevent deflating the batter.
The Role of Fats in a Fluffy and Colorful Unicorn Cake
Fats add moisture and richness while helping maintain a soft texture. However, the type of fat used can impact the fluffiness of the cake.
- Butter – Creates a tender crumb and adds a rich flavor.
- Oil – Produces an extra moist cake, making it a good addition to certain recipes.
- A Combination of Butter and Oil – Provides the best of both worlds: a flavorful and soft cake that remains moist.
Best Practices for Incorporating Fats
- Cream butter and sugar together for at least 3-5 minutes to incorporate air.
- If using oil, mix it with the wet ingredients before combining with dry ingredients.
- Ensure butter is at room temperature before mixing to allow proper creaming.
Mixing Techniques for an Airy Unicorn Cake
Even with the best ingredients, how they are mixed will determine the final texture. Following the right mixing techniques ensures a soft, well-risen cake.
Creaming Butter and Sugar for Maximum Air
The creaming method is one of the most important steps in achieving a light cake.
- Beat butter and sugar together on medium speed for at least 3-5 minutes until pale and fluffy.
- This step helps trap air, which expands during baking, making the cake lighter.
- Over-creaming can cause the butter to become too soft, leading to a dense texture.
How to Avoid Overmixing
- Once the flour is added, mix only until combined to prevent excess gluten formation.
- Use a spatula to gently fold in ingredients instead of vigorously stirring.
- If using an electric mixer, mix on low speed when incorporating dry ingredients.
Baking Techniques for a Perfectly Fluffy and Colorful Unicorn Cake
Even if the batter is mixed perfectly, baking conditions play a critical role in achieving the ideal texture.
Controlling the Oven Temperature
- Bake at 325-350°F (163-177°C) to allow for even rising without overbaking.
- Use an oven thermometer to ensure accuracy, as many ovens run hotter or colder than their settings indicate.
- Avoid opening the oven door too often, as temperature fluctuations can cause the cake to collapse.
Preventing a Dry Cake
- Do not overbake—check for doneness by inserting a toothpick into the center. If it comes out with a few moist crumbs, the cake is ready.
- Use a cake strip around the pan to help retain moisture.
- If the cake seems dry, brush the layers with a simple syrup before assembling.
Using the Right Cake Pans
The type of cake pan used affects how the cake bakes.
- Light-colored aluminum pans – Distribute heat evenly and prevent over-browning.
- Glass and dark pans – Absorb more heat, which can cause uneven baking.
- Springform pans – Work well for layered cakes, making them easier to release.
Ensuring Even Baking
- Divide the batter evenly among pans to ensure layers bake uniformly.
- Rotate the pans halfway through baking if necessary.
- Allow cakes to cool for 10 minutes in the pan before transferring to a wire rack.
Cooling and Storing to Maintain a Fluffy and Colorful Unicorn Cake
Once baked, proper cooling and storage are essential to preserving the cake’s airy texture.
How to Cool Cake Layers Without Losing Moisture
- Place cakes on a wire rack to prevent condensation buildup.
- Avoid refrigerating immediately, as this can dry out the cake.
- If storing for later use, wrap layers tightly in plastic wrap before refrigerating.
Best Ways to Store a Unicorn Cake
- For short-term storage, keep the cake at room temperature in an airtight container.
- For longer storage, refrigerate and bring to room temperature before serving.
- If freezing, wrap each layer in plastic wrap and foil to retain moisture.
Final Thoughts on Achieving the Best Texture
Mastering how to make a fluffy and colorful unicorn cake requires careful attention to ingredients, mixing techniques, and baking conditions. By following these expert tips, you will achieve a cake that is not only visually stunning but also irresistibly light and airy. Every step, from selecting the right flour to using the correct baking methods, contributes to the final texture. With practice and precision, creating the perfect fluffy and colorful unicorn cake becomes easy, ensuring that every slice is as magical as it looks.etail, you’ll achieve a fluffy, magical cake that’s worthy of its whimsical design!
How to Bake Evenly Colored Layers for a Fluffy and Colorful Unicorn Cake
When learning how to make a fluffy and colorful unicorn cake, achieving evenly colored layers is essential. A unicorn cake is all about vibrant, magical colors, and inconsistent or dull layers can take away from its stunning appearance. However, baking multiple layers with uniform colors can be tricky, especially if the batter bakes unevenly or if the colors fade during the process. By following the right techniques, it’s possible to create perfectly even, bright layers that enhance the whimsical charm of a unicorn cake.
Why Evenly Colored Layers Matter in a Fluffy and Colorful Unicorn Cake
Color is one of the defining features of a unicorn cake. Therefore, each layer should be bold, evenly distributed, and perfectly baked. Uneven colors can make the cake look patchy, while fading can result in dull, muted tones instead of bright, magical hues.
The Impact of Even Layers on the Final Presentation
- Evenly colored layers create a stunning visual effect when the cake is sliced.
- Balanced colors prevent the cake from looking inconsistent or unpolished.
- A well-distributed color gradient enhances the dreamy unicorn aesthetic.
Common Mistakes That Lead to Uneven Colors
- Not mixing food coloring evenly into the batter.
- Using liquid food coloring, which can dilute the batter and cause uneven tones.
- Baking at a temperature that is too high, leading to browning on the edges and fading in the center.
Choosing the Right Food Coloring for a Fluffy and Colorful Unicorn Cake
Not all food colorings are created equal. Some fade during baking, while others can create an unappealing, artificial taste. To ensure bright and even colors, choosing the right type of food coloring is crucial.
The Best Types of Food Coloring for Cake Batter
- Gel Food Coloring – Highly concentrated, providing deep, vibrant colors without altering the batter’s consistency.
- Powdered Food Coloring – Excellent for bold hues, as it doesn’t add extra moisture to the batter.
- Oil-Based Food Coloring – Best for coloring chocolate-based batters without affecting texture.
Why Liquid Food Coloring Should Be Avoided
- It requires large amounts to achieve vibrant colors, which can change the consistency of the batter.
- The pigments are less stable and may fade more easily during baking.
- It often results in pastel shades instead of the bold, magical hues needed for a unicorn cake.
Tips for Mixing Food Coloring Evenly
- Always start with a white cake base to ensure true color payoff.
- Add food coloring a little at a time, mixing well after each addition.
- Use a whisk or rubber spatula to fully incorporate the color without overmixing the batter.
Dividing Batter Evenly for Consistent Layer Colors
To achieve a fluffy and colorful unicorn cake with perfectly even layers, each portion of batter must be divided accurately. Unequal batter amounts can cause some layers to bake thicker than others, leading to inconsistent colors and textures.
The Best Methods for Dividing Cake Batter
- Use a digital kitchen scale to weigh each portion of batter for precise measurements.
- If a scale isn’t available, use a measuring cup to scoop equal amounts into separate bowls.
- Always level out each portion to prevent one layer from having more batter than the others.
Preventing Color Variation Between Layers
- Mix colors in separate bowls before pouring them into the cake pans to maintain consistency.
- Double-check that each bowl has the same amount of food coloring to ensure all layers match.
- Stir each colored batter gently before pouring to prevent color settling.
Baking at the Right Temperature for Even Color Distribution
Baking temperature plays a major role in keeping colors bright and evenly distributed. If the oven is too hot, the edges may darken while the center remains pale. On the other hand, if the oven is too cool, the layers may bake unevenly, leading to inconsistent color.
The Ideal Baking Temperature for a Fluffy and Colorful Unicorn Cake
- Bake at 325°F (163°C) to allow the cake to cook slowly and evenly.
- Avoid baking at 350°F (177°C) or higher, as excessive heat can cause browning.
- Use an oven thermometer to ensure the temperature is accurate.
How to Prevent Color Fading During Baking
- Cover cake layers loosely with foil for the last few minutes of baking if browning starts to appear.
- Avoid overbaking, as prolonged exposure to heat can dull vibrant colors.
- Remove the cake from the oven as soon as a toothpick inserted in the center comes out with a few moist crumbs.
Preventing Uneven Browning on Cake Layers
Even with the best food coloring and batter distribution, the cake layers can sometimes develop darker edges while the centers remain light. Fortunately, a few simple adjustments can prevent this issue.
Best Practices to Avoid Browning on the Edges
- Use light-colored aluminum pans, which distribute heat evenly without causing dark edges.
- Apply cake strips around the pans to prevent excessive browning on the sides.
- Rotate cake pans halfway through baking for uniform heat exposure.
Additional Tips for Even Baking
- Avoid placing cake pans too close together, as this can restrict airflow and lead to uneven baking.
- If possible, bake all layers on the same oven rack to ensure they cook at the same rate.
- Let cake layers cool in the pan for 5-10 minutes before transferring them to a wire rack.
Enhancing Color Vibrancy After Baking
Once the cake layers are baked, a few extra steps can help maintain their bright, beautiful colors.
How to Lock in Vibrant Colors
- Let layers cool completely before assembling, as residual heat can cause slight fading.
- If colors appear slightly dull, apply a thin coat of simple syrup to revive their brightness.
- Stack layers carefully to prevent crumbs from mixing and dulling the overall color effect.
Why Simple Syrup Helps Maintain Color
- It adds extra moisture to keep the cake soft and fluffy.
- A flavored simple syrup can enhance the cake’s overall taste while preserving vibrancy.
- It prevents the cake from drying out, especially if making the cake ahead of time.
Final Thoughts on Baking Evenly Colored Layers
Mastering how to bake evenly colored layers for a fluffy and colorful unicorn cake requires attention to detail, but the results are well worth the effort. By choosing the right food coloring, dividing batter accurately, baking at the correct temperature, and preventing browning, each layer will come out perfectly even and vibrant.
A fluffy and colorful unicorn cake is meant to be a showstopper, and having consistently colored layers makes all the difference. Whether baking for a birthday, celebration, or special event, using these expert techniques will ensure that the final cake looks as magical as it tastes.ate a visually stunning unicorn cake that’s not just magical on the outside but dazzling on the inside, too!
Cooling and Prepping Layers for a Fluffy and Colorful Unicorn Cake Assembly
Once the cake layers are baked to perfection, the next crucial step is cooling and prepping them for assembly. Proper cooling prevents cracks, ensures even frosting, and helps maintain the soft, airy texture needed for a fluffy and colorful unicorn cake. If the layers are not handled correctly at this stage, they may become dry, crumbly, or difficult to stack. Therefore, following the best techniques will guarantee a smooth and stable unicorn cake assembly.
Why Cooling the Cake Layers Properly Matters
Cooling is not just about letting the cake sit at room temperature; rather, it is a controlled process that preserves moisture while preventing shrinkage. Since unicorn cakes often have multiple layers, it is essential to handle them carefully to maintain their structure and vibrant colors.
The Benefits of Proper Cooling
- Prevents the cake from becoming dry or crumbly.
- Ensures even frosting application without tearing the layers.
- Helps the cake maintain its fluffy and airy texture.
- Keeps colors bright by avoiding excessive condensation.
Common Mistakes That Lead to Dry or Soggy Layers
- Leaving the cake in the pan for too long, causing excess moisture buildup.
- Moving the cake too quickly to a cooling rack, leading to cracks.
- Not covering the cake properly, allowing it to dry out.
How to Cool Cake Layers for a Fluffy and Colorful Unicorn Cake
To maintain a light and fluffy texture, cooling must be done gradually. Rushing the process can make the cake dense, while improper cooling can lead to structural issues when assembling the layers.
Step-by-Step Cooling Process
- Let the Cake Rest in the Pan – After baking, allow the cake to sit in the pan for 10-15 minutes to stabilize.
- Transfer to a Cooling Rack – Gently remove the cake from the pan and place it on a wire rack to cool completely.
- Avoid Direct Airflow – Do not place the cake near an open window or fan, as rapid cooling can cause cracks.
- Cover with a Clean Kitchen Towel – This prevents excess moisture loss while still allowing air circulation.
- Let It Cool for At Least One Hour – The cake must be completely cool before moving to the next step.
Why a Wire Rack Is Essential for Even Cooling
- Allows air to circulate on all sides, preventing soggy bottoms.
- Keeps condensation from forming underneath the cake.
- Helps layers cool evenly without becoming too firm.
Prepping Cake Layers for a Fluffy and Colorful Unicorn Cake
After cooling, the cake layers must be prepared for stacking. A well-prepped cake results in a smooth, professional-looking finish and ensures stability during assembly.
Leveling the Cake Layers for a Perfect Stack
Even if the layers appear flat, slight doming can occur during baking. Leveling them ensures a sturdy base for each layer, preventing the cake from tilting.
- Use a Serrated Knife or Cake Leveler – Gently trim the tops to create an even surface.
- Check for Consistency – Stack the layers lightly before frosting to ensure they align properly.
- Remove Excess Crumbs – Brush off loose crumbs to prevent them from mixing into the frosting.
Why Leveling Matters for a Fluffy and Colorful Unicorn Cake
- Prevents the cake from leaning or collapsing during assembly.
- Ensures each slice looks even and well-defined.
- Helps the frosting spread more smoothly.
Chilling the Cake Layers Before Frosting
For best results, chilling the layers before frosting makes the cake easier to handle. This step also reduces crumbs when applying the first layer of frosting.
- Wrap Each Layer in Plastic Wrap – This prevents them from drying out.
- Refrigerate for At Least 30 Minutes – This firms up the cake, making it easier to frost.
- Avoid Freezing for Too Long – While freezing is an option, keeping the layers in the fridge maintains the best texture.
How Chilling Helps in the Decorating Process
- Makes frosting application cleaner and smoother.
- Prevents layers from shifting while stacking.
- Keeps the buttercream from melting too quickly.
The Role of Simple Syrup in Maintaining Moisture
Even with proper cooling, some cakes can lose a bit of moisture. Brushing layers with simple syrup enhances softness and flavor while ensuring the cake remains moist.
How to Make and Apply Simple Syrup
- Combine Equal Parts Sugar and Water – Heat until fully dissolved, then cool.
- Use a Pastry Brush – Lightly coat each layer before frosting.
- Avoid Over-Saturating – A light coating is enough to enhance moisture without making the cake soggy.
Why Simple Syrup Is Beneficial
- Keeps the cake soft without altering the texture.
- Helps maintain freshness if making the cake in advance.
- Can be flavored with extracts to complement the unicorn cake theme.
Storing Cake Layers Before Final Assembly
If assembling the cake later, proper storage is key to preserving fluffiness and color vibrancy.
Best Storage Methods for Maximum Freshness
- Short-Term (Up to 24 Hours) – Wrap layers in plastic and store at room temperature.
- Medium-Term (Up to 3 Days) – Keep wrapped layers in the refrigerator.
- Long-Term (Up to 3 Months) – Freeze layers, ensuring they are tightly sealed.
Tips for Keeping Layers Fluffy and Moist
- Avoid refrigerating without wrapping, as this can dry out the cake.
- Thaw frozen layers at room temperature before decorating.
- If layers feel dry, apply simple syrup before stacking.
Final Steps Before Assembling the Unicorn Cake
Now that the layers are fully cooled and prepped, they are ready for frosting and stacking. However, ensuring that they are properly aligned will make the final unicorn cake look polished and professional.
Pre-Assembly Checklist
- Ensure all layers are completely cool and leveled.
- Double-check that the frosting is at the right consistency.
- Keep tools like offset spatulas and cake scrapers nearby for smooth application.
Why Preparation Leads to a Better Final Cake
- Prevents mistakes before they happen.
- Reduces stress during the decorating process.
- Ensures that each layer is stacked evenly and securely.
Conclusion: The Key to a Flawless Unicorn Cake Assembly
Cooling and prepping the cake layers correctly is just as important as baking. By following these steps, each layer of the fluffy and colorful unicorn cake will be moist, stable, and vibrant. Taking the extra time to let the cake cool, level the layers, and store them properly will result in a final cake that is not only visually stunning but also irresistibly delicious.
By using these expert techniques, assembling a fluffy and colorful unicorn cake becomes an effortless and enjoyable process. Whether making this cake for a birthday, a celebration, or simply for fun, these methods will ensure that the final product is as magical as it looks.dant accents, careful preparation is the key to a stunning and professional-looking cake.
Creating the Unicorn Magic: Colors and Decorations
How to Achieve Vibrant Colors with Food Coloring (Avoiding Fading)
When learning how to make a fluffy and colorful unicorn cake, one of the most important aspects is achieving bright, vivid colors that stay bold even after baking. However, many bakers struggle with food coloring fading during mixing, baking, or storage. Fortunately, by using the right techniques, it is possible to maintain stunning, vibrant colors that make your unicorn cake look as magical as it tastes.
Why Vibrant Colors Matter in a Fluffy and Colorful Unicorn Cake
Since unicorn cakes are known for their whimsical, eye-catching hues, ensuring that the colors remain bold is essential. A dull or unevenly colored cake can take away from the overall presentation, making it less visually exciting. Therefore, understanding how to achieve and maintain vibrant colors will elevate the final look of the cake.
The Benefits of Long-Lasting Colors
- Ensures that the cake layers are bold and beautiful when sliced.
- Prevents colors from looking washed out or uneven.
- Enhances the overall magical unicorn cake aesthetic.
- Creates a professional-quality cake that stands out at any celebration.
Common Reasons Why Colors Fade
- Using the wrong type of food coloring, leading to weak or dull shades.
- Overmixing the batter, which breaks down the color intensity.
- Baking at high temperatures, causing color degradation.
- Storing the cake improperly, which can result in fading over time.
Choosing the Right Type of Food Coloring
Not all food colorings produce the same results. Some fade during baking, while others do not mix well into the batter. Therefore, selecting the best type of food coloring is the first step to achieving bold, fade-resistant colors.
Best Food Colorings for Vibrant Cake Layers
- Gel Food Coloring – Provides intense color without adding extra liquid, making it ideal for cake batter.
- Powdered Food Coloring – Works well for deep, rich hues and does not affect the texture of the batter.
- Oil-Based Food Coloring – Perfect for chocolate cakes and buttercream since it blends smoothly with fats.
Why Liquid Food Coloring Should Be Avoided
- Requires larger amounts to achieve bright colors, which alters the batter’s consistency.
- Tends to create weaker, pastel-like shades instead of bold hues.
- Does not blend as evenly, leading to patchy or streaky colors.
How to Mix Food Coloring Properly for Maximum Vibrancy
Once the right food coloring is chosen, the next step is mixing it into the batter correctly. The way the color is incorporated can affect both vibrancy and consistency.
Steps for Properly Mixing Food Coloring into Cake Batter
- Start with a White Cake Base – Using a white or vanilla cake batter instead of a yellow one allows colors to appear more vibrant.
- Add Food Coloring Gradually – Begin with a small amount and mix before adding more.
- Use a Rubber Spatula or Whisk – This helps distribute the color evenly without overmixing.
- Let the Batter Rest for 10 Minutes – This step deepens the color before baking.
- Adjust if Necessary – If the color is not bright enough, add a little more food coloring and mix gently.
Preventing Overmixing
- Overmixing the batter can introduce too much air, which causes color to fade during baking.
- Use a folding motion instead of stirring vigorously to keep colors bold and consistent.
- If using an electric mixer, mix on low speed to avoid breaking down the color molecules.
Baking at the Right Temperature to Prevent Color Fading
Even when the batter is perfectly colored, baking at the wrong temperature can cause colors to dull. To ensure that the cake layers maintain their brightness, adjusting the baking settings is essential.
Ideal Baking Temperature for Bright Colors
- Bake at 325°F (163°C) instead of 350°F (177°C) to preserve color vibrancy.
- Avoid overbaking, as longer exposure to heat can cause colors to fade.
- Always use an oven thermometer to ensure the correct temperature.
Preventing Browning That Dulls Colors
- Place a light-colored baking pan on the middle oven rack to reduce browning.
- Wrap cake pans with cake strips to maintain even baking and prevent dark edges.
- If the top starts browning too quickly, cover it lightly with aluminum foil during the last 10 minutes of baking.
How to Keep Frosting Colors Vibrant
A fluffy and colorful unicorn cake is not complete without beautifully colored frosting. However, buttercream and fondant colors can fade if not prepared and stored correctly.
Best Practices for Coloring Buttercream
- Start with white buttercream to ensure true color vibrancy.
- Use gel or powdered food coloring for the best intensity.
- Mix colors and let them sit for 15-30 minutes before using, as they deepen over time.
Preventing Buttercream Fading
- Store colored buttercream in an airtight container to avoid oxidation.
- If buttercream appears too pale, add a tiny drop of extra coloring before piping.
- Keep frosted cakes away from direct sunlight, as UV rays can dull colors.
How to Maintain Bold Fondant Colors
- Knead food coloring into fondant gradually for an even tone.
- Dust fondant with cornstarch instead of powdered sugar, which can lighten colors.
- Wrap unused fondant tightly in plastic wrap to prevent drying and fading.
Storing a Fluffy and Colorful Unicorn Cake Without Losing Color
Even after baking and decorating, colors can fade if the cake is not stored correctly. Therefore, keeping the cake fresh while maintaining color vibrancy is essential.
Best Storage Methods for Preserving Colors
- Store the cake in an airtight container to protect it from light and air exposure.
- Keep the cake at room temperature if serving within 24 hours.
- If refrigerating, cover the cake with plastic wrap or a cake dome to prevent drying.
Avoiding Color Changes in Storage
- Never store a colored cake directly in the fridge without covering it, as moisture can alter hues.
- If freezing, wrap each layer tightly in plastic wrap and aluminum foil.
- Allow the cake to come to room temperature before serving to restore its original vibrancy.
Final Thoughts on Achieving Vibrant Colors That Last
Mastering how to achieve vibrant colors with food coloring (avoiding fading) requires the right food coloring, mixing techniques, baking methods, and storage practices. By selecting high-quality gel or powdered food coloring, mixing it properly, and baking at the right temperature, your fluffy and colorful unicorn cake will maintain its bold and magical hues.
Furthermore, using the correct techniques for buttercream and fondant will ensure that the colors remain bright even after decorating. Lastly, proper storage methods will protect the cake’s visual appeal, making it the perfect centerpiece for any celebration.
By following these expert tips, you can confidently create a fluffy and colorful unicorn cake that is not only delicious but also stunningly vibrant from the first slice to the last!t also retain its beautiful hues from the first slice to the last!
Tips for Layering and Stacking a Rainbow Unicorn Cake
The vibrant layers of a rainbow unicorn cake are its most stunning feature, and stacking them properly is essential to create a stable, eye-catching centerpiece. Proper layering and stacking not only ensure that your cake stands tall and looks professional but also reveal the perfect spectrum of colors when sliced. Here’s a detailed guide to help you achieve a flawless and magical cake.
1. Level the Cake Layers for Stability
Uneven layers can cause your cake to wobble or lean, so leveling each layer is crucial for a sturdy stack.
- How to do it: Use a serrated knife or cake leveler to trim any domed tops from your cake layers. This creates flat surfaces that stack neatly and evenly.
- Pro Tip: Chill the cake layers in the refrigerator for 15-20 minutes before leveling. Chilled layers are firmer and easier to cut without crumbling.
2. Use a Cake Board as a Base
A sturdy base is essential for stacking, especially if the cake will be transported. A cake board provides the necessary support and makes handling the cake easier.
- How to do it: Place the bottom layer of your cake on a cake board that matches the size of the cake. Use a small dollop of frosting underneath to keep the layer secure.
- Pro Tip: If your cake is taller than average, consider using thicker boards or doubling up for extra stability.
3. Apply Even Layers of Frosting Between Cake Layers
The frosting between layers acts as glue, holding the cake together and providing visual contrast to highlight the colorful layers.
- How to do it: Use an offset spatula to spread an even layer of frosting (about ¼ to ½ inch thick) on top of each cake layer before stacking the next one. Avoid adding too much frosting, as it can cause the layers to slide.
- Pro Tip: Pipe a frosting dam around the edge of each layer before filling the center. This prevents the frosting from spilling out the sides and keeps the layers clean.
4. Align Layers Carefully
For a professional-looking cake, each layer must be perfectly aligned. Misaligned layers can create a leaning effect or uneven sides.
- How to do it: After adding frosting, place the next cake layer directly on top, aligning the edges. Gently press down to ensure the layer is secure and level.
- Pro Tip: Use a cake turntable to rotate the cake as you stack, allowing you to view it from all angles and make adjustments as needed.
5. Use Dowels for Tall Cakes
If your unicorn cake has more than 4-5 layers or is particularly tall, dowels or straws provide extra support to prevent it from collapsing.
- How to do it: Insert wooden dowels, plastic straws, or cake supports into the center and evenly spaced around the cake. Cut the dowels to match the height of the layers for a seamless fit.
- Pro Tip: For extra stability, place a cardboard cake round between every 4-5 layers and insert dowels through all layers to secure the tiers.
6. Crumb Coat the Assembled Cake
A crumb coat is a thin layer of frosting applied to seal in crumbs and create a smooth surface for the final layer of frosting. This is particularly important for a rainbow cake, where crumbs from brightly colored layers may show through the frosting.
- How to do it: Spread a thin layer of frosting over the entire cake using an offset spatula. Smooth it out as much as possible, covering any gaps between layers. Chill the cake for 15-30 minutes to set the crumb coat.
- Pro Tip: Use a bench scraper to create a clean, smooth finish on the crumb coat before applying the final frosting layer.
7. Chill Layers During Assembly
Chilling the cake layers and the entire cake during the assembly process helps maintain stability and prevents the frosting from softening or sliding.
- How to do it: After stacking 2-3 layers, place the cake in the refrigerator for 15-20 minutes to allow the frosting to firm up before continuing.
- Pro Tip: If you’re assembling the cake in advance, store it in the fridge overnight with plastic wrap loosely covering it to keep it fresh and stable.
8. Frost the Cake Smoothly
A smooth outer layer of frosting not only looks professional but also provides a clean canvas for decorating your unicorn cake.
- How to do it: After the crumb coat has set, apply a thicker layer of frosting and use a bench scraper or spatula to smooth it out. Rotate the cake on a turntable for even coverage.
- Pro Tip: Chill the cake again after frosting to set the outer layer before adding final decorations like swirls, sprinkles, or toppers.
9. Add a Center Support for Extra Stability (Optional)
For extra-tall cakes or cakes that will be transported, adding a center dowel provides additional support to keep the layers from shifting.
- How to do it: Insert a long wooden dowel through the center of the cake, starting from the top and pushing it down through all the layers and the cake board.
- Pro Tip: Sharpen the end of the dowel to make it easier to pierce through the cake and board. Cover the exposed top of the dowel with frosting to hide it.
10. Keep the Cake at the Right Temperature
Temperature plays a crucial role in maintaining the integrity of your stacked cake. Warm temperatures can soften frosting and cause layers to slide.
- How to do it: Store the cake in a cool place or refrigerate it until it’s ready to be served. Remove the cake from the fridge 30-60 minutes before serving to allow the frosting to soften slightly.
- Pro Tip: Avoid storing the cake in humid conditions, as this can cause condensation and affect the frosting.
11. Test the Sturdiness Before Decorating
Before adding final decorations like piped frosting swirls, sprinkles, or toppers, check the cake’s stability to ensure it’s ready to be handled.
- How to do it: Gently press on the sides of the cake to ensure it feels stable. If it wobbles, consider adding extra supports or chilling it again before continuing.
- Pro Tip: Rotate the cake on a turntable to inspect it from all angles and make any last-minute adjustments.
12. Decorate and Display with Confidence
Once your cake is fully stacked, frosted, and stable, you’re ready to add the finishing touches that make your unicorn cake truly magical. A well-stacked cake provides the perfect foundation for colorful swirls, sprinkles, and that iconic unicorn topper.
By following these tips, you’ll create a rainbow unicorn cake that’s not only visually stunning but also stable and easy to handle. The key is to take your time during layering and stacking, ensuring each step is precise and secure. With these techniques, you’ll achieve a professional-quality cake that’s ready to dazzle at any celebration!
Decorating with Buttercream Frosting: Smooth and Swirl Techniques
When creating a fluffy and colorful unicorn cake, decorating with buttercream frosting is one of the most exciting steps. Not only does the buttercream add a creamy, delicious layer, but it also enhances the cake’s visual appeal. Whether you prefer a sleek, smooth finish or a whimsical swirl effect, using the right techniques ensures that the cake looks professional and magical. However, achieving flawless buttercream decoration requires patience and the right tools. By following these expert tips, you can master both smooth and swirl techniques with ease.
Why Buttercream Frosting Is Ideal for a Fluffy and Colorful Unicorn Cake
Buttercream is the most popular frosting for unicorn cakes because it is versatile, easy to work with, and holds its shape well. Unlike whipped cream or fondant, buttercream provides a stable base that allows for smooth finishes and intricate piping details. Additionally, it pairs perfectly with the airy texture of a unicorn cake, enhancing both its taste and presentation.
The Benefits of Using Buttercream
- Creates a stable base for decorating and layering.
- Holds vibrant colors well, making it perfect for a colorful unicorn cake.
- Provides a smooth or textured finish, depending on the chosen technique.
- Allows for easy customization with flavors, colors, and textures.
Common Mistakes That Affect Buttercream Application
- Using the wrong consistency, making it difficult to spread or pipe.
- Applying buttercream to a warm cake, leading to melting and uneven textures.
- Not smoothing or swirling properly, resulting in visible streaks or imperfections.
Achieving a Smooth Buttercream Finish
A smooth buttercream finish gives the cake a polished, professional look. While it may seem challenging at first, using the right techniques will make the process much easier.
Essential Tools for a Smooth Buttercream Finish
- Offset Spatula – Helps spread buttercream evenly.
- Bench Scraper – Creates a clean, flawless finish on the sides.
- Turntable – Allows for even frosting application by rotating the cake smoothly.
- Piping Bags and Tips – Useful for achieving precision in fine details.
How to Apply a Smooth Buttercream Layer
- Start with a Crumb Coat – Apply a thin layer of frosting to seal in crumbs.
- Chill the Cake for 15-20 Minutes – This helps set the crumb coat and makes smoothing easier.
- Apply a Generous Second Layer – Use an offset spatula to spread the buttercream evenly.
- Smooth the Sides with a Bench Scraper – Hold it at a slight angle while rotating the cake.
- Use a Heated Spatula for a Final Touch – Warming the spatula in hot water creates an ultra-smooth surface.
Tips for Avoiding Streaks or Air Bubbles
- Always whip the buttercream properly to remove excess air pockets.
- Work with room-temperature buttercream for better spreadability.
- If air bubbles appear, gently smooth them out using a warm spatula.
Creating Beautiful Swirl Effects with Buttercream
For those who prefer a more playful and whimsical look, buttercream swirls are a fantastic option. This technique adds texture and movement, making the unicorn cake even more magical.
Best Piping Tips for Swirl Designs
- Large Star Tip (1M) – Ideal for creating rosettes and swirls.
- Round Tip (2A) – Perfect for smooth, rounded dollops of frosting.
- French Star Tip (6B) – Adds intricate ridged swirls.
How to Pipe Perfect Buttercream Swirls
- Fill a Piping Bag with Buttercream – Use a large piping tip for bold swirls.
- Hold the Bag at a 90° Angle – This ensures even and balanced swirls.
- Start in the Center and Move Outward – Pipe in a circular motion for a rosette effect.
- Apply Steady Pressure – Consistent squeezing creates uniform swirls.
- Lift the Tip Smoothly – Finish with a gentle pull to form a neat peak.
Creating a Multi-Color Swirl Effect
Since unicorn cakes are known for their bright, dreamy hues, using multiple colors in a swirl design enhances the cake’s visual appeal.
Steps for a Multi-Color Buttercream Swirl
- Divide buttercream into separate bowls and color each one with gel food coloring.
- Lay out a large sheet of plastic wrap and spread each color in a row.
- Roll the plastic wrap into a log shape and place it inside a piping bag.
- Pipe swirls as usual to create a rainbow or ombré effect.
Using Buttercream for a Textured Unicorn Cake
While smooth and swirl techniques are popular, textured buttercream can also create a unique and artistic unicorn cake design.
Fun Texturing Techniques
- Palette Knife Painting – Use a spatula to create a watercolor effect.
- Ruffled Buttercream – Pipe thin, overlapping layers for a ruffled look.
- Spatula Waves – Drag a small offset spatula through the buttercream for movement.
Why Textured Buttercream Works Well for a Unicorn Cake
- Adds depth and visual interest to the design.
- Makes the cake look whimsical and dreamy.
- Is easier to execute than a completely smooth finish.
Final Decorating Touches for a Fluffy and Colorful Unicorn Cake
Once the buttercream is perfectly smoothed or swirled, adding the final decorations brings the cake to life.
Best Finishing Touches
- Edible Glitter and Luster Dust – Adds a magical shimmer.
- Sprinkles and Candy Pearls – Enhances the unicorn theme.
- Gold or Silver Leaf – Elevates the cake with a luxurious touch.
Placing Unicorn-Themed Decorations
- Fondant Horn and Ears – Position at the top for a signature unicorn look.
- Piped Buttercream Mane – Use star tips to create a flowing effect.
- Colorful Drip Icing – Adds a playful, melted-rainbow effect.
Storing a Buttercream-Frosted Unicorn Cake
Since buttercream can be sensitive to temperature, proper storage ensures that the frosting stays fresh and vibrant.
Best Storage Methods
- Room Temperature (Up to 24 Hours) – Keep the cake in a cool, dry place.
- Refrigerated (Up to 3 Days) – Store in an airtight container to prevent drying.
- Frozen (Up to 1 Month) – Wrap tightly in plastic wrap before placing in the freezer.
Preventing Buttercream from Losing Its Shape
- Avoid storing in direct sunlight, as heat can cause melting.
- Let refrigerated cakes sit at room temperature for 30 minutes before serving.
- If buttercream starts to dry, mist lightly with simple syrup before serving.
Final Thoughts on Decorating with Buttercream Frosting
Mastering buttercream frosting techniques for a fluffy and colorful unicorn cake takes practice, but the results are always worth it. Whether aiming for a smooth, polished finish or playful, swirling designs, using the right tools and methods will help achieve a magical final product.
By following these expert tips, decorating a fluffy and colorful unicorn cake becomes both fun and rewarding. Whether for a birthday, special occasion, or just a creative baking project, these buttercream techniques will ensure that the final cake is as stunning as it is delicious!r!
Adding Unicorn Toppers, Edible Glitter, and Sprinkles for a Magical Finish
When decorating a fluffy and colorful unicorn cake, the final touches play a crucial role in bringing the magical theme to life. Not only do unicorn toppers, edible glitter, and sprinkles enhance the cake’s beauty, but they also add texture and depth. However, to achieve a polished, professional look, these decorations must be applied with precision and balance. By following expert techniques, you can ensure that your unicorn cake looks just as stunning as it tastes.
Why Final Decorations Are Essential
A unicorn cake is meant to be vibrant, whimsical, and eye-catching. Therefore, the decorations should not only enhance the overall theme but also maintain a harmonious look. Although it may be tempting to add every sprinkle and sparkle possible, using the right amount in the right places is key to achieving a visually stunning result.
The Importance of a Well-Balanced Design
- Ensures that each decorative element complements the others.
- Prevents the cake from looking too busy or cluttered.
- Enhances the cake’s colors, making them more vivid and striking.
- Adds an interactive and fun element for guests to admire and enjoy.
Common Mistakes to Avoid
- Overloading the cake with decorations, which can distract from the design.
- Using non-edible glitter, which may look pretty but is not safe for consumption.
- Applying sprinkles too late, causing them to fall off instead of adhering properly.
Choosing the Right Unicorn Toppers
The unicorn topper is the focal point of the cake, so selecting the right one makes all the difference. Whether using fondant, edible prints, or plastic figurines, the topper should match the cake’s theme while standing out as the main feature.
Popular Types of Unicorn Cake Toppers
- Fondant Unicorn Horn and Ears – Adds a handcrafted, elegant touch.
- Edible Sugar or Chocolate Unicorns – Provides a delicate, melt-in-your-mouth detail.
- Acrylic or Paper Cutout Toppers – Offers a simple, easy-to-use option.
- Personalized Name or Birthday Toppers – Makes the cake feel extra special.
How to Secure a Unicorn Topper Properly
- Place heavier toppers on a sturdy cake board to prevent sinking.
- If using a fondant horn, insert a wooden dowel inside for extra support.
- For paper or acrylic toppers, position them at an angle to create dimension.
Enhancing the Cake with Edible Glitter
A unicorn cake wouldn’t be complete without a shimmering, magical glow. Edible glitter adds a touch of fantasy, making the cake sparkle under the light. However, it’s important to use food-safe glitter to ensure that every element of the cake is safe to eat.
Best Types of Edible Glitter
- Luster Dust – Creates a soft, elegant shimmer.
- Edible Glitter Flakes – Adds dramatic sparkle with larger, noticeable flakes.
- Petal Dust – Perfect for a pastel, iridescent glow.
- Glitter Spray – Provides an all-over shine without overloading the cake.
How to Apply Edible Glitter for a Stunning Effect
- Use a small brush to dust glitter over fondant decorations for a subtle shine.
- Mix luster dust with a few drops of lemon extract and paint it onto buttercream.
- Spray a light mist of edible glitter spray for a flawless, even sparkle.
Decorating with Sprinkles for a Playful Touch
Sprinkles add texture and color, making the cake look fun and festive. Although they may seem simple, they should be applied strategically to enhance the overall design without overwhelming it.
The Best Sprinkles for a Unicorn Cake
- Rainbow Nonpareils – Tiny, round sprinkles that create a delicate speckled effect.
- Jimmies (Soft Sprinkles) – Ideal for covering the cake’s base with a fun pop of color.
- Star and Heart Shapes – Perfect for adding a fairytale-like feel.
- Metallic Dragees – Small, shiny edible beads that provide a sophisticated touch.
Tips for Applying Sprinkles Evenly
- Gently press sprinkles into soft buttercream before it sets to ensure they stick.
- Use a small spoon to distribute them evenly instead of dumping them all at once.
- For a gradient effect, start with more sprinkles at the bottom and fade upward.
Combining Toppers, Glitter, and Sprinkles for a Magical Finish
To achieve a balanced and professional look, it is important to layer these elements thoughtfully. Rather than placing everything at once, adding decorations in stages helps create a well-structured design.
Steps for a Perfectly Decorated Unicorn Cake
- Position the Unicorn Topper First – This sets the focal point of the cake.
- Pipe the Buttercream Mane Around It – Use multiple colors for a dreamy effect.
- Dust Edible Glitter Over the Buttercream – This enhances the cake’s magical glow.
- Add Sprinkles in Key Areas – Focus on the edges, base, or around the topper.
- Step Back and Adjust as Needed – Ensure the decorations look balanced.
Preventing Decorations from Sliding or Falling
- Make sure the buttercream is slightly tacky so decorations stick properly.
- If attaching fondant decorations, use a small amount of edible glue or water.
- Chill the cake for 15 minutes before transporting to keep everything in place.
Storing and Transporting a Decorated Unicorn Cake
Once the cake is beautifully decorated, it’s important to store it correctly to preserve its magical appearance. Improper storage can lead to smudging, color fading, or decorations falling off.
Best Practices for Storing a Fully Decorated Cake
- Keep the cake in a cool, dry place away from sunlight.
- If refrigerating, place it in a tall cake box to protect the decorations.
- Before serving, let the cake sit at room temperature for at least 30 minutes to soften.
Preventing Decoration Damage During Storage
- Avoid refrigerating a fully decorated cake unless absolutely necessary, as condensation can cause colors to run.
- If freezing, wrap the cake carefully to protect delicate decorations.
- Store extra sprinkles separately and add them fresh before serving for the best look.
Final Thoughts on Adding the Perfect Finishing Touches
Mastering how to decorate a fluffy and colorful unicorn cake with toppers, edible glitter, and sprinkles is all about balance, creativity, and precision. By selecting high-quality decorations and applying them thoughtfully, the final cake will look both enchanting and professionally designed.
With these expert tips, you can create a fluffy and colorful unicorn cake that is not only a delight to eat but also a breathtaking centerpiece for any celebration. Whether for a birthday, baby shower, or any special event, these finishing touches will ensure that your unicorn cake sparkles with magic and charm!tion and a little creativity, your unicorn cake will shine as the star of any celebration!
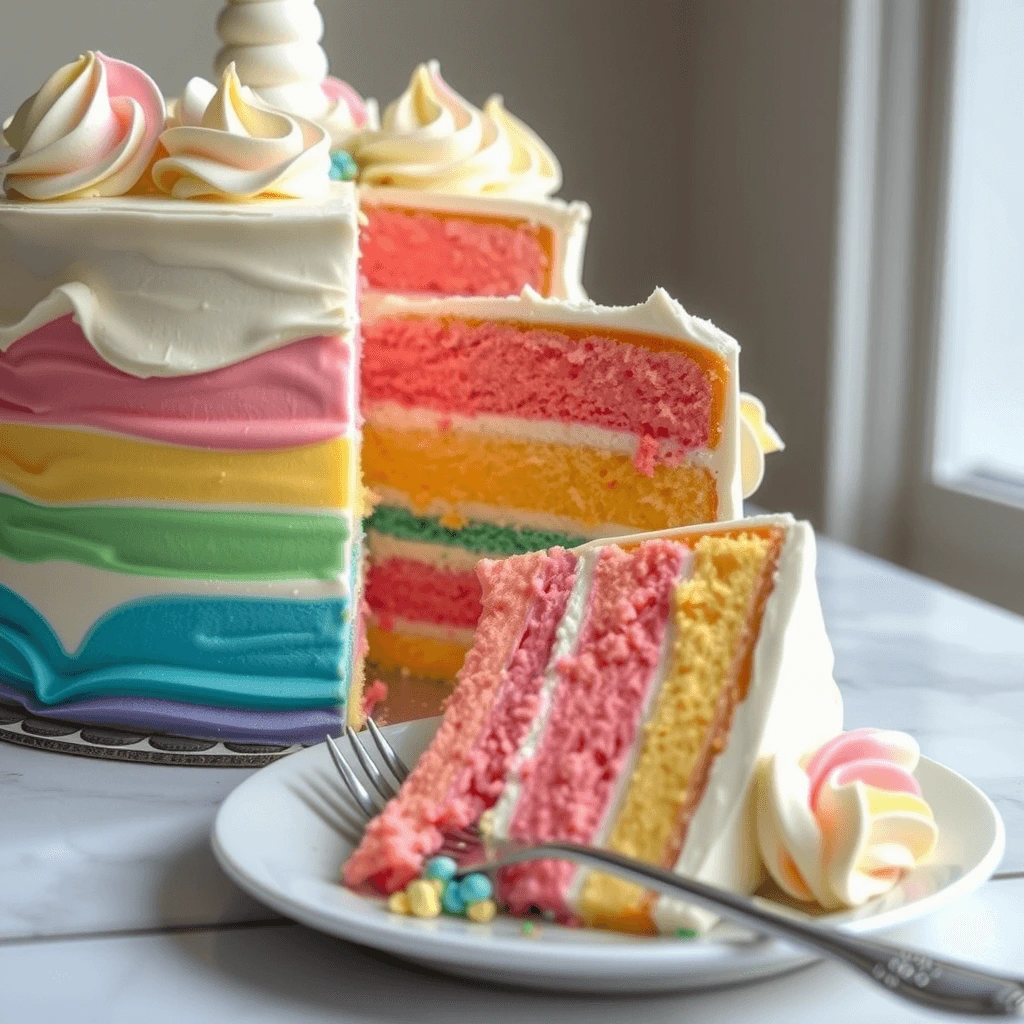
Step-by-Step Assembly for a No-Fail Unicorn Cake
Assembling the Layers Without Cracks or Sliding
When creating a fluffy and colorful unicorn cake, proper assembly is just as important as baking and decorating. If the layers are not stacked correctly, the cake can tilt, slide, or even crack, making it difficult to frost and serve. However, by following the right techniques, you can ensure that each layer stays perfectly in place while maintaining a soft, fluffy texture. Whether you are a beginner or an experienced baker, these expert tips will help you assemble a stunning and stable unicorn cake with ease.
Why Proper Layer Assembly Matters
Since unicorn cakes are often tall and multi-layered, stability is key. Without the correct methods, the cake may shift, causing uneven layers and making decorating more challenging. Furthermore, a poorly assembled cake is more likely to collapse or become difficult to slice.
The Benefits of a Well-Assembled Cake
- Keeps the layers stable and balanced.
- Prevents frosting from squeezing out between layers.
- Ensures the cake remains fluffy and intact when sliced.
- Creates a professional-looking finish that is easy to frost and decorate.
Common Mistakes That Lead to Cracks or Sliding
- Stacking layers while they are still warm, causing them to shift.
- Using too much or too little frosting between layers.
- Not leveling the layers before assembling.
- Applying uneven pressure when stacking, leading to cracks.
Preparing Cake Layers for a Stable Stack
Before assembling a fluffy and colorful unicorn cake, proper preparation is essential. Taking the time to set up the layers correctly will make the stacking process much easier.
How to Ensure Cake Layers Are Ready for Stacking
- Cool the Layers Completely – Warm cake layers are too fragile to stack properly.
- Level Each Layer Evenly – Trim the domed tops to create a flat surface.
- Remove Excess Crumbs – Brush away loose crumbs to keep the frosting clean.
- Chill the Layers for 20 Minutes – Slightly firm layers hold their shape better.
Why Leveling the Layers Is Crucial
- Prevents the cake from leaning or looking uneven.
- Helps frosting spread smoothly without gaps or air pockets.
- Ensures the final cake has a polished, professional appearance.
Using the Right Frosting for Secure Layering
Since frosting acts as the “glue” that holds the cake together, choosing the right type is essential. A fluffy and colorful unicorn cake requires a buttercream that is thick enough to keep layers from sliding yet soft enough to create a light, airy texture.
Best Frosting Options for Layer Stability
- American Buttercream – Thick and firm, making it great for stacking.
- Swiss Meringue Buttercream – Smooth and stable, perfect for tall cakes.
- Ganache Frosting – Provides extra support for delicate layers.
How to Apply Frosting for Maximum Stability
- Pipe a Frosting Border First – Creates a barrier to keep filling from leaking out.
- Spread an Even Layer of Frosting – Use an offset spatula for uniform coverage.
- Stack Layers Gently – Lower each layer slowly instead of pressing down.
- Check for Alignment – Rotate the cake to make sure the layers are even.
Preventing Frosting from Squeezing Out
- Use just enough frosting to hold the layers together without excess.
- Chill the cake after stacking to set the frosting before final decoration.
- If sliding occurs, insert a cake dowel or straw for extra support.
Assembling Cake Layers Without Cracks
To avoid cracks, handling the cake layers with care is essential. Although cake is delicate, using the right techniques will prevent damage during stacking.
How to Prevent Cake Layers from Cracking
- Use a Cake Lifter or Large Spatula – This prevents breakage when moving layers.
- Support the Bottom of Each Layer – Place your hand under the cake while transferring.
- Lower Each Layer Gently – Never drop or press down forcefully.
- Fill Gaps with Buttercream – This adds stability and prevents air pockets.
What to Do If a Layer Cracks
- If a small crack appears, apply a thin layer of frosting to seal it.
- If a layer breaks completely, use extra buttercream to “glue” it back together.
- Avoid stacking cracked layers on top of one another to prevent further damage.
Keeping Layers From Sliding During Assembly
Even if the layers are stacked properly, they may still shift if the cake is not assembled correctly. Fortunately, using simple techniques can prevent sliding and ensure the cake remains stable.
How to Prevent Sliding Between Layers
- Chill the layers slightly before stacking to firm up the cake structure.
- Use a turntable while assembling to keep everything aligned.
- If the cake is extra tall, insert dowels or straws for additional support.
Tips for Securing a Tall Unicorn Cake
- Stack layers in pairs before adding the next set to distribute weight evenly.
- Apply a thin crumb coat to lock everything in place before the final frosting layer.
- Let the cake rest in the refrigerator for 30 minutes before decorating.
Final Steps Before Decorating
Once all the layers are stacked, checking for stability is important before moving on to frosting and decorations. A well-assembled cake will hold its shape throughout the decorating process and look flawless when served.
Final Checklist for a Secure Unicorn Cake
- Ensure all layers are evenly aligned and centered.
- Gently press down to check for any shifting or air pockets.
- Refrigerate the cake to set the frosting before applying decorations.
Why Letting the Cake Rest Improves Stability
- Allows frosting to firm up, making it easier to work with.
- Prevents decorations from sliding down the sides.
- Ensures the cake remains intact while serving and slicing.
Storing a Layered Unicorn Cake Before Serving
If the cake needs to be stored before serving, keeping it at the right temperature will help maintain its structure. Improper storage can cause sliding or make the cake too dry.
Best Storage Methods for a Layered Cake
- Short-Term (Up to 24 Hours) – Keep at room temperature under a cake dome.
- Medium-Term (Up to 3 Days) – Store in the refrigerator, covered lightly.
- Long-Term (Up to 3 Months) – Wrap in plastic wrap and freeze.
Preventing Layer Separation in Storage
- Always refrigerate a layered cake on a flat, level surface.
- If storing for longer periods, add a cake board between layers for support.
- Allow refrigerated cakes to come to room temperature before serving.
Final Thoughts on Assembling Cake Layers Without Cracks or Sliding
Mastering how to assemble a fluffy and colorful unicorn cake is essential for achieving a professional and visually stunning result. By using the right frosting techniques, handling layers carefully, and ensuring stability, you can prevent cracks and sliding while keeping the cake light and airy.
With these expert tips, assembling a unicorn cake becomes a stress-free and enjoyable process. Whether for a birthday, a special event, or a fun baking project, these techniques will guarantee that every layer stays in place, ensuring a beautiful, delicious, and picture-perfect unicorn cake!es that your cake is not only a visual masterpiece but also a joy to slice and serve!
Piping Techniques for the Unicorn Mane and Details
When decorating a fluffy and colorful unicorn cake, the piped mane and intricate details bring the magical theme to life. Not only does the buttercream mane add texture and dimension, but it also enhances the whimsical aesthetic. However, achieving a flawless piped design requires the right tools, techniques, and a little bit of patience. By mastering different piping methods, you can create a stunning unicorn mane that looks as professional as it is enchanting.
Why Piping Techniques Matter for a Fluffy and Colorful Unicorn Cake
A well-piped unicorn mane transforms the cake from simple to spectacular. Since unicorn cakes are all about vibrant colors and dreamy swirls, the mane should be dynamic and visually appealing. The right piping techniques ensure that the mane flows beautifully while maintaining its structure.
The Importance of Precision in Piping
- Creates a realistic and elegant unicorn mane effect.
- Prevents buttercream from melting or losing its shape.
- Adds layers of color and texture for a more magical appearance.
- Helps define key cake details, making the design stand out even more.
Common Mistakes to Avoid
- Using buttercream that is too soft, causing the piped mane to collapse.
- Not practicing piping techniques before decorating the cake.
- Holding the piping bag at the wrong angle, leading to uneven swirls.
- Applying too much pressure, which can distort the buttercream shapes.
Choosing the Right Piping Tips for the Unicorn Mane
Since the mane should have depth and movement, selecting the right piping tips is crucial. Using different tips allows for a variety of textures, making the mane look more natural and visually interesting.
Best Piping Tips for a Fluffy and Colorful Unicorn Cake
- Large Star Tip (1M) – Ideal for creating bold, flowing rosettes.
- French Star Tip (6B) – Produces ridged swirls for extra dimension.
- Open Round Tip (2A) – Perfect for smooth dollops of buttercream.
- Leaf Tip (352) – Adds realistic foliage effects to complement the mane.
How to Use Multiple Piping Tips for a Stunning Mane
- Start with the largest piping tip to form the main structure.
- Add texture by using a smaller tip between the larger swirls.
- Alternate between different colors to enhance the depth and vibrancy.
Preparing Buttercream for Piping
The consistency of the buttercream plays a major role in achieving clean, structured piping. If the frosting is too soft, the designs will not hold their shape. On the other hand, if it is too stiff, piping becomes difficult and uneven.
How to Achieve the Perfect Buttercream Consistency
- Use High-Quality Butter – Softened butter creates a smooth, creamy texture.
- Add Powdered Sugar Gradually – This prevents a grainy consistency.
- Incorporate a Small Amount of Heavy Cream – This helps achieve a pipeable texture.
- Test the Buttercream First – Pipe a small swirl on parchment paper to ensure it holds its shape.
Adjusting Consistency Based on Piping Needs
- If the buttercream is too soft, refrigerate it for 10-15 minutes before piping.
- If it is too stiff, add a teaspoon of milk or heavy cream to loosen it slightly.
- Avoid overmixing, as this can introduce air bubbles, making piping less smooth.
Creating a Multi-Colored Unicorn Mane
Since unicorn cakes are known for their bright, blended hues, a single-color mane may not create the desired magical effect. Instead, using multiple colors in a seamless blend enhances the cake’s whimsical charm.
How to Pipe a Rainbow Mane with Multiple Colors
- Divide buttercream into separate bowls and add gel food coloring to each.
- Lay out a large piece of plastic wrap and pipe each color in a row.
- Roll the plastic wrap into a log shape and insert it into a piping bag.
- Pipe as usual, and watch as the colors blend beautifully into a rainbow effect.
Tips for Achieving a Perfect Gradient Effect
- Use colors that complement each other to avoid muddy shades.
- Twist the piping bag slightly while piping to enhance color blending.
- If the colors are not coming through evenly, adjust the bag’s position slightly.
Piping Rosettes, Swirls, and Stars for the Mane
A unicorn’s mane should have movement and texture, which can be achieved through various piping techniques. Combining rosettes, swirls, and stars creates an intricate and professional look.
How to Pipe Rosettes for a Voluminous Mane
- Hold the Piping Bag at a 90° Angle – This ensures even pressure.
- Start in the Center and Move Outward – Pipe in a circular motion.
- Apply Consistent Pressure – This keeps the rosettes full and uniform.
- Release the Pressure Before Lifting the Tip – This prevents buttercream tails.
Mastering Pipe Swirls for a Dynamic Look
- Begin with a firm base before swirling upward.
- Rotate the piping bag slightly as you pipe for a soft curve.
- Combine different swirl sizes to add variety and depth.
How to Pipe Buttercream Stars for Extra Detail
- Use a small star tip to add tiny accents around the mane.
- Press firmly, then pull away gently to form clean peaks.
- Pipe stars in clusters for a more natural effect.
Adding Details to Enhance the Unicorn’s Features
Beyond the mane, additional piped buttercream details bring the unicorn cake to life.
Best Piping Techniques for Unicorn Features
- Piped Eyes – Use a fine round tip and pipe curved lines for a soft expression.
- Eyelashes – Pipe thin lines outward for a whimsical, dreamy look.
- Forelock Curls – Use a small round tip to create curly strands of hair.
Ensuring Fine Details Look Crisp
- Use black or dark-colored buttercream for contrast.
- Chill the cake slightly before piping details to prevent smudging.
- If a mistake is made, gently lift the buttercream off with a toothpick and redo the section.
Storing and Transporting a Piped Unicorn Cake
Once the mane and details are piped, it’s essential to store and transport the cake carefully to maintain the design.
Best Practices for Preserving the Piped Buttercream
- Let the cake sit at room temperature for 10-15 minutes to allow the buttercream to set.
- Store in a cake box or covered container to prevent dust or smudging.
- Avoid direct sunlight, as heat can soften the buttercream too much.
Transporting a Decorated Unicorn Cake Safely
- Place the cake on a non-slip surface in the car.
- Use a sturdy cake board to prevent shifting.
- If possible, chill the cake slightly before transport to help it hold its shape.
Final Thoughts on Piping the Perfect Unicorn Mane and Details
Mastering how to pipe a fluffy and colorful unicorn cake requires the right tools, techniques, and attention to detail. By combining various piping tips, using multiple colors, and applying careful pressure, you can create a stunning unicorn mane that looks as magical as it tastes.
With these expert techniques, decorating a unicorn cake becomes an enjoyable and rewarding experience. Whether for a birthday, a special event, or a fun baking project, these piping methods will ensure that every swirl, rosette, and star looks picture-perfect and full of whimsical charm!icorn cake, delighting everyone at the party with its enchanting design!
How to Create a Stable Structure for a Tall, Show-Stopping Cake
When making a tall, multi-layered cake—like a stunning unicorn cake with vibrant rainbow layers—it’s essential to build a stable structure to prevent leaning, sliding, or collapsing. A well-structured cake not only looks impressive but also stays intact during cutting, serving, and transport. Here’s a detailed guide on how to create a solid foundation for your tall, show-stopping masterpiece.
1. Start with a Sturdy Base
The base of your cake provides the foundation for the entire structure, so it needs to be strong enough to support the weight of multiple layers and decorations.
- How to do it: Use a thick, sturdy cake board that’s at least 2 inches wider than the diameter of your cake. For exceptionally tall cakes, consider using a cake drum or stacking multiple boards together for extra durability.
- Pro Tip: Add a non-slip mat or a small dollop of frosting under the bottom cake layer to prevent it from sliding on the board.
2. Chill the Cake Layers
Chilled cake layers are firmer and easier to handle, making them less likely to crack or crumble during assembly. Cold layers also help the frosting set quickly, reducing the risk of sliding.
- How to do it: After baking and cooling the layers, wrap them tightly in plastic wrap and refrigerate for at least 30-60 minutes. For longer storage, freeze the layers and thaw them in the fridge overnight before assembling.
- Pro Tip: Slightly chilled layers are easier to stack and frost without creating crumbs.
3. Level the Layers for Even Stacking
Uneven layers can create instability in a tall cake, causing it to tilt or lean. Leveling each layer ensures a flat, uniform surface for stacking.
- How to do it: Use a serrated knife or cake leveler to trim any domed tops. Rotate the cake as you cut to ensure evenness.
- Pro Tip: Place each trimmed layer on a flat surface, like a cutting board, to check for evenness before stacking.
4. Apply Even Layers of Frosting Between Cakes
Frosting between layers acts as an adhesive, holding the cake together and preventing layers from sliding. However, too much frosting can create instability.
- How to do it: Use an offset spatula to spread a thin, even layer of frosting (about ¼ inch thick) between each layer. Avoid overloading with frosting, as it can cause the layers to shift under the weight of the cake.
- Pro Tip: Pipe a frosting dam around the edges of each layer before filling the center. This helps prevent frosting from spilling out the sides.
5. Insert Dowels for Support
For cakes taller than 3-4 layers, dowels provide additional support to prevent the cake from collapsing under its weight.
- How to do it:
- Insert dowels (wooden, plastic, or sturdy straws) into the bottom tier of the cake, spacing them evenly in a circular pattern.
- Cut the dowels to match the height of the cake layer, ensuring they are flush with the top.
- Place a cake board on top of the dowels before stacking the next tier. Repeat for each additional tier.
- Pro Tip: Use food-safe dowels and ensure they’re placed symmetrically for even weight distribution.
6. Add a Center Dowel for Extra Stability
A center dowel is particularly useful for very tall cakes or cakes that will be transported. It anchors all the layers together, preventing them from shifting or toppling.
- How to do it:
- Sharpen one end of a long wooden dowel.
- Insert it through the center of the cake, starting from the top and pushing it down through all the layers and cake boards until it reaches the base.
- Ensure the dowel is straight and secure by gently pressing it into the bottom cake board.
- Pro Tip: Cover the exposed end of the dowel with frosting to blend it into the cake.
7. Chill the Cake During Assembly
Keeping the cake chilled during the assembly process helps maintain its structure and prevents the frosting from becoming too soft.
- How to do it: After stacking every 2-3 layers, refrigerate the cake for 15-20 minutes to allow the frosting to set. This step is especially important if you’re working with a tall cake in a warm environment.
- Pro Tip: Assemble the cake in a cool room to keep the frosting and cake layers firm.
8. Apply a Crumb Coat and Chill
A crumb coat—a thin layer of frosting applied over the entire cake—locks in crumbs and provides a smooth surface for the final layer of frosting. It also helps stabilize the cake by “gluing” the layers together.
- How to do it: Spread a thin layer of frosting over the sides and top of the cake using an offset spatula. Smooth it out and chill the cake for 15-30 minutes to set the crumb coat.
- Pro Tip: Use a bench scraper to achieve a clean, even crumb coat.
9. Frost and Decorate with Care
The final layer of frosting and decorations adds weight to the cake, so it’s important to apply them carefully to maintain stability.
- How to do it: Frost the cake in thin layers, smoothing each one before adding the next. Rotate the cake on a turntable for even coverage.
- Pro Tip: Avoid placing heavy decorations, like fondant or toppers, near the edges, as this can cause imbalance. Instead, position them closer to the center for better support.
10. Store and Transport with Stability in Mind
Once your cake is fully assembled and decorated, proper storage and transport ensure it stays stable until it’s ready to be served.
- How to do it:
- Refrigerate the cake to firm up the frosting before transport.
- Use a sturdy cake box with a non-slip mat underneath the cake board.
- Transport the cake on a flat surface in your vehicle, such as the trunk or floor, and drive carefully to avoid sudden stops or sharp turns.
- Pro Tip: If possible, assemble the final tier or add delicate decorations at the venue to minimize the risk of damage during transport.
11. Test the Stability Before Serving
Before serving the cake, check its stability to ensure it’s ready for cutting and slicing.
- How to do it: Gently press the sides of the cake and ensure it doesn’t wobble. If necessary, add additional supports or re-align layers.
- Pro Tip: Chill the cake briefly before cutting to make slicing easier and to preserve the integrity of the layers.
By following these steps, you can confidently create a tall, show-stopping unicorn cake that is both visually stunning and structurally sound. With proper preparation and attention to detail, your cake will remain stable and impress guests from the first glance to the last bite!
Troubleshooting Common Issues: Uneven Frosting, Drooping Decorations, and More
No matter how much preparation goes into making a unicorn cake, common issues like uneven frosting or drooping decorations can still arise. However, these problems can be quickly addressed with a few simple tips and techniques. Below, we’ll cover solutions for the most common challenges so you can ensure your cake is flawless and ready to impress.
1. Uneven Frosting
Uneven frosting can make your cake look lopsided or unpolished, detracting from its overall presentation. This issue often occurs due to inconsistent frosting application, uneven cake layers, or an unstable cake base.
Causes of Uneven Frosting:
- Layers are not leveled before stacking.
- Frosting is applied unevenly or in varying thicknesses.
- The turntable or cake is not stable during frosting.
How to Fix It:
- Level the Layers: Before frosting, use a serrated knife or cake leveler to trim any domed tops from the cake layers. Start with a perfectly flat base to make the frosting process easier.
- Use a Bench Scraper: Hold a bench scraper against the sides of the cake while rotating it on a turntable. This helps smooth the frosting evenly around the cake.
- Apply a Crumb Coat: Start with a thin crumb coat to seal in crumbs and create a uniform base. After chilling the crumb coat, apply the final layer of frosting more evenly.
- Check Your Tools: Ensure your spatula or bench scraper is clean and free of excess frosting while smoothing. Dipping your tools in warm water and drying them before use can help create a flawless finish.
2. Drooping Decorations
Drooping decorations, like piped buttercream swirls or fondant elements, can ruin the appearance of your unicorn cake. This issue typically happens when the frosting or decorations are too heavy, soft, or poorly supported.
Causes of Drooping Decorations:
- Buttercream is too soft or warm.
- Decorations are placed on uneven or unstable surfaces.
- The cake is exposed to warm temperatures or high humidity.
How to Fix It:
- Chill the Cake: Refrigerate the cake before decorating to ensure the base is firm. Chill the cake again after adding decorations to help set them in place.
- Stabilize the Frosting: Use a sturdy buttercream recipe with enough powdered sugar to create a firm texture. If the frosting is too soft, refrigerate it for 15-20 minutes before piping.
- Support Heavy Decorations: Use toothpicks or food-safe dowels to secure heavier decorations like fondant horns or ears. Position them carefully to avoid uneven weight distribution.
- Work in a Cool Environment: Avoid decorating in a warm room. If the cake will be displayed outdoors, keep it shaded or covered to prevent melting or drooping.
3. Frosting Cracks or Air Bubbles
Cracked or bubbly frosting can make the cake’s surface look unpolished and uneven. This issue is often due to improper frosting consistency or temperature changes.
Causes of Cracks or Air Bubbles:
- Frosting is too thick or dry.
- The cake was chilled for too long before applying frosting.
- Air was whipped into the frosting during mixing.
How to Fix It:
- Adjust Frosting Consistency: Add a small amount of milk, heavy cream, or softened butter to the frosting to make it smoother and more pliable.
- Eliminate Air Bubbles: Mix frosting on low speed to avoid incorporating air. For pre-mixed frosting, smooth it out with a spatula to release trapped air.
- Fix Cracks: If cracks form after frosting the cake, apply a small amount of softened buttercream over the cracks and smooth it out with an offset spatula.
4. Sliding or Leaning Layers
Sliding or leaning cake layers can result in an unstable cake that looks messy and may even collapse.
Causes of Sliding or Leaning Layers:
- Frosting between layers is too thick or soft.
- Uneven cake layers create an unstable stack.
- The cake is assembled on an unstable base.
How to Fix It:
- Level the Layers: Always trim cake layers to ensure they’re flat and even before stacking.
- Pipe a Frosting Dam: Pipe a ring of frosting around the edge of each layer before adding filling or frosting. This prevents the filling from spilling out and destabilizing the cake.
- Use Dowels for Support: For tall cakes, insert dowels or sturdy straws into the center of the cake to keep the layers stable.
- Chill Between Layers: Refrigerate the cake briefly after stacking each layer to allow the frosting to set and prevent sliding.
5. Fading or Bleeding Colors
Bright, vibrant colors are essential for a unicorn cake, but they can fade or bleed into each other if not handled carefully.
Causes of Fading or Bleeding Colors:
- Frosting is exposed to direct sunlight or high humidity.
- Gel food coloring wasn’t thoroughly mixed into the frosting.
- The frosting was applied to a wet or overly moist surface.
How to Fix It:
- Use Gel Food Coloring: Gel-based colors are more concentrated and less likely to fade compared to liquid food coloring.
- Avoid Moisture: Ensure the cake layers are completely cooled and crumb-coated before applying colorful frosting.
- Store Properly: Keep the cake in a cool, dry place away from sunlight to preserve the vibrancy of the colors.
6. Uneven Piping Designs
Uneven piping can make the unicorn mane or other decorative elements look inconsistent and less polished.
Causes of Uneven Piping:
- Inconsistent pressure on the piping bag.
- Frosting is too stiff or soft.
- Piping tips are clogged or dirty.
How to Fix It:
- Practice First: Practice your piping technique on parchment paper before decorating the cake to ensure consistent designs.
- Adjust Frosting Consistency: If the frosting is too stiff, add a small amount of milk or heavy cream. If it’s too soft, chill it for a few minutes before piping.
- Use the Right Tools: Keep your piping bag clean, and make sure the tips are free of clogs. Use a coupler to easily switch between tips if needed.
7. Decorations Falling Off
If edible or fondant decorations don’t adhere properly to the cake, they may slide off or fall during display or transport.
Causes of Falling Decorations:
- Frosting surface is too smooth or dry.
- Decorations are too heavy or improperly secured.
How to Fix It:
- Use Edible Glue or Buttercream: Attach decorations using a small amount of buttercream or edible glue to ensure they stay in place.
- Secure Heavy Items: Use toothpicks or food-safe skewers to anchor heavy decorations like fondant unicorn horns or ears.
- Chill to Set Decorations: After applying decorations, chill the cake to set them in place and prevent movement.
8. Crumbs in the Frosting
Crumbs can get caught in the frosting, creating a messy and unpolished look.
How to Fix It:
- Apply a Crumb Coat: Seal in crumbs with a thin layer of frosting before adding the final layer.
- Work Gently: Use a light touch when spreading frosting to avoid disturbing the cake layers.
By addressing these common issues with careful techniques and proper preparation, you can create a stunning unicorn cake that’s both structurally sound and visually magical. With practice and a little patience, even the most challenging problems can be solved, leaving you with a flawless show-stopping dessert!
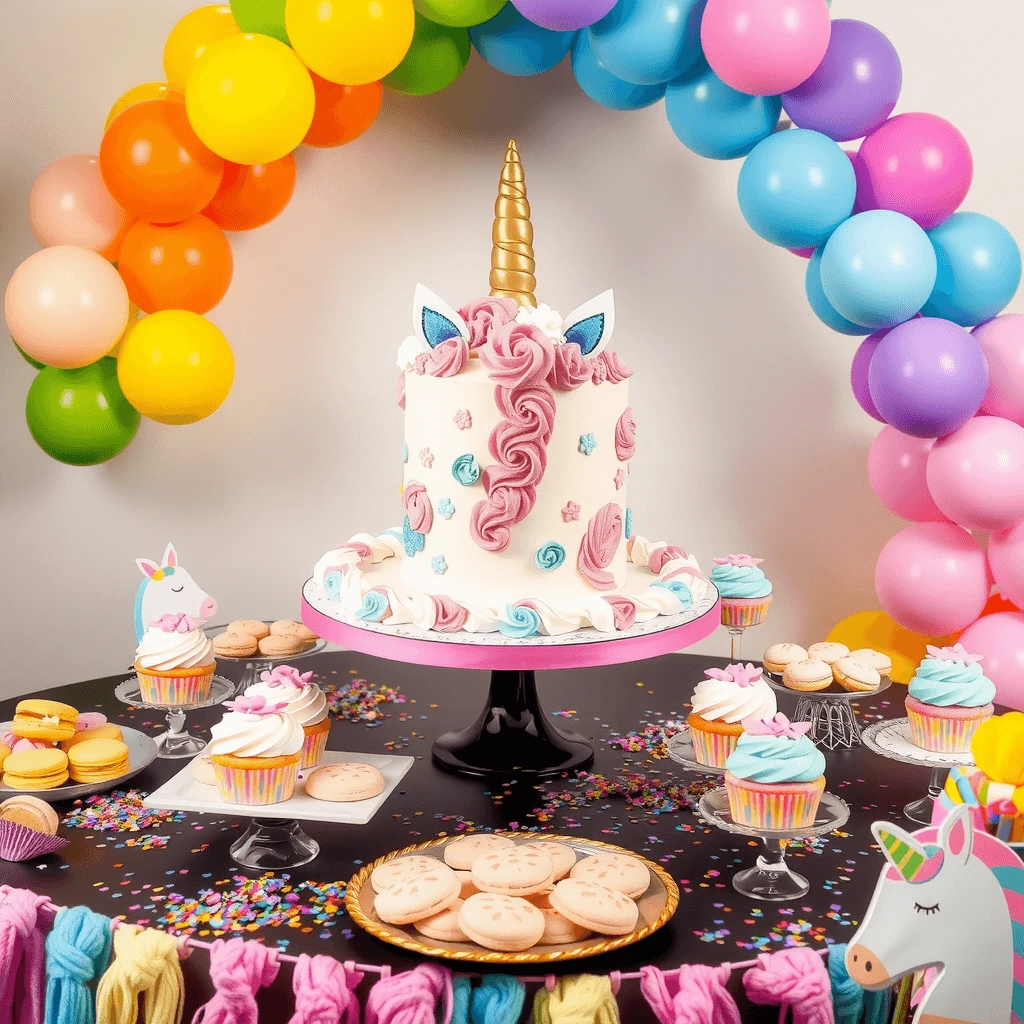
Serving and Storing Your Unicorn Cake
Tips for Slicing the Cake to Showcase the Colorful Layers
When making a fluffy and colorful unicorn cake, the magic doesn’t stop at decorating. The real excitement comes when slicing the cake to reveal the vibrant, multi-layered masterpiece inside. However, cutting a tall, delicate cake requires precision to ensure each slice remains clean, even, and visually stunning. By using the right tools and techniques, you can showcase every bright, beautiful layer while maintaining the cake’s fluffy texture.
Why Proper Slicing Is Important
Since a unicorn cake is known for its bold, eye-catching colors, slicing it correctly ensures that each piece highlights the rainbow effect. A poorly cut slice can cause layers to collapse or colors to blend together, diminishing the cake’s visual impact. Therefore, understanding the best slicing techniques will help keep the layers defined and the presentation flawless.
The Benefits of Proper Cake Slicing
- Ensures that each slice remains neat and evenly portioned.
- Preserves the fluffy texture without compressing the layers.
- Prevents colors from mixing or becoming smudged.
- Creates a stunning visual impact when the cake is served.
Common Mistakes That Ruin the Cake’s Appearance
- Using the wrong knife, which tears through the layers instead of cutting smoothly.
- Cutting too soon, causing crumbs to mix into the frosting.
- Pressing too hard, which flattens the fluffy layers and distorts the shape.
Choosing the Right Knife for Slicing
The type of knife you use plays a major role in achieving clean, precise slices. A sharp, properly sized knife will glide through the layers without crushing the cake.
Best Knives for Slicing a Fluffy and Colorful Unicorn Cake
- Serrated Bread Knife – Ideal for cutting through soft cakes without smearing the frosting.
- Long, Thin Chef’s Knife – Works well for tall cakes with multiple layers.
- Cake Slicer or Pastry Knife – Provides the cleanest cuts for a polished presentation.
Why a Sharp Knife Makes a Difference
- Reduces drag and crumbs, keeping the layers neat.
- Prevents excessive pressure, so the cake retains its fluffiness.
- Helps achieve even, symmetrical slices.
Preparing the Cake for Slicing
Before cutting into a fluffy and colorful unicorn cake, a few preparation steps can make the slicing process easier. Taking the time to set up properly will help avoid mistakes and ensure clean, beautiful slices.
How to Get the Cake Ready for Cutting
- Chill the Cake for 15-20 Minutes – Slightly firming up the buttercream makes slicing easier.
- Use a Warm, Clean Knife – Run the knife under hot water and wipe it dry before cutting.
- Decide on Slice Sizes – Plan whether to cut traditional wedges or rectangular slices.
- Use a Gentle Sawing Motion – Avoid pressing down too hard to keep layers intact.
Why Chilling Helps with Clean Slices
- Prevents buttercream from smearing across the colorful layers.
- Keeps the cake stable while cutting, reducing the risk of collapsing.
- Makes fondant decorations or toppers easier to remove before slicing.
Slicing Techniques for Maximum Visual Impact
A unicorn cake should look just as stunning when sliced as it does when whole. Using the right cutting methods ensures that each slice displays even, bold layers instead of a messy mix of colors.
How to Slice a Round Layered Unicorn Cake
- Score the Cake Lightly – Use the knife’s tip to outline where each slice will go.
- Cut a Central Wedge First – This makes it easier to remove the first piece cleanly.
- Use a Gentle Sawing Motion – Let the knife glide through rather than pressing down.
- Clean the Knife Between Cuts – Wipe off excess frosting after each slice for a polished look.
Keeping the Layers Perfectly Defined
- Cut straight down instead of angling the knife.
- Wipe away any crumbs before making the next cut.
- Ensure each slice includes every color from top to bottom.
How to Slice a Tall Unicorn Cake Without Collapsing It
- Cut the Cake in Half First – Then divide each half into smaller portions.
- Use a Cake Lifter or Spatula – Carefully transfer slices without breaking them.
- Support the Layers with a Cake Server – This keeps the frosting intact.
Preventing Tall Cake Slices from Falling Apart
- If the cake is taller than six inches, consider cutting each slice in half horizontally.
- Keep the knife straight to prevent uneven cuts.
- If serving a crowd, opt for smaller, rectangular portions instead of large wedges.
Serving the Cake for Maximum Presentation
Once the cake is sliced, the final step is presenting it beautifully. Since the layers are the highlight of the unicorn cake, arranging the slices properly enhances the visual appeal.
Best Ways to Plate Unicorn Cake Slices
- Use white or pastel-colored plates to make the vibrant layers pop.
- Drizzle each slice with extra buttercream or edible glitter for a magical effect.
- Serve with a side of whipped cream or fresh berries for added contrast.
Avoiding Messy Serving
- Use a cake server or pie spatula instead of picking up slices by hand.
- If serving multiple slices, stagger them slightly to showcase the colorful layers.
- Keep napkins nearby, as bright-colored cakes can stain fingers.
Storing Leftover Slices Without Losing Their Shape
If there are leftovers, storing the cake properly ensures that the colors remain vibrant and the texture stays soft. Improper storage can cause layers to dry out or lose their fluffiness.
Best Storage Methods for Leftover Unicorn Cake
- Room Temperature (Up to 24 Hours) – Cover the cake loosely with plastic wrap.
- Refrigerated (Up to 3 Days) – Place slices in an airtight container to retain moisture.
- Frozen (Up to 3 Months) – Wrap each slice individually in plastic wrap and foil.
Keeping the Colors Bright Even After Storage
- Avoid placing the cake in direct sunlight, as colors may fade.
- Let refrigerated slices come to room temperature before serving.
- If the cake seems dry, brush the cut sides with a light simple syrup before eating.
Final Thoughts on Slicing a Unicorn Cake
Mastering how to slice a fluffy and colorful unicorn cake takes just as much care as baking and decorating. By using the right knife, preparing the cake properly, and serving it thoughtfully, you can ensure that each slice showcases the beautiful, vibrant layers inside.
By following these expert tips, cutting a unicorn cake becomes effortless, allowing every guest to enjoy a picture-perfect slice. Whether for a birthday, a special occasion, or a fun gathering, these slicing techniques will guarantee that your unicorn cake looks just as magical on the plate as it does on the cake stand! rainbow layers and make every guest feel like they’re getting a slice of edible art!
How to Store Leftover Cake to Maintain Freshness and Fluffiness
After the celebration is over and your unicorn cake has wowed the crowd, there’s often some cake left over. Proper storage is key to maintaining the cake’s freshness, flavor, and fluffiness, ensuring it stays delicious for days to come. Whether you’re storing it for a day or a week, these tips will help preserve your cake’s magical taste and texture.
1. Start with Proper Slicing and Handling
The way you handle leftover cake before storage impacts its longevity. Exposed cake layers can dry out quickly, so it’s essential to minimize their exposure to air.
- How to Do It:
- Slice the remaining cake into portions or keep it whole if you plan to serve it again soon.
- Cover the exposed sides of the cake with a thin layer of buttercream or plastic wrap to seal in moisture.
- Pro Tip: Use a clean knife for slicing to avoid introducing crumbs or debris into the storage process.
2. Store in an Airtight Container
Air exposure is the primary cause of dryness in leftover cake. An airtight container creates a barrier that helps retain moisture and prevents the cake from absorbing odors from other foods.
- How to Do It:
- Place individual slices or the entire cake in an airtight container. If the cake is tall or heavily decorated, use a container with enough height to prevent squishing.
- If you don’t have an airtight container, wrap the cake tightly in plastic wrap and then in aluminum foil for extra protection.
- Pro Tip: For decorated cakes, insert toothpicks into the top to prevent plastic wrap or foil from touching the frosting.
3. Refrigerate for Short-Term Storage
If you plan to eat the leftover cake within a few days, refrigeration is the best option. While refrigeration can dry out cakes over time, proper wrapping or sealing prevents this.
- How to Do It:
- Wrap the cake securely or place it in an airtight container before refrigerating.
- Keep the cake on a flat surface in the fridge to avoid tilting or sliding layers.
- Pro Tip: If your cake has fondant decorations, avoid refrigerating for extended periods, as condensation can make the fondant sticky.
4. Freeze for Long-Term Storage
Freezing is the best way to preserve leftover cake for longer periods (up to 3 months) while maintaining its freshness and fluffiness. Proper freezing also prevents freezer burn, which can ruin the taste and texture.
How to Freeze Cake:
- Wrap Slices or Layers Individually: Use plastic wrap to tightly wrap each slice or layer, ensuring no parts are exposed.
- Double Wrap for Extra Protection: Wrap the plastic-wrapped cake in aluminum foil or place it in a freezer-safe bag or container to prevent freezer burn.
- Label and Date: Write the storage date on the wrapping or container to keep track of how long the cake has been frozen.
Pro Tip: If freezing a cake with frosting, flash freeze it first by placing it uncovered in the freezer for 1-2 hours. Once the frosting is firm, wrap it securely to avoid smudging.
5. Bring Cake Back to Room Temperature Before Serving
Cold or frozen cake can lose its fluffiness if served immediately. Allowing it to come to room temperature helps restore its original texture and flavor.
- How to Do It:
- For refrigerated cake, let it sit at room temperature for 30 minutes to 1 hour before serving.
- For frozen cake, thaw it in the refrigerator overnight and then let it come to room temperature before serving.
- Pro Tip: To refresh the cake further, you can microwave individual slices for 10-15 seconds to soften the frosting and fluff up the layers.
6. Store Decorated Cakes with Care
If your leftover unicorn cake is heavily decorated with buttercream swirls, fondant, or edible glitter, extra care is needed to preserve its appearance during storage.
- How to Do It:
- Use a cake dome or tall container to protect decorations from being smudged or flattened.
- For fondant or sugar decorations, store them separately at room temperature in an airtight container to prevent them from becoming sticky or discolored.
- Pro Tip: Add a layer of parchment paper between the decorations and the container lid to avoid direct contact.
7. Avoid Storing in Humid or Warm Environments
Warm or humid environments can cause frosting to melt, decorations to slide, and layers to become soggy.
- How to Do It:
- Always store leftover cake in a cool, dry place, such as a refrigerator or freezer.
- If the cake needs to be transported, use a cooler or insulated bag with ice packs to maintain a stable temperature.
- Pro Tip: Avoid storing cake near strong-smelling foods in the fridge, as it can absorb odors.
8. Refreshing Dry Cake
If your leftover cake does dry out slightly, there are ways to refresh it and restore some of its moisture.
- How to Do It:
- Brush the cake layers lightly with simple syrup (a mixture of sugar and water) to add moisture without making the cake soggy.
- Serve with a dollop of whipped cream, fresh fruit, or ice cream to enhance the texture and flavor.
- Pro Tip: Warm the cake briefly in the microwave or oven to soften it before serving.
9. Portion Control for Easy Storage
If you expect to have leftovers, slicing the cake into individual portions before storage can make it easier to grab a single serving without exposing the rest of the cake.
- How to Do It:
- Slice the cake into even pieces and wrap each piece individually.
- Store the wrapped slices in a single airtight container or freeze them for long-term storage.
- Pro Tip: For a taller cake, cut slices in half horizontally to create smaller portions that are easier to handle and store.
10. Monitor Storage Time
Even with proper storage, leftover cake has a limited shelf life. Keeping track of how long your cake has been stored ensures it’s enjoyed at its best.
- How to Do It:
- Refrigerated cake typically stays fresh for 3-5 days.
- Frozen cake can last up to 3 months if properly wrapped.
- Pro Tip: Always check for signs of spoilage, such as a sour smell, unusual texture, or discoloration, before serving leftover cake.
By following these tips, you can store leftover unicorn cake while preserving its freshness, flavor, and fluffiness. Whether you enjoy it the next day or weeks later, proper storage ensures every bite is as magical as the first!
Perfect Pairings: Drinks and Sides to Complement Your Unicorn Cake
A unicorn cake is already a star on its own, but pairing it with the right drinks and sides can elevate the dessert experience, adding balance and flair to your celebration. The ideal pairings enhance the magical, whimsical vibe of the cake while providing a mix of complementary and contrasting flavors. Here’s how to create a menu of drinks and sides that will perfectly accompany your unicorn cake.
1. Drinks That Pair Well with Unicorn Cake
The drinks served alongside a unicorn cake should complement its sweetness and colorful charm. Whether you’re hosting a children’s party or an elegant celebration, the right beverage can enhance the flavors and add to the magical atmosphere.
Fun and Kid-Friendly Options:
- Sparkling Lemonade:
- A refreshing drink with a hint of tanginess that balances the sweetness of the cake. Add a splash of food coloring or edible glitter to match the unicorn theme.
- Pro Tip: Serve in clear glasses with colorful straws and rim the glasses with sugar or sprinkles for a whimsical touch.
- Rainbow Milkshakes:
- Blend different flavors and colors of milkshakes (strawberry, vanilla, and blueberry) and layer them in a clear glass to mimic the cake’s rainbow design.
- Pro Tip: Top with whipped cream, sprinkles, and a small fondant unicorn horn for extra magic.
- Fruity Punch:
- Mix fruit juices like pineapple, orange, and cranberry with sparkling water or ginger ale for a colorful and fizzy punch.
- Pro Tip: Add floating fruit slices or ice cubes with edible flowers for visual appeal.
- Cotton Candy Soda:
- Pour clear soda like Sprite over a tuft of cotton candy for a dramatic, colorful drink that kids will adore.
Elegant and Adult-Friendly Options:
- Champagne or Prosecco:
- The light, bubbly texture of sparkling wine complements the fluffiness of the cake, while its subtle sweetness pairs well with buttercream frosting.
- Pro Tip: Add a splash of grenadine or edible glitter to the glass for a magical presentation.
- Flavored Iced Teas:
- Fruity iced teas like peach, raspberry, or hibiscus provide a refreshing contrast to the cake’s sweetness.
- Pro Tip: Garnish with mint leaves, lemon slices, or edible flowers for a sophisticated touch.
- Rainbow Cocktails:
- Layer colorful liqueurs (such as grenadine, blue curaçao, and orange juice) for a stunning rainbow drink that echoes the cake’s vibrant layers.
- Pro Tip: Use clear glassware to highlight the layers and serve with a sugared rim.
2. Sides That Pair Well with Unicorn Cake
Adding sides to your dessert spread provides variety and balance, complementing the rich, sweet flavors of the cake. The best sides are light, colorful, and fun, reinforcing the magical theme of the unicorn cake.
Light and Refreshing Options:
- Fresh Fruit Skewers:
- Thread colorful fruits like strawberries, kiwi, pineapple, and blueberries onto skewers for a healthy, visually appealing side.
- Pro Tip: Add a drizzle of white chocolate or edible glitter for a touch of magic.
- Mini Parfaits:
- Layer yogurt or whipped cream with fruit and colorful sprinkles in small cups. Parfaits provide a creamy, tangy complement to the cake’s sweetness.
- Pro Tip: Use clear glasses to showcase the colorful layers and top with a small fondant unicorn or sprinkles.
- Fruit Sorbet:
- Serve small scoops of fruit-flavored sorbet (like mango, raspberry, or lemon) to cleanse the palate and provide a refreshing contrast to the cake.
- Pro Tip: Add an edible flower or mint leaf garnish for a sophisticated touch.
Whimsical and Themed Options:
- Rainbow Macarons:
- Offer delicate macarons in a variety of rainbow colors and flavors to match the unicorn theme.
- Pro Tip: Display them on a tiered stand for an elegant presentation.
- Unicorn Popcorn:
- Toss popcorn with melted white chocolate and colorful sprinkles for a sweet, crunchy treat.
- Pro Tip: Serve in decorative unicorn-themed paper cones or cups.
- Mini Donuts:
- Decorate small donuts with colorful icing, sprinkles, and edible glitter to mirror the cake’s design.
- Pro Tip: Arrange the donuts in a rainbow pattern on a platter for added charm.
3. Balancing the Sweetness of the Cake
Since unicorn cake is typically sweet and rich, adding sides and drinks with contrasting flavors can balance the dessert table. Here’s how to achieve balance:
- Tangy Elements: Serve citrus-flavored sorbet, lemonade, or fruit salads to cut through the richness of the cake.
- Savory Pairings: Include light, savory snacks like cheese platters or salted nuts to offset the sweetness.
- Light Textures: Choose airy sides like whipped cream parfaits or meringues to complement the cake’s fluffiness without adding heaviness.
4. Presentation Tips for Pairings
The way you present your drinks and sides can enhance the overall magical vibe of your unicorn cake.
- Color Coordination: Match the colors of your sides and drinks to the cake’s rainbow hues for a cohesive theme.
- Themed Servingware: Use unicorn-themed cups, plates, and napkins to tie the presentation together.
- Edible Decorations: Garnish drinks and sides with sprinkles, edible glitter, or small fondant decorations to reinforce the magical theme.
5. Unique Unicorn-Themed Pairings
If you want to go all out, here are some unique unicorn-themed pairings to complement your cake:
- Unicorn Hot Chocolate: A pastel-colored hot chocolate topped with whipped cream, marshmallows, and edible glitter.
- Rainbow Cheesecake Bites: Mini cheesecakes with colorful layers to mimic the unicorn cake’s aesthetic.
- Unicorn Pretzel Sticks: Pretzel rods dipped in white chocolate and decorated with sprinkles and edible glitter.
By thoughtfully pairing your unicorn cake with complementary drinks and sides, you create a well-rounded dessert experience that leaves guests delighted and impressed. Whether you choose playful, kid-friendly options or elegant, adult-oriented pairings, the right combinations will enhance the magic and make your celebration unforgettable.
Sharing the Magic: Ideas for Presenting Your Unicorn Cake at Parties or Events
A unicorn cake is not just a dessert; it’s a showstopping centerpiece that can add enchantment and excitement to any party or event. The way you present your cake can amplify its magical appeal and make it the highlight of the celebration. From creative setups to complementary decorations, here are some tips and ideas to ensure your unicorn cake shines as the star of the occasion.
1. Create a Themed Display Table
The way you present the cake can set the tone for the entire event. A themed display table enhances the cake’s magical vibe and makes it stand out as the centerpiece.
- How to Do It:
- Use a color palette that matches the cake, such as pastel pinks, purples, blues, and gold.
- Add a tablecloth or runner in a shimmering or glittery material to mimic a magical ambiance.
- Incorporate complementary decorations like faux flowers, star-shaped confetti, and small unicorn figurines around the cake.
- Pro Tip: Use a tiered cake stand or a pedestal with a gold or white finish to elevate the cake and make it more prominent.
2. Spotlight the Cake with Lighting
Proper lighting can make your unicorn cake look even more magical. Lighting draws attention to the cake and enhances the sparkle of decorations like edible glitter and metallic accents.
- How to Do It:
- Place small LED lights or fairy lights around the cake to create a glowing effect.
- Use a focused spotlight to illuminate the cake while keeping the rest of the room slightly dimmed.
- Incorporate candles for a soft, warm glow, but ensure they are placed safely away from the cake.
- Pro Tip: Use colorful LED lights that match the cake’s theme, such as pastel hues or rainbow colors.
3. Add Themed Backdrops
A backdrop behind the cake table enhances the overall presentation and creates a picture-perfect moment for photos.
- How to Do It:
- Use a unicorn-themed backdrop with rainbows, clouds, and stars for a playful look.
- Opt for a metallic fringe curtain or a sequined fabric for a glamorous vibe.
- Create a DIY balloon arch in pastel colors to frame the cake table.
- Pro Tip: Customize the backdrop with the birthday person’s name or a phrase like “Magical Moments” or “Welcome to the Unicorn Party.”
4. Surround the Cake with Coordinated Desserts
Complement the unicorn cake with smaller themed desserts arranged around it to create a cohesive display. These desserts not only enhance the table but also provide additional options for guests.
- Ideas for Coordinated Desserts:
- Unicorn cupcakes with matching frosting swirls and edible glitter.
- Rainbow macarons arranged in a circular pattern around the cake.
- Sugar cookies shaped like stars, rainbows, and unicorns.
- Cake pops with colorful coatings and unicorn horns made from fondant.
- Pro Tip: Use tiered trays or cake stands at varying heights to add dimension to the display.
5. Personalize the Cake Presentation
Adding personal touches to the presentation makes the cake even more special and memorable.
- How to Do It:
- Place a custom cake topper with the guest of honor’s name or age on the cake.
- Include a small framed sign near the cake with a message like “Make a Wish” or “A Magical Treat Awaits.”
- Use themed party favors, like unicorn headbands or wands, as part of the table decor.
- Pro Tip: Incorporate photos of the guest of honor as part of the cake table decor to make the display more personal.
6. Use Creative Cake Stands
A unique cake stand can elevate the cake—literally and figuratively—making it a focal point of the event.
- Ideas for Cake Stands:
- A clear acrylic stand with lights or glitter inside for a floating effect.
- A rustic wooden stand for a more whimsical, earthy vibe.
- A mirrored stand to reflect the cake’s colors and add a touch of glamour.
- Pro Tip: Decorate the base of the stand with fresh flowers, greenery, or small unicorn-themed accents for added charm.
7. Plan a Cake Reveal Moment
A grand reveal of the unicorn cake can make the event even more memorable. This works especially well for milestone celebrations or themed parties.
- How to Do It:
- Cover the cake with a decorative cloche or fabric and unveil it with fanfare, like music or a countdown.
- Incorporate sparklers or small fireworks on the cake for a dramatic entrance.
- Use a rotating cake stand to showcase the entire 360-degree design as it’s revealed.
- Pro Tip: Coordinate the cake reveal with a special moment, like singing “Happy Birthday” or making a toast.
8. Arrange Photo Opportunities
A beautifully presented unicorn cake is a natural magnet for photos. Encourage guests to take pictures with the cake by creating a photo-friendly setup.
- How to Do It:
- Place the cake in the center of a decorated area that doubles as a photo booth.
- Provide unicorn-themed props, like hats, wands, or glasses, for guests to use in their photos.
- Use a chalkboard or letterboard near the cake with a hashtag for the event to encourage sharing on social media.
- Pro Tip: Position the cake table near natural light or use a ring light to ensure photos come out bright and vibrant.
9. Keep the Cake Fresh During Display
If the cake will be on display for an extended period, it’s important to protect it from heat and humidity to maintain its appearance and taste.
- How to Do It:
- Display the cake in a cool, air-conditioned area away from direct sunlight.
- Use a glass or acrylic cake dome to shield it from dust and insects while keeping it visible.
- For outdoor events, place the cake under a shaded canopy and serve it promptly.
- Pro Tip: Keep a small portion of buttercream on hand for touch-ups in case of smudges or melting.
10. Coordinate with the Event Theme
Tie the cake presentation into the overall theme of the party to create a seamless, cohesive experience.
- How to Do It:
- If the event has a “rainbow unicorn” theme, use matching decorations like rainbow streamers, pastel balloons, and holographic accents.
- For an elegant unicorn celebration, opt for metallic gold or silver decor, paired with soft pastel colors.
- Use unicorn-themed plates, napkins, and utensils to complement the cake’s design.
- Pro Tip: Match the party favors or invitations to the colors and motifs of the cake to create a consistent look.
By thoughtfully planning the presentation of your unicorn cake, you can create a magical, unforgettable experience for your guests. Whether it’s through creative decorations, coordinated desserts, or a dramatic reveal, sharing the magic of your cake will leave everyone enchanted and ensure your celebration is truly one to remember.
Conclusion
A unicorn cake is more than just a dessert—it’s a magical creation that brings joy, whimsy, and wonder to any celebration. From crafting vibrant, fluffy layers to decorating with enchanting details like glittering swirls and edible toppers, every step in the process contributes to a show-stopping masterpiece. Whether you’re a first-time baker or a seasoned pro, the key to success lies in careful planning, creativity, and attention to detail.
By following these tips, you can confidently bake, assemble, and present a unicorn cake that dazzles your guests and creates unforgettable memories. From the first glance to the final slice, your cake will not only look stunning but taste delicious, leaving everyone in awe of your skills and imagination. So, roll up your sleeves, unleash your creativity, and let your unicorn cake become the highlight of your next celebration—a dessert that truly embodies the magic of the moment!