
A gender reveal cake isn’t just a dessert it’s an exciting centerpiece that makes any baby shower or gender reveal cake party truly unforgettable. From that first slice unveiling a burst of pink or blue, to the delighted reactions of friends and family, every detail builds anticipation and joy. Whether you prefer a classic vanilla sponge layered with hidden confetti sprinkles or a bold design topped with playful fondant decorations, there are endless ways to customize your gender reveal cake for the big moment. In this post, we’ll explore how to create a show-stopping gender reveal cake, share tips for decorating with buttercream frosting and blue or pink food coloring, and reveal creative. Let’s dive in!
Must-Have Ingredients for the Perfect Gender Reveal Cake
Creating the perfect gender reveal cake starts with mastering the basics. From selecting the right ingredients to ensuring your cake bakes evenly, these essentials set the foundation for a memorable dessert. If you’re new to baking or looking for a refresher, check out The Spruce Eats: Baking 101 for tips on measuring, mixing, and baking like a pro.
For decorating inspiration and guidance, explore Wilton: Cake Decorating Tips to learn techniques like frosting smooth finishes or adding fondant accents. If you’re searching for premium-quality baking tools and ingredients, head over to King Arthur Baking for everything from specialty flours to cake pans.
By mastering these fundamentals and using high-quality tools and ingredients, you’ll be well on your way to creating a gender reveal cake that’s both stunning and delicious.
How to Make a Gender Reveal Cake: A Step-by-Step Guide
A gender reveal cake is more than just a dessert—it’s the heart of an unforgettable celebration, bringing family and friends together to share in a moment of excitement. Since this cake plays such a vital role, it’s essential to get every detail just right. From choosing the best ingredients to creating a flawless design, this guide will walk you through every step to ensure your cake is not only visually stunning but also irresistibly delicious. So, let’s dive right in and discover how to craft the perfect gender reveal cake that will leave your guests in awe!
Selecting the Best Ingredients for a Gender Reveal Cake
Before you even start baking, it’s crucial to select high-quality ingredients that will enhance both the flavor and texture of your cake. After all, the best cakes start with the best ingredients.
Choosing the Right Cake Base
To begin with, the type of cake you choose will determine its overall texture, stability, and how well it holds its shape. Therefore, it’s important to pick the right base for your reveal cake.
- Vanilla Sponge: This classic option is light, fluffy, and easy to color, making it the most popular choice.
- Chocolate Cake: While undeniably rich and delicious, it doesn’t allow for a vibrant color reveal. Instead, you may need to rely on a hidden filling.
- Lemon Cake: A refreshing alternative, lemon cake provides a bright, zesty flavor while still maintaining a neutral base for food coloring.
- Red Velvet: If you’re looking for a unique choice, red velvet offers a slightly tangy taste and pairs exceptionally well with cream cheese frosting.
- Gluten-Free or Vegan Options: If you want to accommodate all guests, consider using almond flour, oat flour, or plant-based substitutes to create an inclusive dessert.
Selecting the Best Food Coloring
Since the color reveal is the highlight of the cake, choosing the right type of food coloring is essential. Not all food colorings are created equal, so it’s important to use one that produces a vibrant hue without altering the texture of the batter.
- Gel-Based Food Coloring: This option provides intense pigmentation without adding excess liquid, which makes it the best choice for cakes.
- Powdered Food Coloring: If you prefer a dry alternative, powdered food coloring works well, especially for delicate batters that need to stay light and airy.
- Natural Food Dyes: For a health-conscious option, consider using beetroot powder for pink and spirulina powder for blue. However, keep in mind that natural colorings may produce a more muted shade.
Choosing the Perfect Frosting
Now that you’ve selected your cake base and food coloring, it’s time to think about the frosting. Since the outer appearance of the cake sets the stage for the big reveal, it’s important to choose a frosting that is both beautiful and easy to work with.
- Buttercream Frosting: This versatile choice provides a smooth finish and is ideal for piping intricate designs.
- Whipped Cream Frosting: If you want something light and airy, whipped cream frosting is an excellent option. However, it’s best served immediately, as it doesn’t hold up as well over time.
- Cream Cheese Frosting: For those who love a hint of tangy flavor, cream cheese frosting pairs perfectly with red velvet and lemon cakes.
- Fondant: If you’re looking for a sleek, polished finish, fondant is your best bet. Not only does it provide a professional appearance, but it also allows for detailed designs.
Preparing and Coloring the Cake Batter
Now that all your ingredients are ready, it’s time to mix and color the batter. Since the consistency of the batter directly impacts the cake’s texture, it’s essential to follow proper mixing techniques to achieve a perfect bake.
Mixing the Batter for a Smooth, Even Texture
To ensure a well-balanced batter, follow these key steps:
- Cream the Butter and Sugar: Begin by whipping the butter and sugar together until light and fluffy. This step is crucial for achieving an airy texture.
- Add the Eggs One at a Time: Slowly incorporating eggs prevents curdling and ensures an even distribution of ingredients.
- Alternate Dry and Wet Ingredients: By gradually adding flour and liquids, you avoid overmixing, which can result in a dense cake.
- Scrape Down the Sides of the Bowl: This simple step ensures that all ingredients are fully incorporated, preventing lumps.
Achieving the Perfect Color for the Reveal
Since the color inside the cake is the star of the show, getting it just right is absolutely essential.
- Start with a Small Amount of Color: It’s easier to add more food coloring than to correct an overly intense shade. Therefore, always start with a small amount and gradually build up.
- Use Gel or Powdered Food Coloring: These options produce a deep, rich color without altering the batter’s consistency.
- Mix Thoroughly to Avoid Streaks: To ensure an even color distribution, stir well and check for any unmixed patches.
Baking the Cake Layers for the Best Results
Once the batter is perfectly mixed, it’s time to bake the cake layers. Since baking determines the cake’s texture and moisture level, it’s important to follow best practices to achieve a perfect result.
Choosing the Right Cake Pans
- Aluminum Pans: Since aluminum distributes heat evenly, it helps prevent overbaking or uneven cooking.
- Non-Stick Pans: These are convenient for easy removal, but you may need to adjust baking times slightly.
- Springform Pans: If you’re making a multi-layered cake, a springform pan allows for easier assembly.
Proper Baking Techniques for a Moist, Even Cake
- Preheat the Oven: Since consistent heat is key to even baking, always preheat the oven before placing the cake inside.
- Use an Oven Thermometer: Because oven temperatures can vary, using a thermometer ensures accuracy.
- Rotate the Cake Pans Midway Through Baking: This step helps prevent uneven cooking and ensures a smooth top.
- Check for Doneness with a Toothpick: To test if the cake is fully baked, insert a toothpick in the center—if it comes out clean, the cake is ready.
Cooling and Handling the Cake Layers
- Let the Cake Cool in the Pan First: Since cakes are delicate when hot, allow them to cool in the pan for at least 10 minutes before transferring them.
- Move to a Wire Rack: To ensure even cooling, place the cakes on a wire rack.
- Chill Before Frosting: Since warm cakes can cause frosting to melt, refrigerate them before assembly.
Assembling and Decorating the Cake for Maximum Impact
Now that the cake is fully baked and cooled, it’s time to put everything together.
Creating a Show-Stopping Reveal
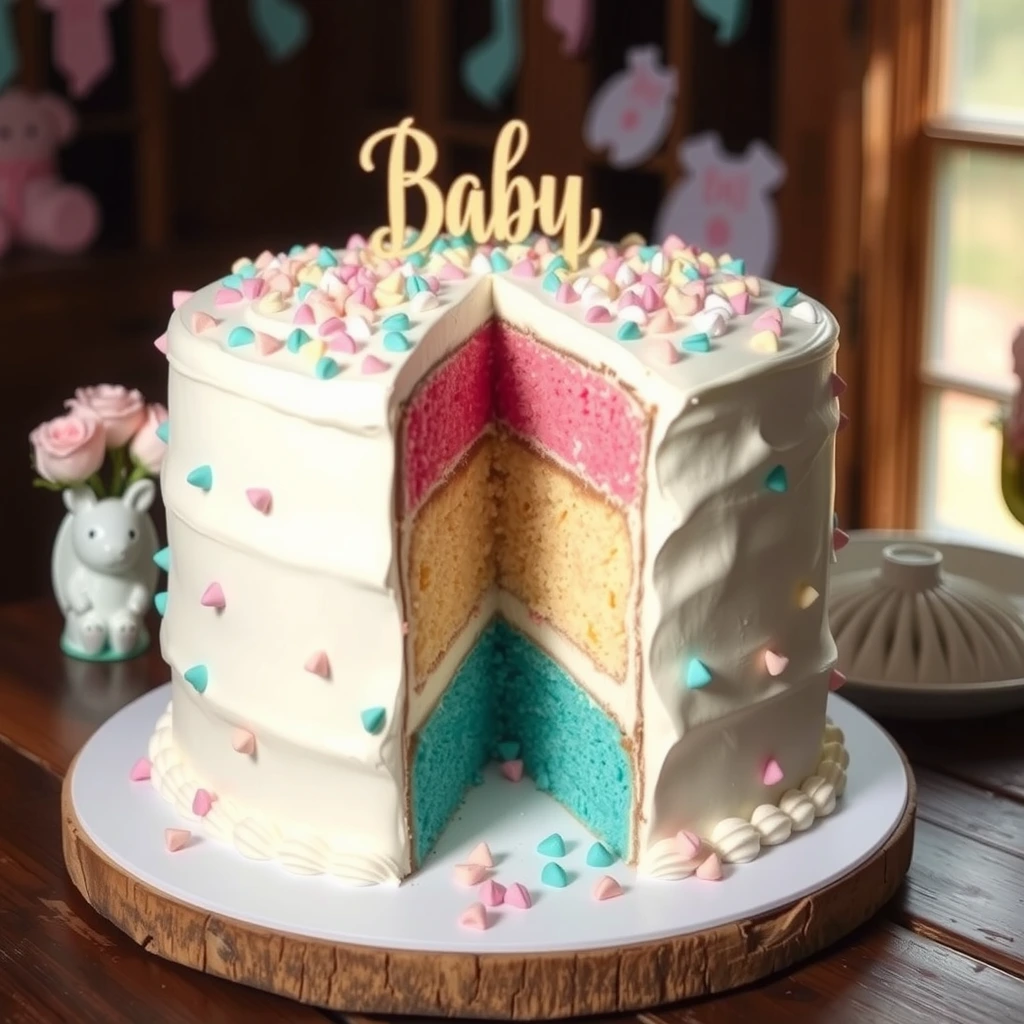
- Traditional Layered Cake: When sliced, each layer will showcase a hidden pink or blue surprise.
- Sprinkle-Filled Center: A hollowed-out center filled with candy or sprinkles creates a dramatic effect when cut.
- Ombre Layers: A gradual color transition makes the reveal even more visually stunning.
Decorating the Cake to Impress
- Smooth Buttercream Finish: Creates a polished, professional look.
- Fondant Cutouts: Adds playful elements like baby footprints or question marks.
- Ombre Frosting: Blends pink and blue into a gradient effect.
- Edible Glitter or Pearl Dust: Adds a touch of sparkle and elegance.
Conclusion
Ultimately, making a gender reveal cake is about more than just baking—it’s about crafting a magical moment filled with anticipation and joy. By selecting high-quality ingredients, following expert techniques, and ensuring a flawless reveal, you can create a cake that will leave a lasting impression. Now, it’s time to put your skills to the test and bake a gender reveal cake that will truly steal the show. Happy baking!
Essential Baking Tools for a Flawless Gender Reveal Cake
To create a truly breathtaking gender reveal cake, having the right baking tools is just as important as using high-quality ingredients. Without the proper equipment, even the most well-prepared batter can turn into a baking disaster. So, if you want to achieve a flawless cake with a smooth finish, precise layers, and a picture-perfect reveal, investing in essential tools is an absolute must. Below, we’ll explore the key tools you’ll need, explain why each one is crucial, and offer expert tips to ensure your cake turns out spectacular every single time.
Choosing the Right Cake Pans for Even Baking
Since the structure of your cake depends heavily on the pan you use, selecting the right one is critical. After all, an unevenly baked cake can make the final reveal less impressive.
Best Cake Pans for Perfect Layers
- Aluminum Cake Pans: These pans distribute heat evenly, preventing overbaking in some spots while underbaking in others. Because of their excellent heat conduction, they are a favorite among professional bakers.
- Non-Stick Cake Pans: While these make cake removal easier, they may require slight temperature adjustments since they tend to heat up faster.
- Springform Pans: If you’re planning a multi-layered cake, a springform pan makes it incredibly easy to remove the layers without damaging them. Since gender reveal cakes often feature multiple layers, this is a great option.
- Deep Cake Pans: If you prefer taller cakes or want to create a dramatic slice reveal, a deep cake pan will give you extra height to work with.
Additional Tips for Using Cake Pans Effectively
- Grease and Line the Pans Properly: To prevent sticking, use butter or non-stick spray, followed by a layer of parchment paper.
- Use Identical Cake Pans for Uniform Layers: This ensures all layers bake evenly and fit together perfectly.
- Rotate the Pans Halfway Through Baking: Since ovens can have hot spots, rotating the pans helps achieve consistent results.
The Importance of a High-Quality Stand Mixer or Hand Mixer
Since gender reveal cakes require a perfectly smooth and airy batter, having a reliable mixer is a game-changer. While mixing by hand is possible, using an electric mixer will save time and improve the texture significantly.
Stand Mixer vs. Hand Mixer: Which One Should You Choose?
- Stand Mixer: If you bake frequently, a stand mixer is well worth the investment. It offers hands-free operation, multiple speed settings, and various attachments to mix, whip, and knead with ease.
- Hand Mixer: If you don’t have space for a stand mixer, a high-powered hand mixer is a great alternative. While it requires more effort, it still provides enough speed and control for a fluffy cake batter.
Must-Have Attachments for Mixing Success
- Paddle Attachment: Ideal for creaming butter and sugar to achieve a light, fluffy consistency.
- Whisk Attachment: Helps incorporate air when beating eggs or whipping cream.
- Dough Hook: Useful for mixing thicker batters or fondant.
Measuring Tools for Precision
Since baking is a science, precise measurements are absolutely essential. Even a small miscalculation can alter the texture, rise, or taste of your cake.
Essential Measuring Tools
- Measuring Cups and Spoons: Invest in high-quality, accurate measuring cups for both wet and dry ingredients. Stainless steel cups are particularly durable and long-lasting.
- Digital Kitchen Scale: Since weight measurements are often more accurate than volume measurements, a kitchen scale ensures perfect consistency every time.
- Liquid Measuring Cup: A glass or plastic measuring cup with a spout is ideal for measuring milk, oil, or other liquids.
Pro Tips for Accurate Measuring
- Spoon and Level Dry Ingredients: Instead of scooping directly from the bag, spoon flour into the measuring cup and level it off with a knife for accuracy.
- Use a Scale for Exact Measurements: Especially when working with ingredients like flour or sugar, weighing them provides more consistent results.
- Check Eye Level When Measuring Liquids: To avoid incorrect amounts, always place liquid measuring cups on a flat surface and view them at eye level.
Cake Leveler and Serrated Knife for Perfect Layers
Since gender reveal cakes often feature multiple layers, achieving even layers is crucial for a professional finish. Uneven layers not only look messy but can also cause the cake to become unstable.
Best Tools for Leveling Cake Layers
- Cake Leveler: This tool allows you to slice across your cake with precision, ensuring all layers are identical in height. Some adjustable cake levelers even let you choose the thickness of each layer.
- Serrated Knife: If you don’t have a cake leveler, a long serrated knife can be used to carefully trim the top and even out the layers.
Tips for Achieving Even Cake Layers
- Chill the Cake Before Cutting: Since freshly baked cakes can crumble easily, chilling them in the refrigerator for 30 minutes makes them firmer and easier to cut.
- Use a Ruler for Accuracy: If you want truly precise layers, measuring the height of each section before cutting will help ensure consistency.
- Trim the Dome Off the Cake: Most cakes develop a dome while baking, so leveling the top ensures a flat surface for stacking.
Offset Spatula and Bench Scraper for Flawless Frosting
Since the exterior of your gender reveal cake is just as important as the inside, smoothing the frosting is a crucial step. The right tools will make this process much easier and help you achieve a professional look.
Best Tools for Smoothing and Frosting
- Offset Spatula: A long, flat spatula that allows you to spread frosting smoothly without creating uneven ridges.
- Bench Scraper: If you’re aiming for ultra-smooth frosting, a bench scraper will help you achieve sharp edges and an even finish.
Pro Tips for a Professional Frosting Finish
- Apply a Crumb Coat First: A thin initial layer of frosting seals in crumbs, making the final layer much smoother.
- Chill Between Coats: Refrigerating the cake after applying the crumb coat helps the final layer glide on effortlessly.
- Use a Turntable for Even Coverage: A cake turntable allows you to rotate the cake while applying frosting, making the process faster and more precise.
Cake Decorating Tools for a Stunning Finish
Since presentation is everything, having the right decorating tools will elevate your cake from ordinary to extraordinary.
Must-Have Cake Decorating Tools
- Piping Bags and Tips: Create elegant details like borders, rosettes, or swirls using various piping tips.
- Fondant Smoother: If you’re covering the cake with fondant, a fondant smoother will help remove air bubbles and create a polished look.
- Edible Glitter and Sprinkles: These small touches add an extra layer of excitement and make the cake visually appealing.
Final Decorating Tips
Play with Texture Variety
Layering different elements like silky-smooth icing, piped details, and edible accents adds depth and dimension to your cake design.
Stick to a Unified Color Palette
When incorporating gender-reveal shades like pink or blue, try blending in complementary pastels to maintain a soft, cohesive visual appeal.
Top It Off with a Surprise Element
A playful cake topper that reads “Boy or Girl?” can add a fun, finishing touch and heighten the anticipation before the big reveal.
Conclusion
Since a gender reveal cake is the highlight of the celebration, having the right baking tools makes all the difference. With the proper equipment, you can ensure even layers, smooth frosting, and a jaw-dropping reveal that will leave guests in awe. So, whether you’re a beginner or an experienced baker, investing in the best tools will help you create a cake that looks just as amazing as it tastes. Now, it’s time to get your tools ready, start baking, and create a gender reveal cake that will truly steal the show!
Guide to the Ultimate Gender Color Reveal: A Complete Step-by-Step Breakdown
A gender color reveal is one of the most thrilling ways to announce a baby’s gender. Whether it is a small intimate gathering or a large-scale celebration, the reveal moment should be executed flawlessly. A well-planned event ensures excitement, suspense, and a picture-perfect outcome that will be cherished forever.
Understanding every element—from selecting the right reveal method to ensuring a smooth execution—helps create a truly magical experience. This guide provides a detailed breakdown of all the essential steps to craft the ultimate gender color reveal.
Planning the Perfect Gender Reveal Event
A successful gender reveal requires thoughtful preparation. The theme, venue, and overall event logistics should be well-coordinated to enhance the experience.
Choosing the Right Date and Venue
A gender reveal can be hosted at home, outdoors, or in a rented venue. Selecting the perfect location is key to setting the right atmosphere.
- Home Gatherings: Ideal for small, intimate celebrations with close family and friends. Offers control over decor and privacy.
- Outdoor Parks or Gardens: Provides a scenic backdrop and accommodates larger groups. Perfect for smoke bomb or confetti cannon reveals.
- Banquet Halls or Restaurants: A formal setting that allows guests to enjoy a catered meal before the big moment.
- Virtual Gender Reveals: A creative option for long-distance loved ones. The reveal can be live-streamed on social media or via video call.
When selecting the date, it is crucial to consider:
- The availability of close family and friends
- Any conflicts with holidays or major events
- The season and potential weather conditions if planning an outdoor reveal
Selecting a Theme and Color Scheme
While pink and blue remain the traditional colors, modern gender reveals incorporate unique color palettes and creative themes.
- Elegant Themes: Gold and silver, celestial (“Twinkle Twinkle, Little Star”), or floral designs
- Rustic Chic: Earthy tones with wooden accents, greenery, and soft lighting
- Neon or Glow-in-the-Dark: Bright, bold colors that make the reveal stand out, especially for night events
- Custom Color Reveals: Some parents opt for purple, yellow, or other colors that have personal significance
Matching decorations, invitations, and party favors to the theme ensures a cohesive and visually appealing setup.
Keeping the Gender a Surprise
Parents must decide whether they want to find out the baby’s gender alongside their guests or be the ones revealing it.
- For a Surprise Reveal: Ask the ultrasound technician to write the gender on a note and place it in a sealed envelope. A trusted friend or event planner can coordinate the reveal.
- For Parents Who Already Know: The event becomes more about surprising guests. Additional entertainment, such as trivia games, can add excitement.
Choosing the Best Gender Color Reveal Method
The reveal moment is the highlight of the event. Selecting a method that aligns with the venue, guest count, and personal preferences ensures a seamless experience.
Edible Reveals: Cakes, Cupcakes, and Treats
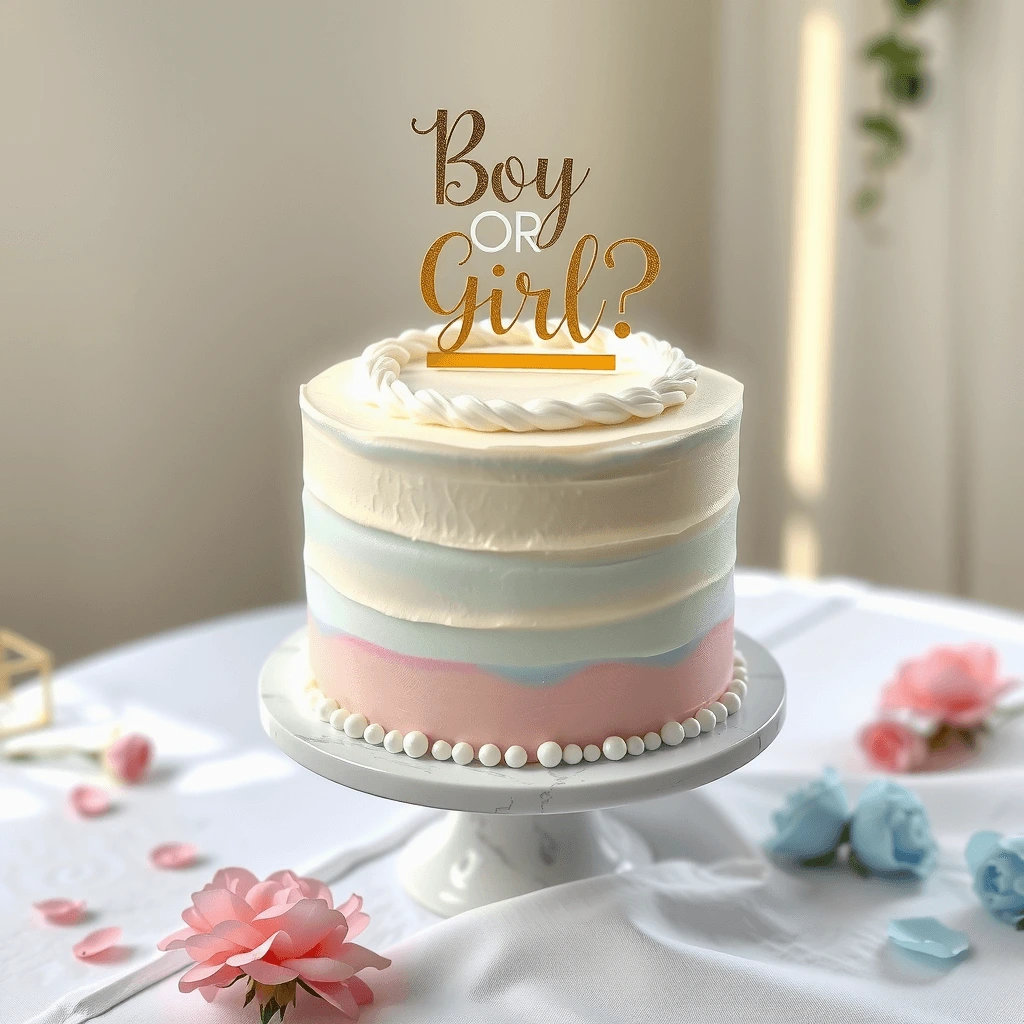
A gender reveal cake is one of the most classic and sweet ways to unveil the surprise. The inside of the cake is filled with either pink or blue sponge, frosting, or candy.
- Layered Cakes: When sliced, the color inside is revealed.
- Cupcake Reveals: Individual treats with colored filling ensure every guest participates in the reveal.
- Macarons and Cookies: Bite-sized surprises that add elegance and charm to the occasion.
For the best results:
- Use a neutral outer frosting color to maintain the surprise.
- Ensure the filling is vibrant enough for clear visibility.
- Incorporate a “cutting countdown” to build suspense before slicing the cake.
Smoke Bombs and Powder Cannons
Smoke bombs and powder cannons create a dramatic, high-impact reveal, making them perfect for outdoor settings.
- Biodegradable Smoke Bombs: Safe for the environment and produce thick, colorful plumes.
- Handheld Powder Cannons: Guests can participate by launching cannons filled with pink or blue powder simultaneously.
- Aerial Color Blasts: Colored powder is released from a drone or confetti cannon above the event for a large-scale effect.
Safety tips:
- Always use these outdoors in an open space.
- Check wind conditions to prevent smoke or powder from dispersing too quickly.
- Keep guests at a safe distance for maximum visibility.
Balloon-Based Reveals
Balloons offer a fun and visually appealing reveal method.
- Opaque Black Balloon: Filled with colored confetti or powder, popped to unveil the gender.
- Balloon Box Release: A large box releases pink or blue helium balloons when opened.
- LED Balloons: Glow-in-the-dark balloons add an exciting nighttime twist to the reveal.
For a coordinated reveal, ensure the balloon setup is stable and positioned in a well-lit area.
Confetti Cannons and Piñatas
For an interactive approach, confetti cannons or gender reveal piñatas can add to the excitement.
- Handheld Confetti Cannons: Guests can set off multiple cannons for a burst of color.
- Pull-String Piñatas: Suspended piñatas filled with pink or blue confetti fall when the string is pulled.
Capturing the Perfect Gender Reveal Moment
Documenting the reveal ensures memories last a lifetime.
Hiring a Professional Photographer
A professional can capture high-quality images and videos that truly showcase the emotion of the moment.
- Consider hiring a videographer for slow-motion shots and reactions.
- Drones provide unique aerial footage for larger-scale reveals.
- Arrange for close-up shots of the couple’s reaction as well as crowd reactions.
Setting Up a Photo and Video Station
A designated area for guests to take photos before and after the reveal enhances the event’s experience.
- Include a custom backdrop with themed decorations.
- Provide props like baby onesies, sunglasses, and signs that say “Team Boy” or “Team Girl”.
- Encourage guests to use a custom event hashtag when posting photos on social media.
Creating a Seamless and Memorable Experience
The details surrounding the reveal contribute to the overall experience.
Adding a Personal Touch
Small details make the event more meaningful.
- Handwritten Letters: Parents can write a message to their future child, reading it aloud before the reveal.
- Family Involvement: Grandparents, older siblings, or pets can be included in the reveal for an extra sentimental touch.
Incorporating Fun Gender Reveal Games
Engaging activities keep guests entertained leading up to the big moment.
- Old Wives’ Tales Predictions: Guests guess the gender based on pregnancy myths.
- Team Pink vs. Team Blue: Attendees wear a color representing their prediction.
- Baby Name Suggestions: Guests write down name ideas before the reveal.
Ensuring a Flawless Reveal
A gender reveal should be stress-free and enjoyable.
Testing the Reveal Setup in Advance
A trial run prevents unexpected issues.
- Check weather conditions for outdoor events to avoid wind interference.
- Test equipment such as confetti cannons, balloons, or powder cannons to ensure proper functionality.
Prioritizing Safety
Safety should always be a priority, especially for firework or smoke-based reveals.
- Avoid using flammable materials or dangerous pyrotechnics.
- Ensure children and pets are at a safe distance before setting off any reveal elements.
Final Thoughts on the Ultimate Gender Color Reveal
A gender color reveal is a once-in-a-lifetime experience that deserves thoughtful planning. Whether opting for a grand outdoor spectacle or a simple intimate moment, the key to a successful reveal is careful coordination, creativity, and meaningful personal touches.
By selecting the right reveal method, capturing the moment effectively, and creating a seamless experience, parents can ensure that their gender reveal is not only unforgettable but also a truly joyous celebration.heme—you’ll create a gender reveal cake that adds a sense of wonder and excitement. Thoughtful planning ensures that the moment you slice into the cake becomes the highlight of the celebration, leaving parents and guests alike with a sweet memory that’s impossible to forget.
How to Prepare the Perfect Cake Base and Layers for a Gender Reveal
How to Pick the Perfect Gender Reveal Cake: A Complete Guide
A gender reveal cake is one of the most exciting ways to share the news of your baby’s gender with family and friends. Not only does it serve as a centerpiece for your celebration, but it also builds suspense and delivers a magical moment when sliced.
Choosing the perfect gender reveal cake requires thoughtful consideration of flavor, design, filling, and reveal method. This guide will help you navigate every aspect, ensuring your cake is as visually stunning as it is delicious.
Understanding the Role of a Gender Reveal Cake
A gender reveal cake is not just a dessert—it is a highlight of the event. Its purpose goes beyond taste, as it also plays a significant role in the reveal moment.
Why Choose a Cake for Your Gender Reveal?
- Classic and Elegant: A cake provides a timeless and sophisticated way to reveal the baby’s gender.
- Customizable: Cakes can be tailored in terms of flavors, colors, fillings, and decorations.
- Interactive Reveal: The process of cutting into the cake builds anticipation and excitement for guests.
- Photo-Worthy: A beautifully crafted cake enhances the event’s aesthetic and makes for a memorable photo opportunity.
Selecting the Right Cake Flavor
The first step in choosing a gender reveal cake is deciding on the flavor. It should be something that complements the filling while appealing to the majority of guests.
Classic Flavor Choices
- Vanilla: A light, fluffy option that pairs well with any frosting or filling.
- Chocolate: A rich and indulgent choice that can still accommodate a colored reveal inside.
- Red Velvet: A unique and slightly cocoa-flavored cake that adds a hint of luxury.
- Lemon: A fresh and tangy alternative for those who prefer something citrusy.
Pairing Flavors for the Perfect Balance
To create a well-balanced cake, consider pairing flavors thoughtfully:
- Vanilla + Strawberry or Raspberry Filling: A light and fruity combination.
- Chocolate + Peanut Butter or Salted Caramel: A decadent mix of sweet and savory.
- Lemon + Blueberry or Cream Cheese Frosting: A refreshing and zesty match.
Deciding on the Reveal Method
The magic of a gender reveal cake lies in how the gender is revealed. There are different ways to achieve the surprise effect.
Hidden Color Sponge
- Beneath the frosting lies the answer, dyed sweetly in pink or blue.
- Works best with light-colored batters such as vanilla or lemon.
- Provides a clean and clear reveal when the cake is sliced.
Colorful Filling Surprise
- The outer layer remains neutral, while the filling is colored.
- Fillings can include:
- Buttercream or Whipped Cream tinted in pink or blue.
- Fruit-based fillings such as blueberry or raspberry jam.
- Candy fillings like M&Ms or sprinkles that spill out when cut.
Layered Cake Reveal
- Each layer of the cake alternates between pink and blue for added mystery.
- The final bottom layer is revealed to confirm the gender.
- Works well for tall cakes and tiered designs.
Choosing the Right Frosting
Frosting serves both a decorative and functional purpose, holding the cake together while adding flavor.
Buttercream Frosting
- The most versatile and widely used option.
- Smooth and creamy, making it perfect for piping decorations.
- Can be kept neutral on the outside while hiding the reveal inside.
Cream Cheese Frosting
- A slightly tangy alternative that pairs well with red velvet or lemon cake.
- Best suited for cakes that will be served immediately due to its softer consistency.
Whipped Cream Frosting
- Light and airy, perfect for those who prefer a less sweet option.
- More delicate than buttercream and requires refrigeration.
Fondant for a Polished Look
- Provides a sleek and smooth surface, ideal for elaborate decorations.
- Can be sculpted into creative designs like baby booties, rattles, or bows.
- Works best with an underlayer of buttercream for added flavor.
Decorating the Gender Reveal Cake
Once the structure and flavors are chosen, the next step is designing a cake that fits the theme of your reveal party.
Color Palette and Theme
- Traditional pink and blue keeps the mystery alive.
- Neutral tones like gold, silver, or white allow the inside color to be the focal point.
- Pastel shades, floral patterns, or celestial designs can add elegance.
Toppers and Edible Decorations
- Fondant Baby Items: Baby shoes, pacifiers, onesies, or teddy bears.
- Edible Glitter and Gold Leaf: Adds a touch of luxury.
- Acrylic or Wooden Cake Toppers: Messages like “He or She? What Will It Be?”.
Drip Cakes for a Stylish Reveal
- A white or neutral base with colored ganache dripping down the sides.
- The color of the ganache hints at the gender without fully revealing it.
Serving the Cake for the Ultimate Reveal
The moment the cake is cut should be well-coordinated to maximize excitement.
Positioning and Setup
- Place the cake on a table in a central location for all guests to see.
- Ensure good lighting for clear visibility and photo opportunities.
- Have a camera or videographer ready to capture the reactions.
Building Anticipation Before Cutting
- Engage guests by asking them to guess the gender before the reveal.
- Count down from 10 before slicing into the cake to build suspense.
- Ensure both parents cut into the cake together for a shared moment.
Capturing the Reveal Moment
- Have a designated photographer to take close-ups of the cake and guests’ reactions.
- Record in slow motion for a dramatic effect when the color is revealed.
- Encourage guests to share their predictions and reactions on social media.
Common Mistakes to Avoid When Choosing a Gender Reveal Cake
A flawless gender reveal cake requires careful planning. Avoiding these common mistakes ensures a smooth and successful reveal.
Using Low-Quality Food Coloring
- Cheap food coloring can alter the taste or produce a dull color.
- Gel-based food colors are recommended for vibrant results.
Forgetting to Test the Reveal Method
- A small test batch ensures the color is visible when baked.
- Filling consistency should be checked to avoid leaks or blending.
Overcomplicating the Design
- A busy exterior can take attention away from the reveal moment.
- A clean, simple design often works best.
Final Thoughts: Creating the Perfect Gender Reveal Cake
A gender reveal cake is more than just a dessert—it is a symbol of joy, excitement, and anticipation. By carefully selecting flavors, choosing a creative reveal method, and decorating with purpose, you can create a cake that is both stunning and memorable.
Whether you opt for a classic hidden sponge, a candy-filled surprise, or a stylish drip cake, the key is to ensure that the reveal moment is as sweet and special as the celebration itself.sponge, a decadent chocolate base, or even a zesty lemon cake, the right recipe ensures your gender reveal cake not only looks stunning but delights guests with every bite.
Step-by-Step Cake Layering Guide
A perfectly layered cake is a combination of precision, technique, and attention to detail. Layering a cake is not just about stacking one layer on top of another; it involves meticulous preparation, leveling, filling, stacking, and frosting to ensure a stable, visually stunning, and delicious result.
Every step in the process contributes to the cake’s final presentation and taste. A well-layered cake should be structurally sound, allowing it to hold its shape when cut, while also providing an evenly distributed flavor in every bite.
The Importance of Proper Cake Layering
Cake layering is essential to achieving professional-quality cakes. Properly layered cakes not only look better but also taste better, as they allow for even distribution of fillings and frostings.
Enhancing Structural Integrity
A poorly layered cake can collapse, slide, or become unstable when stacked. Proper leveling and filling techniques ensure that each layer remains secure, preventing shifting or sagging over time.
Ensuring Even Distribution of Flavor
Each bite of a layered cake should offer a balanced taste of cake, filling, and frosting. Uneven layering can result in one section having too much filling while another is too dry.
Improving the Aesthetic Appeal
A cake with evenly stacked layers, clean edges, and smooth frosting presents a polished, professional finish. It serves as the centerpiece of celebrations and special occasions.
Key Components of a Well-Layered Cake
Achieving the perfect layered cake requires attention to each component, from the quality of the cake itself to the consistency of the fillings and frostings.
Cake Layers
The foundation of the cake should be baked evenly and prepared properly before assembly. The texture of the cake should be soft yet firm enough to hold the weight of additional layers.
Choosing the Right Cake Recipe
Not all cakes are suitable for layering. Cakes that are too delicate may crumble under the weight of additional layers, while dense cakes may be too heavy, causing fillings to be pushed out.
- Best Cakes for Layering: Sponge cake, butter cake, chiffon cake, and genoise
- Cakes to Avoid for Layering: Flourless cakes, molten lava cakes, and extremely airy cakes
Controlling Cake Texture for Layering
- Overmixing the batter leads to a dense texture, making the cake harder to cut and stack
- Using cake flour instead of all-purpose flour creates a softer, more refined crumb
- Adding a little extra egg can help strengthen the structure for tall layer cakes
Cake Fillings
The filling serves as the glue that holds cake layers together while enhancing the overall flavor profile.
Selecting the Right Filling for the Cake Type
- Sturdy Cakes (e.g., butter cakes, pound cakes): Can support heavier fillings like ganache and caramel
- Light Cakes (e.g., sponge cakes, chiffon cakes): Pair well with airy fillings like whipped cream or mousse
- Moist Cakes (e.g., red velvet, banana cake): Work best with complementary fillings like cream cheese frosting
Avoiding Fillings That Are Too Soft
Soft fillings, such as custard and curds, can cause layers to slip. Stabilizing them with buttercream or using a buttercream dam around the edges prevents leakage.
Cake Frosting
Frosting not only adds flavor but also plays a role in securing the layers and giving the cake a clean, professional appearance.
Choosing the Right Frosting
- Buttercream: Ideal for structured cakes, smooth application, and piped decorations
- Ganache: Adds richness and works well for drip cakes and sleek finishes
- Cream Cheese Frosting: A tangy alternative that pairs well with moist cakes like red velvet
- Whipped Cream: Light and airy but requires refrigeration to maintain structure
Using a Crumb Coat for a Smoother Finish
A crumb coat is a thin layer of frosting that seals in loose crumbs before applying the final frosting layer. Chilling the cake after applying the crumb coat ensures a cleaner, smoother final coat.
The Step-by-Step Process for Cake Layering
1. Preparing the Cake Layers
Before layering begins, the cakes must be completely cooled, leveled, and ready for stacking.
Cooling the Cake Completely
- Warm cake layers are fragile and can break apart when handled
- Let the cakes rest in the pan for 10 to 15 minutes before moving them to a wire rack
- For best results, chill the cakes for at least 30 minutes before trimming and stacking
Leveling the Cake for Even Layers
- Use a serrated knife or a cake leveler to remove domed tops
- Keeping layers uniform in height prevents an uneven stack and improves stability
- Turntables make it easier to rotate the cake while trimming for precision
2. Adding the Filling Between Layers
Each layer should have an evenly distributed filling to prevent bulging and imbalance.
Applying a Buttercream Dam
A buttercream dam helps prevent soft fillings from oozing out between layers.
- Pipe a thick border of buttercream around the edge of the cake layer
- Spread the filling evenly within the dam using an offset spatula
- Avoid overfilling, as too much filling can cause layers to slide
3. Stacking the Cake Layers Properly
The way layers are stacked determines the cake’s stability and overall appearance.
Aligning the Layers Correctly
- Each layer should be centered to avoid an uneven cake
- Press down gently after stacking to secure the layers without squeezing out the filling
- If stacking multiple tiers, use cake boards and dowels for support
Chilling Between Stacking for Stability
- Placing the cake in the fridge for 15-20 minutes between stacking prevents shifting
- Chilled cakes are easier to handle, especially when applying the final frosting layer
4. Applying the Crumb Coat
The crumb coat locks in loose crumbs and provides a smooth base for the final frosting.
How to Apply a Crumb Coat
- se an offset spatula to apply a light coating of frosting all over the cake
- Smooth the sides with a bench scraper while rotating the cake on a turntable
- Chill the cake for at least 30 minutes to allow the crumb coat to set
5. Frosting the Cake for a Professional Finish
A well-applied frosting layer enhances the cake’s appearance and texture.
Techniques for a Smooth Finish
- Apply the final layer of frosting using an offset spatula in even strokes
- Use a bench scraper to smooth out imperfections while rotating the cake
- Wipe the spatula clean between strokes for a polished look
6. Decorating the Cake for Presentation
Final decorations add visual appeal and can elevate the cake’s design.
Piping Borders and Embellishments
- Use a piping bag with decorative tips for elegant borders and rosettes
- Experiment with different nozzles to create texture and dimension
Adding Final Decorative Touches
- Fresh fruits, edible flowers, and sprinkles enhance the cake’s appearance
- A drip effect using ganache or caramel creates a modern, artistic finish
Mastering the Art of Cake Layering
Perfecting cake layering takes practice, patience, and precision. By following these steps, bakers can create cakes that are structurally stable, visually appealing, and perfectly balanced in flavor. Whether for special occasions or professional baking, attention to detail in each layer ensures a flawless final result.’re aiming for.
How to Prepare Batter and Bake Perfectly
Achieving a flawless cake starts with preparing the batter correctly and using the right baking techniques. Every step in the process, from measuring ingredients precisely to mixing the batter properly and ensuring even baking, contributes to the cake’s texture, structure, and overall quality. Without the right approach, a cake can become too dense, dry, or unevenly baked.
This guide will walk through each critical step, helping you achieve a smooth batter and a perfectly baked cake every time.
The Importance of Proper Batter Preparation
Incorrect measurements, overmixing, or using ingredients at the wrong temperature can drastically affect the outcome.
Ensuring Accurate Measurements
Measuring ingredients precisely is crucial for achieving the right balance of structure and moisture in the cake. Even small miscalculations can lead to undesirable results.
- Always use dry measuring cups for flour and sugar, and liquid measuring cups for milk and oil.
- Spoon and level the flour instead of scooping directly from the bag to prevent packing too much into the cup.
- Weigh ingredients with a digital kitchen scale for the most accurate results.
Using Ingredients at the Right Temperature
Temperature affects how ingredients interact during mixing and baking.
- Butter should be softened but not melted, ensuring proper creaming with sugar.
- Bringing eggs to room temperature helps them blend more easily into the batter, creating a smooth and stable mixture.
- Milk and other dairy ingredients should also be at room temperature to prevent curdling when mixed.
Mixing the Batter for the Best Texture
How the batter is mixed impacts the cake’s crumb, rise, and consistency. Different cake types require different mixing techniques.
The Creaming Method for Fluffy Cakes
The creaming method is best for butter-based cakes, such as vanilla and pound cakes. It incorporates air into the batter, making the cake light and soft.
- Beat butter and sugar together on medium speed until the mixture is pale and fluffy.
- Add the eggs individually, mixing thoroughly after each one to ensure a smooth, uniform batter.
- Mix in dry ingredients alternately with liquid ingredients, starting and ending with the dry components.
The Reverse Creaming Method for a Silky Crumb
If you’re after a soft, tight crumb and a refined cake texture, reverse creaming is a technique worth mastering. This method starts by blending the dry ingredients with the fat, which helps coat the flour and limits gluten formation. The result is a tender, almost velvety bite.
To get started, mix your flour, sugar, leaveners, and salt in a bowl. Then add room-temperature butter or oil and mix until the consistency resembles damp sand. Afterward, gradually incorporate your liquid ingredients such as milk, eggs, or yogurt—until the batter is smooth and consistent. This method is especially effective for sponge-style or wedding cakes where texture matters most.
The One-Bowl Method for Quick, Fuss-Free Cakes
The one-bowl approach is a lifesaver when you’re short on time but still want a homemade cake with reliable texture. It’s best suited for cupcakes, snack cakes, or weekday bakes.
Begin by whisking together all dry ingredients in one large bowl. Then pour in the wet ingredients like eggs, oil, milk, and vanilla and gently stir everything together. Be careful not to overmix; once the flour disappears into the batter, you’re done. A few lumps are fine and will disappear as the cake bakes.
This technique is great for beginner bakers and anyone who appreciates quick cleanup without sacrificing flavor or consistency.
Avoiding the Most Common Cake Batter Mistakes
Even with quality ingredients and a solid recipe, small errors in technique can sabotage your cake. Here’s how to avoid the most frequent slip-ups.
Mixing Too Much
After the flour has been added, stir just enough to bring the batter together. Overworking it develops gluten, which leads to a chewy, dense cake instead of one that’s light and airy.
Not Mixing Enough
Failing to fully blend your batter can leave behind dry pockets of flour or unincorporated liquids. Always scrape the sides and bottom of your bowl to ensure the mixture is smooth and uniform.
Using Ingredients Straight from the Fridge
Cold butter won’t cream properly, and cold eggs can cause the batter to curdle. Let all your ingredients sit at room temperature for at least 20–30 minutes before you begin mixing. This ensures they emulsify correctly and help your cake bake evenly.
Preparing the Cake Pan the Right Way
A well-prepared cake pan can mean the difference between a beautifully released cake and one that sticks or crumbles.
Choosing the Best Pan for the Job
Light-colored aluminum pans are often ideal, as they promote even heat distribution. Dark pans tend to absorb heat more quickly, which can lead to overbaking. If you’re using a glass or ceramic pan, consider lowering your oven temperature slightly since these materials retain heat longer.
Greasing and Lining the Pan
Thoroughly grease the pan with butter, oil, or non-stick spray, paying extra attention to the corners. Line the base with parchment paper to make removal a breeze. For delicate or high-sugar cakes, dusting the greased surface with flour or cocoa powder adds another layer of non-stick protection.
Why Cake Strips Help
Cake strips help prevent domed tops by insulating the outer edge of the pan. When soaked in water and wrapped around the pan before baking, they encourage a level, even rise ideal for layer cakes that you want to stack flat.
Baking Like a Pro
Even the most carefully mixed batter can fall short if the baking stage isn’t handled correctly. Your oven’s temperature, placement, and timing are critical for getting a cake that rises evenly and bakes all the way through.
Proper Oven Temperature Matters
Always preheat your oven for at least 15 minutes before placing your cake inside. For accuracy, use an oven thermometer most ovens are slightly off. If it runs too hot, your cake may crack on top or bake unevenly. If it’s too cool, it may sink or come out underbaked.
Best Placement in the Oven
Bake your cake on the center rack for the most consistent results. If you’re baking multiple layers, make sure there’s space between pans so hot air can circulate. Avoid opening the oven door too soon especially in the first half of baking as this can cause the cake to collapse.
How to Tell When Your Cake Is Ready
Look for visual and tactile cues. A properly baked cake will spring back when gently pressed in the center. You’ll also notice the cake edges pulling slightly away from the sides of the pan.
Cooling and Storing Without Losing Moisture
What you do after baking is just as important as how you mixed and baked the cake. Improper cooling or storage can lead to dryness or soggy texture.
How Long to Cool in the Pan
After removing the cake from the oven, allow it to sit in the pan for about 10 to 15 minutes. This helps it firm up enough to release cleanly. Don’t leave it too long steam can build up and make the bottom soggy.
Transferring to a Wire Rack
Place your cake on a wire cooling rack to allow air to circulate freely around it. This keeps the bottom from sweating and helps the entire cake cool at an even rate.
Keeping It Moist
Once your cake is completely cool, wrap it in plastic wrap to preserve its moisture. If you’re not frosting it right away, you can also place it in an airtight container to prevent the crumb from drying out.
Freezing for Later
Want to bake ahead? Freezing cake layers is a great option. Once fully cooled, wrap each layer tightly in plastic wrap, then a second layer of foil for added protection. Store in a freezer-safe bag or container and label with the date.
When ready to use, let the cake thaw still wrapped at room temperature. This prevents condensation from forming directly on the cake, which can make it soggy.
The Path to a Perfect Cake Starts with the Batter
From start to finish, every step you take in preparing, baking, and cooling your cake impacts the final result. Accurate measuring, proper mixing techniques, and thoughtful baking practices make all the difference between a mediocre cake and one that impresses.
Whether you’re baking for a celebration or a quiet weekend treat, these pro-level tips will help you create cakes that are not only visually stunning but also incredibly moist, flavorful, and satisfying with every bite.
Top Decoration Ideas for a Show-Stopping Gender Reveal Cake
Frosting Ideas for Gender Reveal Cakes
Frosting plays a key role in the presentation and excitement of a gender reveal cake. Not only does it enhance the cake’s flavor and texture, but it also contributes to the overall reveal experience. The right frosting can create a visually stunning exterior while keeping the surprise hidden inside.
From smooth, elegant finishes to playful, colorful designs, there are countless ways to decorate a gender reveal cake. By selecting the perfect frosting type and technique, you can ensure that the cake is both beautiful and delicious.
Selecting the Best Frosting for a Gender Reveal Cake
Different types of frosting offer varying levels of stability, sweetness, and texture. Some frostings are ideal for piping and intricate decorations, while others provide a silky-smooth finish.
Buttercream: The Classic and Most Versatile Choice
Buttercream is one of the most commonly used frostings due to its smooth texture, flexibility in decorating, and ability to hold its shape well.
Why Buttercream is Ideal for Gender Reveal Cakes
- It can be colored in neutral shades while concealing the surprise inside.
- Buttercream is firm enough for piping detailed decorations, like flowers and ruffles.
- It allows for creative techniques such as ombre, rosettes, and watercolor effects.
Popular Buttercream Flavors for Gender Reveal Cakes
- Vanilla Buttercream: A classic choice that pairs well with any cake flavor.
- Almond Buttercream: A subtle nutty twist that enhances the sweetness of the cake.
- Strawberry Buttercream: A fruity and slightly tangy option for a refreshing taste.
Whipped Cream Frosting: Light and Fluffy
For a delicate, less sweet frosting, whipped cream is a great alternative. However, it needs to be stabilized to ensure it holds its shape.
Advantages of Whipped Cream Frosting
- It creates a soft, cloud-like texture, making the cake look elegant and dreamy.
- Whipped cream has a light flavor that complements sponge and chiffon cakes.
- It is perfect for pastel-colored gender reveal cakes, adding a soft aesthetic.
How to Stabilize Whipped Cream Frosting
- Add unflavored gelatin to help it hold its shape longer.
- Use powdered sugar instead of granulated sugar to maintain its consistency.
- Refrigerate the cake until serving, as whipped cream is temperature-sensitive.
Cream Cheese Frosting: Rich and Tangy
For those who prefer a slightly tangy contrast to the cake’s sweetness, cream cheese frosting is a fantastic option. However, it is softer than buttercream, requiring chilling between decorating steps.
Reasons to Use Cream Cheese Frosting for Gender Reveal Cakes
- It pairs well with red velvet, carrot, and spice cakes.
- The slight tanginess balances out overly sweet cake flavors.
- It can be tinted in pastel colors or kept neutral for a minimalistic design.
Creative Frosting Designs for Gender Reveal Cakes
Once the right frosting is chosen, the next step is selecting a design that complements the theme of the gender reveal. The cake’s exterior should build anticipation while keeping the inside surprise well-hidden.
Ombre Frosting: A Gradual Color Transition
Ombre frosting creates a beautiful gradient effect, making the cake look modern and artistic.
How to Achieve an Ombre Effect
- Prepare buttercream in three to four shades of the same color.
- Start with the darkest shade at the bottom and gradually work up to the lightest shade.
- Use an offset spatula or bench scraper to blend the colors for a seamless transition.
Rosette Frosting: Elegant and Textured
Rosettes add a sophisticated floral effect that covers the entire cake in decorative swirls.
Steps to Create Rosette Frosting
- Use a large star piping tip to pipe rosettes in a circular motion.
- Begin piping at the base and work upward in layers for a full floral effect.
- For added detail, alternate shades of buttercream for a multicolored look.
Watercolor Frosting: A Painted Look for a Modern Effect
A watercolor effect gives the cake a hand-painted, artistic touch.
How to Create a Watercolor Frosting Design
- Dab small amounts of different colored buttercream around the cake.
- Use a bench scraper or offset spatula to blend the colors gently.
- Avoid overmixing to maintain the distinct yet fluid brushstroke effect.
Gender Reveal Drip Cake: A Playful and Trendy Design
Drip cakes create a fun and dramatic look, perfect for revealing the gender.
Steps for Making a Gender Reveal Drip Cake
- Prepare white buttercream or pastel-colored frosting as the base.
- Melt white chocolate and mix with food coloring to create either pink or blue drips.
- Spoon or pour the drip mixture over the edges, allowing it to cascade naturally.
Unique Ways to Incorporate the Gender Reveal Into the Frosting
Beyond the exterior design, the frosting itself can be part of the reveal moment. By cleverly using colored frosting or hidden details, the gender can be revealed in an unexpected and exciting way.
Hidden Color Under a Neutral Exterior
The outside of the cake can remain neutral while the frosting inside provides the surprise.
Techniques for a Hidden Color Reveal
- Pipe the outside of the cake in white or pastel-colored buttercream.
- When the cake is sliced, the inner frosting reveals pink or blue filling.
- To enhance the effect, add matching colored sprinkles or edible glitter inside.
Multicolor Frosting Swirls on the Top
For a colorful and eye-catching approach, use multiple colors in the frosting itself.
How to Pipe Multicolor Swirls
- Fill a piping bag with two or three colors of buttercream side by side.
- Pipe swirls on top of the cake to create a dynamic, multicolored effect.
- This technique works especially well with ombre or pastel themes.
Frosting-Stuffed Layers for a Fun Surprise
Instead of using frosting only on the outside, incorporating a frosting-stuffed center adds an extra layer of excitement.
Creating a Frosting-Stuffed Gender Reveal Cake
- Carve out a small circular hole in the middle of each cake layer.
- Pipe a generous amount of pink or blue frosting into the center before stacking.
- When the cake is sliced, the filling will spill out, revealing the gender.
Final Touches for a Perfect Gender Reveal Cake
Once the frosting is applied, adding decorative details enhances the cake’s presentation.
Using Edible Glitter and Sprinkles
- Edible glitter adds a magical shimmer to the frosting.
- Gender-themed sprinkles can be used for subtle hints before the reveal.
Personalized Cake Toppers and Decorative Elements
- A custom cake topper reading “Boy or Girl?” adds a fun touch.
- Fondant baby shoes, rattles, or bows can reinforce the theme.
Adding Themed Balloons or Miniature Props
- Small edible balloons made from fondant or meringue can complement the cake’s theme.
- Using edible gold leaf or pearls enhances the elegance of the design.
Making the Gender Reveal Cake Memorable
A gender reveal cake is more than just a dessert—it is a centerpiece of a special moment. By choosing the right frosting, incorporating creative designs, and using hidden details for the reveal, you can make the experience truly unforgettable. Whether opting for a smooth ombre finish, playful drip design, or an intricate rosette texture, the frosting transforms the cake into a stunning and delicious surprise.
Planning ahead and perfecting the frosting techniques ensures that the reveal is not only visually impressive but also a delightful treat. By experimenting with different styles and colors, you can craft a gender reveal cake that will leave guests in awe while creating a cherished memory for the parents-to-be.red sweetness level, structural needs, and decorative goals, you’ll enhance both the flavor and visual impact of your gender reveal cake. Whether you opt for a classic American buttercream or a luxurious cream cheese frosting, the right choice will tie together every element—from the cake’s fluffy layers to the final photo-worthy reveal.
Ideas for Fondant Toppers and Edible Decor
When designing a gender reveal cake, fondant toppers and edible decorations play a crucial role in enhancing both the visual appeal and the overall theme. These details not only make the cake stand out but also help build excitement leading up to the big reveal. Whether you prefer an elegant design or a fun and whimsical approach, selecting the right decorations ensures that the cake complements the occasion perfectly.
By carefully choosing fondant toppers and edible accents, you can create a stunning centerpiece that captivates guests while maintaining the element of surprise. Let’s explore the best options to elevate your gender reveal cake to a whole new level.
Choosing the Right Fondant Toppers for a Gender Reveal Cake
Fondant toppers allow for intricate and detailed cake decorations that are both visually appealing and structurally stable. They can be sculpted, shaped, or molded to fit any theme, making them an ideal choice for gender reveal cakes.
Why Fondant Toppers Are Ideal for Gender Reveal Cakes
Because fondant is highly versatile, it can be shaped into almost any design, allowing for a fully customized cake. Unlike buttercream, which is soft and requires precise piping skills, fondant provides a polished and professional finish with clean edges and intricate details.
- It offers endless customization options, from tiny baby shoes to elegant script lettering.
- Fondant toppers can be made in advance, allowing for better preparation before the event.
- Unlike other frostings, fondant maintains its shape, ensuring long-lasting decorations.
Selecting the Best Type of Fondant for Cake Decorations
Since different types of fondant work better for specific decorations, it’s essential to choose the right one for your design.
Rolled Fondant for a Smooth and Polished Look
Because rolled fondant creates a flawless surface, it’s ideal for covering cakes or cutting out simple decorations like stars, bows, or baby-themed shapes.
- It’s best used for large, smooth decorations that need to hold their shape.
- Works well for layered fondant pieces, such as stacked letters or ribbons.
Gum Paste for More Intricate and Detailed Designs
Gum paste, which dries firmer than traditional fondant, is perfect for sculpted decorations like baby figurines, rattles, or delicate flowers.
- Since gum paste hardens quickly, it’s ideal for standing decorations.
- It’s best suited for 3D fondant toppers that require added support.
Modeling Chocolate for a Softer, More Malleable Option
Because modeling chocolate stays pliable longer, it allows for more flexibility when creating figurines and sculpted decorations.
- Ideal for creating lifelike baby faces, bows, or stuffed animal toppers.
- Provides a smooth texture and slightly glossy finish, giving cakes a refined touch.
Creative Fondant Toppers to Enhance the Theme
Themed fondant toppers add personality and meaning to the gender reveal cake. Whether you want something playful or elegant, the right decorations create a memorable visual impact.
Baby-Themed Fondant Toppers for a Classic Look
For a timeless and adorable design, baby-inspired fondant toppers bring charm and cuteness to the cake.
Tiny Baby Shoes or Booties for a Sweet Touch
Because baby shoes are a classic symbol of new life, they make a perfect gender reveal topper.
- One shoe can be pink and the other blue, maintaining suspense.
- The shoes can be detailed with tiny laces or bows for extra charm.
Fondant Onesies and Baby Bibs for a Fun Decoration
Onesies and bibs can be placed on the cake’s surface or attached to the sides for a playful effect.
- Adding edible letters spelling out “Boy or Girl?” enhances the excitement.
- They can be textured or embossed to look like real fabric.
Text-Based Fondant Toppers for a Personalized Touch
Because words add clarity and fun to a gender reveal cake, fondant text toppers are a great way to make the message stand out.
“Boy or Girl?” Fondant Plaque for Suspense
A decorative plaque can be positioned on top of the cake to build anticipation.
- The lettering can be elegant script or bold block letters for easy readability.
- The plaque itself can be shaped into a heart, banner, or cloud for added flair.
Personalized Name or Date for a Custom Look
Because personalization makes the cake more meaningful, adding names or a due date creates a unique touch.
- Using edible markers or embossed fondant stamps ensures a professional finish.
- A fondant ribbon or banner around the base can display a heartfelt message.
Floral and Nature-Inspired Fondant Toppers for Elegance
If you prefer a softer, more sophisticated design, flowers and nature elements can elevate the cake’s appearance.
Fondant Roses and Peonies for a Romantic Aesthetic
Handcrafted fondant flowers add a delicate, luxurious feel to the cake.
- Soft pastel shades like pink, blue, and lavender complement gender reveal themes.
- Dusting the flowers with edible shimmer powder enhances their beauty.
Leafy Greenery and Vine Accents for a Natural Effect
Because greenery adds texture and contrast, it’s a great complement to floral decorations.
- Fondant leaves and vines can be used to frame the cake’s edges.
- Adding tiny edible pearls between the vines makes the cake look more elegant.
Edible Decorations to Elevate the Cake’s Design
Beyond fondant toppers, edible decorations provide additional texture, shine, and visual appeal.
Shimmering and Metallic Accents for a Luxurious Finish
A touch of edible shimmer or gold detailing enhances the cake’s sophistication.
Edible Gold Leaf for a High-End Look
Because gold leaf catches the light beautifully, it creates a luxurious aesthetic.
- It can be applied in flakes for a delicate effect or as full sheets for bold coverage.
- Pairs well with minimalist or elegant cake designs.
Pearlized Edible Dust for a Soft Glow
Since pearlized dust reflects light, it gives cakes a subtle shimmer.
- Works well for fondant bows, baby footprints, or decorative ruffles.
- Can be brushed over the entire cake for a frosted-glass effect.
Sprinkle and Confetti Decorations for a Fun Touch
Sprinkles and edible confetti bring an extra element of excitement to the cake.
Themed Sprinkles for Added Detail
- Gold stars, mini hearts, or blue and pink sprinkles can enhance the cake’s surface.
- Sprinkle borders along the base provide a neat and polished finish.
Confetti Explosion Effect for an Interactive Reveal
If you want an extra surprise, an edible confetti layer under the fondant makes the reveal even more exciting.
- When the cake is cut, tiny edible confetti spills out, revealing the baby’s gender.
- Works best with a fondant-covered exterior to keep the surprise hidden.
Final Thoughts on Fondant Toppers and Edible Decorations
By incorporating fondant toppers and edible decorations, you can elevate a gender reveal cake from simple to spectacular. Whether you choose baby-themed toppers, elegant floral details, or shimmering metallic accents, the right design makes the cake not only a delicious dessert but also a visually captivating centerpiece.
By carefully selecting each decorative element, you ensure that the reveal moment is as magical as the occasion itself. Thoughtful touches, combined with creative execution, make for an unforgettable cake that enhances the excitement of sharing the baby’s gender with loved ones.ming a personalized focal point that amplifies the excitement of your gender reveal. Whether you stick to simple shapes or dive into sculpted fondant figures, these decorative elements let you infuse creativity into every inch of your celebration.
Decorating with Sprinkles and Edible Extras
When it comes to decorating a gender reveal cake, sprinkles and edible extras play a crucial role in enhancing both the visual appeal and the element of surprise. Whether you’re going for a classic, elegant look or a fun, whimsical design, adding the right combination of sprinkles, glitter, and edible accents can transform your cake into a stunning centerpiece.
Using different types of edible decorations allows you to create texture, depth, and contrast. From pearlized sugar pearls to shimmering confetti and edible gold leaf, each element contributes to a polished and professional finish. Let’s explore the best ways to use sprinkles and edible extras to take your gender reveal cake to the next level.
Choosing the Right Sprinkles for a Gender Reveal Cake
Sprinkles come in a variety of shapes, sizes, and colors, allowing you to customize your cake to match the occasion. Selecting the right type of sprinkles ensures that the design aligns with your vision while maintaining the element of surprise.
Types of Sprinkles to Enhance Your Cake Design
Since different types of sprinkles offer unique decorative effects, understanding their purpose helps in selecting the right ones for your cake.
Classic Jimmies for a Playful Look
- Jimmies are soft, elongated sprinkles that work well for adding pops of color.
- Because they are slightly flexible, they hold their shape without being too crunchy.
- A mix of pastel pink and blue jimmies can be used to keep the reveal a surprise.
Confetti Sprinkles for a Festive Touch
- These small, flat discs add a fun and celebratory feel to the cake.
- They can be used on the top layer, sides, or even hidden inside the cake for a confetti surprise.
- Since they come in a variety of colors, you can mix in neutral tones to maintain the mystery.
Sugar Pearls for an Elegant Finish
- Sugar pearls add a touch of sophistication and work well for both modern and classic cake designs.
- These small, round beads come in white, silver, gold, or pastel shades, complementing a gender reveal cake beautifully.
- They can be arranged in border patterns, scattered across the frosting, or used to accent other decorations.
Sanding Sugar for a Subtle Shimmer
- Sanding sugar is a fine, sparkling sugar that gives cakes a delicate, glittery effect.
- It works especially well for ombre or watercolor frosting styles, adding depth to the design.
- A neutral or metallic color keeps the exterior understated while letting the inside reveal shine.
Dragees for a Luxe Look
- Dragees are metallic-coated edible beads that give cakes an elegant, high-end finish.
- Available in gold, silver, rose gold, and pearlized tones, they add a beautiful contrast to soft buttercream or fondant.
- Since they have a hard texture, they should be placed strategically for decoration rather than covering the entire cake.
Sprinkle Placement Techniques for Maximum Impact
Once you’ve chosen the perfect sprinkles, applying them in creative ways enhances the cake’s design. From subtle accents to bold coverage, different techniques create unique visual effects.
Full Sprinkle Coating for a Dramatic Effect
Covering the entire cake with sprinkles creates a vibrant, textured look that adds excitement.
How to Achieve an Even Sprinkle Coating
- First, apply a thin layer of buttercream frosting to act as an adhesive.
- Next, press sprinkles onto the sides using your hands or a parchment paper method.
- To ensure uniform coverage, gently roll the cake onto a tray of sprinkles, letting them adhere naturally.
Gradient Sprinkle Application for a Cascading Look
A gradient effect, where sprinkles are denser at the bottom and fade upward, gives a sophisticated and stylish appearance.
Creating a Sprinkle Gradient Effect
- Begin by applying a heavy concentration of sprinkles at the base of the cake.
- Using a soft brush or fingers, lightly press sprinkles higher up, gradually decreasing the density.
- To ensure a blended effect, use a mix of fine sanding sugar and larger jimmies for a smooth transition.
Hidden Sprinkles Inside the Cake for a Surprise Reveal
A sprinkle-filled cake adds an unexpected element of fun, making the gender reveal even more exciting.
How to Make a Sprinkle Explosion Cake
- First, bake and cool the cake layers completely before assembling.
- Cut a small circular hole in the center of the middle layers, leaving the top and bottom layers intact.
- Fill the cavity with pink or blue sprinkles to reveal the gender when sliced.
- Seal the top with a full cake layer to conceal the hidden sprinkles until the big moment.
Sprinkle Borders for a Clean and Professional Look
Adding a sprinkle border along the edges or base of the cake enhances the design without overwhelming it.
Steps for a Perfect Sprinkle Border
- Pipe a thin line of buttercream around the base or top edge of the cake.
- Gently press sprinkles into the frosting using a small spoon or tweezers.
- For added elegance, combine sugar pearls and metallic dragees to create a luxurious effect.
Edible Extras to Enhance Cake Decorations
Beyond sprinkles, additional edible elements can elevate the cake’s visual appeal and make it even more special.
Edible Glitter and Luster Dust for a Magical Glow
Adding edible glitter or luster dust gives cakes a soft shimmer, making them sparkle under the light.
How to Apply Edible Glitter Properly
- Lightly dust the cake with a soft brush, focusing on raised edges or textured areas.
- For a stronger effect, mix luster dust with a small amount of clear alcohol or lemon extract and paint it onto fondant decorations.
Chocolate Shavings and Curls for Added Texture
For a gourmet touch, chocolate shavings provide extra texture and depth.
Best Ways to Use Chocolate Decorations
- White chocolate curls can be layered on top to contrast with buttercream frosting.
- Dark chocolate shavings can be sprinkled for a rich, decadent finish.
- Pink or blue-tinted white chocolate pieces can match the gender reveal theme subtly.
Candy and Edible Gems for a Bold Statement
Candy decorations add playful details while making the cake more interactive.
Using Candy for Gender Reveal Cakes
- Rock candy sticks can be placed on top for a crystalline effect.
- Pastel-colored M&Ms or Sixlets can be used as decorative borders or sprinkle alternatives.
- Edible gems provide a touch of elegance and sparkle, especially when placed on fondant bows or flowers.
Bringing It All Together for a Stunning Cake
Decorating with sprinkles and edible extras allows for endless creativity when designing a gender reveal cake. By selecting the right combination of textures, colors, and placement techniques, you can ensure that your cake is not only delicious but also visually impressive.
Whether you opt for a fully coated sprinkle cake, a delicate shimmer dusting, or a hidden surprise inside, each decorative detail contributes to an unforgettable experience. Thoughtful placement and creative use of edible decorations elevate the cake, ensuring that it becomes the highlight of the celebration.
By combining these decorating techniques, you can craft a gender reveal cake that is both breathtaking and memorable. With the right balance of sprinkles, glitter, and edible accents, your cake will leave a lasting impression on everyone at the event.st about flavor but a feast for the eyes. These finishing touches add personality, whimsy, and excitement to each bite—amplifying the joy of discovering whether it’s a boy or a girl and making the celebration truly unforgettable.
Personalizing Cake Colors for Your Theme
Personalizing cake colors is one of the most effective ways to make a gender reveal cake feel unique and special. Color choices set the tone for the cake’s design, making it visually appealing while reinforcing the theme of the celebration. Whether you want a soft pastel aesthetic, a bold and vibrant look, or a trendy ombre finish, the right color scheme can elevate your cake’s overall presentation.
By carefully selecting colors and using the right techniques, you can create a cake that not only complements the theme but also enhances the excitement of the gender reveal. Let’s explore how to personalize cake colors to match your vision perfectly.
Choosing the Right Color Palette for Your Gender Reveal Cake
Color selection is a key component in designing a visually stunning cake. While pink and blue are traditional gender reveal colors, there are many ways to personalize the look by incorporating different hues, tones, and effects.
Classic Gender Reveal Color Schemes
For a timeless and traditional approach, incorporating classic pink and blue hues keeps the theme easily recognizable.
Soft Pastel Palette for an Elegant Look
- Light baby pink and sky blue create a delicate and dreamy appearance.
- Adding white, ivory, or light gray accents softens the contrast, making the cake look sophisticated.
- Pastel colors blend beautifully into ombre or watercolor frosting designs, offering a gentle, seamless transition.
Vibrant and Bold Color Choices for a Modern Twist
- Hot pink and electric blue create a striking contrast, making the cake stand out.
- Metallic accents, such as gold or silver, add a touch of luxury and sophistication.
- Pairing with a black or navy background makes the reveal colors pop dramatically.
Neutral and Unique Color Combinations
For those who want a more subtle approach, using a neutral or creative color palette can make the reveal even more unexpected.
Chic Neutrals for a Minimalist Theme
- White, beige, or taupe paired with soft gold or silver details create a modern, gender-neutral cake.
- Champagne and rose gold accents work well for an elegant and timeless design.
- Keeping the outer cake neutral while revealing vibrant pink or blue inside maintains the element of surprise.
Themed Color Schemes for a Unique Celebration
- A twinkle-twinkle little star theme can feature navy blue, gold, and soft white.
- A jungle safari reveal could incorporate earthy greens, browns, and pops of color inside.
- A storybook or fairytale theme might use lavender, blush pink, and baby blue hues.
Techniques for Achieving Perfect Cake Colors
Once you have chosen your color palette, using the right techniques ensures that your cake has a smooth, consistent, and vibrant finish.
How to Color Cake Batter for a Surprise Inside
Since the inside of the cake is the big reveal, making sure the colors are vibrant and consistent is essential.
Using Gel Food Coloring for Intense Shades
- Gel food coloring is more concentrated than liquid food dyes, allowing for vivid colors without altering the batter consistency.
- To achieve a deep pink or blue, add a small amount of color at a time until the desired shade is reached.
- Mixing colors, such as red and white for pink or blue and a touch of purple for a deeper blue, creates custom hues.
Marbling for a Swirled Effect
- To create a two-toned swirl inside the cake, divide the batter into two portions.
- Color one portion pink and the other blue, then gently swirl them together before baking.
- This technique ensures a surprise no matter where the cake is sliced.
Achieving a Smooth and Even Frosting Color
The frosting should complement the reveal while maintaining an elegant, well-blended appearance.
Ombre Frosting for a Gradual Color Transition
- Start with a neutral base, such as white or pastel, at the top of the cake.
- Gradually blend deeper pink or blue shades as you work toward the bottom.
- Using an offset spatula or bench scraper, smooth out the transitions for a flawless gradient effect.
Airbrushing for a Professional Finish
- An airbrush tool can evenly distribute color over fondant or buttercream, creating a soft and polished look.
- This technique works particularly well for pastel designs or multi-color effects.
- Adding a touch of edible shimmer creates a subtle but stunning highlight.
Incorporating Metallics and Accents for a Luxe Finish
Metallic details add an elegant touch to the cake while making the gender reveal colors stand out.
Gold and Silver Leaf for a Touch of Luxury
- Edible gold or silver leaf can be applied to buttercream or fondant for a high-end look.
- Placing metallic accents around the base or edges enhances the cake’s overall design.
Edible Glitter for a Magical Shine
- A dusting of edible shimmer powder or luster dust gives the cake a soft, sparkling effect.
- Mixing glitter with pink or blue sanding sugar can create a hidden sparkle inside the cake.
Creative Ways to Use Colors in the Gender Reveal
Beyond the cake’s exterior and interior, there are additional ways to incorporate personalized colors for an unforgettable reveal moment.
Hidden Color Layers for a Surprise Effect
Instead of coloring the entire cake, keeping the outer layers neutral while hiding pink or blue inside builds suspense.
How to Create a Hidden Color Layer Cake
- Stack layers with white or pastel exteriors while keeping the middle layer colored.
- Frost the outside with a smooth, neutral buttercream to keep the reveal a secret.
- When sliced, the bright pink or blue inside creates a dramatic reveal moment.
Sprinkle Explosion for a Fun Surprise
Adding sprinkles or edible confetti inside the cake enhances the excitement when it’s cut open.
Steps for a Sprinkle Explosion Cake
- Hollow out the center of the cake layers before assembling.
- Fill the cavity with color-coordinated sprinkles, candies, or edible glitter.
- When the cake is sliced, the sprinkles pour out for an interactive reveal.
Multi-Tiered Cakes with Alternating Colors
For a grand and unexpected reveal, alternating pink and blue layers in a tiered cake keeps guests guessing until the final cut.
How to Alternate Colors in a Tiered Cake
- The bottom tier can be blue while the top tier is pink, leaving the reveal a mystery.
- Using neutral frosting on the outside maintains an elegant and understated look.
- Cutting into each tier gradually reveals the hidden colors inside.
Making the Gender Reveal Cake Truly Unique
By personalizing cake colors to match your theme, you create an experience that is as exciting as it is visually stunning. Whether you opt for classic pastels, a bold and modern color scheme, or a luxurious metallic finish, each color choice enhances the cake’s impact.
Since the reveal moment is the highlight of the event, thoughtful color placement and design techniques ensure that every detail is perfect. With a combination of vibrant cake layers, beautifully blended frosting, and creative decorative accents, you can craft a gender reveal cake that leaves a lasting impression on all your guests.
Ultimately, the goal is to match the cake’s colors with your unique vision, creating an unforgettable and picture-perfect reveal that everyone will remember.—from the intensity of your dye to the finishing touches on your frosting—you can create a gender reveal cake that matches the excitement of the occasion. Whether you choose classic pink or blue hues, venture into experimental pastels, or take a completely different color route, the right colors will tie your entire design together and keep guests talking long after the celebration ends.
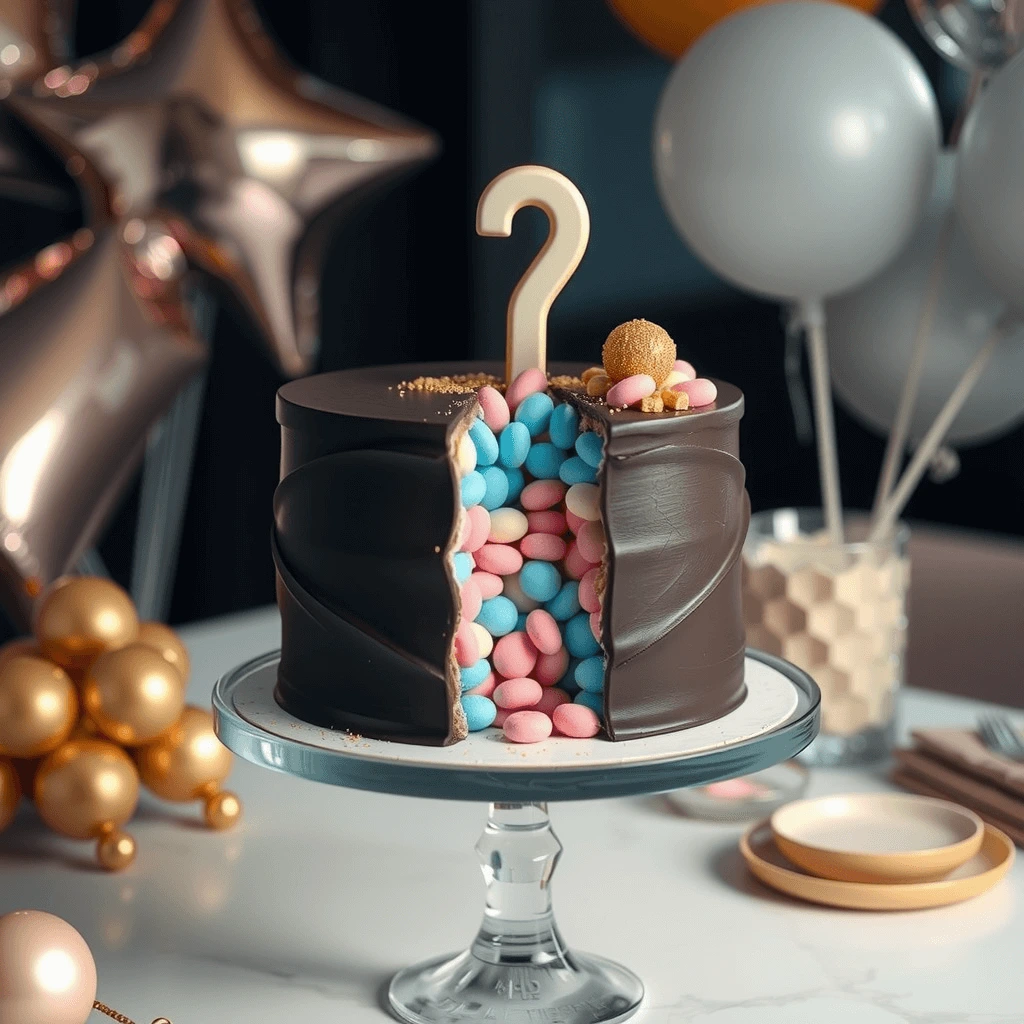
How to Make Your Gender Reveal Extra Special with Unique Ideas
Unique Gender Reveal Themes and Decor
Planning a gender reveal celebration is an exciting opportunity to get creative with themes and decorations. While traditional pink-and-blue designs are always a great choice, many parents-to-be are now opting for unique and personalized themes that reflect their interests, personalities, or favorite aesthetics. Choosing the right theme sets the tone for the entire event, ensuring that the gender reveal moment is both visually stunning and unforgettable.
By incorporating thoughtful decorations, creative color schemes, and fun reveal elements, you can create an experience that is just as magical as the big announcement itself. Whether you prefer an elegant affair, a whimsical adventure, or a completely unexpected concept, there are endless ways to make your gender reveal event truly one-of-a-kind.
Choosing the Perfect Theme for Your Gender Reveal
The theme you select should reflect the personalities of the parents-to-be while also keeping the element of surprise intact. Whether you want something sophisticated, playful, or completely unconventional, the right theme enhances the overall atmosphere and makes the reveal moment even more special.
Classic Yet Creative Gender Reveal Themes
While traditional gender reveal themes often incorporate pink and blue elements, adding a unique twist makes them feel fresh and exciting.
Twinkle Twinkle Little Star for a Celestial Touch
- A soft and dreamy theme inspired by stars, moons, and galaxies.
- Decorate with glowing fairy lights, hanging star cutouts, and gold-and-silver accents.
- Use a star-shaped cake or a moon-piñata filled with pink or blue confetti for the big reveal.
What Will It Bee? for a Sweet and Whimsical Celebration
- A fun nature-inspired theme featuring yellow, black, and white honeybee decor.
- Bee-themed cupcakes, honey jars as favors, and sunflower arrangements set the perfect backdrop.
- A honeycomb-shaped cake with a hidden pink or blue interior creates an adorable and delicious surprise.
Little Prince or Little Princess for a Royal Affair
- A regal theme incorporating gold crowns, elegant pastel drapes, and ornate cake stands.
- A tiara and crown cake topper can hint at the baby’s gender before the final reveal.
- Golden balloons filled with pink or blue confetti make for an eye-catching and interactive moment.
Adventure and Travel-Inspired Gender Reveal Themes
For parents who love travel, adventure, or exploration, these themes add an element of excitement to the gender reveal experience.
He or She? What Will It Be? (Safari Adventure)
- Jungle-inspired decor with green palm leaves, animal prints, and rustic wooden accents.
- A lion or elephant cake with an inside color surprise keeps guests guessing.
- Gender reveal smoke bombs in a lush outdoor setting create a dramatic and photo-worthy moment.
Taco ‘Bout a Baby! for a Fun Fiesta
- A colorful Mexican fiesta theme with bright papel picado banners, piñatas, and sombrero decorations.
- Serve tacos, guacamole, and Mexican sodas for a festive and delicious experience.
- A piñata filled with pink or blue candies adds a fun and unexpected reveal element.
Under the Sea for a Nautical Surprise
- A magical ocean-inspired theme with mermaid tails, seashells, and shimmering blue-green hues.
- A pearl-filled cake where the center reveals the baby’s gender adds to the aquatic mystery.
- Balloons shaped like fish or bubbles complete the look while making the setting feel immersive.
Creative Decoration Ideas to Match the Theme
Once you’ve selected a theme, the right decorations bring it to life. Every element, from the table settings to the backdrop, should enhance the overall aesthetic and build anticipation for the big reveal.
Eye-Catching Balloon Arrangements
Balloons are a staple in gender reveal parties, and using them creatively adds excitement and elegance to the decor.
Balloon Garlands for a Dramatic Backdrop
- Arranging pastel or metallic balloons in gradual color transitions creates a stunning background for photos.
- Mixing white, gold, and soft pink or blue balloons adds an elegant and modern touch.
- A balloon arch over the dessert table or entryway elevates the visual appeal of the event.
Confetti Balloons for an Interactive Reveal
- Fill clear balloons with pink or blue confetti so they burst open when popped.
- For a playful element, let guests pop individual balloons to discover the color inside.
- Using eco-friendly biodegradable confetti keeps the reveal moment both beautiful and environmentally conscious.
Table Decor and Centerpieces That Impress
A well-designed table setup enhances the theme while tying all the decorations together.
Themed Table Runners and Linens
- A starry night theme could include a deep blue tablecloth sprinkled with gold glitter stars.
- A garden or woodland theme benefits from fresh greenery runners and floral centerpieces.
- For a minimalist theme, using neutral tones with gold or silver cutlery keeps the setting elegant.
Personalized Cake Stands and Dessert Displays
- Displaying the gender reveal cake on a custom cake stand with baby-themed decorations makes it the centerpiece of the event.
- Adding small cupcakes with half pink and half blue frosting keeps guests engaged before the reveal.
- Serving personalized cookies shaped like baby onesies, rattles, or animals adds a charming touch.
Lighting and Special Effects for a Magical Atmosphere
Soft lighting and unique effects can elevate the ambiance, making the event feel more intimate and enchanting.
Fairy Lights and Candles for a Warm Glow
- Stringing fairy lights across the venue adds a twinkling and dreamy atmosphere.
- Using floating candles or lanterns enhances the elegance of an evening event.
LED Letter Signs for a Bold Statement
- Light-up letters spelling out “Boy or Girl?” create a perfect photo backdrop.
- Changing the LED colors during the reveal moment makes for an exciting and unexpected surprise.
Creative Reveal Ideas That Match the Theme
The actual gender reveal moment should be just as memorable as the decor. Coordinating the reveal method with the theme ensures a seamless and visually impactful experience.
Smoke Bombs for a Stunning Outdoor Reveal
- Gender-colored smoke bombs create a cinematic effect, especially in outdoor settings.
- A burst of pink or blue smoke against a scenic backdrop makes for unforgettable photos.
Themed Fireworks or Sparklers for a Grand Reveal
- If the event is held at night, fireworks matching the baby’s gender can light up the sky in pink or blue hues.
- Sparklers can be handed out to guests for an interactive and glowing celebration.
Giant Mystery Boxes for a Suspenseful Reveal
- A beautifully decorated box filled with helium balloons that float out upon opening builds excitement.
- Customizing the box with baby-themed designs or personalized messages makes it extra special.
Creating a Gender Reveal Experience to Remember
A gender reveal party is more than just an announcement—it is a shared experience that brings family and friends together in a joyful celebration. By selecting a unique theme, incorporating personalized decor, and using an unforgettable reveal method, you ensure that the event is truly special.
Since every detail contributes to the atmosphere, carefully choosing colors, decorations, and creative reveal ideas ensures that your gender reveal stands out. Whether you opt for an elegant royal theme, a playful adventure concept, or a breathtaking celestial design, the key is to make the event a reflection of your style and personality.
Ultimately, the best gender reveal theme is one that makes the moment feel magical, exciting, and perfectly tailored to you. With thoughtful planning, stunning decorations, and a memorable reveal, you can create an event that will be cherished by everyone for years to come.
Guide to Baking a Multi-Layer Pastel CaGuide to Baking a Multi-Layer Pastel Cake
Baking a multi-layer pastel cake requires precision, patience, and creativity. While the process may seem complex, breaking it down step by step makes it manageable and enjoyable. A pastel cake, with its soft hues and delicate layers, is perfect for special occasions like gender reveal parties, birthdays, and weddings. However, achieving even layers, vibrant-yet-subtle colors, and a flawless finish requires careful planning.
By following this comprehensive guide, you will learn how to create a stunning pastel cake with multiple layers, ensuring that both the appearance and flavor are exceptional. With the right techniques and a little practice, you can bake a professional-quality cake that will impress your guests.
Preparing for a Multi-Layer Pastel Cake
Before you begin mixing ingredients, having a clear plan ensures smooth execution. Because each layer will have a distinct pastel color, careful preparation is crucial for achieving a seamless gradient effect.
Choosing the Right Cake Recipe
A light and fluffy cake works best for multiple layers, as it ensures the structure remains stable without being too dense.
Best Cake Types for Multi-Layer Cakes
- Sponge Cake: Light and airy, making it ideal for layering.
- Vanilla Butter Cake: Sturdy yet soft, allowing easy stacking.
- Chiffon Cake: Moist and delicate, perfect for absorbing pastel colors.
Gathering Essential Baking Tools
Having the right tools on hand makes the baking and assembly process much easier.
Must-Have Tools for Multi-Layer Cakes
- Multiple cake pans of the same size for even baking.
- Digital kitchen scale to ensure equal layer thickness.
- Offset spatula and bench scraper for smooth frosting application.
- Piping bags and tips for decorative pastel frosting accents.
- Gel food coloring to achieve soft, vibrant pastel hues without affecting consistency.
Mixing the Cake Batter for Even Layers
The key to a well-structured pastel cake lies in its batter. Ensuring uniform consistency across all layers prevents color variation and uneven textures.
Achieving a Consistent Batter
For a perfectly layered cake, the batter must be mixed evenly, preventing dense or unevenly baked layers.
Steps for a Smooth Cake Batter
- First, sift all dry ingredients together to avoid lumps and ensure a uniform texture.
- Next, cream butter and sugar until light and fluffy, incorporating air into the batter.
- Then, add eggs one at a time, ensuring each is fully blended before adding the next.
- Finally, alternate adding dry and wet ingredients, mixing until just combined to avoid overworking the batter.
Dividing the Batter Evenly for Multiple Layers
Since each layer must have the same thickness, dividing the batter correctly is crucial.
Techniques for Equal Layer Distribution
- Use a kitchen scale to measure and distribute the batter evenly across all cake pans.
- If you don’t have a scale, use a measuring cup to portion the batter into each pan.
- Smooth the tops using an offset spatula to ensure even baking.
Coloring the Cake Layers with Pastel Shades
Achieving a soft, pastel gradient requires the right balance of color and consistency. Unlike bold cake colors, pastels should be delicate yet distinct.
Selecting the Right Food Coloring
Using high-quality gel food coloring prevents altering the cake’s texture.
Why Gel Food Coloring is Best for Pastels
- Only a small amount is needed to achieve the perfect shade.
- It blends smoothly into batter, ensuring an even hue.
Creating a Gradient Effect with Pastel Colors
To achieve a smooth ombre transition, each cake layer should be slightly deeper in color than the one before.
Steps to Blend Gradient Pastel Layers
- Start by leaving one layer uncolored for a neutral base.
- Add a tiny drop of gel food coloring to the second layer and mix gently.
- For each following layer, gradually increase the amount of color for a deeper hue.
- Be cautious not to add too much color at once, as pastels should remain soft and subtle.
Baking the Layers for a Perfect Texture
Once the batter is ready and colored, baking at the right temperature ensures even layers with minimal doming.
Setting the Right Oven Temperature
For best results, cakes should bake slowly at a moderate temperature to prevent browning.
Baking Temperature Tips
- Preheat the oven to 325°F (163°C) instead of the usual 350°F to avoid over-baking.
- Place cake pans on the center rack to ensure even heat distribution.
- Avoid opening the oven door too soon, as temperature fluctuations can cause sinking.
Testing for Doneness
Because overbaking can dry out the cake, checking for doneness at the right time is essential.
How to Know When Cake Layers Are Fully Baked
- Lightly press the top—if it springs back, the cake is fully baked.
- The edges should slightly pull away from the pan, indicating that the cake is set.
Cooling and Leveling the Cake Layers
Cooling cakes properly prevents condensation, which can affect the texture and frosting application.
Best Practices for Cooling Cake Layers
To avoid sticky or soggy layers, cooling must be done correctly.
Cooling Cakes Without Drying Them Out
- Let cakes sit in the pans for 10 minutes before transferring them to a wire rack.
- Cover layers with a clean kitchen towel to retain moisture.
- Avoid refrigerating warm cakes, as sudden cooling can create condensation.
Leveling Cake Layers for a Neat Stack
Even layers create a stable cake structure and an elegant final presentation.
Steps for Leveling Cakes Easily
- Use a serrated knife or cake leveler to remove domed tops.
- Rotate the cake while cutting to maintain an even surface.
- Brush off excess crumbs before assembling to keep the frosting clean.
Frosting and Decorating a Multi-Layer Pastel Cake
A beautifully frosted cake enhances its pastel aesthetic while maintaining a smooth and professional finish.
Choosing the Right Frosting for Pastel Cakes
The frosting should be light and airy to complement the delicate cake layers.
Best Frosting Options for Pastel Cakes
- Swiss Meringue Buttercream: Silky, smooth, and less sweet than American buttercream.
- Whipped Cream Frosting: Light, fluffy, and perfect for a soft pastel aesthetic.
- White Chocolate Ganache: Provides a glossy, elegant finish while enhancing pastel colors.
Applying a Smooth Buttercream Finish
A smooth frosting layer ensures the cake looks polished and professional.
Steps for a Flawless Finish
- Apply a thin crumb coat to trap loose crumbs and set the base.
- Chill the cake for 30 minutes before applying the final frosting layer.
- Use a bench scraper and offset spatula to create a seamless finish.
Decorating with Pastel Accents
Adding decorative touches completes the pastel aesthetic.
Creative Decorating Ideas
- Pipe ombre pastel swirls on top for a delicate, floral effect.
- Sprinkle edible pearls or sanding sugar for a soft shimmer.
- Use fresh flowers that match the pastel theme for a natural touch.
Perfecting the Art of Multi-Layer Pastel Cakes
By following these steps, you can create a pastel cake that is not only visually stunning but also rich in flavor and texture. While the process requires patience, attention to detail ensures that each layer is perfectly baked, evenly colored, and smoothly frosted. Whether you are making this cake for a gender reveal, birthday, or wedding, it will undoubtedly be a showstopper. With careful planning, precise techniques, and a touch of creativity, your multi-layer pastel cake will be a masterpiece worth celebrating.
Guide to Gender Reveal Cupcakes
Gender reveal cupcakes are a delightful way to add excitement to a celebration while allowing each guest to participate in the surprise. Unlike a large cake, these cupcakes create individual moments of joy, as everyone gets to experience the reveal firsthand. Beyond being visually appealing, they are also incredibly versatile, allowing for different flavors, fillings, and decorative styles.
By carefully planning the flavors, fillings, and decorations, you can craft gender reveal cupcakes that not only taste amazing but also become the highlight of the event. A well-executed cupcake design ensures that the gender remains a mystery until the moment of the reveal.
Planning and Preparation for Gender Reveal Cupcakes
Preparation is key when it comes to making gender reveal cupcakes. Every element, from the batter to the frosting, must be strategically designed to maintain the surprise while delivering a delicious treat.
Selecting the Best Cupcake Base
Since the cupcake base provides the foundation for the entire dessert, choosing a well-balanced recipe is essential.
Types of Cupcakes That Work Well for Gender Reveals
- Classic Vanilla Cupcakes – Their neutral color and subtle flavor allow the pink or blue filling to stand out.
- Chocolate Cupcakes – Rich and indulgent, they offer a delicious contrast to a creamy filling.
- Lemon Cupcakes – Slightly tangy and refreshing, they pair well with sweet buttercream.
- Red Velvet Cupcakes – Their mild cocoa flavor and velvety texture create a luxurious experience.
Gathering Essential Baking Tools
Equipping yourself with the right tools ensures that the process goes smoothly, from mixing the batter to decorating the final product.
Must-Have Tools for Perfect Cupcakes
- Cupcake Liners – Helps maintain a clean presentation and prevents sticking.
- Muffin Tin – Ensures even baking and uniform cupcake sizes.
- Melon Baller or Small Spoon – Essential for hollowing out cupcakes before adding the filling.
- Piping Bags and Tips – Allows precise frosting application for a beautiful finish.
- Offset Spatula – Helps smooth frosting and apply even layers.
- Gel Food Coloring – Provides vibrant colors without altering the texture of the batter or frosting.
Mixing and Baking the Cupcakes
Achieving light and fluffy cupcakes requires attention to detail in mixing, measuring, and baking. Proper ingredient ratios and mixing techniques contribute to the final texture and structure of the cupcakes.
Achieving a Consistent and Fluffy Batter
A well-mixed batter ensures even baking and a smooth, uniform texture. Overmixing or undermixing can negatively impact the structure.
Steps for a Perfectly Mixed Batter
- Begin by sifting dry ingredients together to remove lumps and ensure even distribution.
- Cream butter and sugar together until pale and fluffy, incorporating air for a lighter texture.
- Add eggs one at a time, beating after each addition to prevent curdling.
- Alternate dry and wet ingredients, starting and ending with dry ingredients to maintain structure.
- Mix just until combined, as overmixing can result in dense cupcakes.
Baking for Even and Moist Cupcakes
The right temperature and timing are crucial for producing cupcakes that bake evenly and remain soft.
Baking Tips for the Best Results
- Preheat the oven to 350°F (175°C) to ensure consistent heat distribution.
- Fill cupcake liners two-thirds full to allow for proper rising.
- Avoid overbaking by checking for doneness with a toothpick—if it comes out clean, the cupcakes are ready.
- Let the cupcakes cool completely before filling, as warm cupcakes can cause the filling to melt.
Creating the Hidden Surprise Inside the Cupcakes
The hidden filling is what makes gender reveal cupcakes special. It should be vibrant enough to stand out while complementing the overall flavor.
Best Fillings for Gender Reveal Cupcakes
Different fillings offer unique textures and flavors, so choosing the right one enhances both the surprise and the taste.
Popular Gender Reveal Fillings
- Colored Buttercream or Whipped Cream – A simple yet effective way to introduce the hidden color.
- Fruit Preserves – Raspberry, strawberry, or blueberry jam provides a naturally vibrant hue.
- Vanilla Pudding or Custard – Creamy and smooth, adding richness to the cupcake.
- Candy Confetti or Sprinkles – Adds a fun and crunchy texture along with a colorful surprise.
How to Properly Fill the Cupcakes
Since the filling must remain hidden until the first bite, a precise technique ensures that it stays concealed while preserving the cupcake’s structure.
Step-by-Step Guide to Filling Cupcakes
- Use a melon baller or small spoon to hollow out the center of each cupcake.
- Ensure that enough cake remains at the bottom to hold the filling securely.
- Pipe or spoon the pink or blue filling into the cavity, ensuring even distribution.
- Replace the removed cake piece to seal the filling inside without revealing it.
Decorating and Frosting the Cupcakes
Frosting plays a dual role—it enhances the flavor while keeping the reveal a secret. A beautifully decorated cupcake heightens anticipation, making the big moment even more exciting.
Choosing the Best Frosting for Gender Reveal Cupcakes
Since different frostings offer varying textures and consistencies, selecting the right one affects both taste and aesthetics.
Frosting Options That Work Best
- Swiss Meringue Buttercream – Silky and smooth, perfect for elegant piping.
- Cream Cheese Frosting – Tangy and creamy, balancing the sweetness of the cake.
- Whipped Cream Frosting – Light and airy, ideal for delicate decorations.
- White Chocolate Ganache – Adds a glossy, luxurious finish.
Decorating Techniques to Conceal the Surprise
While the frosting should look stunning, it must also prevent any hints of the hidden color from showing through.
Creative Decoration Ideas
- Two-Tone Swirls – Use neutral colors such as white and pastel yellow to maintain the mystery.
- Fondant Toppers – Decorate with baby-themed shapes like pacifiers, onesies, or rattles.
- Sprinkle Coating – Rolling the frosting in white or gold sprinkles adds texture while keeping the secret intact.
- Metallic Edible Glitter – A light dusting of silver or gold gives an elegant finishing touch.
Presenting the Cupcakes for a Memorable Reveal
Once decorated, the way the cupcakes are presented adds to the overall excitement of the event. Arranging them strategically ensures that the reveal moment is as dramatic as possible.
Display Ideas for Maximum Impact
The presentation should enhance the suspense while making the cupcakes a visually appealing centerpiece.
Best Ways to Display Gender Reveal Cupcakes
- Arrange cupcakes on a tiered stand to create an eye-catching focal point.
- Set up a mystery box reveal, where guests select a cupcake to bite into.
- Use a decorative serving platter with themed embellishments to match the party decor.
Enhancing the Reveal Moment
Since the reveal is the highlight, capturing guests’ reactions ensures that the moment becomes a lasting memory.
Ways to Make the Reveal More Special
- Encourage guests to bite into the cupcakes at the same time for a collective surprise.
- Set up a video recording station to capture reactions in real-time.
- Pair the cupcakes with matching drinks or desserts for a fully coordinated theme.
Bringing It All Together for the Perfect Gender Reveal Cupcakes
By focusing on flavor, decoration, and presentation, gender reveal cupcakes become more than just a dessert—they become an unforgettable experience. Every detail, from the hidden filling to the final swirl of frosting, plays a role in building excitement and anticipation.
With careful execution and creative touches, these cupcakes will leave a lasting impression, making the gender reveal celebration a truly magical event. Whether for a small family gathering or a large party, gender reveal cupcakes are the perfect way to share the joy of a new arrival with loved ones.ditional, full-sized cake, you can introduce a playful twist to your gender reveal party. These individually styled treats allow everyone to share in the surprise simultaneously and make for a stunning display on your dessert table. Most importantly, they ensure the focus remains on the heartfelt moment of discovering whether it’s a sweet baby boy or girl on the way—one delicious bite at a time.
Creating a Fondant Peek-a-Boo Effect
A fondant peek-a-boo effect is a creative and visually striking way to enhance gender reveal cakes, cupcakes, and other desserts. Unlike traditional designs, this technique allows you to add an interactive element that builds anticipation before the big reveal. By carefully layering fondant and incorporating hidden colors, you can create a design that surprises and delights guests the moment it is revealed.
This effect works well for gender reveal celebrations, birthday cakes, or any special occasion where an element of surprise is desired. To ensure a flawless finish, you will need to use precise fondant techniques, vibrant colors, and the right tools. By following this step-by-step guide, you will learn how to create a seamless and professional peek-a-boo effect that will leave everyone amazed.
Understanding the Fondant Peek-a-Boo Effect
Before diving into the process, it is essential to understand what makes this effect so unique. Unlike a simple color reveal, this technique involves layering fondant in a way that creates a hidden surprise beneath a top layer.
Why Use the Peek-a-Boo Technique?
Since traditional gender reveal cakes often rely on hidden fillings, the peek-a-boo effect offers an innovative alternative. Rather than waiting until the cake is sliced, guests can immediately see hints of the hidden color, building anticipation while maintaining an elegant design.
Key Benefits of the Peek-a-Boo Effect
- Adds a dramatic reveal moment without slicing the cake.
- Works on cupcakes, cookies, and tiered cakes, making it versatile.
- Enhances the overall aesthetic by blending elegance with an element of surprise.
- Allows for customization, making it easy to match any theme or celebration style.
Essential Tools and Materials
To create the perfect fondant peek-a-boo effect, you will need specific tools and ingredients.
What You Need for a Seamless Fondant Design
Since fondant requires precision and careful handling, using the right tools ensures a professional-looking finish.
Tools Required
- Rolling pin – Helps achieve an even fondant thickness.
- Fondant smoother – Eliminates air bubbles and creates a flawless surface.
- X-Acto knife or fondant cutter – Necessary for precise cutouts.
- Edible glue or water brush – Helps attach fondant securely.
- Round or shaped cutters – Creates consistent peek-a-boo openings.
- Food-safe paintbrushes – Useful for dusting edible shimmer or applying details.
Best Fondant Types to Use
Not all fondant works equally well for this technique, so choosing the right one makes a difference.
- Traditional rolled fondant – Ideal for covering cakes and creating layered effects.
- Modeling chocolate – Offers more flexibility and works well for sculpted designs.
- Gum paste – Dries quickly, making it suitable for cutouts that need to hold their shape.
Step-by-Step Guide to Creating the Peek-a-Boo Effect
Once you have gathered your tools and ingredients, it is time to bring the design to life. To achieve a clean and visually appealing peek-a-boo effect, follow these steps carefully.
Step 1: Preparing the Base Cake or Cupcakes
Since a smooth cake base is essential, preparing the cake correctly ensures a flawless finish.
How to Create the Perfect Cake Foundation
- First, bake and cool the cake layers completely to prevent melting fondant.
- Then, apply a thin crumb coat of buttercream to seal in any loose crumbs.
- After that, chill the cake for at least 30 minutes to create a firm surface for fondant application.
- Finally, roll out the base layer of fondant evenly and cover the cake, smoothing out any air bubbles.
Step 2: Coloring and Preparing the Hidden Fondant Layer
Since the hidden layer is the highlight of the peek-a-boo effect, selecting the right color and placement is key.
How to Add a Vibrant Hidden Layer
- Choose a bold pink or blue color to ensure the reveal is noticeable.
- Roll out a thin sheet of colored fondant, ensuring it is slightly larger than the cutout area.
- Carefully attach the colored fondant directly to the cake’s buttercream layer so it stays in place.
Step 3: Creating the Peek-a-Boo Cutouts
Since the peek-a-boo element is the most exciting part, precision is crucial for achieving clean, professional-looking openings.
How to Cut and Reveal the Hidden Layer
- Roll out a neutral-colored fondant layer that will cover the hidden color.
- Use a round cutter or X-Acto knife to create partial cutouts.
- Peel back each cutout gently, revealing just enough color underneath to build anticipation.
- If needed, secure lifted edges with edible glue to maintain the peek-a-boo effect.
Step 4: Adding Decorative Details
Now that the peek-a-boo design is in place, additional decorative elements enhance the overall aesthetic.
Best Decorative Additions for a Polished Look
- Edible gold or silver dust adds a touch of elegance.
- Hand-painted fondant accents, such as baby footprints or stars, personalize the design.
- Fondant bows or ribbons around the base of the cake help frame the peek-a-boo effect beautifully.
Step 5: Final Touches for a Flawless Finish
Before displaying the cake, checking for any imperfections ensures a professional presentation.
How to Perfect the Final Design
- Gently press any loose fondant edges to ensure they adhere properly.
- Use a soft brush to remove excess cornstarch or powdered sugar from the surface.
- Apply a thin layer of edible shimmer to give the fondant a polished, high-end look.
Creative Variations of the Peek-a-Boo Effect
Although the classic peek-a-boo technique is stunning on its own, there are several ways to elevate the design further.
Peek-a-Boo Cupcakes for an Interactive Reveal
Cupcakes allow for individual reveals, making them a great alternative to a full cake.
How to Apply the Technique to Cupcakes
- Cover each cupcake with a thin layer of fondant before cutting small windows.
- Instead of a solid fondant layer, use fondant cutouts in fun shapes, such as hearts or stars.
- Add a dusting of edible glitter to the exposed color for an extra pop.
Peek-a-Boo Cookies for a Playful Surprise
If you prefer cookies, this effect works beautifully on sugar cookies with fondant tops.
How to Create Peek-a-Boo Cookies
- Roll out a base cookie dough layer, then add a fondant top layer with small cutouts.
- Apply colorful royal icing beneath the fondant to create a soft, surprise reveal.
- Press tiny edible pearls around the cutout edges for added decoration.
Making the Peek-a-Boo Effect Stand Out
To ensure your creation is the centerpiece of the event, presentation is just as important as execution.
Ways to Elevate the Final Display
- Place the cake on a rotating cake stand to allow guests to admire the effect from all angles.
- Use a well-lit backdrop with complementary colors to make the peek-a-boo details pop.
- Arrange matching themed cupcakes or cookies around the main cake for a coordinated look.
Bringing It All Together for a Stunning Peek-a-Boo Reveal
By carefully planning and executing the fondant peek-a-boo effect, you can transform an ordinary cake into a showstopping masterpiece. Since this technique allows for endless customization, it can be adapted to fit any occasion, from gender reveals to birthdays and weddings.
With the right tools, attention to detail, and creative flair, you can craft a fondant peek-a-boo design that leaves a lasting impression. Ultimately, the goal is to blend artistry with excitement, ensuring that every guest is captivated by the surprise hidden within.or delicate cutouts or bold, statement-making shapes, this technique keeps everyone guessing—and thoroughly enchanted—up until the final reveal.

How to Make Your Gender Reveal Moment Truly Memorable
How to Highlight the Slicing Ceremony
The slicing ceremony is the pinnacle of any gender reveal celebration, creating an unforgettable moment of excitement and anticipation. Since the cake serves as the centerpiece of the event, the way the reveal is presented and captured makes all the difference. Beyond simply cutting into the cake, enhancing the experience with thoughtful details, dramatic presentation, and coordinated reactions ensures that the reveal is not only emotional but also visually stunning.
By carefully planning every aspect—from lighting and decorations to guest involvement and photography—you can elevate the slicing ceremony into a breathtaking experience that will be remembered for years to come.
Setting the Stage for the Reveal Moment
Because the slicing ceremony is the highlight of the event, preparing the perfect setting ensures that the moment is beautifully captured and enjoyed by all. Choosing the right decor, lighting, and background makes the scene more visually striking, while the positioning of guests helps build excitement.
Selecting the Perfect Cake Display
The way the cake is positioned plays a crucial role in drawing attention to the reveal moment. A well-designed cake table enhances the overall atmosphere and creates a natural focal point.
How to Create an Eye-Catching Cake Setup
- Place the cake on a raised cake stand to elevate it above the table, making it more visible.
- Use decorative backdrops such as floral arrangements, balloon garlands, or neon signs reading “Boy or Girl?” to frame the cake beautifully.
- Arrange the table with matching desserts like cupcakes, cookies, or macarons to complement the theme.
- Scatter small LED lights or candles around the cake stand to create a warm, inviting glow.
Optimizing Lighting for a Picture-Perfect Reveal
Since lighting affects how the reveal moment appears in photos and videos, ensuring the right setup is key.
Best Lighting Techniques for the Slicing Ceremony
- Use natural daylight or soft white LED lighting to keep the scene bright and well-lit.
- Avoid harsh overhead lights that can cast unflattering shadows on the cake and guests.
- Position a spotlight or ring light near the cake table to focus attention on the reveal moment.
- If the event is outdoors, consider using string lights or fairy lights to enhance the ambiance.
Arranging Guests for Maximum Excitement
Since guest reactions contribute to the overall energy of the reveal, ensuring they are positioned correctly makes the moment even more exciting.
How to Position Guests for the Best Experience
- Ask guests to form a semi-circle around the cake table so everyone has a clear view.
- Encourage family members or close friends to stand near the front, as their reactions will be the most emotional.
- If recording the reveal, designate a space for photographers or videographers to capture clear footage.
- Provide small props like confetti poppers or balloons for guests to use after the reveal to add an extra celebratory touch.
Enhancing the Build-Up Before the Slice
Since anticipation is what makes the slicing ceremony thrilling, creating a sense of suspense before cutting into the cake enhances the overall experience.
Engaging Guests with Fun Guessing Games
Before the slicing begins, involving guests in interactive activities builds excitement and keeps them engaged.
Pre-Reveal Activities to Heighten Anticipation
- Set up a “Team Boy vs. Team Girl” voting station where guests place their guesses.
- Hand out wearable accessories such as pink or blue wristbands to show guest predictions.
- Play a quick “Old Wives’ Tales” quiz, where guests guess the gender based on fun myths.
Choosing the Right Music for the Reveal Moment
Music sets the tone for the slicing ceremony, creating an emotional and celebratory atmosphere.
Best Song Choices for the Gender Reveal
- A slow, dramatic song leading up to the slice, followed by an upbeat celebration track.
- If using a countdown, choose a suspenseful instrumental build-up before the cake is cut.
- Classic songs like “Isn’t She Lovely” for a girl or “The Boys Are Back in Town” for a boy add a personalized touch.
Adding an Extra Layer of Suspense
Instead of immediately slicing the cake, adding small moments of suspense keeps guests on edge and heightens excitement.
Ways to Build Suspense Before Cutting
- Have one partner pretend to slice but stop just before revealing the color.
- Ask guests to count down from ten, increasing anticipation.
- Cover the cake in a final decorative layer (such as a neutral-colored fondant) so the gender is hidden until the slice is lifted.
Executing the Cake Reveal Flawlessly
Because the moment of slicing is the main event, ensuring a smooth execution makes the reveal more magical.
Mastering the Perfect Cake Cut
Using the correct cutting technique ensures that the hidden color inside the cake is revealed cleanly and dramatically.
How to Slice the Cake for the Best Reveal
- Use a sharp, serrated knife to ensure a clean cut without crumbling.
- Cut a deep, straight slice down the center to expose as much of the inner color as possible.
- Lift the slice slightly before fully removing it to allow the color to show gradually for added suspense.
- Ensure both partners hold the knife together for a symbolic and shared moment.
Capturing the Best Photos and Videos
Since the slicing ceremony is the most memorable part of the event, capturing the moment in high quality is essential.
Tips for Photographing and Filming the Reveal
- Have a designated photographer or videographer positioned at the perfect angle.
- Capture close-ups of the cake slice, reactions of the parents-to-be, and guests’ expressions.
- Use slow-motion recording for a dramatic effect during the reveal.
- Take multiple shots before, during, and after the slice to ensure the best moments are captured.
Celebrating Immediately After the Reveal
Since the moment of discovery is emotional and exciting, transitioning smoothly into a celebration makes the experience feel seamless.
Coordinating the Celebration After the Slice
Guests should feel encouraged to celebrate the reveal in a way that makes the moment even more fun and festive.
Fun Ways to Celebrate Immediately After the Slice
- Have guests pop confetti cannons or release balloons as soon as the color is revealed.
- Play a lively song to transition into an energetic celebration.
- Provide pink or blue-themed drinks and desserts for guests to enjoy.
- Take group photos with the cake as a keepsake of the big moment.
Announcing the Gender with a Special Touch
For an extra meaningful moment, adding a personalized announcement makes the reveal feel even more heartfelt.
Ways to Announce the Gender Creatively
- Have one partner say the gender aloud while raising the cake slice.
- Use a custom sign or banner that drops once the cake is cut.
- Incorporate a personalized toast to thank guests for being part of the special moment.
Making the Slicing Ceremony Unforgettable
By carefully planning the details leading up to, during, and after the slicing ceremony, you can ensure that the reveal is an emotional, exciting, and unforgettable experience. Whether through suspenseful build-up, interactive guest involvement, or beautifully executed photography, every element plays a role in making the moment truly special.
Since this is a once-in-a-lifetime event, taking the time to highlight the slicing ceremony transforms it from a simple cake-cutting into a grand, heartfelt celebration. Ultimately, the goal is to create a joyful memory filled with excitement, love, and lasting impressions that everyone will cherish for years to come.xtravaganza complete with confetti showers, the slicing ceremony unites everyone in a moment of shared happiness for the new life on the way.
Ideas for Gender Reveal Photos and Videos
Capturing the gender reveal moment is just as important as planning the celebration itself. Since the reveal happens in just a few seconds, ensuring that you document the moment properly allows you to relive it and share it with loved ones who couldn’t attend. Whether you prefer professional photography, a DIY setup, or a cinematic video, using creative angles, lighting, and themes enhances the overall experience.
By planning ahead and incorporating engaging visual elements, you can create stunning photos and videos that make the reveal moment even more magical. In addition, choosing the right setting, coordinating guest reactions, and using fun props all contribute to a memorable and beautifully captured event.
Planning the Perfect Gender Reveal Photoshoot
Before the big day, taking time to plan the details of your photoshoot ensures high-quality images that reflect the excitement of the reveal. The background, outfits, and props all play a significant role in making the pictures visually appealing and meaningful.
Choosing the Right Location for Stunning Photos
Since the location sets the scene, selecting the perfect spot enhances the overall composition of the images.
Best Locations for a Gender Reveal Photoshoot
- Outdoor Parks or Gardens – Natural lighting, lush greenery, and open spaces create dreamy backdrops.
- Beaches or Lakesides – The soft hues of the water and sand complement pastel color themes beautifully.
- Home Settings – A cozy and intimate option, perfect for a personal and relaxed atmosphere.
- Urban Cityscapes – Rooftops or scenic viewpoints add a modern and stylish touch to the photos.
Coordinating Outfits for a Picture-Perfect Look
Since matching outfits enhance the visual impact of the photos, coordinating colors and styles creates a polished aesthetic.
Tips for Choosing the Best Outfits
- Wear neutral tones like white, beige, or gray to let the reveal color stand out.
- Add subtle hints of pink and blue through accessories like scarves, ties, or jewelry.
- Avoid overly busy patterns, as they can distract from the main focus of the reveal.
- Choose flowy dresses or fitted shirts that flatter both parents-to-be for a stylish look.
Using Props to Enhance the Photo Composition
Since props add an interactive element, incorporating them creatively makes the photos more dynamic and fun.
Popular Gender Reveal Photo Props
- Chalkboards with “Boy or Girl?” Signs – Adds a personal touch to the announcement.
- Colored Balloons – Creates a visually striking effect when released.
- Confetti Poppers – Captures a lively, celebratory explosion of color.
- Ultrasound Images – Provides a heartfelt connection to the baby.
Creative Gender Reveal Photo Ideas
Beyond traditional reveal photos, experimenting with different angles, perspectives, and timing makes the images unique and engaging.
Slow-Motion Powder or Smoke Bomb Shots
Since powder or smoke bombs create a dramatic effect, capturing them in slow motion results in breathtaking images.
How to Capture the Best Powder or Smoke Bomb Photos
- Use a high-speed camera to freeze the colorful explosion in crisp detail.
- Shoot against a contrasting background so the pink or blue hue stands out.
- Time the release carefully to maximize the impact of the color reveal.
Reflection Shots for an Artistic Touch
If you’re looking for a creative approach, using reflections in water or mirrors adds depth to the image.
Best Ways to Incorporate Reflections
- Stand near a calm lake or puddle for a mirrored effect.
- Hold a hand mirror facing the couple to show their excited expressions.
- Use a reflective floor or glass window for an elegant, modern twist.
Backlit Silhouette Shots for a Dramatic Look
Since lighting affects the mood of a photo, using a backlit effect creates a striking contrast.
How to Achieve the Perfect Silhouette Photo
- Position the couple in front of a sunset or bright light source.
- Hold balloons, a baby onesie, or a sign to create a unique shape in the shadow.
- Adjust camera settings to enhance the contrast between the dark foreground and glowing background.
Filming an Unforgettable Gender Reveal Video
Since videos capture movement, expressions, and reactions, they bring an extra level of emotion to the reveal moment. Instead of just taking photos, recording a video allows you to relive every detail of the surprise and excitement.
Choosing the Right Video Style
Since every couple has a unique personality, choosing the right video style helps set the tone for the celebration.
Types of Gender Reveal Video Styles
- Cinematic Slow Motion – Highlights emotions and reactions with a dramatic effect.
- Vlog-Style Reveal – A more casual and personal video that captures the event as it unfolds.
- Montage Edit – Combines multiple moments into a fast-paced, exciting sequence.
- Drone Footage – Adds an aerial perspective for a grand, sweeping effect.
Creative Ways to Film the Gender Reveal Moment
Since the actual reveal lasts only a few seconds, capturing it from multiple angles ensures that every detail is documented.
How to Film the Reveal Like a Pro
- Use at least two cameras to get different perspectives.
- Set up a tripod for a steady main shot, while a second person films close-ups.
- Record in high frame rate mode to allow for slow-motion playback.
- Capture guest reactions, as their expressions add to the emotional impact of the moment.
Editing Tips to Make the Video More Engaging
Since editing ties the entire video together, adding thoughtful effects enhances the overall storytelling.
How to Edit a Gender Reveal Video for Maximum Impact
- Start with a build-up segment, showing the parents-to-be and guests before the reveal.
- Add soft background music that builds in intensity leading up to the reveal moment.
- Incorporate slow-motion effects to highlight the exact second the color is revealed.
- End with a montage of reactions, ensuring the video feels joyful and celebratory.
Sharing the Photos and Videos in a Meaningful Way
Once the photos and videos are captured, sharing them creatively makes the announcement even more special.
Best Platforms for Sharing Gender Reveal Photos and Videos
Since different platforms cater to different audiences, choosing the right one ensures that the reveal reaches loved ones effectively.
Where to Share Your Gender Reveal Content
- Instagram Stories & Reels – Great for quick, high-impact reveal videos.
- Facebook Live or Posts – Allows friends and family to engage with the moment.
- YouTube or TikTok – Perfect for a cinematic-style gender reveal edit.
- Personal Blog or Website – A more intimate way to share the reveal with detailed captions.
Creative Captions to Announce the Big News
Since captions add personality, choosing the right words makes the announcement more engaging.
Examples of Fun Gender Reveal Captions
- “Pink or blue? The moment we’ve all been waiting for!”
- “Our little one is on the way… and we finally know who’s coming!”
- “Boy or girl? Watch our surprise unfold!”
- “And the answer is… 💙 or 💖? Watch to find out!”
Making the Gender Reveal Photos and Videos Unforgettable
Since the gender reveal is a once-in-a-lifetime event, capturing the moment in a meaningful way ensures that the joy, excitement, and emotions are preserved forever. By carefully planning your photoshoot, incorporating creative filming techniques, and adding a personal touch to your videos, you can turn the reveal into a breathtaking memory.
Ultimately, the goal is to create content that reflects the happiness of the moment, making it a cherished keepsake for years to come. Whether through professional photography, cinematic video edits, or heartwarming social media posts, the right approach ensures that the gender reveal remains a moment to remember.her you hire a professional or rely on a helpful friend, the combination of good lighting, strategic angles, and genuine enthusiasm will shine through in every shot.
Tying Your Cake to the Party Theme
Since the cake is often the centerpiece of a gender reveal party, ensuring that it seamlessly matches the overall theme enhances the visual appeal and creates a more cohesive experience. Instead of simply making a standard cake with pink or blue filling, incorporating design elements that align with the party’s decorations, colors, and style makes the celebration feel thoughtfully curated. By carefully selecting colors, decorations, and presentation details, you can elevate the cake from a simple dessert to a show-stopping reveal piece.
Because every theme has unique visual and decorative elements, tailoring the cake’s design to match the party theme ensures consistency. Whether you are hosting a whimsical garden party, a luxurious royal-themed gathering, or a playful sports-inspired event, the right cake design strengthens the overall aesthetic while keeping the gender reveal moment exciting and memorable.
Choosing the Right Cake Design Based on the Party Theme
Since each party theme has a distinct mood and visual style, selecting the right cake design is essential for maintaining harmony in the decorations. Beyond color coordination, details such as frosting texture, decorative elements, and cake toppers all contribute to making the cake a stunning focal point.
Matching Cake Colors to the Party Palette
Because color plays a key role in party aesthetics, ensuring that the cake complements the theme’s palette creates a polished look.
How to Choose the Perfect Cake Colors
- If your theme includes soft pastels, such as a floral garden party, opt for a pastel ombré cake with gentle pink and blue hues blending into each other.
- For a glamorous gold and white theme, incorporate edible gold leaf, metallic sprinkles, and elegant script decorations.
- If you are hosting a sports-themed party, use team colors, stripes, or a jersey-shaped cake to reflect the excitement of the theme.
- In the case of a twinkle-twinkle little star theme, a cake featuring navy blue with gold stars and soft cloud-like frosting ties into the dreamy aesthetic.
Using Decorative Elements That Reflect the Theme
Since decorations are what bring a cake to life, choosing elements that align with the party’s visual style enhances the overall experience.
Best Cake Decorations for Themed Gender Reveal Cakes
- Floral and Garden Themes – Fresh edible flowers, piped buttercream roses, and delicate greenery accents create an elegant, nature-inspired cake.
- Luxury and Royal Themes – Gold accents, ornate fondant designs, and edible pearls add sophistication.
- Safari or Jungle Themes – Animal print fondant patterns, palm leaf toppers, and miniature edible jungle animals make the cake stand out.
- Baby-Themed Designs – Tiny fondant baby booties, rattles, or pacifiers add a cute, gender-neutral touch.
- Modern Minimalist Themes – Smooth white buttercream with a simple, elegant drip effect keeps the design sleek and stylish.
Selecting the Right Cake Shape for Visual Impact
Because the cake’s shape influences how it fits within the party theme, thinking beyond a standard round cake creates a more exciting and unique display.
Creative Cake Shapes That Align with Party Themes
- A storybook or fairytale theme could feature a castle-shaped cake with pastel pink or blue accents.
- For a travel or adventure-themed reveal, a cake shaped like a hot air balloon, globe, or suitcase adds a sense of excitement.
- If you’re hosting a winter wonderland party, a tiered cake with icicle-like fondant drips and edible snowflakes makes a stunning statement.
- A boho-chic party pairs well with a semi-naked cake adorned with dried florals and a soft watercolor effect.
Incorporating the Reveal Moment into the Cake Design
Since the gender reveal is the main highlight, ensuring that the cake itself plays a role in the big moment makes the experience even more interactive. Instead of simply slicing into a pink or blue-filled cake, adding a creative reveal element enhances the surprise factor.
Creative Ways to Reveal the Gender with the Cake
Peek-a-Boo Fondant Design for a Dramatic Effect
- If you want to build suspense, create a fondant peek-a-boo effect, where a ripped or unpeeled fondant layer reveals a pink or blue interior underneath.
- Use layered fondant flaps shaped like baby clothes or bows, which can be peeled back for a slow reveal.
Hidden Sprinkle Explosion for an Exciting Surprise
- A hollowed-out center filled with pink or blue sprinkles, candies, or edible confetti creates a burst of color when the cake is sliced.
- This effect works best for tall tiered cakes, as the extra height allows for a larger reveal space.
Drip Cake with a Hidden Color Twist
- A white or neutral-colored drip cake that features a hidden pink or blue drizzle inside the top layer keeps the surprise discreet until sliced.
- To make the reveal more exciting, pour additional colored ganache over the top, allowing the color to spill over dramatically.
Balloon Pop Cake for an Interactive Reveal
- A cake with a small edible balloon filled with colored edible powder or sprinkles can be popped using a cake knife, revealing a dusting of pink or blue.
- This adds an element of playfulness and engagement for guests watching the reveal.
Coordinating the Cake Table with the Party Theme
Because the cake table serves as the main display area, decorating it in a way that complements the cake and theme ensures a visually stunning setup.
Creating a Stunning Cake Table Setup
How to Style the Cake Table to Match the Theme
- Use themed backdrops with banners, fairy lights, or printed signs to add depth.
- Place matching desserts, such as cupcakes, cake pops, and cookies, around the main cake for a cohesive presentation.
- Arrange gender-neutral flowers, candles, or decorative trays to enhance the elegance of the setup.
- Use a statement cake stand that elevates the cake, making it the focal point of the table.
Adding Additional Desserts That Complement the Cake
Since pairing the cake with matching treats adds to the overall theme, incorporating small, themed desserts creates a more immersive experience.
Themed Dessert Ideas to Match the Cake
- Macarons in neutral shades with a hidden pink or blue filling.
- Custom sugar cookies shaped like baby bottles, rattles, or animals.
- Mini cupcakes with surprise centers filled with gender-reveal-colored frosting.
- Chocolate-covered strawberries with a color-coded drizzle.
Final Touches to Make the Cake Stand Out
Since presentation plays a significant role in making the cake unforgettable, adding final decorative touches ensures that it truly shines.
Using Personalized Cake Toppers for a Custom Touch
Best Cake Topper Ideas for a Gender Reveal Cake
- “Boy or Girl?” acrylic toppers in metallic gold or silver for an elegant finish.
- Personalized name toppers with the baby’s name or due date.
- Small figurines or baby-themed fondant toppers, such as tiny shoes or teddy bears.
Coordinating the Cake Cutting Ceremony with the Theme
Because the slicing ceremony is a major part of the reveal, tying it to the theme enhances the overall experience.
How to Make the Cake Cutting More Thematic
- Use matching cake-cutting utensils that reflect the party’s colors.
- Set up a special backdrop behind the cake-cutting area for better photos.
- Provide matching plates and napkins to maintain theme consistency.
Bringing It All Together for a Stunning Themed Cake Reveal
Since the gender reveal cake is one of the most photographed and anticipated elements of the event, ensuring that it aligns with the party theme makes the celebration feel well-planned and visually cohesive. By thoughtfully incorporating color coordination, decorative details, and interactive reveal elements, you can create a cake that not only looks stunning but also enhances the excitement of the big moment.
Ultimately, the goal is to craft a cake that seamlessly ties into the overall theme, creating a memorable and visually striking reveal that leaves a lasting impression on guests. Whether through intricate fondant work, clever surprise elements, or beautifully styled table decor, the right approach ensures that the gender reveal cake becomes the highlight of the celebration.teractive elements, every detail counts toward a celebration that feels unified and thoughtfully planned. The result is a celebration where the big reveal becomes part of an even bigger, beautifully orchestrated experience—one that family, friends, and parents-to-be will reminisce about long after the party ends.
Post-Reveal Celebration Ideas
Since the gender reveal moment is the highlight of the event, the celebration shouldn’t stop after the big announcement. Instead of simply cutting the cake and moving on, keeping the energy alive with engaging activities, themed refreshments, and heartfelt moments ensures that the party remains memorable.
By carefully planning post-reveal activities, incorporating creative ways to celebrate, and ensuring guests feel included, you can make the entire event feel cohesive and full of joy. Whether through interactive games, customized food and drinks, or meaningful traditions, the right post-reveal celebration ideas help carry the excitement forward.
Keeping the Excitement Going After the Reveal
Since the adrenaline from the reveal moment is at its peak, transitioning smoothly into a fun celebration helps maintain the high energy. To keep guests engaged, plan activities that encourage participation while reinforcing the excitement of welcoming a new family member.
Themed Group Toast to Celebrate the News
Because a toast brings everyone together, starting the post-reveal celebration with a heartfelt speech is a wonderful way to acknowledge the moment.
How to Make the Toast Special
- Use gender-themed drinks such as pink lemonade, blue mocktails, or color-changing cocktails.
- Have the parents-to-be share their feelings about the reveal, adding a personal touch.
- Encourage close family members to say a few words, making the moment more intimate.
- Play a short slideshow or video montage of the couple’s journey leading up to this moment.
Music and Dance to Keep the Celebration Vibrant
Since music sets the mood, having an upbeat playlist ensures that the excitement doesn’t fade after the reveal.
Best Ways to Keep the Energy High
- Start with a lively song immediately after the reveal, prompting guests to cheer and dance.
- Include gender-themed songs, such as “Isn’t She Lovely” for a girl or “The Boys Are Back in Town” for a boy.
- Organize a dance-off or fun baby-related dance challenges, such as “Baby Shark” or “Rock-a-Bye Baby” remixes.
- Provide personalized glow sticks, confetti poppers, or party hats to keep the energy festive.
Fun and Interactive Activities for Guests
Since guests have gathered to celebrate this milestone, involving them in interactive activities keeps them engaged. Rather than just watching the reveal, giving them something to participate in makes the event feel more inclusive.
Baby Name Suggestion Station
Because the gender is now revealed, encouraging guests to contribute name ideas adds a fun and personal touch.
How to Set Up a Baby Name Suggestion Activity
- Provide cute stationery, mini chalkboards, or a decorated name jar for guests to write their suggestions.
- Divide suggestions into boy, girl, or unisex name categories, allowing guests to contribute creative ideas.
- Have the parents-to-be pick a few favorites and announce which ones they love the most.
- Offer a small prize to the guest with the most unique or creative name suggestion.
Photo Booth with Themed Props
Since everyone loves capturing memories, setting up a photo booth ensures that guests take home a fun keepsake from the event.
How to Create the Perfect Photo Booth Setup
- Use a customized backdrop with “It’s a Boy!” or “It’s a Girl!” banners.
- Provide props like baby bottles, bibs, pacifiers, and funny signs for guests to hold.
- Include balloons or confetti cannons to make the photos more dynamic.
- Offer instant-print polaroid cameras so guests can take home their pictures immediately.
Gender-Themed Games for Extra Fun
Since games add laughter and excitement, incorporating baby-related challenges keeps the event lighthearted and entertaining.
Best Games for a Post-Reveal Celebration
- Baby Trivia – A fun quiz about baby facts, old wives’ tales, or parenting myths.
- Diaper Changing Challenge – Guests compete to see who can change a diaper the fastest on a baby doll.
- Baby Food Tasting Test – Participants try different baby food flavors while blindfolded and guess what they are.
- Guess the Due Date – Guests write down their predictions for the baby’s arrival date, with a prize for the closest guess.
Food and Drinks to Match the Celebration
Since food is a big part of any gathering, offering creative gender-themed treats and drinks keeps guests excited and engaged.
Sweet Treats That Celebrate the Reveal
Because desserts add a festive touch, serving themed sweets ensures that the party’s visual appeal continues even after the cake is cut.
Best Themed Desserts to Serve
- Cotton Candy Station – Guests can choose between pink or blue cotton candy.
- Color-Coordinated Macarons – A sweet treat that adds elegance to the dessert table.
- Cupcakes with Dual-Colored Frosting – These visually appealing cupcakes reflect both gender colors.
- Chocolate-Covered Strawberries – White chocolate-dipped strawberries with a pink or blue drizzle.
- Baby Rattle Cake Pops – Cake pops shaped like baby rattles, dipped in pink or blue chocolate.
Signature Drinks to Elevate the Party
Since a well-curated drink menu adds to the celebration, creating fun themed beverages ensures that everyone has something festive to sip on.
Creative Gender-Themed Drink Ideas
- Mocktail Spritzers – Lemonade mixed with blue or pink fruit puree for a refreshing non-alcoholic option.
- Cotton Candy Champagne – Champagne poured over cotton candy for a whimsical color-changing effect.
- Berry Infused Water – Blueberries or raspberries added to sparkling water for a light, refreshing drink.
- Customized Baby Bottles – Serve milkshakes or smoothies in baby bottles for a playful touch.
Heartfelt Moments to Make the Celebration Meaningful
Since this event is about celebrating family, adding heartfelt moments makes the gathering feel even more special.
Letters to the Baby Keepsake
Because the baby will one day look back on this moment, collecting letters from loved ones creates a touching memory.
How to Organize a Letter-Writing Station
- Provide decorative stationery for guests to write messages to the baby.
- Set up a themed mailbox or keepsake box to store the letters.
- Encourage guests to write predictions, well-wishes, or funny parenting advice.
- Present the letters to the child in the future, such as on their 18th birthday.
Surprise Gift for the Parents-to-Be
Since the couple is celebrating an important milestone, surprising them with a thoughtful gift makes the event even more memorable.
Meaningful Gift Ideas for the Parents
- Personalized “Mom” and “Dad” T-Shirts – A fun way to embrace their new titles.
- Baby Memory Book – Helps them document the journey leading up to the baby’s birth.
- Custom Family Name Sign – A decorative sign featuring the baby’s name.
- Relaxation Gift Basket – Includes spa items, cozy blankets, and candles for the parents-to-be to enjoy before the baby arrives.
Bringing the Post-Reveal Celebration to Life
Since the gender reveal moment is a once-in-a-lifetime experience, ensuring that the celebration continues afterward keeps the event exciting and memorable. By incorporating interactive games, themed desserts, heartfelt traditions, and fun activities, guests remain engaged and entertained.
Ultimately, the goal is to create an atmosphere of joy, love, and celebration while making sure that the parents-to-be feel supported and cherished. Since this is a significant milestone in their journey, turning the reveal into a full celebration ensures that every guest leaves with lasting memories and excitement for the baby’s arrival.er and create lasting memories of the day you discovered who you’ll soon be welcoming into your family.
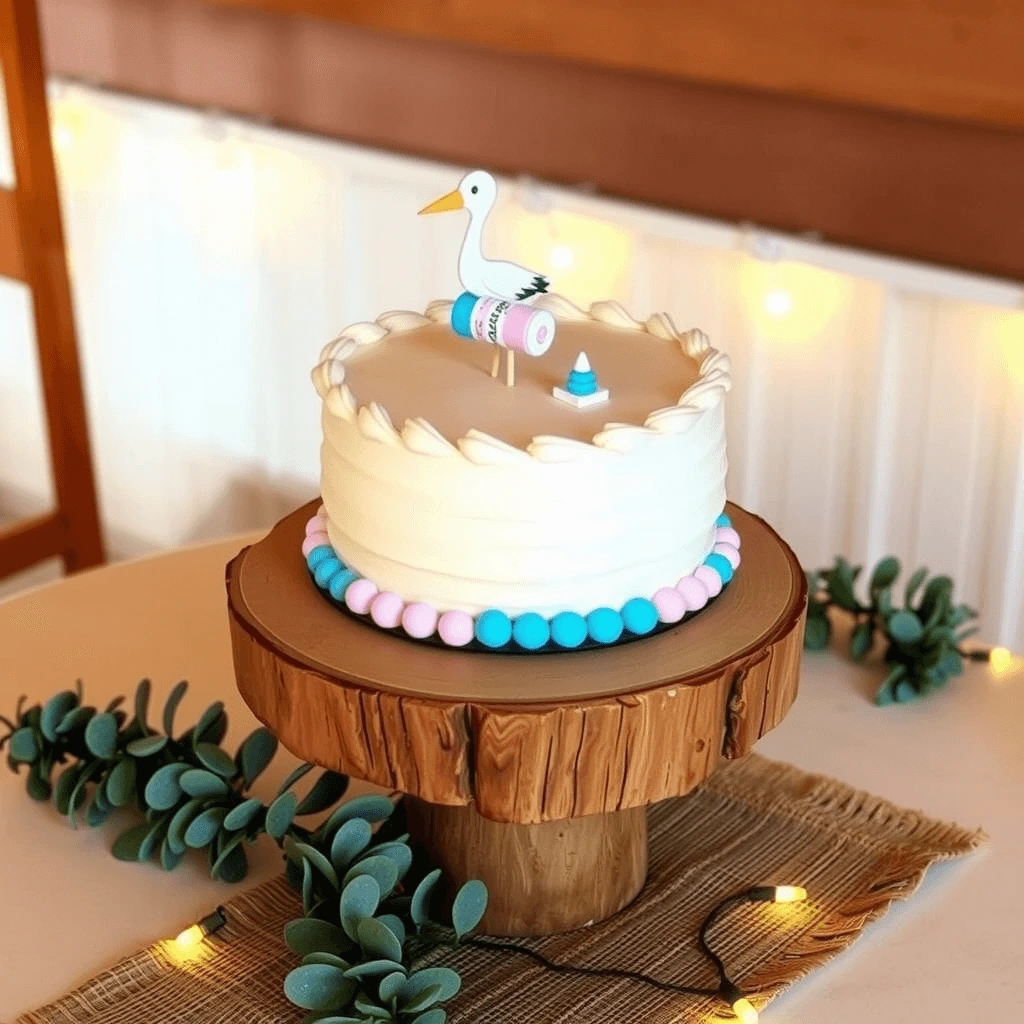
Conclusion
Planning a gender reveal cake goes beyond just choosing pink or blue—it’s about crafting a meaningful experience that brings joy to everyone celebrating your special moment. By selecting the right ingredients and mastering essential techniques, you can transform a simple cake into a captivating centerpiece. Personal touches like sprinkle-filled centers, fondant toppers, or hidden color layers add an element of surprise, making the reveal unforgettable for everyone involved.
Your cake can also become a reflection of the overall party theme, tying together decorations, activities, and the excitement of the big reveal. Whether it’s a pastel ombré masterpiece or a bold sprinkle explosion, the cake serves as a highlight that builds anticipation and adds magic to the event. Capturing the slicing moment on camera ensures you’ll cherish those memories for years to come, sharing the joy with family and friends who couldn’t attend.
Once the surprise is unveiled, the celebration doesn’t have to end. Toasts, themed games, and delicious treats keep the excitement going as everyone comes together to honor your growing family. With thoughtful planning, a touch of creativity, and love in every detail, your gender reveal cake will be more than just dessert—it will be a moment of connection, joy, and lifelong memories.
1 thought on “Gender Reveal Cake: Top 10 Ideas for a Big Surprise”