
If you love the flakiness of a croissant but prefer something a little less buttery and more structured, then Gipfeli is the perfect Swiss pastry for you. A beloved breakfast staple in Switzerland, Gipfeli may look similar to the classic French croissant, but it has its own unique characteristics—slightly denser, mildly sweet, and made with less butter while still achieving that deliciously crisp, golden-brown exterior.
Unlike traditional croissants, which rely heavily on butter lamination, Gipfeli is a bit easier to master, making it a fantastic recipe for beginners. In this step-by-step guide, you’ll learn how to make authentic Swiss Gipfeli at home using simple ingredients and straightforward techniques. Whether you’re new to baking or looking to expand your repertoire of European pastries, this beginner-friendly Gipfeli recipe will have you baking like a pro in no time!
Let’s get started!

What is Gipfeli? A Swiss Pastry Staple
Gipfeli vs. French Croissants: Key Differences in Texture and Ingredients
When comparing Gipfeli to French croissants, most people assume they are identical, but the differences go beyond just butter content and shape. These two pastries have unique characteristics that set them apart in terms of flavor, texture, and preparation methods. Understanding these differences will help you appreciate the Swiss take on the classic croissant and choose the right pastry for your taste.
Butter Content and Richness
One of the most defining characteristics of a croissant is its rich, buttery taste, achieved through lamination, where layers of butter are folded into the dough multiple times.
- French croissants use a high percentage of butter, often over 25% of the dough’s total weight, which contributes to their signature light, flaky texture and deep buttery flavor.
- Gipfeli, on the other hand, contains less butter, giving it a slightly drier, firmer texture while still maintaining a crisp exterior.
Swiss bakers traditionally use high-quality Alpine butter, which has a lower moisture content compared to commercial butter. This results in a well-structured, flaky texture without excessive greasiness.
Dough Composition and Sweetness
Beyond butter, the dough itself plays a crucial role in distinguishing Gipfeli from French croissants.
- Gipfeli dough contains a small amount of sugar and sometimes milk, giving it a mildly sweet, balanced taste.
- French croissant dough is unsweetened, relying solely on butter for its flavor.
The inclusion of sugar and milk in Gipfeli dough makes it slightly more tender and less reliant on butter for texture. This also means Gipfeli is naturally sweeter than croissants, though not as sweet as Danish pastries or brioche.
Flour Choices and Structure
The type of flour used can significantly impact the final texture of both pastries.
- Swiss Gipfeli dough often includes Zopfmehl, a type of flour with a higher protein content than all-purpose flour, making the final product slightly denser and more structured.
- Croissants, on the other hand, use softer wheat flour to achieve their signature light, airy crumb.
The higher protein content in Zopfmehl gives Gipfeli more chew and stability, making it an excellent choice for filling with jam, honey, or Swiss cheese, as it holds its shape well without collapsing.
Flakiness and Density
Lamination is an essential part of both Gipfeli and croissant recipes, but the technique and the outcome differ between the two.
- Gipfeli has fewer butter layers than a croissant, which results in a denser, more structured texture rather than the ultra-light honeycomb crumb found in croissants.
- Croissants have a high number of thin butter layers, creating a delicate, airy interior with a distinct honeycomb-like structure when baked.
The lower butter content and slightly different rolling technique make Gipfeli more compact and less prone to crumbling, making it a more practical choice for a quick breakfast or snack.
How Butter Distribution Affects the Final Texture
In croissant dough, the butter is evenly distributed through meticulous lamination, allowing steam to expand the dough during baking, creating a puffy, layered effect.
- In Gipfeli, since there is less butter incorporated, the layers do not separate as dramatically, resulting in a firmer bite and more uniform texture throughout.
- The higher hydration in croissant dough contributes to a lighter structure, while Gipfeli’s slightly lower hydration produces a heartier, more filling pastry.
Shape and Appearance
Although both pastries share the crescent shape, subtle differences in rolling and shaping make them visually distinct.
- Gipfeli is rolled more compactly, creating a shorter, slightly wider crescent with fewer visible open layers.
- Croissants have a more elongated, pronounced crescent shape, with layers that naturally separate during baking to form a flaky exterior.
The more tightly rolled structure of Gipfeli contributes to its slightly firmer bite, making it less fragile than a croissant.
Baking and Texture Outcome
The way Gipfeli and croissants are baked plays a key role in their final texture and flavor.
- Gipfeli bakes at a slightly lower temperature, allowing it to develop a deep golden-brown crust without excessive crispiness.
- Croissants require high heat initially, which encourages the butter layers to separate and steam, creating a more dramatic rise and airy crumb.
Since Gipfeli has a slightly higher sugar content, it can caramelize more quickly, giving it a richer golden color even at moderate baking temperatures.
How the Final Texture Affects Taste Perception
The more compact, slightly sweeter nature of Gipfeli makes it a more filling pastry, while the light, flaky nature of croissants makes them feel more delicate and refined.
- Gipfeli pairs well with hearty breakfast spreads, such as butter, honey, or Swiss preserves.
- Croissants are typically served plain, with jam, or made into sandwiches, as their delicate structure makes them ideal for layering flavors.
Which One Should You Choose?
Both Gipfeli and croissants have their own appeal, depending on what you’re looking for in a pastry.
- If you love a rich, buttery, ultra-light pastry, croissants are the way to go.
- If you prefer a slightly sweet, structured, and beginner-friendly pastry, Gipfeli is the perfect choice.
Why Gipfeli is Better for Beginners
For home bakers who are new to laminated dough, Gipfeli is a great place to start.
- Fewer butter layers make the process less complicated.
- More structured dough reduces the risk of tearing or over-proofing.
- Easier rolling and shaping technique compared to croissants.
Since Gipfeli doesn’t require as much precision in lamination, it’s an excellent introduction to Swiss pastry baking, allowing beginners to achieve flaky, golden-brown pastries without the stress of perfect layering.
Final Thoughts on the Differences Between Gipfeli and Croissants
While both pastries are delicious in their own way, Gipfeli stands out as a uniquely Swiss take on a classic croissant.
- Lighter in butter but still flaky and satisfying.
- Easier to bake for beginners.
- Pairs perfectly with Swiss breakfast spreads.
For those who love a balance between buttery richness and a structured bite, Gipfeli is the ideal pastry. Whether enjoyed plain, with jam, or as part of a Swiss-style breakfast, this pastry remains a timeless favorite.
The Swiss Tradition: Why Gipfeli is a Popular Breakfast Choice in Switzerland
Switzerland is known for its rich culinary heritage, and when it comes to breakfast, Gipfeli is a staple in Swiss homes, bakeries, and cafés. More than just a pastry, Gipfeli is a symbol of Swiss breakfast culture, often enjoyed with coffee, butter, and jam. Its popularity stems from a combination of tradition, convenience, and quality ingredients, making it a go-to morning treat for many Swiss people.
A Morning Ritual: How Gipfeli Fits into Swiss Breakfast Culture
In Switzerland, breakfast is often a simple yet satisfying meal, consisting of bread, cheese, butter, honey, and jam, accompanied by coffee, tea, or hot chocolate. Gipfeli naturally fits into this tradition, offering a flaky, slightly sweet, and buttery addition to the table.
- Many Swiss pick up fresh Gipfeli from their local Bäckerei (bakery) early in the morning.
- At home, Gipfeli is often served with butter, honey, or Swiss preserves such as apricot, cherry, or raspberry jam.
- Children and adults alike enjoy Gipfeli with a cup of hot chocolate or milk, while coffee lovers pair it with café crème or a strong espresso.
Swiss breakfast culture is about simplicity and quality, and Gipfeli perfectly embodies both.
Why Gipfeli is Preferred Over Other Pastries for Breakfast
While croissants and other pastries are enjoyed in many European countries, Gipfeli holds a special place in Swiss breakfast culture for several reasons:
- Less greasy than croissants, making it a lighter yet satisfying choice.
- Milder sweetness, making it easy to pair with both savory (cheese, ham) and sweet (honey, jam) accompaniments.
- Easy to eat on the go, making it a practical choice for busy mornings.
Many Swiss prefer Gipfeli over heavier pastries like pain au chocolat or Danish pastries, as it strikes the perfect balance between flakiness, flavor, and digestibility.
Swiss Bakeries: The Art of Freshly Baked Gipfeli
Bakeries play a crucial role in keeping the Gipfeli tradition alive in Switzerland. Unlike mass-produced pastries, most Swiss Bäckereien (bakeries) take great pride in crafting fresh, high-quality Gipfeli daily.
- Many bakeries use Swiss-sourced ingredients, including Alpine butter and Zopfmehl (Swiss bread flour).
- Traditional methods ensure a flaky, golden-brown texture with a soft yet structured interior.
- Some bakeries offer whole wheat or spelt Gipfeli for a healthier alternative.
In larger cities like Zurich, Geneva, and Bern, Gipfeli is a morning staple, with locals lining up at their favorite bakeries before heading to work or school.
Regional Variations of Gipfeli Across Switzerland
While the classic buttery Gipfeli remains the most popular version, regional variations exist:
- Butter Gipfeli (Buttergipfeli) – The most traditional version, featuring high-quality Swiss butter for a flaky, golden texture.
- Laugen Gipfeli (Pretzel Gipfeli) – A Bavarian-inspired version, where the Gipfeli dough is dipped in lye before baking, resulting in a chewy, pretzel-like crust.
- Vollkorn Gipfeli (Whole Wheat Gipfeli) – A healthier alternative made with whole grain flour, offering a nuttier taste and more fiber.
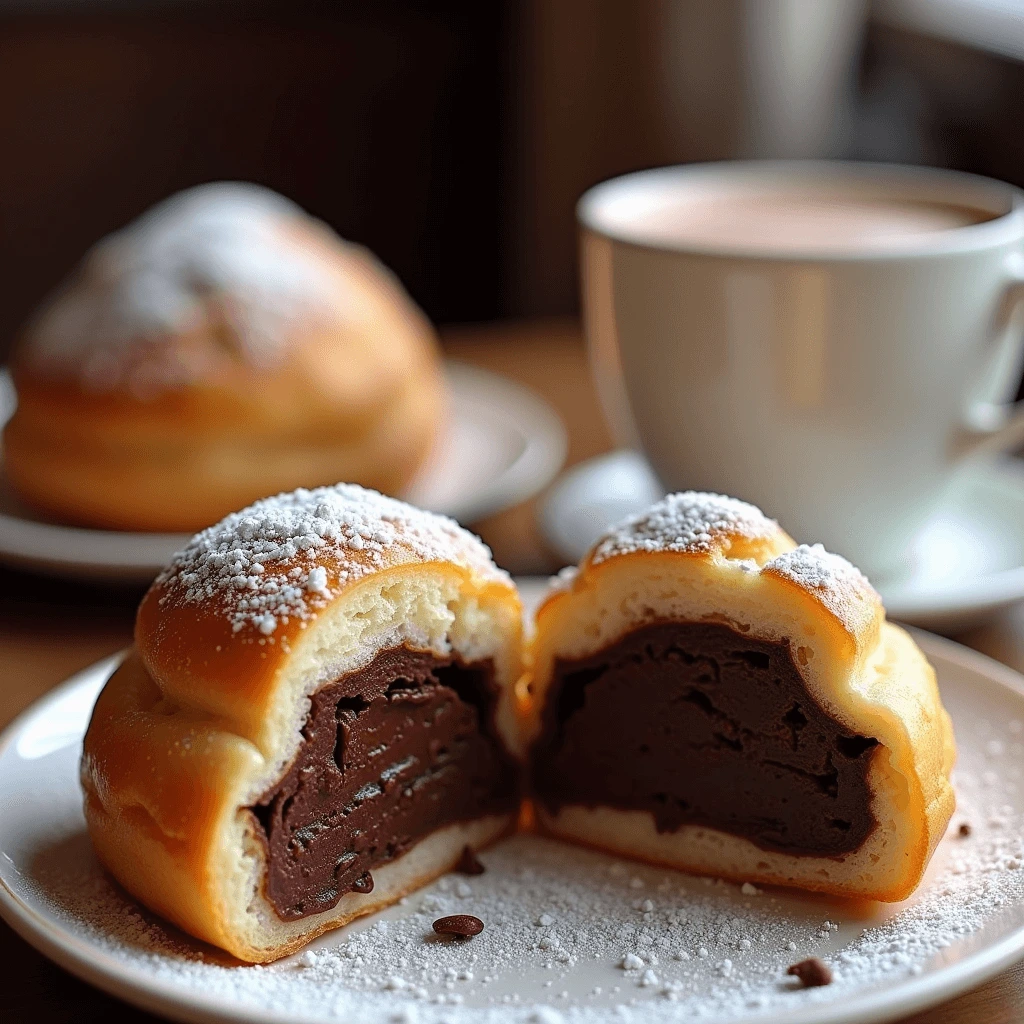
- Schoggi Gipfeli (Chocolate Gipfeli) – A variation with a chocolate filling, often made with Swiss dark chocolate for a rich, indulgent treat.
Each of these variations caters to different tastes, but the classic Buttergipfeli remains the favorite among Swiss locals.
The Role of Gipfeli in Swiss Hospitality and Sunday Brunch
In Switzerland, food is often associated with togetherness and hospitality, and Gipfeli plays an essential role in weekend brunch culture.
- On Sundays, many families enjoy a leisurely brunch featuring freshly baked Gipfeli, Zopf (Swiss braided bread), cheese, and meats.
- When guests visit, serving Gipfeli with coffee and Swiss chocolate is a common gesture of warmth and hospitality.
- During business meetings or casual gatherings, it’s not uncommon for Gipfeli to be served alongside coffee, making it a popular pastry in Swiss offices.
Whether enjoyed at home, in a café, or during a business breakfast, Gipfeli remains a cherished part of Swiss culinary heritage.
Gipfeli and Swiss Coffee Culture: The Perfect Pairing
Gipfeli is rarely eaten on its own—Swiss coffee culture plays a significant role in enhancing the experience.
- The slightly sweet and buttery nature of Gipfeli pairs perfectly with Swiss-style coffee, including:
- Café crème – A mild, creamy coffee, similar to an Americano with milk.
- Espresso – A strong, bold shot of coffee that balances the richness of the pastry.
- Schale (Swiss latte) – A milder, milk-based coffee, similar to a cappuccino but less foamy.
Cafés across Switzerland often serve Gipfeli as part of a simple breakfast set, where you can get a Gipfeli with coffee or tea for a quick yet delicious start to the day.
Why Gipfeli Remains a Timeless Swiss Classic
Despite the rise of modern breakfast trends, Gipfeli remains an essential part of Swiss mornings for several reasons:
- Deep-rooted tradition – Passed down through generations, Gipfeli has been a breakfast staple for centuries.
- Quality ingredients – Swiss bakeries prioritize locally sourced, high-quality butter, flour, and dairy products, making even the simplest pastries stand out.
- Balanced texture and flavor – Not as heavy as a croissant, but still indulgent enough for a satisfying morning treat.
For locals and tourists alike, no trip to Switzerland is complete without experiencing a freshly baked Gipfeli, making it one of the country’s most beloved breakfast items.
Here’s the revised version of your section with reduced passive voice and shorter sentences for better readability and SEO performance.
Ingredients Matter: The Role of Zopfmehl, Butter, and Yeast in Gipfeli Dough
The success of Gipfeli dough depends on three essential ingredients: Zopfmehl (Swiss bread flour), butter, and yeast. Each plays a crucial role in creating the flaky texture, golden crust, and light interior that define authentic Swiss Gipfeli. Unlike croissants, which rely heavily on butter for structure, Gipfeli balances its ingredients for a crisp yet slightly denser pastry.
Zopfmehl: The Foundation of Gipfeli Dough
Zopfmehl is a Swiss bread flour blend commonly used in Gipfeli, Zopf (Swiss braided bread), and other traditional baked goods. It contains:
- White wheat flour, which improves elasticity and stretchability.
- A small percentage of spelt or durum wheat flour, which enhances structure.
Why Zopfmehl Works Best for Gipfeli
This unique blend provides the right balance of gluten strength and tenderness:
- Higher protein content than all-purpose flour creates a well-structured dough that holds its shape.
- Stronger gluten development results in a flaky yet slightly chewy texture.
- Better absorption of butter prevents greasiness while allowing for a crisp crust.
Best Alternatives to Zopfmehl for Home Bakers
Since Zopfmehl is mainly available in Switzerland, home bakers can substitute it with:
- A 50/50 mix of bread flour and all-purpose flour to replicate the structure.
- All-purpose flour with added wheat gluten (1 teaspoon per cup) to strengthen the dough.
- Pastry flour for a softer texture, though the final result may lack some structure.
Using the right flour ensures the Gipfeli dough remains balanced—not too soft or too stiff.
Butter: The Key to Flakiness and Layers
Butter gives Gipfeli its richness, crispness, and delicate layering. Though it uses less butter than a croissant, quality matters.
Why High-Fat Butter Creates Better Gipfeli
- Swiss butter has a lower moisture content, which enhances flakiness.
- Butter fat coats dough layers, allowing them to separate during baking.
- Its rich flavor complements Gipfeli’s mild sweetness.
How Butter Forms Flaky Layers
Although Gipfeli dough requires less lamination than croissant dough, the folding and rolling technique still creates light layers.
- Rolling butter into the dough traps steam inside, forming a crisp, golden crust.
- Unlike croissants, which need multiple folds, Gipfeli requires simpler lamination for thicker layers.
Best Butter Choices for Gipfeli
For the best results, use:
- European-style butter (82%+ fat content), which closely resembles Swiss butter.
- Plant-based butter with high fat content, for a dairy-free Gipfeli.
- Avoid margarine, as its high water content prevents proper lamination.
Yeast: The Engine of Fermentation and Rise
Yeast plays a crucial role in Gipfeli dough, giving it lightness and structure. Unlike croissants, which need a slow fermentation to develop air pockets, Gipfeli dough undergoes a moderate rise for a balance of density and fluffiness.
Choosing the Right Yeast for Gipfeli
Bakers typically use one of these three yeast types:
- Fresh yeast – Preferred in Swiss bakeries for its consistent rise and mild flavor.
- Active dry yeast – Requires proofing in warm liquid before mixing into the dough.
- Instant yeast – Works quickly and can be added directly to dry ingredients.
Fermentation Process: How Yeast Affects the Dough
- First Rise (Bulk Fermentation):
- Yeast converts sugars into carbon dioxide, expanding the dough.
- The process takes 1.5 to 2 hours at room temperature, or overnight in the fridge for deeper flavor.
- Shaping and Proofing:
- Once shaped, Gipfeli needs a final proofing stage to allow the layers to expand.
- Proper proofing prevents dense or deflated pastries after baking.
Common Yeast Mistakes and Fixes
- Under-proofing results in dense Gipfeli. Allow the dough to rise properly.
- Over-proofing causes Gipfeli to collapse during baking. Keep an eye on timing.
- Expired yeast won’t work. Check for bubbles during proofing before adding it to the dough.
For the best results, let the dough double in size before shaping.
How These Ingredients Work Together
Each of these three ingredients—Zopfmehl, butter, and yeast—plays a unique role:
- Zopfmehl creates a structured yet tender dough.
- Butter enhances flakiness and flavor.
- Yeast provides a gentle rise for a balanced texture.
Mastering their functions ensures a perfect Gipfeli—flaky, golden, and delicious. Enjoy it with coffee, jam, or Swiss cheese for an authentic breakfast experience.

Essential Ingredients and Tools for Making Gipfeli
To achieve the best Gipfeli texture, using authentic Swiss ingredients and quality baking tools is essential. You can find Swiss Zopfmehl, high-fat butter, and premium yeast at Swiss Food Store.
Flour Choices: Best Types of Flour, Including Swiss Zopfmehl vs. All-Purpose Flour
Flour plays a critical role in determining the texture, flakiness, and structure of Gipfeli. The type of flour used affects how the dough absorbs butter, develops gluten, and bakes into its signature crisp, golden layers. While Swiss Zopfmehl is the traditional choice, other flour types can be used depending on availability and preference.
Swiss Zopfmehl: The Traditional Choice for Gipfeli
Zopfmehl is a unique blend of white wheat flour and a small percentage of spelt or durum wheat flour, commonly used in Swiss baking. It is specifically designed to create a balanced gluten structure, making it ideal for pastries like Gipfeli and Swiss braided bread (Zopf).
Why Zopfmehl is Ideal for Gipfeli
- Higher protein content (11–12%) provides a stronger dough structure without making it too tough.
- The small percentage of spelt or durum flour improves elasticity, making the dough easier to roll and shape.
- Absorbs butter efficiently, ensuring a flaky but not overly greasy texture.
- Develops a tender yet structured bite, giving Gipfeli a slightly firmer interior compared to croissants.
Because of these qualities, Swiss Zopfmehl strikes the perfect balance between chewiness and lightness, making it the top choice for authentic Gipfeli.
All-Purpose Flour: A Widely Available Alternative
For home bakers who don’t have access to Zopfmehl, all-purpose flour (AP flour) is the closest substitute. However, it has some key differences:
- Lower protein content (10–11%) results in a slightly softer, less structured dough.
- Less elasticity, making it more prone to tearing during rolling and shaping.
- Does not absorb butter as effectively, which may lead to a slightly greasier texture.
How to Adjust When Using All-Purpose Flour
Since all-purpose flour lacks the same gluten strength as Zopfmehl, small adjustments can help improve the dough’s texture:
- Increase kneading time slightly to develop more gluten.
- Chill the dough longer to strengthen it before shaping.
- Use a mix of AP flour and bread flour (50/50) to mimic Zopfmehl’s structure.
Bread Flour: When More Strength is Needed
Bread flour has a higher protein content (12–14%), making it more elastic and structured. While this can be beneficial for Gipfeli dough, it also has some drawbacks:
- Too much gluten development can make the dough chewy instead of flaky.
- Stronger gluten strands may resist rolling, making shaping more difficult.
- Can result in a firmer bite, reducing the delicate crispness of traditional Gipfeli.
Best Way to Use Bread Flour
If bread flour is the only available option, consider these adjustments:
- Mix it with all-purpose flour (50/50 ratio) to soften the structure.
- Reduce kneading time to avoid over-developing gluten.
- Let the dough rest longer before shaping, so it relaxes and rolls out more easily.
Pastry Flour: A Softer Alternative
Pastry flour has a lower protein content (8–9%), making it ideal for soft, delicate pastries. However, for Gipfeli, pastry flour alone lacks the necessary structure, which can cause issues:
- Weaker gluten formation results in a dough that may not hold its shape well.
- Too tender of a texture can lead to a pastry that is more cake-like rather than flaky.
- Can struggle to support butter layers, making it prone to collapsing during baking.
When to Use Pastry Flour
While not ideal on its own, pastry flour can work if blended with stronger flour types:
- Mix pastry flour with bread flour (50/50 ratio) for a better balance.
- Use it in combination with all-purpose flour to create a softer yet structured Gipfeli.
Whole Wheat Flour: A Healthier Option with Trade-offs
Whole wheat flour introduces more fiber and nutrients into Gipfeli but significantly changes its texture and rise:
- Higher fiber content absorbs more liquid, leading to a drier dough.
- Denser structure results in less flakiness.
- Stronger wheat flavor alters the traditional taste of Gipfeli.
Best Way to Use Whole Wheat Flour
For those who prefer a healthier alternative, whole wheat flour can be used in moderation:
- Replace only 25–30% of the flour with whole wheat to maintain some lightness.
- Increase hydration slightly to counteract the flour’s higher absorption rate.
- Allow the dough to rest longer, giving the flour time to soften.
Flour Comparison Chart: Choosing the Right Flour for Gipfeli
| Flour Type | Protein Content | Best For | Drawbacks |
|---|---|---|---|
| Zopfmehl (Swiss) | 11–12% | Authentic Gipfeli, great balance of structure and softness | Hard to find outside Switzerland |
| All-Purpose | 10–11% | Closest alternative, decent flakiness | Slightly softer dough, less elasticity |
| Bread Flour | 12–14% | Stronger dough, holds shape well | Can be too chewy, less delicate flakiness |
| Pastry Flour | 8–9% | Soft, tender texture | Lacks structure, can be too delicate |
| Whole Wheat | 12–14% | Adds fiber, healthier option | Makes dough denser, reduces flakiness |
Final Recommendation: The Best Flour for Gipfeli
For authentic Swiss Gipfeli, Zopfmehl is the best choice due to its balanced protein content and ability to absorb butter effectively. If Zopfmehl is unavailable, the best alternative is a mix of all-purpose flour and bread flour in equal parts.
- Use all-purpose flour for a softer, more accessible option.
- Blend bread flour with all-purpose flour for better structure.
- Avoid using only pastry flour or whole wheat flour, as they either lack structure or make the dough too dense.
By choosing the right flour, bakers can achieve the perfect Gipfeli texture—flaky, golden, and structured yet tender.
Butter & Lamination: Why High-Quality Swiss Butter Creates the Best Layers
Butter is one of the most critical ingredients in Gipfeli, directly influencing its flakiness, flavor, and texture. The quality, fat content, and lamination process determine how well the layers separate during baking. While Gipfeli contains less butter than traditional French croissants, using high-quality Swiss butter ensures a light, crisp exterior with delicate, distinct layers inside.
Why Swiss Butter Makes a Difference
Switzerland is known for its superior dairy products, and Swiss butter stands out for several reasons:
- Higher fat content (82–85%) compared to standard butter, which contains around 80% fat.
- Lower moisture content, allowing better absorption into the dough without making it greasy.
- Rich, creamy flavor from grass-fed Swiss cows, which enhances the pastry’s taste.
- Superior plasticity, meaning it remains pliable during lamination without melting too quickly.
These qualities make Swiss butter ideal for laminated doughs like Gipfeli, ensuring consistent layering and a balanced, flaky texture.
How Butter Affects Flakiness in Gipfeli
Flakiness in pastries depends on how butter interacts with flour and steam during baking. When properly layered, butter melts and releases steam, creating air pockets that form the crispy, golden-brown layers.
- High-fat butter absorbs less water, preventing soggy layers and maintaining structure.
- Steam expansion lifts the dough, giving it a light and airy interior.
- Butter layers act as barriers, keeping each fold separate to form distinct flaky sheets.
The Lamination Process: How Layers Are Formed
Lamination is the technique of folding butter into dough, which creates thin alternating layers of butter and dough. While Gipfeli has fewer folds than croissants, the lamination process still plays a vital role in achieving a structured, crisp texture.
Step 1: Preparing the Butter for Lamination
Before incorporating butter into the dough, it needs to be:
- Cold but pliable – Too hard, and it will crack; too soft, and it will blend into the dough rather than forming layers.
- Rolled into a flat sheet – This ensures even butter distribution across the dough.
- Chilled properly – Keeping butter cold prevents premature melting, which can ruin layering.
Step 2: Incorporating Butter into the Dough
- Roll out the dough into a rectangle.
- Place the butter sheet in the center and fold the dough over it.
- Seal the edges to prevent butter from escaping.
Step 3: Folding and Rolling (Creating the Layers)
Lamination involves a series of folds and rolls to create multiple thin butter layers within the dough.
- Single Fold (Letter Fold): The dough is folded like a letter into three layers.
- Rolling and Folding Again: This step is repeated at least 2–3 times to create even layers.
- Chilling Between Folds: Dough is chilled for 20–30 minutes between folds to prevent butter from melting.
Since Gipfeli contains less butter than croissants, fewer folds are required, but the technique still ensures a structured, flaky pastry.
Common Lamination Mistakes and How to Avoid Them
Even experienced bakers can run into problems when laminating dough. Here’s how to fix common issues:
| Mistake | Cause | Solution |
|---|---|---|
| Butter leaking out | Dough was rolled too thin or butter was too soft | Keep butter cold and seal edges properly |
| Dough tearing | Overworked dough or lack of rest time | Allow the dough to rest before rolling again |
| Layers not forming | Butter melted into the dough | Chill dough between folds to keep butter intact |
| Uneven layers | Butter not distributed evenly | Ensure butter sheet covers the dough evenly |
By avoiding these mistakes, the lamination process will produce distinct, flaky layers without gaps or butter seepage.
Best Butter Choices for Gipfeli
If Swiss butter is unavailable, the best alternatives are:
- European-style butter (82%+ fat content) – Provides similar richness and layering ability.
- High-fat cultured butter – Adds depth of flavor and maintains lamination integrity.
- Avoid regular supermarket butter – Lower fat content and higher moisture can weaken layers.
Final Thoughts: The Secret to Flaky, Buttery Gipfeli
To achieve perfectly layered Gipfeli, use high-quality butter, master the lamination process, and maintain proper dough temperature. When done correctly, Gipfeli will have crispy, golden-brown layers, a soft interior, and a delicate butter-rich flavor—a true Swiss breakfast classic.
Yeast & Fermentation: The Importance of Proofing for Airy, Flaky Results
Yeast plays a critical role in Gipfeli dough, influencing both texture and flavor. Unlike chemical leaveners such as baking powder, yeast-based fermentation creates a slow, natural rise, allowing the dough to develop its signature flakiness and airy interior. Proper proofing techniques ensure that Gipfeli achieves the perfect balance between structure and lightness, making them crisp on the outside and tender inside.
How Yeast Works in Gipfeli Dough
Yeast is a living organism that ferments sugars in the dough, producing carbon dioxide gas and organic acids. This gas expansion creates air pockets, which lead to a light, fluffy texture when baked. The acids contribute to a subtle depth of flavor, making Gipfeli taste richer and more complex.
Types of Yeast Used for Gipfeli
Bakers can use different types of yeast depending on their preference and availability.
- Fresh yeast (preferred by Swiss bakers) – Offers the best fermentation control and produces a mild, well-developed flavor.
- Active dry yeast – Requires proofing in warm liquid before mixing but works well for home bakers.
- Instant yeast – Can be mixed directly into the flour, making it the most convenient option.
The Fermentation Process: How Yeast Creates Flaky Layers
Fermentation occurs in two main stages:
1. Bulk Fermentation (First Rise)
After mixing the ingredients, the dough must go through bulk fermentation, which allows yeast to:
- Break down complex starches into simple sugars, improving flavor.
- Create carbon dioxide bubbles, expanding the dough.
- Strengthen the gluten network, ensuring a structured but tender crumb.
Ideal Bulk Fermentation Conditions:
- Room temperature (75–80°F or 24–27°C) for 1.5 to 2 hours.
- For enhanced flavor, a slow fermentation in the refrigerator overnight (8–12 hours) is recommended.
- The dough should double in size before proceeding to shaping.
2. Shaping and Final Proofing (Second Rise)
After the dough has rested, it is rolled, cut, and shaped into crescents. At this stage, proper proofing is essential to:
- Allow the yeast to continue producing gas, ensuring a light texture.
- Ensure the layers in the dough expand properly, giving the Gipfeli its characteristic flakiness.
- Improve the final volume and softness without making the pastry too dense.
Ideal Final Proofing Conditions:
- Dough should proof at a slightly warmer temperature (80–85°F or 27–29°C).
- This process takes about 45 minutes to 1 hour.
- The dough should swell slightly but not collapse when gently pressed.
Why Proper Proofing is Essential for Perfect Gipfeli
Skipping or rushing the proofing stage can lead to common texture issues:
| Proofing Issue | Result | Cause |
|---|---|---|
| Under-proofing | Dense, heavy Gipfeli | Dough didn’t rise long enough |
| Over-proofing | Collapsed or flat pastry | Dough sat too long, over-expanding |
| Cold Proofing Mistake | Poor butter lamination, uneven rise | Dough too cold when shaped |
| Proofing Too Warm | Weak gluten, misshapen layers | Butter melted before baking |
How Fermentation Affects Flavor
Beyond texture, fermentation also plays a key role in flavor development. During proofing, yeast produces organic acids, which:
- Give Gipfeli a mild, slightly tangy undertone.
- Enhance the depth of butter flavor.
- Create a more aromatic, bakery-style pastry.
Best Practices for Yeast and Fermentation in Gipfeli
- Use fresh or high-quality yeast to ensure consistent rising.
- Give the dough enough time to ferment, but avoid over-proofing.
- Control temperature carefully—too hot and the butter melts, too cold and the yeast slows down.
- Test proofing readiness by gently pressing the dough—if it springs back slowly, it’s ready for baking.
By mastering yeast fermentation and proofing, home bakers can achieve light, airy, and beautifully layered Gipfeli, ensuring they are crisp on the outside and soft inside.
Baking Tools: Rolling Pin, Pastry Brush, Baking Sheet, and Parchment Paper
Making Gipfeli requires more than just high-quality ingredients—it also depends on using the right baking tools. The tools you choose will affect the texture, shape, and final presentation of your pastries. From rolling out the dough to ensuring an even golden crust, each tool plays a crucial role in the baking process.
Rolling Pin: Achieving Uniform Dough Thickness
A rolling pin is essential for shaping Gipfeli and ensuring an even, consistent dough thickness. Since lamination and flakiness depend on uniform layers, the rolling pin helps control the butter distribution in the dough.
Best Types of Rolling Pins for Gipfeli Dough
- French Tapered Rolling Pin – A smooth, handle-free pin that provides precise control and works well for laminated doughs.
- Classic Wooden Rolling Pin with Handles – A traditional option that offers stability and ease of use.
- Non-Stick Rolling Pin – Reduces dough sticking, making it ideal for those working with softer pastry doughs.
Rolling Techniques for Even Lamination
- Chill the dough before rolling to prevent butter from melting.
- Roll outward from the center to maintain even pressure.
- Use light, even strokes to avoid tearing the layers.
- Rotate the dough between rolls to ensure uniform thickness.
Pastry Brush: Creating a Glossy, Golden Finish
A pastry brush is an underrated but essential tool for applying an egg wash, which gives Gipfeli its deep golden color and slight sheen. Without an egg wash, the baked pastries may look pale and dull, missing the classic glossy finish seen in bakeries.
Types of Pastry Brushes and Their Uses
- Natural Bristle Brushes – Absorb liquid well but can shed bristles over time.
- Silicone Brushes – More durable and easier to clean but may not spread liquids as evenly.
Egg Wash Application Tips
- Use a light hand—too much egg wash can cause pooling and uneven browning.
- Brush in long, gentle strokes to prevent disturbing the layers.
- Apply just before baking for the best golden-brown crust.
Baking Sheet: Ensuring Even Baking and Crisp Texture
A high-quality baking sheet ensures even heat distribution, allowing Gipfeli to bake uniformly without over-browning or undercooking. Choosing the right sheet prevents soggy bottoms and enhances crispness.
Best Baking Sheets for Gipfeli
- Heavy-Gauge Aluminum Baking Sheet – Retains heat well and prevents warping.
- Non-Stick Baking Sheet – Reduces the risk of sticking but may not crisp the bottom as well as aluminum.
- Insulated Baking Sheet – Helps prevent over-browning but may result in slightly softer Gipfeli.
Baking Tips for Optimal Results
- Line the baking sheet with parchment paper to prevent sticking.
- Leave enough space between Gipfeli to allow for proper air circulation.
- Preheat the oven properly to ensure consistent baking temperature.
Parchment Paper: Preventing Sticking and Easy Cleanup
Parchment paper is indispensable for baking Gipfeli because it:
- Prevents the dough from sticking to the pan, ensuring a smooth release.
- Creates an even baking surface, allowing the bottoms to crisp up perfectly.
- Reduces the need for excessive greasing, keeping the pastries light and flaky.
Alternatives to Parchment Paper
- Silicone Baking Mat (Silpat) – A reusable option that provides similar non-stick benefits.
- Lightly Floured Baking Sheet – Works in a pinch, but may absorb some butter from the dough.
Final Thoughts: The Importance of Proper Baking Tools
Each tool—from the rolling pin to parchment paper—plays a crucial role in making perfect Gipfeli. Using the right tools ensures that your dough rolls evenly, layers bake to perfection, and the final result is crisp, golden, and bakery-quality.
Step-by-Step Guide to Making Homemade Gipfeli
Step 1: Preparing the Dough (Mixing Ingredients, Kneading, and First Rise)
The foundation of flaky, airy Gipfeli starts with properly preparing the dough. Each step—from selecting ingredients to kneading and proofing—determines the final texture and structure. Proper gluten development, fermentation, and hydration are key to achieving a light, layered pastry with a crisp exterior.
Mixing Ingredients: Creating a Balanced Dough
A well-balanced Gipfeli dough contains flour, butter, yeast, sugar, salt, and milk (or water). Unlike croissant dough, which relies on a high butter ratio, Gipfeli dough is slightly denser, making it easier to handle while still maintaining a flaky texture.
Essential Ingredients for Gipfeli Dough
- Flour: Swiss Zopfmehl (or a blend of bread and all-purpose flour) for a strong but soft structure.
- Yeast: Active dry, instant, or fresh yeast to provide a gentle rise without making the dough too airy.
- Butter: High-fat Swiss butter for richness and a delicate crumb.
- Milk or Water: Milk enhances softness, while water creates a crisper crust.
- Sugar: A touch of sugar for mild sweetness and yeast activation.
- Salt: Strengthens gluten and enhances flavor balance.
Mixing Process for the Best Dough Consistency
- Activate the Yeast (if using active dry yeast): Dissolve yeast in lukewarm milk or water (100–110°F / 37–43°C) with a teaspoon of sugar. Let it sit for 5–10 minutes until foamy.
- Combine Dry Ingredients: In a large mixing bowl, whisk together flour, sugar, and salt.
- Incorporate Wet Ingredients: Add softened butter and the yeast mixture to the flour.
- Mix Until Dough Forms: Stir using a wooden spoon or stand mixer with a dough hook until the ingredients come together into a rough dough.
Kneading: Developing Gluten for Structure
Once the dough is mixed, kneading helps develop gluten strands, which provide the chewiness and strength needed for layering. The goal is to create a smooth, elastic dough that holds its shape but remains soft.
How to Knead Gipfeli Dough Properly
- Knead by Hand: Transfer the dough to a lightly floured surface and knead for 8–10 minutes. Use a push-pull technique, pressing with the heel of your hand and folding it back.
- Knead with a Stand Mixer: Mix on low speed for 5–7 minutes until the dough becomes smooth and slightly tacky but not sticky.
- Perform the Windowpane Test: Stretch a small piece of dough between your fingers. If it forms a thin, translucent membrane without tearing, the gluten is well-developed.
Common Kneading Mistakes and How to Fix Them
| Issue | Cause | Solution |
|---|---|---|
| Dough is too sticky | Too much moisture or under-kneading | Add a little more flour and continue kneading |
| Dough is too dry | Not enough hydration | Knead in small amounts of milk or water until softer |
| Dough tears easily | Under-kneaded, weak gluten | Knead longer until elasticity improves |
| Dough is too tough | Over-kneaded, gluten too tight | Let it rest for 10–15 minutes to relax gluten |
First Rise: Bulk Fermentation for Flavor and Texture
After kneading, the dough needs time to rise, allowing yeast to create gas bubbles that result in a light texture. The fermentation process also enhances flavor complexity.
How to Properly Proof the Dough
- Shape into a Ball: Lightly oil a large bowl and place the dough inside. Cover with plastic wrap or a damp cloth.
- Let It Rise Until Doubled:
- Room Temperature Rise (1.5–2 hours) – Ideal for faster fermentation.
- Slow Cold Fermentation (Overnight in the Fridge) – Enhances flavor and improves dough structure.
- Check Readiness: Press the dough lightly with a finger—if the indentation remains, it’s ready. If it springs back immediately, let it proof longer.
Troubleshooting First Rise Issues
| Problem | Cause | Solution |
|---|---|---|
| Dough isn’t rising | Yeast is expired or liquid was too hot/cold | Check yeast freshness, use lukewarm liquid |
| Dough overproofed | Left too long in a warm environment | Punch down and reshape for second rise |
| Dough has dry crust | Exposed to air for too long | Cover properly with plastic wrap or towel |
Final Thoughts: The Key to a Perfect Dough
By following these steps—mixing ingredients properly, kneading to develop gluten, and allowing a full first rise—you create the perfect foundation for light, airy, and flaky Gipfeli. The dough is now ready for lamination, where butter is incorporated to form delicate, golden-brown layers.
Step 2: Laminating the Dough (Folding Butter Layers for Flaky Texture)
Lamination is the most crucial step in achieving the signature flakiness and layered structure of Gipfeli. While Gipfeli requires fewer layers than croissants, proper butter incorporation and folding ensure a crisp, golden exterior with delicate air pockets inside. Mastering this technique is essential for producing authentic Swiss Gipfeli that rival those found in Swiss bakeries.
What is Laminating and Why is it Important?
Lamination is the process of folding and rolling butter into dough to create multiple thin layers. During baking, the butter melts and releases steam, puffing up the dough to form airy layers. If done correctly, lamination gives Gipfeli:
- A light, crisp texture without being greasy.
- Well-defined layers that separate beautifully.
- A golden-brown crust with a slight sheen.
Preparing the Butter Block for Laminating
Before rolling butter into the dough, it must be properly prepared to ensure even layering.
Choosing the Right Butter
- Use high-fat European-style butter (82%+ fat content) to reduce moisture and prevent soggy layers.
- Swiss butter is preferred due to its rich flavor and plasticity, making it easier to work with.
How to Prepare the Butter Block
- Soften the butter slightly but keep it cold. It should be pliable but not melting.
- Place the butter between two sheets of parchment paper. Roll it into a thin rectangle about ⅓ inch (8mm) thick.
- Chill the butter in the fridge for 20–30 minutes to keep it firm but workable.
Tip: The butter should be the same consistency as the dough to prevent breakage or melting during lamination.
Incorporating Butter into the Dough
Once the butter is properly prepared, it’s time to enclose it within the dough.
Step 1: Rolling Out the Dough
- Lightly flour a surface and roll out the dough into a large rectangle, about twice the size of the butter block.
- Ensure the dough is cold but pliable. If it resists rolling, let it rest for 5–10 minutes.
Step 2: Locking in the Butter
- Place the butter in the center of the dough.
- Fold the dough over the butter so it fully encloses it like an envelope.
- Press the edges gently to seal. No butter should be exposed.
At this stage, the dough should resemble a book, with butter neatly enclosed inside.
Folding and Rolling: Creating Layers in the Dough
Now that the butter is enclosed, it’s time to fold and roll the dough to create layers.
First Fold (Letter Fold / Single Fold)
- Roll out the dough into a long rectangle (about 3x its width).
- Fold the top third down and the bottom third up, like folding a letter.
- Rotate the dough 90 degrees, so the seam is horizontal.
- Wrap in plastic and chill for 20–30 minutes.
This first fold creates three distinct layers of dough and butter.
Second Fold (Turning the Dough Again)
- Roll out the chilled dough again into a long rectangle.
- Repeat the same letter fold (top third down, bottom third up).
- Rotate 90 degrees, wrap, and chill again.
By now, the dough has 9 layers of butter and dough.
Third Fold (Final Layering Step)
- Repeat the rolling and folding process one last time.
- Wrap the dough in plastic wrap and refrigerate for at least 1 hour, or overnight.
After the third fold, the dough contains 27 layers, ensuring a light, flaky structure once baked.
Common Mistakes in Laminating and How to Fix Them
| Issue | Cause | Solution |
|---|---|---|
| Butter breaks inside | Butter was too cold or dough was overworked | Let butter warm slightly before rolling |
| Butter oozes out | Dough was too warm, butter melted | Chill dough longer between folds |
| Uneven layers | Butter wasn’t distributed evenly | Roll dough gently and apply even pressure |
| Dough resists rolling | Gluten is too tight | Let dough rest before rolling again |
Final Resting Before Shaping
Once the final fold is completed, let the dough rest in the refrigerator for at least an hour, or overnight. This step:
- Allows the gluten to relax, making shaping easier.
- Ensures the butter stays firm, preventing greasy layers.
- Helps the dough develop a more complex flavor.
With proper lamination, the Gipfeli dough is now ready for shaping and proofing—the next steps in creating a perfectly crisp, flaky, and airy Swiss pastry.
Step 3: Shaping the Gipfeli (Rolling into Crescent Shapes)
Shaping is one of the most visually defining steps in making Gipfeli. Unlike French croissants, Gipfeli has a slightly denser structure, but it still requires careful rolling to achieve a well-defined crescent shape with evenly spaced layers. Proper shaping ensures that each Gipfeli bakes evenly, has a crisp golden crust, and maintains its flaky interior.
Preparing the Dough for Shaping
Before shaping, the laminated dough must be properly chilled and evenly rolled out to ensure that the layers remain intact.
Step 1: Rolling Out the Dough
- Lightly flour a clean work surface to prevent sticking.
- Remove the chilled dough from the refrigerator and let it sit for 5 minutes to make rolling easier.
- Roll out the dough into a large rectangle, about ¼ inch (6 mm) thick.
- Trim the edges with a sharp knife or pastry cutter to create clean, even sides.
Tip: Rolling with even pressure prevents the layers from compressing, ensuring a flakier texture.
Cutting the Dough into Triangles
- Measure the base width of each triangle (usually 2.5 to 3 inches / 6–8 cm).
- Use a sharp knife or pizza cutter to cut long, equal-sized triangles from the dough.
- Ensure each triangle has a sharp tip and a wide base, as this helps create the signature crescent shape when rolled.
Tip: If the dough becomes too soft, place it back in the refrigerator for 10 minutes before shaping.
Rolling the Dough into Crescent Shapes
Once the dough is cut, it’s time to roll each triangle into a Gipfeli.
Step 1: Creating Tension in the Dough
- Gently stretch the tip of the triangle outward to lengthen it slightly.
- Starting at the wide base, begin rolling the dough tightly towards the tip.
Step 2: Forming the Crescent Shape
- Once rolled, place the Gipfeli on a lined baking sheet with the tip tucked underneath. This prevents the dough from unrolling while baking.
- Gently bend the ends slightly inward to form a crescent shape.
- Repeat with remaining triangles, ensuring they are evenly spaced at least 2 inches (5 cm) apart on the baking sheet.
Tip: Avoid rolling too loosely, as this can cause the Gipfeli to lose their shape during baking.
Final Proofing: Letting the Shaped Gipfeli Rise
Before baking, the shaped Gipfeli must undergo a second proofing to allow the dough to rise and expand slightly.
- Cover the shaped Gipfeli loosely with a clean kitchen towel or plastic wrap.
- Let them proof in a warm, draft-free area for 45 minutes to 1 hour, or until they appear slightly puffed.
- Perform the poke test: Lightly press a Gipfeli with your fingertip—if the dough springs back slowly, it’s ready to bake.
Avoid Overproofing: If proofed too long, the layers may collapse, resulting in a dense pastry.
At this stage, the Gipfeli are ready for the final step—baking to a perfect golden crisp.
Step 4: Proofing and Baking (Final Rise, Brushing with Egg Wash, and Baking Temperature)
The final proofing and baking steps determine whether your Gipfeli will have the perfect golden crust, delicate flakiness, and soft, airy layers inside. If this stage is rushed or not executed correctly, the result could be dense, under-risen pastries or an uneven, dry texture. By following precise proofing and baking techniques, you ensure that the butter layers remain intact, the yeast completes its final fermentation, and the Gipfeli bake evenly with a crisp finish.
Final Proofing: The Key to a Flaky, Well-Risen Gipfeli
Proofing is the last fermentation step before baking. During this stage, the yeast continues producing carbon dioxide, allowing the dough to rise one last time before the heat of the oven solidifies its structure. The layers formed during lamination need enough time to expand without overproofing, which could lead to deflation in the oven.
Setting Up the Ideal Proofing Environment
For the best results, Gipfeli should be proofed in a warm, draft-free space with controlled humidity. If the environment is too dry, the surface of the dough may form a crust, which prevents proper expansion. If it is too humid, the butter could melt prematurely, leading to a greasy texture instead of crisp layers.
- Ideal Temperature: Maintain a proofing temperature of 75–80°F (24–27°C).
- Humidity Control: Place a bowl of warm water in the proofing area to create a humid environment, preventing the surface from drying out.
- Covering the Gipfeli: Use a clean kitchen towel or lightly greased plastic wrap to keep the dough from forming a skin.
Checking When the Dough is Fully Proofed
Timing is essential when it comes to proofing. Overproofed Gipfeli will collapse in the oven, while underproofed ones won’t expand enough, resulting in a dense texture.
- The Poke Test: Gently press the side of a Gipfeli with your fingertip.
- If the dough springs back slowly, it is ready for baking.
- If it springs back immediately, it needs more time to proof.
- If the indentation stays and the dough deflates slightly, it has overproofed.
- Visual Cues: The Gipfeli should look plumper and slightly swollen, but not overly expanded.
- Time Estimate: The final proofing should take 45 minutes to 1 hour, depending on room temperature and yeast activity.
Brushing with Egg Wash: Creating a Deep Golden-Brown Finish
The egg wash is an essential step in achieving a shiny, golden-brown crust. Without it, the Gipfeli will look dull and pale. The right egg wash also contributes to a slight crispness on the exterior, complementing the soft, layered interior.
Best Egg Wash Recipes for a Bakery-Quality Finish
Different egg wash variations can create different finishes.
- Classic Glossy Egg Wash:
- 1 whole egg
- 1 tablespoon milk or water
- Whisk until smooth
- Deep Golden-Brown Wash (for a richer color):
- 1 egg yolk
- 1 teaspoon heavy cream
- Shiny and Crisp Finish:
- 1 whole egg
- ½ teaspoon sugar
- ½ teaspoon salt
- This enhances caramelization and adds a mild, glossy sheen.
Proper Egg Wash Application
- Use a soft pastry brush to prevent deflating the proofed dough.
- Apply an even, thin layer—too much egg wash can create streaks or puddles.
- Avoid brushing the edges of the dough, as this can seal the layers and prevent proper rising.
- Let the egg wash sit for 5 minutes before baking to ensure an even finish.
Baking: Achieving the Ideal Crispness and Texture
Baking temperature and time are critical factors that determine the final texture of the Gipfeli. The right oven setup ensures that the dough puffs up properly, the butter layers separate into crisp, defined sheets, and the exterior develops a deep golden hue.
Preheating the Oven for Even Heat Distribution
- Preheat the oven to 375°F (190°C) for at least 15 minutes before baking.
- Use the middle rack for even browning and to prevent burning.
- If using a convection oven, lower the temperature to 350°F (175°C) since the fan circulates heat more efficiently.
Baking Time and Techniques for Optimal Results
- Standard Baking Time: 18–22 minutes, or until the Gipfeli are a rich golden-brown.
- Rotating the Tray: Halfway through baking, rotate the baking sheet to ensure even browning.
- Steam Injection (Optional): Placing a small dish of hot water in the oven during the first 5 minutes can create a slightly crisper crust.
How to Prevent Common Baking Mistakes
| Issue | Cause | Solution |
|---|---|---|
| Pale, dull Gipfeli | Not enough egg wash or underbaking | Apply a second light egg wash layer, bake longer |
| Burnt tops, raw inside | Oven too hot, uneven baking | Lower temperature, bake slightly longer |
| Flat, dense texture | Underproofed dough, butter melted too early | Allow full proofing time, keep dough cold |
| Butter leaking out | Layers improperly sealed | Ensure butter is enclosed properly before rolling |
Cooling: Allowing the Layers to Set Properly
Cooling is often overlooked, but it is vital for maintaining the structure and texture of Gipfeli. Cutting into them too soon can result in compressed layers and a soggy crumb.
- Transfer immediately to a wire rack to prevent the bottoms from becoming soggy.
- Let them cool for at least 10–15 minutes before serving.
- If storing for later, let them cool completely before placing them in an airtight container.
Reheating for the Best Texture
If you need to reheat Gipfeli, avoid using a microwave, which makes them soft. Instead:
- Oven method: Bake at 300°F (150°C) for 5–7 minutes to restore crispness.
- Air fryer method: Heat at 320°F (160°C) for 3–4 minutes for a fresh-out-of-the-oven texture.
Final Key Takeaways for Perfectly Baked Gipfeli
- Proof the dough until it’s slightly puffed but not overexpanded.
- Apply a well-balanced egg wash for a deep golden-brown crust.
- Bake at the right temperature and rotate for even color.
- Let them cool properly to maintain the layers and flakiness.
By following these final steps meticulously, your homemade Gipfeli will have the perfect contrast of crisp, buttery layers and a light, airy crumb—just like those found in the best Swiss bakeries.

Pro Tips for Perfect Gipfeli Every Time
How to Get Flaky Layers (Importance of Cold Butter and Proper Rolling Technique)
The secret to achieving perfectly flaky Gipfeli lies in two key elements: cold butter and precise rolling techniques. These factors directly impact the layering, rise, and texture of the pastry. If the butter melts too soon or the rolling technique is inconsistent, the layers may merge, resulting in a dense or greasy pastry instead of a light, crisp one.
Why Cold Butter is Essential for Flakiness
Butter plays a dual role in Gipfeli—it adds richness and ensures distinct, airy layers. However, for proper lamination, the butter must remain cold yet pliable throughout the rolling and folding process.
How Cold Butter Creates Flaky Layers
- Steam Production: When the Gipfeli bake, the cold butter melts and releases steam. This steam pushes the dough layers apart, creating distinct, crisp sheets inside the pastry.
- Layer Separation: If butter stays solid during rolling and folding, it acts as a barrier between dough layers, ensuring they don’t merge into a single dense mass.
- Preventing Greasiness: Butter that melts too soon gets absorbed into the dough, eliminating the distinct layering effect and making the pastry greasy instead of flaky.
How to Keep Butter at the Right Temperature
- Chill the butter before incorporating it into the dough (20–30 minutes in the fridge).
- If the dough feels warm at any stage, refrigerate it immediately before continuing rolling.
- Use a cold work surface, such as a marble countertop, to slow down butter softening.
- Work quickly but gently when handling the dough to prevent heat transfer from your hands.
Proper Rolling Technique for Even Layers
Rolling is just as important as cold butter when creating flaky layers. Uneven pressure or improper technique can crush the butter layers or cause them to become too thin in some areas, leading to uneven puffing and inconsistent texture.
Step-by-Step Guide to Rolling Gipfeli Dough Properly
- Lightly flour the work surface to prevent sticking, but avoid using too much flour, which can dry out the dough.
- Place the chilled dough on the surface and begin rolling outward from the center.
- Use gentle, even pressure to avoid squeezing the butter out of the dough.
- Rotate the dough 90 degrees after every few rolls to maintain an even shape and thickness.
- Keep the dough at an even thickness of about ¼ inch (6 mm) throughout.
Common Rolling Mistakes and How to Avoid Them
| Mistake | Cause | Solution |
|---|---|---|
| Butter leaks out | Dough became too warm, butter melted | Chill dough before rolling again |
| Dough tears while rolling | Overworked gluten, too much pressure applied | Let the dough rest for 5–10 minutes before rolling |
| Layers disappear after baking | Butter got absorbed into dough, improper folding | Keep butter cold and avoid pressing too hard when rolling |
| Dough resists rolling | Gluten is too tight from overworking | Allow the dough to relax at room temperature for a few minutes |
How Many Times Should You Roll and Fold?
For Gipfeli, three folds are usually enough to create 27 layers of butter and dough. More than that can make the pastry too dense, while fewer folds may not create enough separation for flakiness.
Resting Between Rolling
Resting the dough between rolling phases is crucial for maintaining layer integrity. Each time the dough is folded:
- Chill it for at least 20–30 minutes before rolling again.
- This helps firm up the butter and prevents it from blending into the dough.
By keeping the butter cold and laminated properly, and by using precise rolling techniques, you will achieve Gipfeli with crisp, delicate layers that separate beautifully when baked.
Avoiding Common Mistakes (Overproofing, Too Much Flour, Incorrect Lamination)
Even experienced bakers can encounter issues when making Gipfeli. Small mistakes during proofing, rolling, or lamination can drastically affect the final texture, preventing the pastry from achieving its light, flaky layers and golden crisp crust. By understanding these common errors and how to fix them, you can ensure consistently perfect Gipfeli every time.
Overproofing: Why Timing Matters
Proofing is essential for developing structure and lightness, but if left for too long, Gipfeli dough can become overexpanded and weak, leading to deflated, dense, or collapsed pastries when baked.
Signs of Overproofed Dough
- Dough looks excessively puffy and is too soft to handle.
- When pressed gently with a fingertip, the indentation stays without springing back.
- The layers lose definition during baking, and the butter leaks out instead of creating air pockets.
How to Prevent Overproofing
- Use a timer: Gipfeli should proof for 45 minutes to 1 hour at 75–80°F (24–27°C).
- Do the poke test: If the dough springs back too quickly, it needs more time. If it deflates, it has overproofed.
- If overproofed, gently reshape and refrigerate for 15 minutes before baking to slow fermentation.
How Overproofing Affects the Final Texture
- The gluten weakens, causing the layers to collapse instead of rising.
- The interior becomes dense and gummy instead of airy.
- The butter seeps out, making the Gipfeli greasy rather than flaky.
By closely monitoring proofing time and temperature, you maintain structure and ensure proper oven spring during baking.
Too Much Flour: Why Less is More
Flour provides the foundation for Gipfeli dough, but using too much—especially during rolling—can negatively affect the final texture.
Problems Caused by Excess Flour
- Tough dough: Too much flour makes the dough dense and chewy instead of tender and flaky.
- Poor butter absorption: Extra flour can prevent proper butter lamination, leading to uneven layers.
- Dry pastries: The lack of hydration affects fermentation, making the final product dry.
How to Use the Right Amount of Flour
- Measure precisely: Weigh flour using a kitchen scale rather than relying on volume measurements.
- Use minimal flour when rolling: Lightly dust the surface and rolling pin, but don’t coat the dough.
- If dough becomes too dry, add a teaspoon of milk or water and knead gently to restore elasticity.
Best Practice: Flour Management During Rolling
- Rotate the dough frequently instead of adding extra flour to prevent sticking.
- Use a pastry scraper to lift dough instead of adding flour underneath.
- Brush off excess flour before folding and proofing to ensure smooth layering.
By managing flour properly, you maintain a soft yet structured dough with optimal hydration for flakiness.
Incorrect Lamination: The Root of Uneven Layers
Lamination is the most critical technique for creating flaky layers in Gipfeli. If done incorrectly, the butter can leak out, become absorbed, or fail to separate the layers properly.
Signs of Incorrect Lamination
- Butter breaks through the dough while rolling.
- Uneven layers with some parts being too thick and others too thin.
- Butter oozes out during baking, leaving behind a greasy texture.
How to Fix Lamination Mistakes
- If butter melts while rolling, chill the dough for 20 minutes before continuing.
- If butter breaks inside the dough, let the dough rest for 10 minutes before the next fold.
- Roll with light, even pressure to prevent crushing the butter layers.
Ensuring Proper Butter Distribution
- Butter should be evenly spread when first incorporated into the dough.
- Keep the butter and dough at similar temperatures to prevent breaking.
- Use gentle rolling motions instead of pressing too hard.
Best Folding Technique for Gipfeli
- Letter Fold Method: Fold the dough into three equal sections like a letter, chill, and repeat.
- Chill Between Folds: Always refrigerate for 20–30 minutes between folds to prevent butter melting.
- Three Folds for Ideal Layers: More than three folds can make the dough too dense, while fewer may not create enough layers.
By laminating properly, you create even, delicate layers that puff beautifully during baking.
Final Checklist for Avoiding Common Mistakes
| Mistake | Cause | Solution |
|---|---|---|
| Overproofed dough | Proofed too long, weak gluten structure | Refrigerate for 15 minutes before baking |
| Underproofed dough | Dough didn’t rise enough before baking | Allow additional proofing time (use poke test) |
| Butter leaks out | Dough too warm, improper lamination | Chill dough between folds, handle gently |
| Layers disappear | Butter melted into dough | Use high-fat butter, keep dough cold |
| Tough texture | Too much flour during rolling | Use minimal flour, rotate dough instead of adding more |
| Dough resists rolling | Overworked gluten, not enough rest | Allow dough to relax before rolling again |
By avoiding these common mistakes, you ensure that your Gipfeli turn out golden, crisp, and perfectly layered—just like the ones from a Swiss bakery.
Serving Suggestions (Best Jams, Honey, or Butter Pairings for a Swiss Breakfast)
Gipfeli are a staple in Swiss breakfast culture, often enjoyed freshly baked with simple yet high-quality accompaniments. While delicious on their own, Gipfeli pair beautifully with butter, jams, honey, and other spreads that enhance their rich, flaky texture. The right pairing balances sweetness, creaminess, and a touch of indulgence, making breakfast a delightful experience.
Classic Swiss Butter Pairing
Butter is a must-have accompaniment for Gipfeli, enhancing its richness and delicate crumb. Swiss butter, known for its high fat content and creamy texture, spreads smoothly and melts beautifully into the warm layers of the pastry.
Best Butter Choices for Serving with Gipfeli
- Alpine Swiss Butter: Traditional, high-fat butter with a smooth, creamy taste.
- European-Style Butter (82%+ fat content): Offers the closest match to Swiss butter, with a luxurious texture.
- Cultured Butter: Slightly tangy and rich, adding depth to the mild sweetness of Gipfeli.
How to Serve Butter with Gipfeli
- Room Temperature Spread: Let the butter soften slightly before spreading for a smooth, even layer.
- Lightly Melted Butter: Spread a thin layer on warm Gipfeli to enhance flakiness without making it greasy.
- Salted vs. Unsalted: Salted butter adds contrast to sweet jams, while unsalted preserves the pastry’s natural flavors.
Swiss Jams: A Traditional Sweet Pairing
Jams are a common accompaniment for Gipfeli in Swiss homes and cafés, offering a sweet contrast to the buttery pastry. Swiss jams are known for their natural fruit flavors, balanced sweetness, and high-quality ingredients.
Best Jams to Pair with Gipfeli
- Apricot Jam (Aprikosenkonfitüre)
- A Swiss favorite, known for its slightly tart, floral notes.
- Complements the buttery, flaky layers without overpowering them.
- Raspberry Jam (Himbeerkonfitüre)
- Bright and tangy, with a rich red color.
- Adds a touch of acidity that enhances the richness of Gipfeli.
- Blackberry Jam (Brombeerkonfitüre)
- A deeper, more complex flavor with subtle earthy notes.
- Works well for those who prefer a less sweet, more refined pairing.
- Cherry Jam (Kirschkonfitüre)
- Popular in Switzerland, often made with Luzerner cherries.
- Pairs exceptionally well with both butter and honey.
- Strawberry Jam (Erdbeerkonfitüre)
- A classic choice that is sweet and mildly tangy.
- The bright fruitiness pairs well with salted butter.
Serving Tip: Warmed Jam for a Luxurious Spread
- Heat jam slightly before serving to create a smooth, glossy spread.
- Serve with a small butter knife or spoon to avoid overloading the delicate Gipfeli layers.
Swiss Honey: A Natural, Golden Drizzle
Honey is another traditional Swiss breakfast pairing, often drizzled over warm Gipfeli for a sweet, floral depth. Swiss honey varieties range from light and delicate to dark and robust, offering different flavor profiles to suit individual tastes.
Best Types of Swiss Honey for Gipfeli
- Alpine Blossom Honey (Alpenblütenhonig)
- Light, floral, and subtly sweet.
- Pairs well with butter or soft cheeses for a balanced flavor.
- Forest Honey (Waldhonig)
- Darker and more complex, with a slightly caramelized flavor.
- Ideal for those who enjoy richer, deeper sweetness.
- Acacia Honey (Akazienhonig)
- Delicate and smooth, with a light golden hue.
- Does not overpower the natural flavor of Gipfeli.
How to Serve Honey with Gipfeli
- Drizzle over a buttered Gipfeli for a smooth, indulgent contrast.
- Pair with nuts or soft cheeses for a more gourmet Swiss-style breakfast.
- Use a honey dipper to control portion size and avoid oversaturation.
Gourmet Swiss Pairings: Elevating Your Gipfeli Experience
For a more indulgent Swiss breakfast, consider pairing Gipfeli with traditional Swiss ingredients that add depth and texture.
Soft Cheeses and Spreads
- Mascarpone or Ricotta – Adds a light, creamy contrast to the crisp layers.
- Swiss Quark (Quarkkäse) – Mild, slightly tangy, and protein-rich, perfect with honey or jam.
- Crème Fraîche – Offers a slightly sour, buttery richness that pairs well with sweet spreads.
Nut-Based Spreads
- Almond Butter – A nutty, slightly sweet option that pairs well with honey.
- Hazelnut Spread (Swiss-style Nussnougatcreme) – A decadent pairing for chocolate lovers.
- Pistachio Cream – Rich and slightly sweet, offering a gourmet alternative to jam.
Beverage Pairings: Completing the Swiss Breakfast
Gipfeli is best enjoyed alongside a warm, comforting drink that enhances its flavors.
Swiss Coffee and Tea Pairings
- Café Crème – A smooth, mild coffee similar to an Americano but with a touch of cream.
- Espresso – Strong and bold, providing a contrast to the pastry’s mild sweetness.
- Schale (Swiss Latte) – A coffee and milk blend that balances well with jam-covered Gipfeli.
- Hot Chocolate (Heiße Schokolade) – A rich, creamy alternative, especially popular in colder months.
Fruit Juices and Herbal Teas
- Freshly Squeezed Orange Juice – A classic pairing for a refreshing, citrusy contrast.
- Apple Cider – A warming, subtly spiced beverage that complements honey-drizzled Gipfeli.
- Herbal Swiss Alpine Tea – Infused with chamomile, mountain herbs, or mint, creating a soothing morning ritual.
The Perfect Swiss Breakfast Experience
For an authentic Swiss-style breakfast, serve warm, freshly baked Gipfeli with an assortment of jams, Swiss butter, and high-quality honey. Whether enjoyed with coffee in the morning or as a relaxed weekend treat, these pairings elevate Gipfeli into a true indulgence, rich in tradition and flavor.
Storing and Reheating (How to Keep Them Fresh and Crispy)
Gipfeli are best enjoyed fresh out of the oven, but proper storage and reheating techniques allow you to preserve their flaky texture, buttery layers, and golden crispiness for days or even weeks. Whether you plan to store them overnight, freeze them for later, or reheat them for a bakery-fresh experience, following the correct steps ensures that Gipfeli remain delicious and satisfying every time.
Short-Term Storage: Keeping Gipfeli Fresh for Up to 2 Days
For the first 24 to 48 hours, Gipfeli maintain their best texture and flavor when stored properly at room temperature. Incorrect storage can lead to staleness, sogginess, or loss of crisp layers.
Best Methods for Storing Gipfeli at Room Temperature
- Use a Paper Bag or Ventilated Container
- A paper bag prevents moisture buildup while allowing airflow, keeping the Gipfeli crust crisp.
- Avoid plastic containers or plastic wrap, as they trap humidity and make the pastry soggy.
- Wrap with Parchment Paper or a Kitchen Towel
- Wrapping Gipfeli loosely in parchment paper or a clean towel helps absorb excess moisture without drying them out.
- This method also preserves the delicate butter flavor and keeps the layers from softening.
- Store in a Cool, Dry Place
- Keep Gipfeli away from direct sunlight, heat sources, or humid areas.
- A breadbox or covered basket provides an ideal environment.
Signs That Gipfeli Are No Longer Fresh
- The crust becomes soft or chewy, rather than crisp.
- The layers lose definition, making the pastry feel dense.
- The buttery aroma fades, reducing the richness of the pastry.
If Gipfeli begin to stale or soften, reheating can help restore their texture.
Long-Term Storage: Freezing Gipfeli for Maximum Freshness
If you need to preserve Gipfeli for longer than two days, freezing is the best method to maintain their structure, flavor, and crispness. Proper freezing prevents freezer burn, moisture loss, and butter absorption into the dough.
Step-by-Step Guide to Freezing Freshly Baked Gipfeli
- Allow Gipfeli to Cool Completely
- Storing warm pastries traps steam, leading to soggy layers.
- Ensure they are at room temperature before freezing.
- Wrap Individually in Parchment Paper
- Wrapping each Gipfeli prevents them from sticking together.
- It also protects the outer layers from moisture absorption and freezer burn.
- Store in an Airtight Container or Freezer Bag
- Remove excess air from the bag before sealing.
- Use a double-layer method (wrapped in parchment, then placed in a freezer bag) for extra protection.
- Label with the Date
- Gipfeli can be stored for up to 2 months in the freezer.
- Mark the freezing date to ensure optimal freshness.
Freezing Unbaked Gipfeli Dough for Fresh Baking Later
- Shape the Gipfeli and place them on a baking sheet.
- Freeze for 1–2 hours until solid to prevent sticking.
- Transfer to a freezer-safe bag or container.
- Store for up to 2 months.
- When ready to bake, thaw overnight in the refrigerator, proof as usual, and bake fresh.
Reheating Gipfeli: Restoring Their Flaky, Crisp Texture
Cold or stale Gipfeli can easily be revived with the right reheating technique. Avoid using the microwave, as it makes the pastry rubbery and chewy instead of crisp and flaky.
Best Methods for Reheating Gipfeli
- Oven Reheating (Best for Crispiness)
- Preheat oven to 325°F (160°C).
- Place Gipfeli on a baking sheet.
- Warm for 5–7 minutes, or until crisp and heated through.
- Let them cool slightly before serving.
- Air Fryer Reheating (Quick and Effective)
- Set air fryer to 320°F (160°C).
- Reheat for 3–5 minutes until the exterior crisps up.
- Avoid overcrowding to ensure even heat circulation.
- Toaster Oven Reheating (For Single Servings)
- Place Gipfeli directly on the toaster oven rack.
- Heat for 5 minutes at 325°F (160°C) for an oven-fresh texture.
Reheating Frozen Gipfeli: Pre-Baked vs. Unbaked Dough
- For pre-baked frozen Gipfeli:
- Bake directly from frozen at 325°F (160°C) for 8–10 minutes until heated through.
- For unbaked frozen Gipfeli:
- Thaw overnight in the fridge.
- Proof for 45–60 minutes at room temperature before baking.
- Bake at 375°F (190°C) for 18–22 minutes.
How to Keep Gipfeli Crispy for Longer
Crispness is one of the most important qualities of a well-made Gipfeli. To maintain this texture for as long as possible, follow these best practices.
Preventing Sogginess
- Never store warm Gipfeli in an airtight container. The trapped steam will make the crust soft.
- Avoid refrigeration, as cold temperatures dry out the pastry and dull the buttery flavor.
Restoring Flakiness
- Always use dry heat (oven or air fryer) instead of steam-based methods.
- Let reheated Gipfeli sit for 1–2 minutes before eating to allow the layers to set properly.
Reviving Day-Old Gipfeli
- If Gipfeli feel slightly stale but not completely hard, lightly spritz them with water before reheating in the oven.
- This method mimics the effect of a bakery’s steam ovens and rejuvenates the crust.
Final Tips for Maintaining Fresh, Crisp Gipfeli
- Use a breathable storage method, such as a paper bag or towel wrapping.
- Reheat using dry heat methods (oven, toaster oven, or air fryer).
- Freeze properly if storing for more than two days to prevent loss of texture.
- Always cool Gipfeli completely before storing to avoid condensation buildup.
By following these expert storage and reheating techniques, you can enjoy Gipfeli with their original crispness, buttery layers, and golden texture whether they’re freshly baked or stored for later.
Frequently Asked Questions About Gipfeli Recipe
Can I Make Gipfeli Without Yeast? (Alternative Methods)
Traditional Gipfeli rely on yeast fermentation to develop their light, airy texture and mild depth of flavor. However, if you prefer a quicker version or need a yeast-free alternative, there are methods to achieve flaky, crescent-shaped pastries without yeast. While the texture may differ slightly, these methods still produce buttery, golden layers with a crisp bite.
Using Baking Powder as a Yeast Substitute
Baking powder provides chemical leavening instead of fermentation, resulting in a pastry that is flakier and denser than traditional Gipfeli. This method is best for those who want a quick, no-proofing version.
How to Replace Yeast with Baking Powder
- Use 2 teaspoons of baking powder per 3 cups (375g) of flour.
- Omit the proofing steps, since baking powder activates immediately.
- Increase the butter content slightly to compensate for the lack of fermentation-driven elasticity.
- Knead gently to prevent overworking the dough, which can make it tough.
- Bake immediately after shaping at 375°F (190°C) for 18–20 minutes.
Texture Differences
- No yeast fermentation means no natural air pockets.
- The texture is closer to a biscuit or scone, but still flaky.
- Faster preparation since there is no need for rising time.
Laminated Puff Pastry Method (Closest to Flaky Layers Without Yeast)
For a flaky, layered alternative without yeast, puff pastry dough offers the best substitute. This method mimics the crisp, buttery structure of Gipfeli, though it lacks the mild chewiness from gluten development in yeast-based doughs.
How to Use Puff Pastry to Make Yeast-Free Gipfeli
- Use high-quality store-bought puff pastry or make a homemade laminated dough.
- Roll the pastry into a rectangle and cut into triangles, just like traditional Gipfeli.
- Brush with an egg wash before baking for a golden sheen.
- Bake at 400°F (200°C) for 15–18 minutes until puffed and golden.
Texture Differences
- Very light and flaky, similar to a croissant but without the chew of yeast dough.
- Layers separate more dramatically due to the laminated butter.
- Crispier texture rather than a soft, layered bite.
Greek Yogurt or Buttermilk-Based Dough (Soft and Flaky)
A dough made with Greek yogurt or buttermilk can replace the yeast’s hydration role, adding tanginess and tenderness while still creating a structured, crescent-shaped pastry. This method is ideal for a soft, slightly flaky texture.
How to Make Gipfeli with Yogurt or Buttermilk Dough
- Replace yeast and milk with 1 cup of Greek yogurt or buttermilk.
- Use baking soda (1 teaspoon) or baking powder (2 teaspoons) as a leavening agent.
- Mix until just combined—overmixing will make the dough tough.
- Roll, cut, and shape into crescents, then chill for 30 minutes.
- Bake at 375°F (190°C) for 18–20 minutes until golden.
Texture Differences
- More tender than traditional Gipfeli, with a slight biscuit-like softness.
- A mild tangy flavor, making it perfect for pairing with sweet or savory fillings.
- Less structured layering, but still light and buttery.
Gipfeli with Soda Water or Sparkling Water (A Lighter Alternative)
For an airy, quick dough with a hint of fluffiness, carbonated water can provide natural leavening without yeast. This method creates a lighter pastry without the need for yeast fermentation.
How to Use Soda Water for a No-Yeast Gipfeli Dough
- Replace milk with an equal amount of soda water or sparkling water.
- Combine with flour, butter, and a pinch of salt.
- Add baking powder (2 teaspoons) to enhance lift.
- Knead gently, shape, and bake at 375°F (190°C) for 18 minutes.
Texture Differences
- Softer, more delicate pastry compared to yeast-based Gipfeli.
- Mild rise and slight air pockets, but not as structured as laminated dough.
- Best for a quick, easy, and airy breakfast pastry.
Comparing Yeast-Free Gipfeli Methods
| Method | Flakiness | Airiness | Best For | Baking Time |
|---|---|---|---|---|
| Baking Powder | Moderate | Dense | Quick, no-rise version | 18–20 mins |
| Puff Pastry | High | Very airy | Ultra-crisp layers, no kneading | 15–18 mins |
| Greek Yogurt Dough | Soft & Flaky | Light | Soft, slightly tangy breakfast pastry | 18–20 mins |
| Soda Water Dough | Light | Airy | Quick and fluffy alternative | 18 mins |
Final Thoughts: Choosing the Right Alternative
- For the flakiest, most croissant-like texture, puff pastry is the best choice.
- For a quick, no-rise version, baking powder-based dough is the easiest.
- For a soft, slightly tender pastry, Greek yogurt or buttermilk-based dough works well.
- For a light, airy alternative, soda water dough provides natural leavening.
While traditional Gipfeli use yeast for their signature flavor and texture, these yeast-free methods provide excellent alternatives for those looking for a quicker, simpler, or more unique take on Swiss pastries.
What’s the Best Flour to Use? (Why Swiss Zopfmehl Works Best)
The choice of flour is one of the most critical factors in making perfect Gipfeli. The right flour determines texture, flakiness, and dough elasticity, ensuring that the final pastry has a delicate crumb, crisp layers, and proper rise. While different flour types can be used, Swiss Zopfmehl is the best choice for achieving the ideal Gipfeli texture.
Why Swiss Zopfmehl is the Best Flour for Gipfeli
Zopfmehl is a specialized Swiss bread flour blend commonly used in Zopf (Swiss braided bread) and buttery pastries like Gipfeli. It is known for its balanced gluten strength, moderate protein content, and smooth texture, making it the perfect flour for laminated doughs.
Composition of Zopfmehl
- White wheat flour (high-quality soft wheat) – Provides elasticity and structure.
- A small percentage of spelt or durum wheat flour – Enhances strength and improves dough handling.
Why Zopfmehl Creates the Best Texture
- Higher protein content (11–12%) – This provides enough gluten to hold the butter layers intact while keeping the pastry soft.
- Stronger gluten development – Allows for a well-structured, layered dough without making it too chewy.
- Better absorption of butter – The flour’s consistency ensures that Gipfeli are flaky but not greasy.
- Balanced extensibility and elasticity – The dough stretches without tearing, making rolling and lamination easier.
Because of these characteristics, Zopfmehl is the gold standard for Gipfeli, giving the perfect balance between crispness, tenderness, and structure.
What If You Can’t Find Zopfmehl? Best Substitutes
Since Zopfmehl is mainly available in Switzerland, it can be difficult to source internationally. However, you can replicate its properties by blending different flour types.
Best Flour Blends to Mimic Zopfmehl
- Bread Flour + All-Purpose Flour (50/50 Blend)
- Bread flour adds strength (higher protein).
- All-purpose flour softens the texture for a more delicate bite.
- All-Purpose Flour + Added Wheat Gluten
- Add 1 teaspoon of wheat gluten per cup of all-purpose flour to strengthen the dough.
- Pastry Flour + Bread Flour (60/40 Blend)
- Pastry flour ensures tenderness, while bread flour maintains dough structure.
Comparison of Different Flour Types for Gipfeli
| Flour Type | Protein Content | Best For | Texture Outcome |
|---|---|---|---|
| Zopfmehl (Swiss Blend) | 11–12% | Authentic Gipfeli, best layering and rise | Balanced, flaky, slightly soft |
| Bread Flour | 12–14% | Stronger dough, holds shape well | More structured, slightly chewy |
| All-Purpose Flour | 10–11% | Soft texture, widely available | Less structured, softer bite |
| Pastry Flour | 8–9% | Extra delicate texture | Less gluten, softer, not ideal for lamination |
| Whole Wheat Flour | 12–14% | Adds fiber, healthier alternative | Dense, less flaky |
How Flour Choice Affects Gipfeli Dough
The wrong flour can impact how the layers separate, how the dough rises, and how crispy or tender the pastry turns out.
If You Use Too Much Bread Flour
- Stronger gluten formation can make the dough too chewy instead of light.
- Layers may stick together, reducing flakiness.
If You Use Only All-Purpose Flour
- The dough will be softer and easier to handle, but the layers may be less defined.
- The final texture may lack crispness.
If You Use Pastry Flour
- The lower gluten content can weaken structure, preventing the layers from forming properly.
- The Gipfeli may turn out too delicate and break apart easily.
If You Use Whole Wheat Flour
- Whole wheat flour absorbs more liquid, making the dough drier and denser.
- It produces less rise and fewer layers.
Final Recommendation: Choosing the Best Flour for Gipfeli
For authentic Swiss Gipfeli, Zopfmehl is the best choice. If unavailable, use a blend of all-purpose and bread flour (50/50) to replicate its characteristics.
By selecting the right flour with the correct protein balance, you ensure that your Gipfeli have the perfect structure, lightness, and crisp, flaky layers every time.
Can I Freeze Gipfeli Dough? (Best Freezing and Thawing Methods)
Freezing Gipfeli dough is a great way to prepare fresh, flaky pastries in advance without compromising quality. Whether you want to freeze the dough before lamination, after shaping, or after baking, using the right techniques ensures perfectly risen, crisp, and buttery Gipfeli once baked.
Best Stage to Freeze Gipfeli Dough
Gipfeli dough can be frozen at different stages, but some methods preserve flakiness and texture better than others.
1. Freezing Dough Before Lamination (Best for Long-Term Storage)
- Freezing at this stage prevents butter from breaking down prematurely, keeping the layers distinct when rolled.
- Ideal if you plan to laminate and shape the dough later but want to prepare it in advance.
How to Freeze Pre-Laminated Dough
- Prepare Gipfeli dough up to the first rise (bulk fermentation).
- Shape the dough into a flat disc or rectangle for easier rolling later.
- Wrap tightly in plastic wrap and place in a freezer-safe bag.
- Label with the date and freeze for up to 2 months.
Thawing Instructions
- Transfer to the refrigerator 12–16 hours before using.
- Let the dough rest at room temperature for 30 minutes before rolling and laminating.
2. Freezing Laminated Dough (Best for Faster Gipfeli Preparation)
- Freezing after lamination preserves butter layering, ensuring proper rise and flakiness.
- Useful if you want to skip the lamination step later and go straight to shaping.
How to Freeze Laminated Dough
- Complete all folds and let the dough rest in the fridge for 1 hour before freezing.
- Roll into a flat sheet, place parchment paper between layers if stacking.
- Wrap tightly in plastic wrap and aluminum foil to prevent freezer burn.
- Store in a freezer-safe container and freeze for up to 2 months.
Thawing Instructions
- Thaw overnight in the fridge.
- Let sit at room temperature for 10–15 minutes before rolling and shaping.
3. Freezing Shaped Gipfeli (Best for Quick Baking on Demand)
- Freezing after shaping is the most convenient method since you can bake them fresh from frozen.
- Ensures that Gipfeli rise properly without losing their shape.
How to Freeze Shaped Gipfeli
- Shape the dough into crescents.
- Place Gipfeli on a parchment-lined baking sheet, ensuring they don’t touch.
- Flash freeze for 1–2 hours until solid.
- Transfer to a freezer-safe bag, squeezing out excess air.
- Store for up to 2 months.
Thawing and Baking Instructions
- Option 1: Thaw Overnight
- Place frozen Gipfeli on a baking sheet.
- Cover with plastic wrap and refrigerate overnight.
- Let them sit at room temperature for 30–45 minutes before baking.
- Bake as usual at 375°F (190°C) for 18–22 minutes.
- Option 2: Bake Directly from Frozen
- Place frozen Gipfeli on a baking tray.
- Preheat oven to 350°F (175°C) and bake for 22–25 minutes.
- Brush with egg wash halfway through baking for an even golden crust.
4. Freezing Fully Baked Gipfeli (Best for Convenience, but Less Flaky Texture)
- Freezing after baking is not ideal for maximum flakiness, but it works for short-term storage.
- Best for quick reheating when you need a pastry on the go.
How to Freeze Baked Gipfeli
- Let Gipfeli cool completely to prevent condensation.
- Wrap each Gipfeli in parchment paper to preserve crispness.
- Store in an airtight container or freezer bag for up to 1 month.
Reheating Instructions
- Oven method (best): Bake at 325°F (160°C) for 5–7 minutes to restore crispiness.
- Air fryer method: Heat at 320°F (160°C) for 3–4 minutes.
- Avoid microwaving, as it makes the pastry chewy instead of crisp.
Best Freezing Method Based on Your Needs
| Freezing Method | Best For | Storage Time | Thawing & Baking |
|---|---|---|---|
| Pre-Laminated Dough | Long-term storage, fresh lamination | Up to 2 months | Thaw in fridge overnight, then roll & shape |
| Laminated Dough | Faster preparation, still fresh layers | Up to 2 months | Thaw in fridge, shape and proof before baking |
| Shaped Gipfeli | Quick baking on demand | Up to 2 months | Thaw overnight or bake from frozen |
| Fully Baked Gipfeli | Convenience, quick reheating | Up to 1 month | Reheat in oven at 325°F (160°C) |
Final Tips for Freezing and Thawing Gipfeli Dough
- Always wrap dough tightly to prevent freezer burn.
- Label the freezing date to track freshness.
- Use a baking sheet for flash freezing shaped pastries to avoid them sticking together.
- Never microwave frozen Gipfeli dough—always thaw in the fridge or bake directly.
- For the best results, freeze at the laminated or shaped stage rather than after baking.
By following these best freezing and thawing techniques, you can enjoy perfectly fresh, bakery-quality Gipfeli anytime without compromising on flavor, flakiness, or texture.
Why Is My Gipfeli Not Flaky? (Troubleshooting Lamination Issues)
Lamination is the key technique that creates the distinct layers, airy interior, and crisp, golden crust in Gipfeli. If your pastries come out dense, greasy, or lacking visible layers, it’s a sign that something went wrong during the folding, rolling, or baking process. Understanding what causes lamination failures and how to fix them will help you achieve perfectly flaky Gipfeli every time.
Butter Leaks Out During Baking
Butter leakage is one of the most common reasons for a lack of layers. If the butter melts before it can create steam, the dough won’t separate properly, resulting in dense or greasy pastries instead of light and crisp layers.
Causes of Butter Leakage
- Butter was too soft before lamination
- If butter is too warm, it will absorb into the dough instead of forming separate layers.
- Butter should be firm but pliable (50–55°F / 10–13°C) before rolling.
- Dough became too warm during rolling
- If the dough is rolled and folded at room temperature, the butter softens too quickly.
- Always chill the dough between folds for at least 20–30 minutes.
- Butter block was unevenly distributed
- If the butter isn’t rolled out into a thin, even layer, some areas will lack proper lamination.
- Ensure the butter block is smooth and covers at least ⅔ of the dough before folding.
Solutions to Prevent Butter Leakage
- Chill dough for 15–20 minutes between each fold to maintain butter integrity.
- Use a marble or chilled countertop to slow butter softening.
- Make sure butter and dough are at similar temperatures before laminating.
Layers Didn’t Form Properly
If the baked Gipfeli appear solid inside instead of flaky, the lamination process may have failed. This results in a bread-like pastry rather than a light, layered one.
Why Layers Fail to Develop
- Overworking the dough
- If the dough is rolled and folded too aggressively, the butter gets absorbed instead of staying in sheets.
- Roll with gentle, even pressure, avoiding excessive force.
- Not enough folds
- Gipfeli need at least three letter folds to create the proper layering.
- If fewer folds are used, the butter distribution will be too thick.
- Butter melted into the dough instead of staying in layers
- Overhandling the dough causes the butter to seep into the flour, making it impossible to form flaky layers.
- Chill after every rolling step to prevent butter from blending with the dough.
How to Fix It Next Time
- Use three full letter folds to create 27 layers.
- Always refrigerate between folds to ensure proper separation.
- Avoid pressing too hard while rolling—let the rolling pin do the work.
Dough is Too Chewy or Tough
A good Gipfeli should be light and crisp, not rubbery or dense. If your dough feels chewy, the gluten has likely been overdeveloped.
What Makes Dough Too Chewy?
- Too much kneading before lamination
- Over-kneading strengthens gluten, making the dough elastic rather than tender.
- Stop kneading as soon as the dough is smooth and holds together.
- Using the wrong type of flour
- Bread flour has too much protein, which makes the dough too firm.
- Swiss Zopfmehl or a blend of all-purpose and bread flour (50/50) is best.
- Too much flour added during rolling
- Excess flour dries out the dough and makes it stiff.
- Lightly dust the surface but avoid over-flouring the dough.
How to Get a Softer, Flakier Dough
- Use a balanced flour mix (Zopfmehl or a blend of AP and bread flour).
- Limit kneading to prevent excess gluten development.
- Use just enough flour to prevent sticking, but no more.
Butter Breaks Instead of Spreading Evenly
If the butter cracks or shatters inside the dough, it won’t create smooth layers, leading to uneven rise and dense spots.
Why Butter Breaks in the Dough
- Butter was too cold when incorporated
- If butter is too stiff, it won’t spread evenly between the layers.
- Let butter soften slightly before rolling, but not to the point of melting.
- Dough was too stiff when rolling
- Cold, over-chilled dough resists rolling, causing uneven pressure on the butter.
- Let dough rest at room temperature for 5–10 minutes before rolling.
How to Prevent Butter from Breaking
- Tap butter with a rolling pin before lamination to soften it without melting.
- Roll dough evenly and let it rest if it’s too stiff.
Gipfeli Didn’t Puff Up in the Oven
If your Gipfeli come out flat or don’t rise properly, the layers didn’t expand as they should.
What Causes a Lack of Puff?
- Underproofing before baking
- If the final proofing is skipped or cut short, the dough won’t expand properly in the oven.
- Let shaped Gipfeli proof for at least 45 minutes to 1 hour at room temperature.
- Oven temperature too low
- If the oven isn’t hot enough, butter will leak before the dough rises.
- Bake at 375°F (190°C) for the perfect balance of steam and crispness.
- Sealed edges weren’t tight enough
- If butter leaks out, the layers won’t have enough air pockets to expand.
- Ensure the edges are sealed well after each fold.
How to Fix Puffing Issues
- Always proof shaped Gipfeli before baking.
- Preheat the oven properly before baking to ensure proper rise.
- Seal the dough well to keep the butter inside.
Final Tips for Achieving Perfect Flaky Layers
- Keep butter and dough cold at all times.
- Roll with light, even pressure—never press too hard.
- Chill between folds to maintain lamination integrity.
- ✔ Use three full letter folds for the best layering.
- ✔ Proof properly before baking to allow layers to expand.
- ✔ Bake at a high temperature (375°F / 190°C) to lock in the flakiness.
By mastering these troubleshooting techniques, you can create beautifully layered, bakery-quality Gipfeli with a light, crisp texture and golden, buttery finish every time.
Conclusion
Mastering the art of homemade Gipfeli takes practice, but by following the right techniques, you can achieve golden, flaky, and perfectly layered Swiss pastries every time. From choosing the best flour to mastering lamination and proofing, each step plays a crucial role in creating the light, buttery texture that makes Gipfeli so irresistible.
Key Steps to Perfect Homemade Gipfeli
- Use high-quality butter and flour for the best texture and flavor.
- Keep butter and dough cold throughout the lamination process to maintain distinct layers.
- Roll and fold gently to avoid crushing the layers while ensuring even lamination.
- Proof the shaped Gipfeli properly before baking to allow them to rise and expand.
- Bake at the correct temperature (375°F / 190°C) for the ideal balance of crispness and flakiness.
Try It Yourself & Share Your Results
Now that you have all the techniques and troubleshooting tips, it’s time to put your skills to the test. Whether you’re making Gipfeli for a Swiss-style breakfast or a weekend treat, follow the steps carefully, and you’ll be rewarded with bakery-quality pastries at home.
I’d love to hear about your baking experience! Share your results in the comments or tag me on social media with your Gipfeli creations. Let’s bring a taste of Switzerland into more kitchens!
Explore More Swiss Pastry Recipes
If you enjoyed making Gipfeli, check out my blog for more authentic Swiss pastry recipes, including:
- Zopf Bread – The classic braided Swiss bread with a soft, buttery crumb.
- Nusstorte – A rich Swiss walnut tart with a caramelized nut filling.
- Basler Läckerli – Traditional Swiss honey and almond spice cookies.
Stay inspired, keep baking, and let the magic of Swiss pastries bring warmth and joy to your kitchen!