
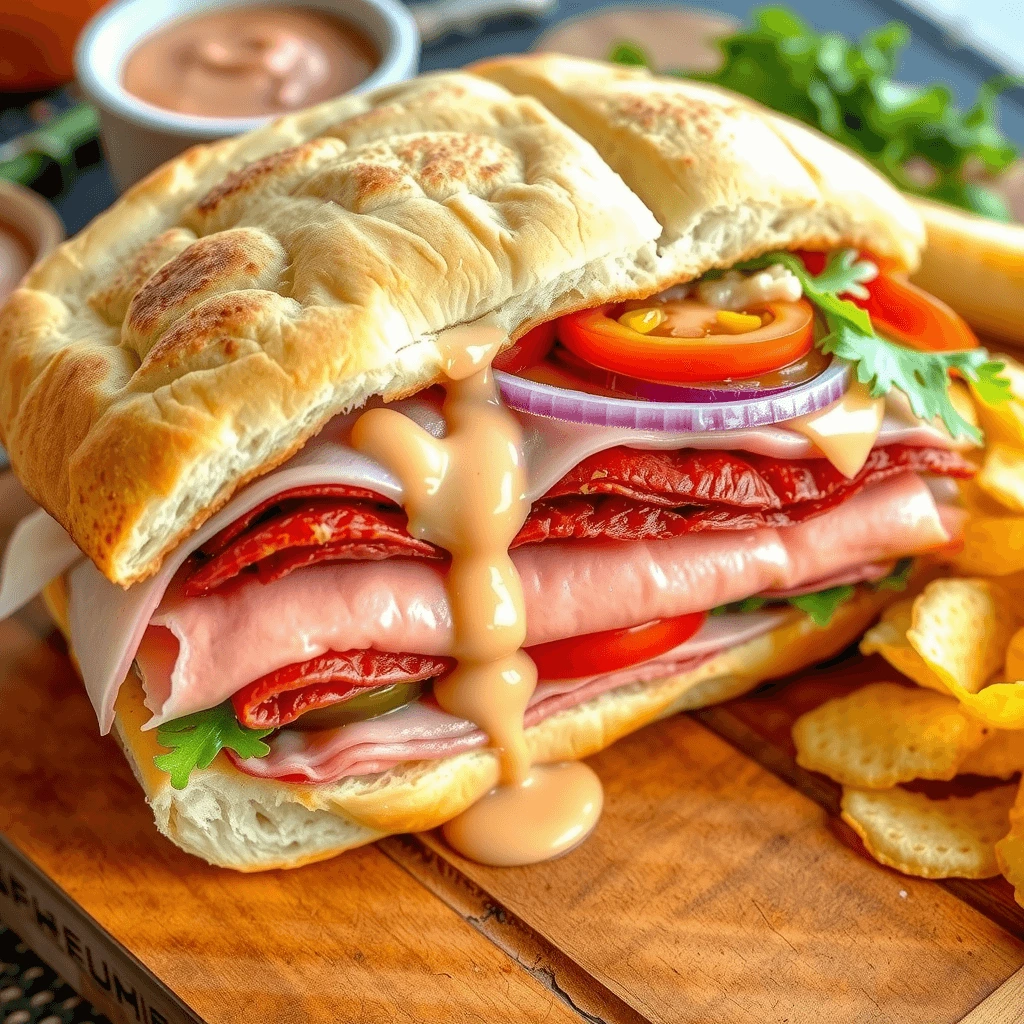
There’s something magical about homemade bread—especially when it’s fresh, warm, and perfectly crafted for your favorite sub sandwich. Enter Hero Bread, the ultimate sub roll that’s soft yet sturdy, with just the right amount of chew. Whether you’re crafting an Italian hoagie loaded with meats and cheese or a veggie-packed grinder with crispy lettuce and tangy dressing, the bread makes all the difference.
Sure, you could grab a pre-made roll from the store, but nothing beats the satisfaction of baking your own Hero Bread at home. With a golden crust and fluffy interior, this sandwich bread is surprisingly easy to master with the right technique. Plus, you get full control over ingredients, flavors, and even dietary adaptations—whether you prefer a classic version, a gluten-free alternative, or a keto-friendly option.
In this guide, we’ll walk you through the ultimate step-by-step baking guide to achieving the perfect sub sandwich bread. From selecting the right flour and yeast to kneading, shaping, and baking for that bakery-quality finish, you’ll learn everything you need to make Hero Bread like a pro. Plus, we’ll troubleshoot common baking mistakes and share expert tips for flavor variations and long-term storage.
Ready to transform your sandwich game? Let’s get baking!
1. Ingredients & Tools You’ll Need
Essential Ingredients for Hero Bread
Creating the perfect Hero Bread requires more than just mixing flour and yeast together. Every ingredient plays a crucial role in determining the texture, flavor, and overall quality of your sub rolls. Therefore, understanding these components will help you achieve bakery-level results at home. Below, we break down each essential ingredient, explain its function, and discuss how to make substitutions or adjustments when necessary.
Flour: The Foundation of Hero Bread
Flour is the backbone of any bread recipe. However, not all flours perform the same way in baking. Choosing the right flour type is critical for achieving the ideal chewiness and structure in Hero Bread.
Bread Flour vs. All-Purpose Flour
Although both bread flour and all-purpose flour contain gluten, they differ in protein content, which significantly affects the final texture.
- Bread Flour (Recommended for Hero Bread)
- Since it contains 12–14% protein, it develops more gluten, resulting in a chewy and elastic dough.
- Due to its high protein level, it creates a stronger dough that rises well and maintains its shape.
- Because of its elasticity, it holds sandwich fillings without breaking apart.
- Unlike all-purpose flour, it enhances oven spring, giving the rolls a light and airy crumb.
- All-Purpose Flour (Alternative Option)
- Since it has 10–12% protein, it forms less gluten, which can lead to a slightly softer bread.
- However, it still produces a good loaf, although it may not be as chewy as one made with bread flour.
- If used, it may require extra kneading to compensate for the lower gluten content.
How to Mimic Bread Flour with All-Purpose Flour
If you only have all-purpose flour, you can still achieve great results. Simply add one teaspoon of vital wheat gluten per cup of all-purpose flour to increase elasticity and improve the bread’s chewiness. This adjustment helps mimic the performance of bread flour, making your rolls sturdier and more structured.
Yeast: The Driving Force Behind Fermentation
Yeast is responsible for leavening the dough, which means it produces the air pockets that make bread light and fluffy. Without yeast, Hero Bread would be dense and heavy.
Types of Yeast Used in Hero Bread
While all yeast types serve the same purpose, they differ in activation methods and fermentation speeds.
- Active Dry Yeast
- Because it contains dormant yeast granules, it must be proofed in warm water (105–110°F) before use.
- Although it takes longer to activate, it enhances the bread’s depth of flavor.
- It is commonly used by traditional bakers who prefer longer fermentation times for improved taste.
- Instant Yeast
- Since it is milled into finer granules, it can be mixed directly with dry ingredients without proofing.
- Unlike active dry yeast, it works faster, making it a convenient choice for busy bakers.
- It is ideal for those who want a quicker rise time without compromising texture.
Yeast Activation: Ensuring Proper Growth
To maximize yeast performance, always test its activity before incorporating it into your dough. If using active dry yeast, dissolve it in ¼ cup of warm water with a teaspoon of sugar and let it sit for 5–10 minutes. If bubbles appear, your yeast is alive and ready to use. However, if no foaming occurs, the yeast may be expired, and it is best to start with a fresh batch.
Hydration: The Role of Water in Dough Formation
Water is essential for activating yeast and hydrating the flour, which allows gluten to develop properly. The correct amount of water ensures a dough that is soft, pliable, and easy to work with.
Ideal Water Temperature for Hero Bread
- 105–115°F for active dry yeast.
- 120–130°F for instant yeast.
If the water is too cold, the yeast will become sluggish, slowing the rise. On the other hand, if it is too hot, it can kill the yeast, preventing fermentation altogether.
Adjusting Hydration Levels for Perfect Dough
Since different types of flour absorb water differently, you may need to adjust hydration levels.
- If the dough feels too sticky, sprinkle in additional flour, one tablespoon at a time.
- If the dough appears too dry, gradually add a teaspoon of warm water while kneading.
Can Milk Replace Water in Hero Bread?
Yes, substituting part of the water with milk can create a softer, richer crumb. However, since milk contains natural sugars, it may slow yeast activity slightly, requiring a longer proofing time.
Sugar: More Than Just a Sweetener
Although sugar adds slight sweetness, it serves multiple functions in Hero Bread.
Why Sugar Is Essential in Hero Bread
- It feeds the yeast, allowing for steady fermentation and a higher rise.
- It enhances the Maillard reaction, leading to a beautifully golden crust.
- It improves moisture retention, which keeps the bread fresh for longer.
Sugar Alternatives for Different Dietary Needs
- Honey: Adds moisture and a mild floral sweetness.
- Maple Syrup: Provides a hint of caramel-like flavor.
- Agave Nectar: A low-glycemic alternative with a neutral taste.
Salt: Strengthening Dough and Balancing Flavor
Salt is not just about taste—it is critical for gluten development and fermentation control.
How Salt Impacts Hero Bread
- Since it regulates yeast activity, it prevents over-fermentation, which can cause the dough to collapse.
- Because it tightens gluten strands, it results in a stronger dough structure.
- Without it, bread would taste flat and unbalanced.
Correct Salt-to-Flour Ratio
The ideal amount of salt is 1.5 to 2 teaspoons per 500 grams (4 cups) of flour. However, avoid adding salt directly to yeast, as this can slow down fermentation. Instead, mix it into the flour first to ensure even distribution.
Fats: The Secret to Tender and Flavorful Bread
Fats significantly impact both the texture and shelf life of Hero Bread.
Choosing the Best Fat for Hero Bread
- Unsalted Butter
- Adds richness and a slightly tender crumb.
- Improves the bread’s ability to stay soft longer.
- Olive Oil
- Produces a slightly chewier texture with a subtle savory note.
- Helps the crust develop a light crispness when used instead of butter.
How Fat Affects Bread Texture
- More fat = a softer crumb and extended freshness.
- Less fat = a chewier texture and more pronounced gluten development.
Can You Make Hero Bread Without Fat?
Yes, but the bread will turn out firmer and slightly drier. To compensate, increase hydration slightly by adding an extra tablespoon of water.
Optional Add-Ins: Enhancing Flavor and Texture
To customize your Hero Bread, consider incorporating various seasonings, seeds, or alternative flours.
Flavor Boosters
- Garlic Powder: Enhances depth with a subtle savory kick.
- Dried Herbs (Oregano, Basil, Thyme): Ideal for Italian-style sub rolls.
- Sesame or Poppy Seeds: Adds a nutty, crunchy topping.
Texture Modifiers
- Whole Wheat Flour (Up to 25%): Provides a slightly denser, more rustic texture.
- Vital Wheat Gluten (1 tsp per cup of flour): Strengthens the dough and improves elasticity.
Summary: Mastering the Ingredients for Hero Bread
Every ingredient in Hero Bread plays a distinct role, influencing the texture, rise, and overall quality of the final loaf.
Key Takeaways
- Choose bread flour for optimal chewiness and elasticity.
- Select the right yeast based on your preferred fermentation speed.
- Maintain proper hydration to balance softness and structure.
- Incorporate sugar for better yeast activity and crust browning.
- Use salt to strengthen gluten and regulate yeast growth.
- Add fats to enhance tenderness and extend freshness.
By carefully balancing these elements, you can create the ultimate Hero Bread that surpasses store-bought options. Now that you understand the ingredients, let’s move on to the step-by-step process of mixing, kneading, and shaping the perfect sub roll.
Must-Have Baking Tools
Baking Hero Bread requires the right tools to ensure efficiency, precision, and consistency. While some tools are essential for kneading, proofing, and baking, others enhance convenience and control over the dough. Choosing the correct equipment can make a significant difference in the final texture and flavor of your homemade sub rolls.
Mixing and Kneading Tools
A well-mixed and properly kneaded dough is crucial for developing gluten, which gives Hero Bread its signature chewy texture. Therefore, selecting the right mixing and kneading tools is the first step in achieving bakery-quality bread.
Stand Mixer with Dough Hook
A stand mixer with a dough hook attachment simplifies the kneading process, ensuring even gluten development while reducing manual effort.
- Provides consistent kneading, which is essential for elastic dough.
- Reduces kneading time by nearly 50% compared to hand kneading.
- Prevents excessive handling, which can lead to overworked dough.
How to Use a Stand Mixer for Kneading
- Attach the dough hook and add the mixed ingredients to the bowl.
- Start at a low speed to combine the ingredients evenly.
- Once a shaggy dough forms, increase the speed to medium-low.
- Knead for 5–7 minutes until the dough becomes smooth and elastic.
Alternative: Hand Kneading Techniques
If you do not have a stand mixer, kneading by hand is a great alternative. However, it requires more effort and patience.
- Use the push, fold, turn technique for best results.
- Knead for 10–15 minutes until the dough passes the windowpane test.
- If the dough becomes too sticky, avoid adding too much flour. Instead, let it rest for a few minutes before continuing to knead.
Mixing Bowls
Mixing bowls are essential for combining ingredients and proofing the dough. Choosing the right material can affect the proofing process.
- Stainless Steel Bowls: Retain warmth, encouraging better yeast activity.
- Glass Bowls: Allow visibility, helping monitor fermentation.
- Plastic Bowls: Lightweight but can absorb odors over time.
Proper Proofing in Mixing Bowls
- Lightly grease the bowl to prevent sticking.
- Place the dough inside and cover with plastic wrap or a damp towel.
- Set in a warm, draft-free area for the first rise.
Wooden Spoon or Danish Dough Whisk
A sturdy mixing tool is essential for properly incorporating ingredients before kneading.
- A wooden spoon is ideal for initial mixing, preventing dough from sticking.
- A Danish dough whisk is excellent for heavy dough, reducing strain while mixing.
When to Use a Dough Whisk
- Best used for high-hydration dough that tends to be sticky.
- Helps mix flour, water, and yeast evenly without overworking the dough.
Bench Scraper
A bench scraper is one of the most versatile tools in bread-making. It is particularly useful for handling sticky dough and shaping sub rolls.
- Helps divide dough evenly without deflating air pockets.
- Prevents excessive sticking when transferring dough to a work surface.
- Makes cleaning flour and dough residues from countertops easier.
How to Use a Bench Scraper for Shaping Rolls
- Lightly dust the work surface with flour.
- Use the bench scraper to divide the dough into equal portions.
- Lift and turn the dough using gentle but firm movements to maintain structure.
Proofing Equipment
Proper proofing is critical for achieving the right texture. The correct proofing tools help maintain optimal fermentation conditions.
Kitchen Scale
Measuring ingredients by weight is significantly more accurate than using measuring cups. A kitchen scale ensures precision, leading to consistent hydration and gluten formation.
- Prevents the common mistake of adding too much flour.
- Ensures all rolls are uniform in size, which helps with even baking.
- Helps measure yeast, salt, and sugar accurately to avoid fermentation issues.
How to Use a Kitchen Scale Effectively
- Always measure flour in grams rather than cups to prevent inconsistencies.
- Weigh each dough portion before shaping to ensure equal-sized rolls.
- Use the tare function to reset the weight between ingredients.
Dough Rising Container
A dough rising container provides a controlled environment for fermentation, preventing the dough from drying out or proofing unevenly.
- Clear containers allow you to visually monitor the dough’s rise.
- Lidded containers help maintain consistent humidity levels.
- Bowl alternatives can work if covered with a damp towel or plastic wrap.
Proper Proofing Steps
- Lightly oil the container to prevent sticking.
- Place the dough inside and mark the starting height with tape.
- Cover and set in a warm place until the dough doubles in size.
Dough Lame or Sharp Blade
Scoring the dough before baking controls how the bread expands in the oven. A sharp tool ensures clean cuts, preventing random splitting.
- A lame (razor blade) creates deep, precise slashes for even expansion.
- A sharp paring knife can be used if a lame is unavailable.
Scoring Techniques for Hero Bread
- Hold the blade at a 45-degree angle.
- Make a single, long cut down the center for a traditional shape.
- If preferred, create diagonal slashes for a classic bakery-style look.
Baking Equipment
Choosing the right baking surface affects how the bread browns and crisps. A well-preheated oven combined with the correct tools ensures the best results.
Baking Stone or Steel
A baking stone or steel helps replicate a professional bread oven by retaining and distributing heat evenly.
- Produces a crispier crust and better oven spring.
- Prevents hot spots that can lead to uneven baking.
- Preheating the stone improves heat transfer for a better rise.
How to Use a Baking Stone
- Preheat the stone at 450°F (232°C) for at least 45 minutes.
- Place the shaped rolls directly onto the hot surface using a peel or parchment paper.
- Avoid sudden temperature changes to prevent cracking.
Heavy-Duty Baking Sheet
For those without a baking stone, a high-quality baking sheet provides a suitable alternative.
- Must be thick and warp-resistant to withstand high temperatures.
- Should be lined with parchment paper to prevent sticking.
- Works well when paired with a steam pan for crust development.
Steam Pan or Sprayer
Introducing steam into the oven helps the bread develop a crisp yet thin crust.
- A steam pan creates a humid environment for proper crust formation.
- A spray bottle can be used to mist the oven walls if a steam pan is unavailable.
Best Steam Methods
- Place a pan with boiling water on the lower rack before baking.
- Alternatively, spray the oven walls with water every 2–3 minutes during the first 10 minutes of baking.
Cooling and Storage Tools
Proper cooling prevents the crust from becoming soggy, while correct storage extends the bread’s freshness.
Wire Cooling Rack
Allowing air to circulate under the bread prevents condensation, which can soften the crust.
- Ensures the crust remains crisp while the interior sets.
- Prevents the bread from developing a gummy texture.
Cooling Best Practices
- Remove rolls from the oven and place them on a wire rack immediately.
- Let them cool for at least 20 minutes before slicing.
Bread Knife
A serrated bread knife ensures clean slices without crushing the rolls.
- A long, serrated blade is ideal for cutting sub rolls evenly.
- Helps maintain the structure of soft yet chewy bread.
Bread Storage Bags or Boxes
Storing Hero Bread correctly preserves its texture and freshness.
- A bread box keeps the bread soft while allowing slight airflow.
- Freezing in airtight bags prevents staleness.
Storage Guidelines
- Store at room temperature for up to three days in a bread box.
- Freeze sliced rolls for up to three months, wrapped in plastic and foil.
Conclusion
By using the right tools, you can streamline your baking process, improve consistency, and enhance the quality of your Hero Bread. From kneading to baking and storing, investing in these essential tools ensures that your sub rolls turn out perfectly every time. Now that we have covered the must-have equipment, let’s move on to the step-by-step recipe guide for baking the perfect Hero Bread.
Optional Add-Ins for Flavor
Enhancing the flavor of Hero Bread can elevate it beyond the classic sub roll. While the base recipe provides a neutral, slightly yeasty taste perfect for sandwiches, adding herbs, spices, seeds, or alternative flours can create a unique variation suited to personal preference. These optional ingredients allow for customization, adding complexity and depth to your homemade bread.
Herbs and Spices: Enhancing Aroma and Taste
Incorporating dried herbs and spices into the dough imparts a subtle yet noticeable flavor, making the bread more aromatic and delicious. Depending on the type of sandwich you plan to make, different seasonings can complement your fillings.
Best Herbs for Hero Bread
- Oregano – Adds a mild, earthy flavor, perfect for Italian-inspired subs.
- Basil – Contributes a slightly sweet, peppery taste that enhances Mediterranean-style sandwiches.
- Thyme – Offers a hint of lemon and mint, balancing richer fillings like roast beef or turkey.
- Rosemary – Provides a strong, pine-like fragrance that pairs well with roasted meats and vegetables.
- Parsley – A mild, fresh herb that complements almost any sandwich.
How to Incorporate Herbs into Dough
- Use 1–2 teaspoons of dried herbs per batch of dough.
- Mix them into the flour before adding wet ingredients to ensure even distribution.
- Knead well so the herbs are evenly spread throughout the dough.
Best Spices for Hero Bread
- Garlic Powder – Adds depth and umami, giving the bread a rich, savory taste.
- Onion Powder – Enhances the overall flavor profile with a hint of sweetness.
- Black Pepper – Provides a subtle kick, balancing out heavier sandwich fillings.
- Paprika – Adds a mild smokiness that works well in grilled sandwiches.
- Cayenne Pepper – Introduces heat for those who enjoy a spicy kick.
How to Use Spices for Flavor Boosting
- Add ½ to 1 teaspoon of spice per batch of dough.
- Blend with flour before mixing to prevent clumping.
- If using fresh garlic or onions, sauté them first to remove excess moisture before kneading them into the dough.
Seeds and Toppings: Adding Texture and Crunch
Toppings like sesame seeds, poppy seeds, and everything bagel seasoning provide additional flavor and texture. Not only do they enhance taste, but they also create a more visually appealing bread.
Common Seed Toppings for Hero Bread
- Sesame Seeds – Add a nutty, slightly toasted flavor while improving crunch.
- Poppy Seeds – Provide a mild earthiness and subtle crunch.
- Flaxseeds – Offer a slightly sweet, nutty flavor while increasing nutritional value.
- Sunflower Seeds – Contribute a rich, toasty flavor, perfect for whole wheat variations.
- Pumpkin Seeds – Add texture and a subtle nuttiness, working well in heartier sandwiches.
How to Apply Seeds to Hero Bread
- Brush the dough with an egg wash or water before baking to help seeds adhere.
- Sprinkle seeds evenly over the top of the dough.
- Lightly press them in to ensure they stick during baking.
- Bake as usual, enjoying the added flavor and crunch.
Everything Bagel Seasoning: A Flavor-Packed Twist
For a bolder taste, consider everything bagel seasoning, which includes sesame seeds, poppy seeds, dried garlic, dried onion, and sea salt.
- Creates a savory, flavorful crust perfect for deli-style sandwiches.
- Works especially well with cream cheese, smoked salmon, or turkey fillings.
- Can be mixed into the dough or sprinkled on top before baking.
How to Use Everything Bagel Seasoning
- Mix 1 tablespoon into the dough for internal flavor.
- Alternatively, sprinkle on top before baking for a bold crust.
- If using on top, lightly press the seasoning into the dough to prevent it from falling off.
Whole Wheat and Alternative Flours: Adding Nutritional Value
For a heartier version of Hero Bread, you can substitute part of the bread flour with whole wheat or other nutrient-dense flours. This adjustment increases fiber content and adds a slightly nutty flavor.
Whole Wheat Flour for a Nutty, Rich Flavor
- Substituting 25–30% of the bread flour with whole wheat flour adds depth without compromising structure.
- Increases fiber content, making the bread more filling.
- Requires slightly more water, as whole wheat absorbs more moisture than white flour.
How to Adjust Hydration for Whole Wheat Bread
- Increase water by 1–2 tablespoons per cup of whole wheat flour used.
- Knead slightly longer to ensure proper gluten development.
- Expect a slightly denser crumb but enhanced flavor.
Rye Flour for a Slightly Tangy Twist
- Adding 10–20% rye flour creates a more complex, earthy flavor.
- Works well with sandwiches featuring strong cheeses, cured meats, or mustard-based sauces.
- Pairs nicely with caraway seeds for a deli-style bread.
Spelt Flour for a Softer, Slightly Sweeter Loaf
- Spelt is an ancient grain that adds mild sweetness and tenderness to the bread.
- Using up to 50% spelt flour results in a softer texture but may require less kneading due to weaker gluten.
Gluten-Free Flour Blends for a Wheat-Free Option
For those avoiding gluten, substituting traditional flour with a gluten-free bread flour blend can still yield great results.
- Use a blend containing rice flour, tapioca starch, and xanthan gum for elasticity.
- Increase hydration slightly, as gluten-free flours tend to absorb more liquid.
- Expect a denser texture, but adding psyllium husk can improve chewiness.
Cheese and Dairy Additions: Enriching Flavor and Texture
Adding cheese or dairy-based ingredients enhances both the texture and flavor of Hero Bread, making it richer and more indulgent.
Grated Cheese for a Savory Boost
- Parmesan – Adds a salty, nutty depth to the crust.
- Cheddar – Contributes sharpness and a slightly crispy exterior.
- Asiago – Provides a mild tanginess that complements Italian sandwiches.
How to Add Cheese to Hero Bread
- Mix ¼ to ½ cup of grated cheese into the dough before kneading.
- Alternatively, sprinkle cheese on top before baking for a crispy crust.
- Reduce added salt slightly if using salty cheeses like Parmesan.
Buttermilk or Yogurt for Tenderness
- Substituting half of the water with buttermilk or yogurt creates a softer crumb.
- The slight acidity improves gluten structure, leading to a lighter, fluffier texture.
- Works well in sandwich rolls that need to remain soft without being too chewy.
Natural Sweeteners: A Subtle Flavor Enhancement
For a hint of sweetness without overpowering the bread, natural sweeteners can be used.
Best Natural Sweeteners for Bread
- Honey – Adds mild sweetness and improves moisture retention.
- Maple Syrup – Introduces a subtle caramel flavor.
- Molasses – Enhances color and adds a deep, slightly smoky sweetness.
How to Use Sweeteners Without Overpowering the Dough
- Add 1–2 tablespoons per batch of dough.
- Reduce added sugar if using liquid sweeteners to prevent excess moisture.
- Mix well with wet ingredients before incorporating into flour.
Conclusion
By incorporating optional add-ins, you can transform Hero Bread into a customized, flavor-rich sub roll that enhances any sandwich. Whether you prefer a subtle enhancement like herbs and seeds or a bold twist with cheese and spices, these additions provide endless possibilities.
Key Takeaways
- Herbs and spices add complexity and balance to the dough.
- Seeds and toppings improve both flavor and texture.
- Alternative flours introduce nutritional benefits and unique flavors.
- Cheese and dairy ingredients enrich the crumb and crust.
- Natural sweeteners create subtle depth without overpowering the bread.
With these add-ins, your homemade Hero Bread will not only be versatile but also tailored to your exact taste preferences. Now that the ingredients and enhancements are covered, let’s move on to the step-by-step recipe guide for making the perfect Hero Bread from scratch.

2. Step-by-Step Hero Bread Recipe
Mixing and Kneading the Dough
Achieving the perfect Hero Bread starts with proper mixing and kneading, which are essential steps in developing gluten. Without well-developed gluten, the bread will lack structure, leading to a dense or crumbly texture. Therefore, understanding the importance of each step and executing it correctly will make a significant difference in the final product. Whether you use a stand mixer or prefer kneading by hand, consistency and technique are key to achieving the right dough texture.
Why Proper Mixing and Kneading Matter
Mixing and kneading are not just about combining ingredients. Instead, they set the foundation for the bread’s structure, texture, and ability to rise properly. The process activates gluten proteins, which create an elastic network capable of trapping air bubbles during proofing. As a result, well-kneaded dough produces a light, airy, and chewy bread.
What Happens When Dough Is Kneaded?
- Gluten Formation – When flour and water combine, gluten proteins develop, giving the dough elasticity.
- Gas Retention – Kneaded dough can trap carbon dioxide produced by yeast, allowing it to rise properly.
- Improved Texture – A strong gluten network ensures that the bread holds its shape and does not collapse.
- Better Oven Spring – Proper kneading helps the dough expand fully in the oven, resulting in a high, fluffy loaf.
On the other hand, if the dough is under-kneaded, it will feel weak and sticky, making it difficult to shape. Conversely, over-kneading—though rare—can make the dough too tight, causing it to resist stretching and leading to a tougher crumb.
Choosing the Right Kneading Method
Depending on your available equipment and preference, you can either knead the dough by hand or use a stand mixer with a dough hook. Both methods are effective, though they require different approaches to achieve optimal results.
Stand Mixer Method: Efficient and Consistent
For those who want to save time, a stand mixer provides a convenient way to knead dough while ensuring even gluten development.
Steps for Kneading with a Stand Mixer
- Attach the dough hook to the stand mixer.
- In the mixing bowl, combine warm water, sugar, and yeast. Let it sit for 5 minutes until the mixture becomes foamy.
- Gradually add the flour, salt, and any optional seasonings to the yeast mixture.
- Start mixing on low speed to combine the ingredients.
- Once the dough comes together, increase to medium-low speed (setting 2 or 3 on most mixers).
- Knead for 5–7 minutes until the dough becomes smooth, elastic, and slightly tacky.
- Stop the mixer and check for gluten development using the windowpane test (explained later).
Why Use a Stand Mixer?
- Reduces Manual Effort – Saves energy compared to hand kneading.
- Provides Consistency – Ensures even gluten formation.
- Prevents Overworking – Mixing times are more controlled.
However, if a stand mixer is unavailable, hand kneading is an excellent alternative that allows more control over the dough’s feel and elasticity.
Hand Kneading Method: Traditional but Effective
For bakers who prefer a hands-on approach, kneading by hand is both effective and rewarding. Although it requires more effort, it provides a better understanding of how dough changes throughout the process.
Steps for Kneading Dough by Hand
- In a large mixing bowl, combine warm water, sugar, and yeast. Allow it to proof for 5–10 minutes until foamy.
- Gradually add flour and salt, stirring with a wooden spoon until a rough dough forms.
- Transfer the dough to a lightly floured surface for kneading.
- Use the push, fold, turn method:
- Push the dough forward with the heels of your hands.
- Fold it back over itself.
- Rotate it a quarter turn and repeat.
- Continue kneading for 10–15 minutes until the dough becomes smooth and elastic.
- Check gluten development using the windowpane test.
Why Knead by Hand?
- Full Control – Allows you to feel when the dough reaches the right consistency.
- No Special Equipment Needed – Works anywhere, anytime.
- Encourages Better Dough Handling Skills – Useful for all types of bread-making.
Though hand kneading takes longer than a stand mixer, it is a valuable skill that can improve overall baking technique.
Checking Dough Consistency
Whether kneading by hand or with a mixer, the dough must reach the correct consistency before moving to the next step. A properly kneaded dough should feel smooth, slightly tacky, and elastic. If the dough is too dry or too wet, adjustments must be made.
Signs of Well-Kneaded Dough
- Soft yet firm – It holds its shape without spreading.
- Elastic and Stretchy – It does not tear easily when pulled.
- Passes the Windowpane Test – A small piece of dough stretches thin without breaking.
Adjusting Dough Hydration
Since flour types absorb moisture differently, some slight adjustments may be needed.
- If the dough is too sticky, sprinkle 1 tablespoon of flour and knead until it becomes manageable.
- If the dough is too dry, add 1 teaspoon of warm water and knead until it feels smooth.
Proper hydration ensures the dough remains pliable and easy to shape later.
Testing Gluten Development
To confirm that kneading is complete, use one of the following tests:
The Windowpane Test
- Pinch off a small piece of dough.
- Gently stretch it between your fingers.
- If the dough stretches into a thin, translucent sheet without tearing, gluten is well-developed.
- If it tears easily, knead for another 2–3 minutes and test again.
The Poke Test
- Lightly flour a finger and press it into the dough.
- If the indentation slowly springs back, the gluten network is strong.
- If it remains indented, the dough needs more kneading.
By using these tests, you can ensure the dough is properly prepared for proofing and shaping.
Common Kneading Mistakes and How to Fix Them
Even with experience, bakers sometimes encounter kneading issues. Recognizing and fixing these problems early can lead to a better final result.
Dough is Too Sticky
Possible Causes:
- Excessive water in the mix.
- Insufficient flour during kneading.
How to Fix It:
- Lightly dust with flour and continue kneading.
- Let the dough rest for 5 minutes to absorb excess moisture before kneading again.
Dough is Too Dry
Possible Causes:
- Too much flour added too quickly.
- Insufficient hydration.
How to Fix It:
- Add warm water 1 teaspoon at a time while kneading.
- Knead thoroughly to allow the flour to fully hydrate.
Dough is Not Elastic Enough
Possible Causes:
- Under-kneading, leading to weak gluten formation.
- Using low-protein flour.
How to Fix It:
- Knead for a few more minutes and retest.
- If using all-purpose flour, add 1 teaspoon of vital wheat gluten per cup to improve elasticity.
Resting the Dough Before Proofing
After kneading, allowing the dough to rest improves extensibility, making it easier to shape.
How to Rest Dough Properly
- Lightly coat the dough with olive oil or butter to prevent drying.
- Place it in a greased mixing bowl.
- Cover with plastic wrap or a damp towel.
- Let it rest for 10–15 minutes before moving to proofing.
This brief resting period relaxes gluten, making the dough more workable.
Conclusion
Mastering mixing and kneading is essential for light, airy, and structured Hero Bread. Whether using a stand mixer or kneading by hand, ensuring proper gluten development is key to achieving the best texture. With these techniques, you can create consistently perfect bread that holds up well to fillings while remaining soft and chewy.
Now that the dough is ready, the next crucial step is proofing, where the yeast continues its work, expanding the dough and enhancing flavor. Let’s move on to the first rise and proofing process.
First Rise (Proofing)
Once the dough has been properly mixed and kneaded, it must go through proofing, also known as the first rise. This critical stage allows the yeast to ferment, producing the gas needed to make the dough expand and develop flavor. Proofing correctly is essential for achieving the light, airy texture that makes Hero Bread perfect for sub sandwiches. Without adequate proofing, the bread may turn out dense, flat, or lacking in depth of flavor.
Why Proofing Matters
During proofing, yeast continues to convert sugars into carbon dioxide and ethanol, which creates air pockets in the dough. The gluten network, developed during kneading, stretches to accommodate these gases, leading to a well-risen loaf with an even crumb.
What Happens During the First Rise?
- Yeast Activity – The yeast consumes sugars, releasing carbon dioxide that inflates the dough.
- Gluten Relaxation – The dough softens, making it easier to shape later.
- Flavor Development – Fermentation enhances the bread’s taste by producing organic acids and alcohols.
If proofing is too short, the dough won’t have enough gas to expand properly, resulting in a compact and heavy texture. On the other hand, if proofed for too long, the dough may over-ferment, causing it to collapse when baked.
Ideal Proofing Conditions
To proof successfully, the dough needs the right temperature, humidity, and time. Controlling these factors ensures that the yeast works efficiently without over- or under-proofing the dough.
Best Temperature for Proofing
- Warm Kitchen (Ideal Range: 75–85°F / 24–29°C) – Speeds up fermentation while keeping yeast active.
- Cooler Environment (Below 70°F / 21°C) – Slows down fermentation, resulting in more complex flavor.
- Too Hot (Above 90°F / 32°C) – Risks over-proofing, weakening the dough structure.
How to Create the Perfect Proofing Environment
If your kitchen is too cold, there are several ways to create a warm proofing area:
- Oven Method: Place the dough inside an off oven with the light on, which maintains a gentle warmth.
- Microwave Method: Heat a cup of water in the microwave for 2 minutes, then place the dough inside with the warm cup to create a humid environment.
- Boiling Water Method: Place a pan of boiling water on the lowest rack of the oven with the dough bowl above it.
- Proofing Box: If you bake often, a dough proofer provides a temperature-controlled environment for optimal results.
Maintaining consistent warmth is key, as temperature fluctuations can slow yeast activity or lead to uneven fermentation.
Choosing the Right Proofing Container
Dough needs ample space to expand while rising. The right container ensures even fermentation and prevents excessive drying.
Best Containers for Proofing
- Large Mixing Bowl – Provides enough room for expansion.
- Plastic Dough Container with Lid – Traps humidity, ensuring an even rise.
- Glass Bowl – Allows visibility to monitor fermentation progress.
Preparing the Dough for Proofing
- Lightly grease the bowl with oil or butter to prevent sticking.
- Place the kneaded dough into the bowl and turn it once to coat it with oil.
- Cover with plastic wrap, a damp towel, or a lid to prevent drying out.
- Set the bowl in a warm, draft-free area.
By lightly coating the dough with oil, you create a barrier that retains moisture, ensuring a soft and well-proofed dough.
How Long Should the First Rise Take?
The ideal proofing time depends on temperature and yeast activity.
Standard Proofing Time for Hero Bread
- Warm Kitchen (75–85°F / 24–29°C): 60–90 minutes.
- Cooler Kitchen (65–70°F / 18–21°C): 90–120 minutes.
- Cold Fermentation (Fridge, 40°F / 4°C): 8–12 hours (overnight).
Can You Overproof Dough?
Yes, leaving the dough to rise too long can lead to overproofing, which weakens the gluten structure. If the dough rises excessively, it may collapse during baking, resulting in a flat or dense loaf.
Signs of Overproofed Dough:
- Dough has more than doubled in size and starts to deflate.
- Air bubbles are too large, making the structure unstable.
- When pressed, the dough does not spring back.
If you accidentally overproof, gently punch down the dough and reshape it before a second rise. However, the final texture may not be as strong as properly proofed dough.
How to Check If Dough Has Risen Enough
Since proofing time can vary, it is important to check if the dough is properly fermented before moving to the next step.
The Poke Test
This simple test helps determine whether the dough has completed its first rise.
- Lightly dust your finger with flour.
- Press into the dough about ½ inch (1 cm) deep.
- Observe how the dough responds:
- If the indentation slowly springs back, the dough is proofed correctly.
- If the indentation stays, the dough may be overproofed.
- If the indentation fills back too quickly, the dough needs more time.
The Volume Test
A well-proofed dough should roughly double in size from its original state. To check:
- Mark the original dough height on the proofing bowl with tape.
- After the recommended time, visually inspect whether the dough has doubled.
- If it hasn’t, allow it to proof for another 15–20 minutes, then check again.
These tests ensure that the dough has proofed just enough to develop structure and flavor without becoming over-expanded.
Troubleshooting Common Proofing Issues
Even with careful monitoring, proofing problems can occur. Recognizing these issues early helps avoid poor results.
Dough is Rising Too Slowly
Possible Causes:
- The room is too cold.
- The yeast is old or inactive.
- There is not enough sugar to fuel fermentation.
How to Fix It:
- Move the dough to a warmer environment.
- Test the yeast by mixing a small amount with warm water and sugar to see if it foams.
- Extend proofing time if necessary.
Dough is Rising Too Fast
Possible Causes:
- The kitchen is too warm.
- Too much yeast was used.
How to Fix It:
- Move the dough to a cooler spot to slow fermentation.
- If overproofed, punch it down and reshape before the second rise.
Dough Has Developed a Dry Skin
Possible Causes:
- The dough was not properly covered.
- The kitchen has low humidity.
How to Fix It:
- Always cover the dough with plastic wrap or a damp towel.
- Lightly brush the dough with oil before covering to retain moisture.
What to Do After the First Rise
Once the dough has proofed correctly, it is ready for shaping. Before moving on, the dough should be punched down gently to release excess gas and redistribute the yeast for even fermentation.
How to Punch Down Dough Properly
- Lightly flour your hands.
- Press down gently on the center of the dough, pushing out large air bubbles.
- Fold the edges toward the center and turn the dough onto a work surface.
This step prevents overly large air pockets from forming in the final bread while maintaining some structure for shaping.
Conclusion
Proofing is a crucial step in developing the texture, flavor, and structure of Hero Bread. By ensuring the right temperature, humidity, and timing, you allow the dough to ferment properly, leading to a soft, chewy, and airy sub roll.
Key Takeaways
- Proper proofing develops flavor and structure.
- Temperature control ensures even fermentation.
- The poke and volume tests help determine readiness.
- Punching down redistributes yeast for the next rise.
Now that the dough has successfully completed its first rise, the next step is shaping the Hero Bread into sub-style loaves before the final proofing and baking process. Let’s move on to the shaping techniques for perfect sub rolls.
Shaping the Hero Bread
Achieving the perfect sub roll shape is crucial for ensuring a well-structured, evenly baked, and visually appealing Hero Bread. This step directly influences the final texture, determining whether the bread will be light and airy or dense and uneven. Proper shaping also ensures that the rolls rise uniformly, bake evenly, and hold sandwich fillings without falling apart.
Why Shaping is a Critical Step
Shaping plays an essential role in both structure and texture. Without proper shaping techniques, the dough may spread too much, resulting in flat, irregular rolls that do not hold their shape during baking. Conversely, overworking the dough during shaping can result in an overly tight crumb, making the bread tough instead of soft and chewy.
The Key Benefits of Proper Shaping
- Even Distribution of Air Pockets – Creates a light, airy interior without large, irregular holes.
- Strong Gluten Network – Ensures the dough holds its shape while allowing for proper expansion.
- Better Oven Spring – Improves rise during baking, making the bread fluffy yet sturdy.
- Uniform Shape – Provides a professional look, ensuring consistency in sandwich preparation.
Since shaping influences every aspect of the final bread, it must be done carefully and correctly.
Preparing the Dough for Shaping
Before beginning the shaping process, the dough must be properly prepared to ensure a smooth, effortless workflow.
Setting Up the Work Area
A clean, well-prepared surface prevents sticking and allows for better dough handling.
Essential Tools for Shaping
- Bench Scraper – Helps divide the dough without tearing.
- Flour or Cornstarch – Prevents the dough from sticking to the surface.
- Rolling Pin (Optional) – Assists in flattening dough evenly.
- Sharp Knife or Dough Lame – Necessary for scoring before baking.
Handling the Dough Correctly
Before shaping, the dough should be gently removed from the proofing bowl. Handling it with care prevents unnecessary deflation, allowing the bread to maintain its lightness.
Steps to Prepare Dough for Shaping
- Lightly dust the work surface with flour to prevent sticking.
- Gently transfer the dough from the bowl, avoiding excessive handling.
- Punch down the dough slightly to release excess air, but be careful not to over-deflate.
- Divide the dough into equal portions using a bench scraper or a sharp knife.
Ensuring Uniform Dough Portions
For consistent sub rolls, each dough portion should be measured precisely.
- Use a kitchen scale to weigh each piece.
- Target 200–250 grams per portion, depending on the desired roll size.
- Keeping each roll uniform helps with even baking and proper rise.
After portioning, the next step is pre-shaping the dough.
Pre-Shaping the Dough
Before the final shaping, pre-shaping helps organize gluten strands, making the dough easier to work with and ensuring a consistent crumb structure.
Why Pre-Shaping is Important
- Prepares the dough for final shaping by giving it an initial structure.
- Aligns the gluten network, preventing tearing and irregular holes.
- Allows the dough to relax, making final shaping smoother.
How to Pre-Shape Sub Rolls
Forming a Basic Log Shape
- Take one dough portion and place it on the floured surface.
- Flatten it gently into a rectangular shape about 6 inches long.
- Fold the bottom third of the rectangle upward toward the center.
- Fold the top third downward, overlapping the first fold.
- Press the seam gently to seal the dough into a rough log shape.
Allowing the Dough to Rest
- Place the pre-shaped dough seam-side down on the work surface.
- Cover with a towel or plastic wrap to prevent drying.
- Let the dough rest for 10–15 minutes before final shaping.
This resting period relaxes the dough, making it easier to stretch and roll into its final shape.
Final Shaping Techniques for Hero Bread
Once the dough has rested, it is time to give it its final sub roll shape. This step ensures the bread bakes evenly, rises properly, and develops a professional look.
The Classic Sub Roll Shaping Method
Flattening for Even Structure
- Take a pre-shaped dough portion and place it on a lightly floured surface.
- Flatten it gently into a rectangle about 8 inches long and 3 inches wide.
- Make sure the dough is evenly thick, with no thin spots that could cause uneven baking.
Rolling and Sealing for Proper Shape
- Starting from the top edge, tightly roll the dough toward yourself.
- With each roll, press gently but firmly to create surface tension.
- Once rolled, pinch the seam closed to prevent unraveling.
- Taper the ends slightly by rolling them with light pressure for a more natural shape.
Alternative Shaping Styles
Depending on preference, the dough can also be shaped differently to achieve different textures and crust finishes.
Baguette-Style Rolls
- Roll the dough longer and thinner for a crispier crust.
- Score with diagonal slashes to encourage better oven expansion.
Ciabatta-Style Rolls
- Use a high-hydration dough and handle it minimally to maintain an open crumb.
- Instead of rolling, shape with gentle stretching and folding.
Hoagie Roll Style
- Flatten the dough slightly more before rolling to create a denser texture.
- Perfect for heavier sandwich fillings like steak or grilled vegetables.
Once shaped, the rolls are ready for their final proofing before baking.
Final Proofing Before Baking
The last proofing stage allows the dough to rise one final time, ensuring that the bread has the right structure and lightness before hitting the oven.
How to Proof Shaped Sub Rolls
Proper Proofing Conditions
- Place the shaped rolls seam-side down on a baking sheet.
- Cover loosely with a towel or plastic wrap to prevent drying.
- Let them proof for 30–45 minutes, or until they increase in size by about 50%.
Checking for Proper Proofing
Use the poke test to see if the dough is ready to bake.
- Press a lightly floured finger into the dough.
- If the indentation springs back slowly, the rolls are fully proofed.
- If it springs back quickly, they need more time.
- If the indentation stays deep, the dough is over-proofed and should be baked immediately.
After proofing, the final step before baking is scoring the dough.
Scoring for Controlled Expansion
Before placing the bread in the oven, scoring controls expansion and ensures an even crust development.
How to Score Hero Bread Properly
Using a Bread Lame or Sharp Knife
- Hold the blade at a 45-degree angle.
- Make a single, long slash down the center of each roll.
- If a more rustic look is preferred, make diagonal slashes instead.
Scoring not only gives the bread a professional look, but it also allows for proper oven spring.
Common Shaping Mistakes and How to Fix Them
Even with experience, bakers sometimes encounter issues during shaping. Identifying and correcting them ensures consistent, high-quality results.
Dough Spreads Too Much After Shaping
Possible Causes
- Under-kneaded dough with weak gluten structure.
- Over-proofing during the first rise.
How to Fix It
- Reduce first proofing time by 10–15 minutes.
- Perform a light kneading session before shaping.
Conclusion
Mastering shaping techniques ensures perfectly structured, bakery-quality Hero Bread. By following precise rolling, sealing, and proofing methods, you can create consistently shaped sub rolls that bake evenly, rise beautifully, and hold up well to fillings.
Now that the rolls are shaped and proofed, the final step is baking them to achieve a crisp, golden crust and a soft, flavorful interior. Let’s move on to baking techniques for Hero Bread.
Baking for a Crispy Crust
Achieving the perfect crispy crust on Hero Bread is essential for creating a bakery-quality sub roll. While the dough preparation and shaping stages lay the foundation, the baking process ultimately determines the final texture, crust thickness, and overall mouthfeel. To ensure optimal results, careful attention must be given to oven temperature, steam control, baking time, and cooling methods.
Understanding the Science Behind a Crispy Crust
Baking is much more than just cooking the dough. Several key processes take place inside the oven that affect the final texture of Hero Bread.
How the Crust Forms During Baking
- Moisture Evaporation – As the bread bakes, water within the dough turns into steam, drying out the surface and creating a crisp exterior.
- Gelatinization of Starches – The outer layer of the dough forms a protective crust as starches break down and interact with heat.
- Maillard Reaction – The combination of heat and sugars in the dough produces a golden-brown crust with deep flavor.
To create a thin yet crispy crust, it is important to control baking temperature, humidity, and airflow throughout the process.
Preheating the Oven for Maximum Heat Retention
A properly preheated oven ensures that the bread bakes evenly, rises well, and develops a strong crust.
Best Temperature for Baking Hero Bread
- 425°F (218°C) – Recommended for a balanced crispiness and soft interior.
- 450°F (232°C) – Ideal for a darker, crunchier crust.
- 400°F (204°C) – Produces a slightly softer crust with a more delicate bite.
Why Preheating is Essential
- Helps maintain a consistent baking environment.
- Ensures an immediate reaction in the dough for better oven spring.
- Prevents underbaking and uneven browning.
How to Preheat the Oven Properly
- Set the oven to 425°F (218°C) at least 30 minutes before baking.
- If using a baking stone or baking steel, place it inside during preheating to mimic a professional bread oven.
- Position an empty metal pan or cast-iron skillet on the bottom rack to generate steam later.
Using Steam for a Crispier Crust
Creating steam in the oven helps delay crust formation, allowing the bread to expand fully before the exterior sets. This process leads to a crisper, thinner crust with superior oven spring.
Why Steam is Important for Hero Bread
- Keeps the surface moist, allowing the bread to rise properly.
- Enhances the Maillard reaction, leading to a richer color and flavor.
- Prevents premature crust formation, ensuring even expansion.
Best Steam Methods for a Crisp Crust
Using a Steam Pan (Recommended Method)
- Place a cast-iron skillet or metal baking pan on the bottom oven rack during preheating.
- Right after placing the dough in the oven, pour 1 cup of boiling water into the hot pan.
- Quickly close the oven door to trap the steam inside.
Spraying the Oven Walls with Water
- Use a spray bottle filled with warm water.
- Immediately after placing the bread in the oven, spray the oven walls 4–5 times.
- Repeat after 5 minutes to maintain humidity.
Placing Ice Cubes in a Hot Pan
- Just before baking, drop 6–8 ice cubes into a preheated metal pan.
- The ice will gradually melt, releasing controlled steam for the first 10 minutes.
Each method ensures that the crust remains flexible during the early baking stage, allowing for better oven spring before crisping up.
Positioning the Bread for Even Baking
Where you place the bread in the oven affects heat distribution, crust development, and overall texture.
Best Oven Rack Placement for Sub Rolls
- Middle Rack – Ideal for balanced heat distribution and uniform crust formation.
- Lower Rack with Baking Stone – Great for achieving a crisp bottom crust.
- Top Rack (Not Recommended) – Can cause excessive browning before the inside is fully baked.
Rotating for Even Browning
- Halfway through baking, rotate the baking sheet 180 degrees.
- This prevents hot spots and ensures consistent coloring across all rolls.
Baking Time and Temperature Adjustments
Different temperatures and baking times yield slightly different crust textures.
Recommended Baking Times Based on Temperature
- 425°F (218°C) – 20 to 25 minutes for a golden, crisp crust.
- 450°F (232°C) – 22 to 27 minutes for a darker, crunchier exterior.
- 400°F (204°C) – 18 to 22 minutes for a softer crust with a tender bite.
Checking for Doneness
Determining when the bread is fully baked ensures that it has the right texture and structure.
How to Know When Hero Bread is Done Baking
Visual Indicators
- The crust should be deep golden brown with slight cracking.
- The surface should be firm and set, not soft or pale.
Tap Test for Hollow Sound
- Remove one roll from the oven and tap the bottom crust with your fingertips.
- If it sounds hollow, the bread is fully baked.
- If it sounds dull or dense, bake for an additional 3–5 minutes.
Using an Instant-Read Thermometer
- Insert a thermometer into the center of the loaf.
- The internal temperature should read 195–200°F (90–93°C).
Using multiple methods ensures the bread is neither undercooked nor overbaked.
Cooling the Bread to Set the Crust
Cooling the bread properly is just as important as baking. If cooled incorrectly, the crust can soften due to trapped steam.
Best Cooling Practices for a Crisp Crust
Using a Wire Cooling Rack
- Transfer the rolls immediately from the baking sheet to a wire rack.
- A wire rack prevents moisture buildup, keeping the crust crisp.
- Let the bread cool for at least 30 minutes before slicing.
Preventing a Soft Crust After Baking
- For extra crispiness, turn off the oven and let the bread sit inside with the door slightly open for 5 minutes.
- This allows excess moisture to escape gradually, keeping the crust firm.
Common Baking Mistakes and How to Fix Them
Even with careful preparation, certain issues can arise. Recognizing and correcting these mistakes ensures consistent, high-quality results.
Crust is Too Soft After Baking
Possible Causes
- Not enough steam in the oven.
- Bread cooled on a solid surface instead of a wire rack.
How to Fix It
- Increase steam during the first 10 minutes of baking.
- Always use a wire rack to prevent trapped moisture.
Bread is Too Dense or Didn’t Rise Well
Possible Causes
- Under-proofed dough.
- Oven temperature too low, preventing proper expansion.
How to Fix It
- Allow bread to proof longer before baking.
- Ensure the oven is fully preheated to 425°F (218°C).
Conclusion
Mastering baking techniques is essential for creating Hero Bread with a crispy, golden-brown crust and a light, airy crumb. By following precise heat control, steam methods, and cooling techniques, you can consistently bake professional-quality sub rolls that surpass store-bought options.
Now that the bread is fully baked, the final step is storing and serving it properly to maintain freshness and quality. Let’s move on to storing and serving Hero Bread for maximum enjoyment.

3. Common Hero Bread Mistakes (And How to Fix Them)
Dense or Gummy Texture
A properly baked Hero Bread should be light, airy, and slightly chewy, making it the perfect foundation for sandwiches. However, if the texture turns out dense, gummy, or overly tough, it affects both the taste and usability of the bread. To avoid this issue, understanding the key factors that contribute to density and gumminess is essential. These issues often arise due to inadequate gluten development, improper fermentation, hydration imbalances, or incorrect baking techniques.
Understanding the Causes of a Dense or Gummy Texture
A dense crumb or a gummy interior can be traced back to mistakes in either the dough preparation, fermentation, or baking process. Identifying the root cause will help in making the necessary corrections to achieve a light, fluffy, and perfectly textured Hero Bread.
Key Factors That Lead to a Dense or Gummy Crumb
- Insufficient Kneading – Weak gluten formation prevents proper gas retention, resulting in a dense crumb.
- Over or Under-Proofing – Affects the dough’s rise, leading to poor structure and uneven air pockets.
- Incorrect Hydration – Too much moisture creates a gummy interior, while too little results in a compact loaf.
- Low Oven Temperature – Prevents proper expansion, causing the bread to bake unevenly.
- Inadequate Baking Time – Bread that is removed too soon remains wet and sticky inside.
To resolve these issues, it is necessary to first analyze the symptoms and determine which stage of the baking process needs improvement.
Recognizing the Signs of Dense or Gummy Bread
A bread’s crumb structure and moisture content can reveal what went wrong during preparation. Examining the final result closely will provide valuable insights into what adjustments need to be made.
Common Symptoms and Their Causes
Bread Feels Heavy and Compact
- Primary Cause: Weak gluten network due to insufficient kneading.
- Solution: Extend the kneading process and perform a windowpane test to verify gluten strength.
Why Is Bread Moist and Sticky Inside?
- Primary Cause: Underbaking, causing excess moisture retention.
- Solution: Increase the baking time by 5–10 minutes and use a thermometer to check doneness.
Bread Collapses or Flattens After Cooling
- Primary Cause: Over-proofing weakens the structure, leading to deflation.
- Solution: Shorten proofing time and use the poke test to determine readiness before baking.
Since each issue stems from a specific mistake, making precise corrections will significantly improve the final outcome.
Fixing Dense or Gummy Hero Bread
Making adjustments at every stage of the process ensures a more structured, lighter crumb with better elasticity and volume.
Enhancing Gluten Development
A strong gluten network is essential for holding air pockets and creating a well-structured crumb. When gluten is underdeveloped, the dough lacks the necessary elasticity to support a proper rise.
Techniques to Strengthen Gluten Formation
Increase Kneading Duration
- Knead for at least 10–15 minutes by hand or 5–7 minutes in a stand mixer using a dough hook.
- If the dough feels loose and sticky, continue kneading until it becomes smooth and elastic.
Perform the Windowpane Test
- Take a small piece of dough and stretch it between your fingers.
- If it forms a thin, see-through sheet without tearing, the gluten is fully developed.
- If the dough tears easily, continue kneading for another 2–3 minutes, then test again.
Use the Right Type of Flour
- Bread flour (12–14% protein) is best for structure and elasticity.
- If using all-purpose flour, add 1 teaspoon of vital wheat gluten per cup for additional strength.
With proper gluten formation, the dough can effectively trap gas, expand evenly, and produce a soft yet structured bread.
Balancing Proofing Time for Optimal Rise
Proofing plays a crucial role in developing flavor, volume, and crumb texture. However, both under-proofing and over-proofing can negatively impact the final result.
Correcting Under-Proofed Dough
Signs of Under-Proofing
- Dough springs back quickly when pressed.
- The crumb is tight with very few air pockets.
- Bread does not rise much during baking.
Solution
- Extend the proofing time by 15–30 minutes, ensuring that the dough doubles in size before baking.
- Maintain a warm, draft-free environment between 75–85°F (24–29°C) for consistent fermentation.
- Use a proofing box or warmed oven to speed up yeast activity in colder kitchens.
Correcting Over-Proofed Dough
Signs of Over-Proofing
- Dough deflates when touched or collapses after baking.
- Bread develops large, irregular air pockets inside.
- The crust appears wrinkled or weak.
Solution
- Reduce proofing time and check readiness with the poke test.
- If over-proofed, gently reshape the dough and allow for a shorter second rise.
By adjusting fermentation time properly, the dough will maintain better gas retention and structural integrity during baking.
Adjusting Dough Hydration for Ideal Texture
Water absorption impacts the bread’s elasticity, chewiness, and final crumb structure. If hydration is off, it can lead to a gummy, dense, or dry loaf.
Fixing Over-Hydrated Dough
Signs of Too Much Water
- Dough is excessively sticky and difficult to shape.
- The interior crumb appears wet and gummy after baking.
Solution
- Gradually incorporate 1–2 tablespoons of flour while kneading.
- Ensure even mixing to allow proper absorption.
Fixing Under-Hydrated Dough
Signs of Too Little Water
- Dough feels stiff, resistant to stretching.
- Bread turns out dense and heavy with minimal air pockets.
Solution
- Slowly add 1 teaspoon of water at a time, kneading well between each addition.
- Allow the dough to rest for 5 minutes to ensure full absorption.
Finding the right hydration balance creates a more extensible dough with the perfect texture.
Baking at the Correct Temperature
Proper oven conditions ensure the bread rises fully, sets correctly, and achieves the desired texture.
Fixing Underbaked Bread
Signs of Undercooking
- The crust is pale and soft.
- The inside remains wet and sticky.
Solution
- Extend baking time by 5–10 minutes and check doneness with a thermometer.
- Ensure the oven is fully preheated to 425°F (218°C) before placing the bread inside.
Fixing Overbaked Bread
Signs of Overbaking
- The crust is too thick and hard.
- The crumb lacks moisture and softness.
Solution
- Lower the baking temperature by 10–15°F and closely monitor the baking process.
- Remove the bread when the internal temperature reaches 195–200°F (90–93°C).
By fine-tuning oven settings, you can achieve a fully baked interior with a perfectly crisp crust.
Conclusion
A dense or gummy texture in Hero Bread is often the result of mistakes in kneading, proofing, hydration, or baking temperature. By addressing these factors, you can consistently achieve a light, airy, and well-structured loaf that enhances any sandwich.
Key Takeaways
- Knead the dough thoroughly to ensure a strong gluten network.
- Proof the dough for the correct amount of time to avoid collapsing or compactness.
- Adjust hydration levels to balance dough extensibility and structure.
- Bake at the right temperature to prevent undercooking or excessive moisture retention.
By making these adjustments, you will produce perfectly textured Hero Bread every time. Now that texture concerns have been addressed, the next step is storing Hero Bread properly to maintain freshness and quality.
Bread Doesn’t Rise Properly
A well-risen Hero Bread is essential for achieving a light, airy texture with a soft yet structured crumb. However, if the dough fails to rise properly, the bread may turn out dense, flat, or lacking volume. This issue can stem from inactive yeast, incorrect proofing conditions, weak gluten development, or poor shaping techniques. Therefore, understanding the potential causes and implementing the right solutions will ensure a successful rise and a bakery-quality loaf.
Understanding Why Bread Fails to Rise
For bread to rise correctly, the yeast must produce enough carbon dioxide to expand the dough, while the gluten network must be strong enough to trap these gas bubbles. If either factor is compromised, the dough will not achieve the necessary volume.
Key Reasons Why Dough Doesn’t Rise Properly
- Dead or Inactive Yeast – If the yeast is expired or not activated correctly, fermentation will not occur.
- Improper Proofing Conditions – Temperature and humidity levels directly affect yeast activity.
- Weak Gluten Structure – If gluten is underdeveloped, the dough cannot hold gas efficiently.
- Incorrect Hydration – Too much or too little water affects elasticity and fermentation.
- Overworked or Overproofed Dough – If gluten is over-kneaded or the dough is proofed too long, gas retention weakens.
Since each of these factors contributes to the bread’s ability to rise, identifying the specific issue is crucial for making the right adjustments.
Identifying the Cause of Poor Dough Rise
To diagnose why the bread didn’t rise properly, examine the dough’s texture, elasticity, and yeast activity.
Common Symptoms and Their Causes
Dough Remains Flat and Dense After Proofing
- Primary Cause: Yeast is inactive or proofing conditions are inadequate.
- Solution: Test yeast freshness and adjust proofing temperature.
Why Dough Rises Slowly or Unevenly
- Primary Cause: Cold kitchen temperature slows fermentation.
- Solution: Move the dough to a warmer, humid environment to encourage yeast activity.
Dough Rises Initially but Then Collapses
- Primary Cause: Over-proofing weakens the structure, causing deflation.
- Solution: Reduce proofing time and perform the poke test to determine readiness.
By carefully observing these signs, adjustments can be made to ensure the dough reaches optimal fermentation and structure.
Fixing Dough That Doesn’t Rise Properly
To encourage proper rising, adjustments must be made at each stage of the bread-making process, from yeast activation to final proofing.
Ensuring Active and Healthy Yeast
Yeast is the primary leavening agent in Hero Bread, meaning it must be active and strong enough to create sufficient gas production.
Testing Yeast for Freshness
How to Check If Yeast is Still Active
- In a small bowl, combine ½ cup of warm water (100–110°F / 38–43°C), 1 teaspoon sugar, and 1 packet (2¼ teaspoons) of yeast.
- Stir gently and let it sit for 5–10 minutes.
- If the mixture becomes foamy and expands, the yeast is active.
- If there is no foam or bubbles, discard the yeast and use a fresh packet.
Using the Right Yeast Type
- Active Dry Yeast – Must be proofed in warm water before adding to the dough.
- Instant Yeast – Can be mixed directly into the flour but still benefits from warm liquids.
- Fresh Yeast (Cake Yeast) – More perishable and requires activation in liquid.
Using high-quality yeast ensures a strong rise and consistent fermentation.
Optimizing Proofing Conditions
The environment in which dough is proofed directly affects how well it rises. Cold temperatures slow down yeast activity, while excessive heat can kill yeast, preventing proper fermentation.
Ideal Proofing Conditions
Best Temperature for Dough Rising
- 75–85°F (24–29°C) – Ideal for consistent yeast activity.
- Below 70°F (21°C) – Slows fermentation, requiring longer proofing times.
- Above 95°F (35°C) – Can kill yeast, stopping dough expansion.
How to Create a Warm Proofing Environment
- Oven Method: Place the dough in an off oven with the oven light on for gentle warmth.
- Microwave Method: Heat a cup of water in the microwave for 2 minutes, then place the covered dough inside to create a humid environment.
- Steam Proofing: Place the dough near a bowl of hot water inside a closed oven to maintain warmth.
Ensuring a stable proofing temperature helps achieve optimal yeast activity and dough expansion.
Strengthening Gluten for Better Gas Retention
Even if yeast produces enough carbon dioxide, the dough must be strong enough to trap and retain gas bubbles for a proper rise. Weak gluten results in flat, dense bread.
Techniques to Improve Gluten Development
Increase Kneading Time
- Knead the dough for at least 10–15 minutes by hand or 5–7 minutes in a stand mixer.
- The dough should feel smooth, elastic, and slightly tacky.
Perform the Windowpane Test
- Take a small piece of dough and stretch it between your fingers.
- If it forms a thin, see-through sheet without tearing, gluten is fully developed.
- If it tears too easily, knead for another 2–3 minutes and test again.
Use High-Protein Flour for Better Structure
- Bread flour (12–14% protein) builds a stronger gluten network than all-purpose flour.
- If using all-purpose flour, add 1 teaspoon of vital wheat gluten per cup of flour for additional strength.
With a properly developed gluten network, the dough will hold gas more effectively, allowing it to rise fully.
Adjusting Hydration Levels for Proper Elasticity
Water absorption affects the dough’s strength and elasticity, impacting how well it rises. The right balance ensures that the dough has enough extensibility to expand without tearing.
Fixing Overly Wet Dough
Signs of Too Much Hydration
- Dough is excessively sticky and hard to shape.
- Bread has a dense, gummy texture after baking.
Solution
- Gradually add 1–2 tablespoons of flour while kneading to adjust consistency.
- Mix thoroughly to ensure even water distribution.
Fixing Dry or Stiff Dough
Signs of Too Little Water
- Dough tears easily and does not expand well.
- The final bread is dense with minimal air pockets.
Solution
- Slowly incorporate 1 teaspoon of water at a time, kneading well between additions.
- Allow the dough to rest for 5 minutes to ensure full absorption.
Balancing hydration results in a more extensible dough with an improved rise.
Baking at the Correct Temperature for Maximum Expansion
Even if the dough rises properly during proofing, incorrect baking conditions can cause it to flatten or not expand fully in the oven.
How to Improve Oven Spring
Signs of Insufficient Oven Spring
- Bread rises during proofing but remains flat after baking.
- The crust forms too early, preventing further expansion.
Solution
- Ensure the oven is fully preheated to 425°F (218°C) before baking.
- Use steam in the first 10 minutes to delay crust formation and allow for expansion.
- Bake on a preheated baking stone or steel for better heat transfer.
By managing oven conditions, the bread achieves a final burst of rise and a well-formed structure.
Conclusion
When Hero Bread fails to rise properly, the issue typically lies in yeast activity, proofing conditions, gluten strength, hydration levels, or baking temperature. Addressing these factors leads to a well-risen, soft, and airy loaf with the perfect structure for sandwiches.
Key Takeaways
- Use fresh, active yeast and proof it properly before adding to the dough.
- Control proofing conditions to maintain ideal fermentation temperatures.
- Develop strong gluten to trap gas effectively.
- Ensure proper hydration levels for extensibility and rise.
- Preheat the oven and use steam to improve final expansion.
Now that the bread has achieved the perfect rise, the next step is enhancing crust formation for a golden, bakery-style finish.
Cracked or Pale Crust
A golden, crispy crust is one of the defining characteristics of a well-baked Hero Bread. However, if the crust turns out pale, cracked, or unevenly colored, the overall quality and texture of the bread may be compromised. Since the crust serves as both a protective layer and a flavor-enhancer, ensuring its proper development is crucial. The appearance, texture, and evenness of the crust are influenced by proofing, oven temperature, steam levels, and baking duration.
Understanding the Causes of Cracked or Pale Crust
The Maillard reaction, which is responsible for the bread’s golden-brown color, occurs when heat interacts with proteins and sugars in the dough. If this process is disrupted due to incorrect temperature control, moisture levels, or baking conditions, the crust may fail to develop properly.
Key Factors That Cause Cracked or Pale Crust
- Insufficient Steam – A lack of steam prevents the crust from expanding properly, leading to cracking.
- Low Baking Temperature – If the oven is too cool, the crust will not brown as expected.
- Over-Proofing or Under-Proofing – Improper fermentation affects the final texture and elasticity of the dough.
- Incorrect Scoring Technique – Deep, uneven, or missing cuts in the dough can cause random cracking.
- Cooling Too Quickly – A rapid change in temperature causes the crust to shrink and crack.
Since multiple factors contribute to crust formation and coloration, analyzing the symptoms carefully will help pinpoint the issue.
Identifying the Cause of a Cracked or Pale Crust
Observing how the crust reacts during baking and cooling can help determine what went wrong.
Common Symptoms and Their Causes
Crust Develops Random Cracks After Baking
- Primary Cause: The dough was either under-proofed or did not receive enough steam.
- Solution: Allow proper proofing time and introduce steam in the first 10 minutes of baking.
Why the Crust Looks Pale and Underdeveloped
- Primary Cause: The oven temperature was too low or baking time was too short.
- Solution: Increase oven temperature to 425°F (218°C) and extend baking time if necessary.
Crust Has Uneven or Patchy Coloration
- Primary Cause: Inconsistent heat distribution or uneven egg wash application.
- Solution: Rotate the baking sheet halfway through baking and apply a uniform egg wash before baking.
Fixing Cracked or Pale Crust on Hero Bread
Making precise adjustments to the proofing, baking, and cooling processes will ensure the crust turns out evenly golden, crisp, and crack-free.
Creating the Right Baking Conditions for Crust Formation
Proper heat and moisture levels inside the oven determine how the crust develops. Managing these factors correctly will result in a consistent, professional-quality crust.
Ensuring the Correct Oven Temperature
Why Temperature Matters
- A temperature too low (below 400°F / 204°C) prevents browning and produces a pale crust.
- A temperature too high (above 450°F / 232°C) may burn the crust before the inside is fully baked.
Best Temperature for Baking Hero Bread
- 425°F (218°C) – Ideal for an evenly browned crust with a crispy texture.
- 450°F (232°C) – Produces a darker, crunchier crust but requires careful monitoring.
- 400°F (204°C) – Results in a softer crust, better for lighter sandwich bread.
How to Ensure Even Heat Distribution
- Preheat the oven for at least 30 minutes before baking.
- If using a baking stone or steel, place it in the oven during preheating to retain heat.
- Rotate the baking sheet halfway through baking to prevent uneven browning.
By controlling oven temperature properly, the bread will develop a rich, golden color with a uniform crust.
Using Steam to Prevent Cracking and Enhance Color
Steam is crucial during the first few minutes of baking because it keeps the crust flexible, allowing for proper oven spring before hardening. Without steam, the crust can set too quickly, leading to random cracks and a tough exterior.
Best Steam Techniques for Hero Bread
Steam Pan Method (Recommended)
- Place a metal baking pan or cast-iron skillet on the bottom oven rack during preheating.
- Once the bread is in the oven, pour 1 cup of boiling water into the hot pan.
- Quickly close the oven door to trap the steam inside.
Spraying the Oven Walls with Water
- Fill a spray bottle with warm water.
- Right after placing the bread in the oven, spray the oven walls 4–5 times.
- Repeat after 5 minutes to maintain moisture levels.
Using Ice Cubes for Gradual Steam Release
- Place 6–8 ice cubes into a preheated metal pan just before baking.
- The ice will melt slowly, providing sustained steam for 10 minutes.
Steam not only prevents cracks but also improves crust color by allowing sugars to caramelize evenly.
Improving Proofing Techniques to Avoid Cracks
Proofing plays a key role in the final texture of the crust. If the dough is under-proofed, it will expand too quickly in the oven and crack. If over-proofed, it may not expand enough, leading to a pale crust.
How to Fix Under-Proofed Dough
Signs of Under-Proofing
- The dough springs back immediately when pressed.
- The crust cracks randomly during baking.
Solution
- Allow the dough to proof 15–30 minutes longer until it doubles in size.
- Maintain a warm, draft-free environment between 75–85°F (24–29°C).
- Use the poke test – gently press the dough; if it springs back slowly, it is ready to bake.
How to Fix Over-Proofed Dough
Signs of Over-Proofing
- The dough collapses slightly before baking.
- The crust turns out pale with a wrinkled texture.
Solution
- Reduce proofing time and use the poke test to confirm readiness.
- If over-proofed, gently reshape the dough, then proof for a shorter period.
By ensuring proper proofing, the crust will be smooth, well-formed, and resistant to cracking.
Scoring the Dough Correctly to Control Expansion
Scoring helps control how the bread expands in the oven, preventing random cracks. If the dough is not scored, pressure builds up inside, forcing the crust to split unpredictably.
Best Scoring Techniques for Hero Bread
Using a Bread Lame or Sharp Knife
- Hold the blade at a 45-degree angle.
- Make a single, long slash down the center of each roll.
- If a more rustic look is desired, make diagonal slashes instead.
Proper scoring ensures the bread expands evenly without cracking in unwanted areas.
Applying an Egg Wash for a Richer, Shinier Crust
If the crust looks pale or dull, applying a wash before baking enhances color and texture.
Best Washes for a Golden Crust
- Egg Wash (1 egg + 1 tbsp water) – Creates a deep golden, glossy crust.
- Milk Wash (Whole Milk or Cream) – Adds color but keeps the crust softer.
- Butter Wash (Brushed After Baking) – Enhances flavor while giving a slight shine.
For even color distribution, apply the wash lightly and evenly with a pastry brush.
Conclusion
A cracked or pale crust results from poor proofing, lack of steam, incorrect baking temperature, or improper scoring. By making the necessary adjustments, you can achieve a smooth, golden, and evenly baked crust that enhances both texture and appearance.
Key Takeaways
- Use steam to keep the crust flexible and prevent cracks.
- Ensure proper proofing to control expansion and structure.
- Bake at the correct temperature to achieve a golden-brown crust.
- Score the dough properly to prevent uncontrolled cracking.
- Apply an egg wash for a more appealing color and shine.
Now that the crust is perfected, the next step is storing Hero Bread correctly to maintain its freshness and texture.

4. Hero Bread Variations & Dietary Adaptations
For those with dietary preferences, there are several Hero Bread variations to explore. If you need a gluten-free option, try a soft and fluffy gluten-free sandwich bread using a blend of gluten-free flours (source).
Gluten-Free Hero Bread
For those who follow a gluten-free diet due to celiac disease, gluten sensitivity, or personal preference, making gluten-free Hero Bread at home ensures better control over ingredients, texture, and taste. However, baking gluten-free bread comes with unique challenges, as gluten is responsible for elasticity, structure, and chewiness in traditional bread. Without it, the dough lacks binding strength and gas retention, often resulting in a crumbly or dense loaf. Therefore, mastering alternative flours, binding agents, and proofing techniques is essential to achieve light, airy, and flavorful gluten-free Hero Bread.
Understanding the Challenges of Gluten-Free Bread
Traditional bread relies on gluten to provide strength, elasticity, and a proper rise. Without gluten, the dough does not stretch or trap gas efficiently, often leading to a compact, dry, or gummy texture. Thus, gluten-free baking requires special techniques and ingredient adjustments to mimic gluten’s role.
Key Challenges in Gluten-Free Bread Baking
- Lack of Elasticity – Without gluten, the dough lacks stretch and structure.
- Weak Gas Retention – Traditional yeast fermentation does not work the same way in gluten-free flour.
- Crumbly Texture – Without proper binders, the bread may fall apart easily.
- Difficulty in Achieving a Good Rise – Gluten-free doughs tend to be denser.
- Dryness or Gumminess – Improper hydration leads to poor texture.
To overcome these challenges, it is important to use the right flour blend, binding agents, and moisture balance while incorporating effective baking techniques.
Choosing the Right Ingredients for Gluten-Free Hero Bread
Since no single gluten-free flour can fully replace wheat flour, using a blend of flours and starches is necessary to achieve the right structure, texture, and taste.
Best Gluten-Free Flour Alternatives
Primary Flours for Structure and Flavor
- Brown Rice Flour – Provides a mild, nutty flavor with good structure.
- Sorghum Flour – Adds protein and a wheat-like taste.
- Almond Flour – Enhances moisture while giving a slight chewiness.
- Teff Flour – Offers a slightly earthy, complex flavor.
Starches for Softness and Binding
- Tapioca Starch – Improves chewiness and mimics gluten’s elasticity.
- Potato Starch – Lightens the texture and helps create a tender crumb.
- Cornstarch – Adds crispiness to the crust.
Binding Agents to Replace Gluten
To hold the dough together, gluten-free breads require additional binding agents that mimic the stretch and elasticity of gluten.
- Xanthan Gum – Improves elasticity and helps the dough rise better.
- Psyllium Husk Powder – Absorbs moisture and creates a flexible, chewy texture.
- Ground Flaxseed or Chia Seeds – When mixed with water, they form a gel that acts as a natural binder.
- Eggs or Aquafaba – Provide structure and aid in leavening.
Using a combination of gluten-free flours, starches, and binding agents helps create a balanced dough with better rise, texture, and taste.
Step-by-Step Gluten-Free Hero Bread Recipe
Since gluten-free doughs behave differently from wheat-based doughs, the mixing, kneading, and proofing methods need slight modifications.
Mixing the Dough
Key Adjustments for Gluten-Free Dough
- Unlike regular dough, gluten-free dough does not require kneading, as there is no gluten to develop.
- Hydration is higher in gluten-free baking to compensate for the lack of gluten elasticity.
- Instead of forming a traditional dough ball, gluten-free dough has a thick batter-like consistency.
Steps for Proper Mixing
- In a bowl, combine dry ingredients:
- 2 cups gluten-free all-purpose flour blend
- ½ cup tapioca starch
- 1 tablespoon psyllium husk powder (or 1 teaspoon xanthan gum)
- 1 teaspoon salt
- In a separate bowl, mix the wet ingredients:
- 1½ cups warm water (100–110°F / 38–43°C)
- 2 teaspoons instant yeast
- 1 tablespoon honey or sugar
- 2 tablespoons olive oil
- 2 eggs (or flax eggs for a vegan alternative)
- Slowly incorporate the wet ingredients into the dry mixture, stirring until it forms a sticky, thick batter.
- Let the dough rest for 10 minutes to allow the psyllium husk or xanthan gum to absorb moisture.
Since gluten-free doughs are softer, they do not need intensive kneading. Instead, gentle mixing and resting allow the flours to hydrate fully, improving texture.
Proofing the Dough for Better Rise
Since gluten-free dough lacks elasticity, proofing must be done carefully to avoid collapse.
Best Proofing Conditions
- Keep the proofing temperature between 75–85°F (24–29°C).
- Use a warm, humid environment to prevent drying.
- Cover the dough with plastic wrap or a damp cloth to retain moisture.
How to Check if the Dough is Ready
- The dough should increase by 50% in size, rather than doubling like traditional dough.
- The surface should look slightly puffy but not overstretched.
- If the dough starts deflating, it has over-proofed and should be baked immediately.
To prevent over-proofing, monitor the dough carefully and adjust proofing times based on room temperature.
Shaping and Baking Gluten-Free Hero Bread
Since gluten-free dough lacks the strength to hold traditional shapes, it is best baked in a loaf pan or structured mold.
Best Shaping Method for Gluten-Free Bread
- Lightly grease a 9×5-inch loaf pan to prevent sticking.
- Transfer the sticky dough into the pan and smooth the top with a wet spatula.
- Let it rest for 10–15 minutes while preheating the oven.
Unlike traditional bread, gluten-free dough does not require a second proof, as it lacks gluten strength.
Baking for a Crispy Crust
Oven Temperature and Time
- Bake at 375°F (190°C) for 40–45 minutes until the crust is golden brown.
- If a crispier crust is desired, brush the top with olive oil or butter before baking.
- Use a thermometer to check doneness – the internal temperature should be 205–210°F (96–99°C).
Cooling for the Best Texture
- Let the bread cool completely on a wire rack before slicing.
- Cooling allows moisture to redistribute, preventing gumminess.
Since gluten-free bread has a different moisture structure, slicing too soon may cause the interior to be sticky.
Common Gluten-Free Bread Mistakes and How to Fix Them
Bread is Too Dense and Heavy
- Cause: Not enough binding agents or hydration.
- Solution: Increase psyllium husk, eggs, or flax gel to improve structure.
Preventing Bread from Crumbling Too Easily
- Cause: Lack of starches or incorrect flour balance.
- Solution: Use a blend of flours and starches, rather than a single flour.
Bread Didn’t Rise Enough
- Cause: Weak yeast activity or improper proofing.
- Solution: Ensure yeast is fresh and active, and proof in a warm environment.
Conclusion
Gluten-free Hero Bread can be just as delicious as traditional bread when proper ingredients, hydration, and baking techniques are used. By understanding how to mimic gluten’s properties, you can create a soft, structured, and flavorful loaf that holds up to any sandwich filling.
Key Takeaways
- Use a mix of gluten-free flours and starches for balanced texture.
- Include binding agents like psyllium husk or xanthan gum to replace gluten.
- Hydration is key – gluten-free dough requires more moisture.
- Bake at the right temperature and allow the bread to cool completely for the best texture.
Now that the gluten-free version is perfected, let’s explore low-carb and keto-friendly Hero Bread alternatives.
Low-Carb/Keto Hero Bread
For those following a low-carb or ketogenic (keto) diet, traditional bread is often avoided due to its high carbohydrate content. However, making a low-carb Hero Bread at home allows for better control over ingredients, texture, and flavor while ensuring a soft, fluffy interior with a slightly crispy crust. Unlike wheat-based bread, keto bread relies on alternative flours, high-fiber binders, and leavening agents to replicate the same chewiness and rise. By understanding the science behind low-carb baking and making precise ingredient adjustments, it is possible to achieve a high-quality, delicious keto bread that holds up well to sandwich fillings.
Challenges of Baking Low-Carb Hero Bread
Since keto baking eliminates traditional wheat and starch-based flours, achieving the same elasticity, rise, and texture of conventional bread requires a unique combination of ingredients and baking techniques. Without gluten, the dough lacks the structural support necessary for trapping air, making it more prone to density and dryness. Therefore, using the right ratios of nut-based flours, fiber-rich binders, and natural leavening agents is essential.
Why Keto Bread Can Be Tricky
Lack of gluten and starch affects multiple aspects of the bread’s structure and mouthfeel. Some of the most common issues include:
- Lack of elasticity – The dough does not stretch or hold shape like traditional wheat-based doughs.
- Weaker gas retention – Keto-friendly flours do not trap air as efficiently, leading to denser loaves.
- Dry or crumbly texture – Without gluten, the bread can become fragile and prone to breaking.
- Overly moist or eggy consistency – Too many eggs or improper hydration can result in a spongy, unpleasant texture.
Choosing the Right Ingredients for Keto Hero Bread
Since traditional flour is too high in carbohydrates for a keto diet, alternative flours, fibers, and stabilizers must be used to replicate the texture of classic bread.
Low-Carb Flour Alternatives
Nut-Based Flours for Structure and Softness
- Almond Flour – The most common keto flour, providing a mild flavor and soft crumb.
- Coconut Flour – Absorbs moisture well and improves the overall texture.
- Hazelnut Flour – Adds a slightly nutty taste while maintaining a light structure.
Fibers for Improved Elasticity
- Psyllium Husk Powder – Acts as a natural gluten replacer, improving dough structure.
- Ground Flaxseed – Adds fiber while enhancing chewiness and binding properties.
- Oat Fiber – Contains zero net carbs and helps lighten the texture of the bread.
Binding Agents for Structure and Rise
- Eggs or Egg Whites – Provide protein, act as a leavening agent, and improve texture.
- Xanthan Gum or Gelatin – Create elasticity, preventing the bread from being too crumbly.
- Apple Cider Vinegar – Reacts with baking powder to increase rise and structure.
Step-by-Step Keto Hero Bread Recipe
To achieve the best rise, structure, and texture, keto bread dough must be mixed, shaped, and baked using specific techniques. Unlike traditional bread dough, kneading is not required, but precise hydration and resting periods are essential.
Mixing the Dough
Understanding the Role of Hydration
- Keto dough is naturally more absorbent than wheat-based dough.
- Over-hydrating leads to a gummy texture, while under-hydrating results in a dry, dense loaf.
- Psyllium husk and coconut flour expand when mixed with liquids, requiring a short resting period to ensure proper absorption.
Combining the Ingredients
- Prepare the dry ingredients in a large bowl:
- 2 cups blanched almond flour
- ¼ cup coconut flour
- 2 tablespoons psyllium husk powder
- 1 tablespoon baking powder
- ½ teaspoon xanthan gum
- ½ teaspoon salt
- Mix the wet ingredients separately:
- 4 eggs (or 2 whole eggs + 2 egg whites for a lighter texture)
- 1 tablespoon apple cider vinegar
- ¼ cup melted butter or coconut oil
- ½ cup warm water (or unsweetened almond milk for softness)
- Slowly incorporate the wet ingredients into the dry mixture, stirring until a thick dough forms.
- Allow the dough to rest for 10 minutes so the psyllium husk and coconut flour can absorb moisture.
Shaping and Preparing for Baking
Since keto dough lacks gluten, it does not stretch like regular bread dough. Instead, shaping must be done gently to ensure the best texture.
Shaping for Optimal Rise
- Lightly grease a 9×5-inch loaf pan or shape the dough into sub roll forms on a parchment-lined baking sheet.
- Wet your hands with water or olive oil to prevent sticking, then smooth the dough into the desired shape.
- If making rolls, score the tops with a sharp knife or bread lame to allow controlled expansion.
- Let the shaped dough rest for 10–15 minutes before baking to ensure even hydration.
Unlike traditional bread, keto dough does not require a second proofing stage, as it does not contain gluten-based gas retention.
Baking Keto Hero Bread for a Perfect Crust
Achieving the right baking temperature and time ensures that the bread is fully cooked inside while maintaining a crisp, golden crust.
Oven Temperature and Baking Time
- Bake at 350°F (175°C) for 40–45 minutes for a fully set, tender loaf.
- For a crispier crust, increase the temperature to 375°F (190°C) for the last 10 minutes.
- The internal temperature should reach 200–205°F (93–96°C) to ensure the bread is fully baked.
Cooling and Slicing for the Best Texture
- Once baked, transfer the bread to a wire rack to cool completely.
- Allow at least 30 minutes before slicing, as cutting too soon may result in a gummy interior.
Common Keto Bread Mistakes and How to Fix Them
Bread is Too Dense or Heavy
- Cause: Too much almond flour or not enough leavening agents.
- Solution: Reduce almond flour slightly and incorporate more egg whites for a fluffier texture.
Why Does Bread Crumble or Fall Apart?
- Cause: Not enough psyllium husk or xanthan gum to bind the ingredients.
- Solution: Increase binding agents and allow the dough to fully rest before baking.
Bread Didn’t Rise Enough
- Cause: Expired baking powder or too few eggs.
- Solution: Use fresh baking powder and separate eggs, whipping the whites for added volume.
Conclusion
Low-carb Hero Bread provides a delicious, keto-friendly alternative to traditional sub rolls. By using the right combination of nut-based flours, fibers, and binding agents, it is possible to create a soft, structured, and flavorful loaf that pairs perfectly with any filling.
Key Takeaways
- Use a blend of almond flour, coconut flour, and psyllium husk for the best structure.
- Hydration is crucial – keto doughs absorb moisture differently than wheat-based ones.
- Bake at the correct temperature to ensure a soft interior with a crisp crust.
- Allow the bread to cool completely before slicing to prevent gumminess.
Now that the keto version is perfected, the next step is exploring a vegan-friendly Hero Bread alternative that eliminates eggs while maintaining structure and taste.
Vegan Hero Bread
For those following a plant-based diet, making vegan Hero Bread at home is an excellent way to ensure a soft, chewy, and flavorful sandwich roll without using animal-based ingredients. While traditional bread recipes rely on eggs, butter, and milk to enhance texture and moisture, these ingredients can be replaced with plant-based alternatives that offer similar functionality. With the right flour blend, binding agents, and leavening techniques, you can create a perfectly structured, golden-crusted vegan bread that is just as satisfying as its non-vegan counterpart.
Challenges of Baking Vegan Bread
Removing animal-based ingredients from a bread recipe requires careful substitutions to ensure the final product maintains the right texture, elasticity, and rise. Since eggs provide structure and moisture, while dairy products contribute to softness and flavor, vegan alternatives must replicate these functions effectively.
Why Baking Vegan Bread Can Be Tricky
When making bread without eggs, butter, or milk, it is important to address the following challenges:
- Lack of Binding Power – Eggs help bind ingredients together, giving the dough structure.
- Reduced Elasticity – Without dairy fats, the bread may lack a soft, stretchy texture.
- Weaker Gas Retention – Traditional bread relies on eggs to support a strong rise.
- Dry or Crumbly Texture – Without proper moisture control, vegan bread can turn out too dry.
By selecting plant-based ingredients that mimic the role of eggs and dairy, you can achieve a soft, well-risen, and delicious loaf.
Choosing the Best Ingredients for Vegan Hero Bread
Since traditional bread relies on animal-based ingredients for texture and flavor, plant-based substitutes must be carefully chosen to ensure a balanced structure and rise.
Flours for the Best Texture
Base Flours for Structure
- Bread Flour (12–14% Protein) – Provides high gluten content for a strong, elastic structure.
- Whole Wheat Flour – Adds fiber and a nutty flavor, though it requires extra hydration.
- All-Purpose Flour – Works well when blended with higher-protein flours.
Alternative Flours for Softness
- Spelt Flour – Adds a light texture and slightly sweet taste.
- Oat Flour – Improves moisture retention while enhancing chewiness.
Vegan Egg Replacements
Since eggs contribute to the rise, moisture, and binding power of bread, vegan substitutes must offer similar structural support.
Best Egg Alternatives for Vegan Hero Bread
- Flaxseed Egg (1 tbsp ground flaxseed + 3 tbsp water per egg) – Creates a gel-like consistency for binding.
- Chia Seed Egg (1 tbsp chia seeds + 3 tbsp water per egg) – Works similarly to flax but adds extra texture.
- Aquafaba (Chickpea Brine, 3 tbsp per egg) – Provides a light, airy texture and enhances rise.
- Unsweetened Applesauce (¼ cup per egg) – Adds moisture while slightly softening the crumb.
Each substitute functions differently, so selecting the right one depends on desired texture and hydration levels.
Dairy-Free Butter and Milk Alternatives
Best Vegan Butter Replacements
- Coconut Oil – Provides a rich, buttery texture while keeping the bread soft.
- Vegan Margarine – Mimics traditional butter but contains no dairy.
- Olive Oil – Adds a mild flavor and helps create a tender crumb.
Best Plant-Based Milk for Bread
- Almond Milk – A mild-flavored, neutral option for softening the dough.
- Oat Milk – Creamier than almond milk, adding subtle sweetness.
- Soy Milk – Contains the most protein, which helps strengthen the dough structure.
Choosing the right dairy-free fats and liquids ensures the bread remains moist, tender, and flavorful.
Step-by-Step Vegan Hero Bread Recipe
Unlike keto or gluten-free bread, vegan bread follows a process similar to traditional bread-making, with kneading, proofing, and baking techniques adjusted to accommodate plant-based ingredients.
Mixing the Dough
Hydration and Gluten Development
- Vegan dough requires slightly more liquid than traditional dough since egg substitutes absorb more moisture.
- Proper gluten development is crucial for ensuring a strong, well-risen loaf.
Preparing the Ingredients
- Combine the dry ingredients in a large mixing bowl:
- 3 cups bread flour (or a mix of bread and whole wheat flour)
- 1 tablespoon sugar (or maple syrup for natural sweetness)
- 2 teaspoons salt
- 1 packet (2¼ teaspoons) instant yeast
- Mix the wet ingredients separately:
- 1 cup warm almond milk (100–110°F / 38–43°C)
- 3 tablespoons olive oil or melted coconut oil
- 1 flax egg (1 tbsp ground flaxseed + 3 tbsp water, let sit for 5 minutes)
- Slowly add the wet ingredients to the dry mixture, stirring until a shaggy dough forms.
- Begin kneading the dough, either:
- By hand for 10–12 minutes, until the dough becomes elastic.
- In a stand mixer with a dough hook for 6–8 minutes.
Letting the dough rest for 5 minutes between kneading allows the flour to fully hydrate, improving gluten development.
Proofing for the Best Rise
Since this is a yeast-based dough, proper proofing is essential for a soft, airy crumb.
Best Proofing Conditions
- Maintain a warm, draft-free environment at 75–85°F (24–29°C).
- Cover the dough with a damp towel or plastic wrap to prevent drying.
How to Check Proofing Readiness
- First Proofing: Let the dough rise until it doubles in size, about 60–90 minutes.
- Shaping the Dough: Punch down the dough, divide it into sub roll shapes, and place them on a baking sheet.
- Final Proofing: Let the shaped dough rest for another 30–45 minutes until slightly puffed.
To prevent over-proofing, perform the poke test – gently press the dough with a fingertip; if it springs back slowly, it is ready to bake.
Baking Vegan Hero Bread for the Perfect Texture
Oven Temperature and Baking Time
- Preheat the oven to 375°F (190°C) for even heat distribution.
- Bake for 22–25 minutes until golden brown.
- The internal temperature should reach 200–205°F (93–96°C) for full doneness.
For a shinier, more golden crust, brush the rolls with oat milk or aquafaba before baking.
Cooling and Slicing
- Transfer the baked rolls to a wire rack immediately to prevent sogginess.
- Let cool for at least 30 minutes before slicing to maintain texture.
Common Vegan Bread Mistakes and How to Fix Them
Bread is Too Dense or Heavy
- Cause: Not enough liquid or improper kneading.
- Solution: Increase hydration slightly and knead until gluten is well developed.
Why Does Bread Crumble Too Easily?
- Cause: Weak binding from egg substitute.
- Solution: Increase psyllium husk, flaxseed, or chia seed for better structure.
Bread Didn’t Rise Enough
- Cause: Yeast was not activated properly.
- Solution: Ensure yeast is fresh and proofed at the correct temperature.
Conclusion
Vegan Hero Bread is an excellent alternative to traditional bread, providing softness, structure, and flavor without using animal products. By selecting the right plant-based substitutes for eggs, dairy, and fats, you can create a high-quality, delicious bread that is perfect for sandwiches.
Key Takeaways
- Use bread flour for a strong gluten network.
- Replace eggs with flax eggs, chia eggs, or aquafaba for proper binding.
- Hydrate the dough adequately for the best rise and structure.
- Bake at 375°F (190°C) for an even golden crust.
Now that the vegan version is perfected, let’s move on to how to store and serve Hero Bread for maximum freshness.
5. Serving Ideas & Storing Your Hero Bread
Classic Sub Sandwich Combinations
Creating a perfect sub sandwich is an art that requires the right balance of flavors, textures, and high-quality ingredients. A well-made sub should have a sturdy yet soft bread base, layers of fresh or cured proteins, crisp vegetables, and a harmonious blend of condiments that elevate the overall taste. Whether you prefer a meat-packed classic, a deli-style cold cut, or a vegetarian masterpiece, the right combination ensures a satisfying bite every time.
The Anatomy of a Great Sub Sandwich
Every great sub sandwich consists of five essential components. By carefully selecting each element, you can create a well-balanced and flavorful sub that holds up well from the first bite to the last.
1. The Bread – A Strong Yet Soft Foundation
The bread is the backbone of any sandwich. It should be sturdy enough to hold the fillings without falling apart, yet soft enough to provide a pleasant chew.
- Hero Bread: The ideal choice for classic subs due to its balanced texture and crust.
- Ciabatta Rolls: Slightly firmer, perfect for sandwiches with saucy ingredients.
- French Baguette: Offers a crispier crust with a light, airy interior.
- Whole Wheat Rolls: Adds a nutty depth of flavor and extra fiber for a healthier option.
To prevent sogginess, lightly toast the bread before assembling the sandwich, especially if using juicy ingredients like tomatoes or saucy proteins.
2. The Protein – The Heart of the Sub
A sandwich’s protein base defines its overall flavor. Whether you prefer classic deli meats, grilled proteins, or plant-based alternatives, selecting the right protein is crucial for a fulfilling experience.
Meat Lover’s Proteins
- Turkey Breast: Lean, slightly sweet, and pairs well with both creamy and tangy condiments.
- Roast Beef: Rich and hearty, often best with horseradish or garlic aioli.
- Salami & Pepperoni: Spicy and fatty, providing a bold, umami-packed flavor.
- Grilled Chicken: A versatile protein that absorbs marinades well for added depth.
- Meatballs: Best paired with marinara sauce and melted cheese.
Plant-Based Protein Alternatives
- Marinated Tofu: Absorbs flavors well and adds a chewy texture.
- Jackfruit Pulled “Pork”: Simulates the taste and texture of slow-cooked meat.
- Grilled Portobello Mushrooms: Offers a meaty, umami-rich bite.
- Lentil and Chickpea Patties: A fiber-packed alternative for plant-based eaters.
3. The Cheese – Enhancing Flavor and Texture
Cheese adds creaminess, saltiness, and depth of flavor to any sub. Selecting the right cheese depends on whether you want a mild, sharp, or melty component.
Best Cheeses for Cold Sub Sandwiches
- Provolone: Smooth and slightly smoky, pairing well with Italian meats.
- Swiss Cheese: Nutty and mild, a great match for turkey or roast beef.
- Mozzarella: Creamy and mild, complements fresh vegetables and herbs.
- Cheddar: Sharp and bold, pairs well with bacon and BBQ flavors.
Best Cheeses for Hot Sub Sandwiches
- American Cheese: Melts effortlessly, ideal for cheesesteaks and burgers.
- Pepper Jack: Adds a spicy kick that enhances grilled meats.
- Parmesan: Perfect for meatball subs, offering a salty, nutty contrast.
- Vegan Cheese Alternatives: Cashew or almond-based cheeses provide creaminess for plant-based sandwiches.
4. The Vegetables – A Fresh, Crunchy Contrast
Adding vegetables provides crunch, freshness, and color, making the sandwich more balanced and enjoyable.
Classic Fresh Vegetables
- Lettuce: Adds a refreshing crunch and pairs well with creamy sauces.
- Tomatoes: Juicy and slightly acidic, balancing rich proteins and cheeses.
- Onions: Raw or caramelized for either sharpness or a sweet contrast.
- Cucumbers: Adds a crisp, watery bite, enhancing the freshness of the sandwich.
Pickled and Roasted Vegetables
- Banana Peppers: Slightly tangy with a mild heat, perfect for Italian hoagies.
- Jalapeños: Brings a spicy kick to balance out creamy elements.
- Roasted Red Peppers: Sweet and smoky, pairing beautifully with grilled proteins.
- Pickles: The ultimate sub topping, adding acidity and crunch.
5. The Condiments – Elevating the Flavor Profile
Condiments bind all the ingredients together while adding moisture and bold flavors. Selecting the right sauce ensures a well-balanced sandwich experience.
Creamy & Savory Spreads
- Mayonnaise: Classic and smooth, enhancing richness without overpowering.
- Garlic Aioli: Adds a subtle depth of roasted garlic flavor.
- Hummus: A great plant-based option for creaminess and protein boost.
Tangy & Spicy Condiments
- Dijon Mustard: Offers a sharp and slightly spicy contrast to meats.
- Buffalo Sauce: Adds heat and tanginess, ideal for chicken-based subs.
- Italian Dressing: A light, herby vinaigrette perfect for cold sandwiches.
Classic Sub Sandwich Combinations
The Italian Hoagie – A Timeless Favorite
A combination of cured meats, provolone cheese, fresh vegetables, and a tangy oil-and-vinegar dressing makes this one of the most iconic sub sandwiches.
Ingredients
- Genoa salami, capicola, pepperoni, mortadella
- Provolone cheese
- Shredded lettuce, sliced tomatoes, red onions, banana peppers
- Olive oil, red wine vinegar, oregano
Pro Tips
- Always slice meats thinly to ensure even layering.
- Toss vegetables in olive oil and vinegar for a more cohesive flavor.
Philly Cheesesteak – A Rich and Savory Option
A warm and comforting sub made famous in Philadelphia, featuring thinly sliced steak and melty cheese.
Ingredients
- Thinly sliced ribeye steak
- Provolone, Cheez Whiz, or American cheese
- Sautéed onions, bell peppers, mushrooms
- Lightly toasted Hero Bread
Pro Tips
- Use high heat to quickly sear the steak, locking in juices.
- Melt cheese directly over the meat to blend flavors seamlessly.
The Turkey & Swiss – A Light and Refreshing Classic
A simple yet flavorful cold-cut sandwich, featuring lean turkey and creamy Swiss cheese.
Ingredients
- Oven-roasted turkey breast
- Swiss cheese
- Lettuce, tomato, cucumber, red onion
- Dijon mustard, mayo
Pro Tips
- Layer vegetables strategically to avoid moisture buildup on the bread.
- Pair with a whole wheat Hero Bread roll for added fiber.
Conclusion
A perfectly crafted sub sandwich is more than just a meal—it’s an experience. By carefully selecting high-quality ingredients, balancing textures, and choosing the right condiments, you can create a sandwich that is both satisfying and flavorful. Whether you opt for a classic Italian hoagie, a Philly cheesesteak, or a veggie-packed sub, the key lies in attention to detail and thoughtful layering.
Key Takeaways
- Hero Bread provides the ideal base, offering both structure and chewiness.
- A balance of textures—crunchy, creamy, and chewy—enhances the eating experience.
- Layer ingredients strategically to prevent sogginess and maximize flavor.
- The right condiments bring harmony, elevating the overall taste of the sandwich.
With these classic sub combinations in mind, the next step is exploring creative and unique ways to use Hero Bread beyond sandwiches.
Beyond Sandwiches: Creative Uses for Hero Bread
While Hero Bread is best known for making delicious sub sandwiches, its potential extends far beyond that. In fact, this versatile bread can be transformed into savory appetizers, comforting breakfast dishes, and even indulgent desserts. With its soft interior, sturdy crust, and neutral flavor, Hero Bread absorbs flavors well and maintains its structure, making it an ideal base for a variety of dishes. Whether you’re looking for a quick snack, a hearty meal, or a sweet treat, there are endless ways to repurpose Hero Bread into something new and exciting.
Why Hero Bread Works for More Than Just Sandwiches
Not all breads are suited for toasting, baking, or cooking in different ways. However, Hero Bread stands out because of its unique texture and composition.
- A firm yet soft structure – Holds up well to toppings, baking, and toasting without falling apart.
- Moisture retention – Absorbs flavors without becoming excessively soggy.
- Mild flavor – Works well in both savory and sweet recipes, allowing versatility in the kitchen.
- Golden crust with chewiness – Provides texture when toasted or grilled, making it an excellent choice for croutons and garlic bread.
Now, let’s explore some creative ways to use Hero Bread that go beyond sandwiches.
Savory Dishes: Reinventing Hero Bread for Meals
Hero Bread’s soft yet structured texture makes it perfect for transforming into savory sides and main dishes. Whether it’s crispy, cheesy, or soaked in flavorful sauces, there’s no shortage of ways to incorporate this bread into your meals.
Homemade Garlic Bread – A Quick and Flavorful Side
When you need a simple yet flavorful addition to pasta dishes, soups, or salads, garlic bread is always a great choice. Hero Bread’s crispy crust and soft interior make it an excellent option for this classic side dish.
Ingredients
- 1 loaf of Hero Bread, sliced
- 4 tablespoons butter (or olive oil for a dairy-free version)
- 3 cloves garlic, minced
- 2 tablespoons fresh parsley, chopped
- ¼ teaspoon salt
- ¼ teaspoon black pepper
- ¼ cup grated Parmesan cheese (optional)
Instructions
- First, preheat the oven to 375°F (190°C).
- In a small bowl, mix butter, garlic, parsley, salt, and black pepper until well combined.
- Next, spread the garlic butter mixture evenly over the sliced Hero Bread.
- If desired, sprinkle grated Parmesan cheese on top.
- Then, bake for 10–12 minutes until golden and crispy.
- Finally, serve warm alongside pasta, soups, or salads.
Pro Tip
For an extra crispy texture, broil the garlic bread for the last 1–2 minutes, keeping an eye on it to prevent burning.
Bruschetta – A Light and Refreshing Appetizer
Bruschetta is an easy yet flavorful dish that turns Hero Bread into a crispy base for fresh toppings. This Italian classic works perfectly as an appetizer, snack, or party dish.
Ingredients
- 6 slices of Hero Bread
- 2 tablespoons olive oil
- 2 ripe tomatoes, diced
- 1 clove garlic, minced
- 5 fresh basil leaves, chopped
- ½ teaspoon balsamic vinegar
- Salt and pepper to taste
Instructions
- Begin by brushing each slice of Hero Bread with olive oil, then toast in the oven until golden brown.
- Meanwhile, in a bowl, combine tomatoes, garlic, basil, balsamic vinegar, salt, and pepper.
- Next, spoon the mixture over the toasted bread.
- Lastly, serve immediately for the best flavor and texture.
Pro Tip
For an added depth of flavor, rub the toasted bread with a raw garlic clove before adding the topping.
Homemade Croutons – Elevate Your Salads and Soups
Instead of buying store-bought croutons, consider making your own crispy, flavorful version using Hero Bread. This not only reduces food waste but also allows you to customize flavors.
Ingredients
- 4 slices of Hero Bread, cubed
- 2 tablespoons olive oil or melted butter
- 1 teaspoon garlic powder
- ½ teaspoon dried oregano
- ½ teaspoon salt
- ¼ teaspoon black pepper
Instructions
- Preheat the oven to 375°F (190°C).
- In a bowl, toss bread cubes with olive oil and seasonings until evenly coated.
- Then, spread them out in a single layer on a baking sheet.
- Bake for 12–15 minutes, tossing halfway, until golden brown and crispy.
- Let cool before storing or serving.
Pro Tip
For extra flavor, add grated Parmesan or smoked paprika before baking.
Breakfast Creations: Start Your Day Right
Hero Bread is also an excellent base for breakfast dishes, providing a soft yet structured foundation for both sweet and savory morning meals.
Classic French Toast – A Brunch Favorite
A rich and custardy French toast starts with high-quality bread that absorbs the egg mixture while maintaining structure.
Ingredients
- 4 slices of Hero Bread
- 2 eggs
- ½ cup milk (or dairy-free alternative)
- 1 teaspoon vanilla extract
- ½ teaspoon cinnamon
- 1 tablespoon butter (for cooking)
Instructions
- In a bowl, whisk together eggs, milk, vanilla extract, and cinnamon.
- Then, dip each slice of Hero Bread into the mixture, making sure it’s fully coated.
- Heat a skillet over medium heat, adding butter.
- Cook each slice for 2–3 minutes per side until golden brown.
- Finally, serve with maple syrup, fresh berries, or powdered sugar.
Pro Tip
For an extra crunchy exterior, coat the bread in crushed cornflakes before frying.
Savory Breakfast Strata – A Make-Ahead Morning Dish
A strata is a savory bread pudding, layered with eggs, cheese, and vegetables for a hearty breakfast.
Ingredients
- 6 slices of Hero Bread, cubed
- 4 eggs
- 1 cup milk
- ½ teaspoon salt
- ¼ teaspoon black pepper
- ½ cup shredded cheese (cheddar or mozzarella)
- ½ cup sautéed vegetables (spinach, mushrooms, bell peppers)
Instructions
- In a greased baking dish, layer bread cubes, cheese, and vegetables.
- In a separate bowl, whisk together eggs, milk, salt, and pepper.
- Pour the mixture over the bread, ensuring it soaks in evenly.
- Cover and refrigerate overnight for better texture.
- The next morning, bake at 375°F (190°C) for 35–40 minutes until golden and set.
Pro Tip
For extra flavor, add crumbled sausage or sun-dried tomatoes.
Conclusion
Hero Bread is far more than just a sandwich base—it is a versatile kitchen staple that can be used in savory dishes, breakfast creations, and even desserts. Whether you’re looking for a quick snack or a hearty meal, this bread can be transformed into something delicious and unique.
Key Takeaways
- Use Hero Bread to create homemade garlic bread, bruschetta, or croutons for added flavor.
- Transform it into breakfast dishes like French toast or strata for a satisfying morning meal.
- Repurpose leftovers into crispy treats to minimize food waste and maximize versatility.
With these creative ideas in mind, the next step is learning how to store Hero Bread properly to maintain its freshness and texture.
How to Store Hero Bread: Keep It Fresh for Longer
Proper storage is essential for maintaining the freshness, texture, and flavor of Hero Bread. If stored incorrectly, bread can become stale, dry, or moldy much faster than expected. By following the right storage techniques, you can extend the shelf life of Hero Bread while preserving its soft, airy interior and crisp crust.
Why Proper Bread Storage Matters
Bread is best when it’s fresh, fluffy, and slightly chewy, but its quality can deteriorate quickly if not stored correctly. Factors like moisture, temperature, and air exposure all influence how long Hero Bread stays at its best.
- Exposure to air can cause bread to dry out and become stale within a couple of days.
- Too much moisture can lead to mold growth, especially in humid environments.
- Storing bread in the refrigerator can make it go stale faster due to moisture loss.
- Freezing bread properly helps preserve it for up to three months without losing quality.
By understanding these key factors, you can choose the best storage method based on how soon you plan to use the bread.
Short-Term Storage: Keeping Hero Bread Fresh for Daily Use
If you plan to consume Hero Bread within three to four days, storing it at room temperature is the best option. However, it’s important to keep it in an environment that balances airflow and moisture retention.
Best Storage Methods for Room Temperature
1. Use a Bread Box for Optimal Freshness
A bread box provides the perfect storage environment by allowing air circulation while preventing excess moisture buildup.
- Keeps the bread soft inside while maintaining a crisp crust.
- Prevents excessive dryness or hardening.
- Reduces the chances of mold growth by controlling humidity levels.
2. Wrap in a Cotton or Linen Towel
If you don’t have a bread box, wrapping Hero Bread in a clean cotton or linen towel is an effective alternative.
- The towel absorbs excess moisture, preventing mold.
- It allows enough airflow to maintain the bread’s texture.
- This method works best when storing bread on the countertop.
3. Store in a Paper Bag for Limited Airflow
For short-term storage, a paper bag is another great option, especially if you want to maintain the bread’s crusty texture.
- The bag allows some moisture to escape, keeping the bread from becoming soggy.
- It prevents the crust from getting too hard.
- Works best when kept in a cool, dry place away from direct sunlight.
What to Avoid
- Plastic bags trap too much moisture, which can lead to mold growth.
- Leaving bread exposed on the counter will cause it to dry out within a day.
- Placing bread near heat sources (like the stove) speeds up staleness.
Medium-Term Storage: Extending Freshness for Up to a Week
If you need to store Hero Bread for five to seven days, it’s best to use airtight storage methods to preserve moisture while preventing mold growth.
Best Storage Methods for Medium-Term Use
1. Store in a Resealable Bread Bag with Ventilation
Using a resealable bread bag with small ventilation holes can help keep bread soft for longer.
- Traps enough moisture to prevent dryness.
- Allows minimal airflow to reduce mold risk.
- Works best when stored in a cool, dry area.
2. Wrap in Parchment Paper and Store in a Bread Bin
This method is great for keeping bread moist without making it soggy.
- Parchment paper helps regulate moisture better than plastic.
- The bread bin keeps the loaf away from direct air exposure.
- Works well for households that eat bread throughout the week.
3. Keep in a Cool, Dark Cabinet
For those without a bread box or bin, storing bread in a cool pantry or cabinet can also work well.
- The lack of light helps reduce heat exposure, slowing down the staling process.
- Works best when combined with a bread bag or parchment paper wrap.
What to Avoid
- Do not refrigerate bread – The fridge accelerates the staling process due to moisture loss.
- Avoid over-sealing bread in plastic wrap – This creates a humid environment, encouraging mold growth.
Long-Term Storage: Freezing Hero Bread for Maximum Shelf Life
If you want to keep Hero Bread fresh for several weeks or months, freezing is the best option. Properly frozen bread retains its texture and flavor, preventing waste while ensuring you always have fresh bread on hand.
Best Freezing Methods for Hero Bread
1. Slice the Bread Before Freezing
Slicing the bread before freezing allows you to thaw only what you need, rather than defrosting an entire loaf.
- Makes it easier to toast individual slices without waiting for them to thaw completely.
- Prevents refreezing, which can degrade the texture.
- Ideal for those who use bread occasionally rather than daily.
2. Wrap Tightly to Prevent Freezer Burn
Bread should be wrapped in multiple layers to prevent freezer burn and preserve moisture.
- First, wrap the bread in plastic wrap or aluminum foil.
- Then, place it inside a resealable freezer bag to protect it from air exposure.
- If freezing multiple slices, separate them with parchment paper to prevent sticking.
3. Label and Date the Storage Bag
To ensure you use the bread at its best quality, label the bag with the date it was frozen.
- Hero Bread stays fresh in the freezer for up to three months.
- After that, it may start to lose flavor and texture.
4. Thawing Frozen Bread the Right Way
When ready to use, bread should be thawed gradually to prevent sogginess.
- For whole loaves, let them sit at room temperature for 3–4 hours.
- For slices, place them directly in a toaster or oven at 300°F (150°C) for 5–7 minutes.
- Avoid microwaving, as this can make the bread tough and rubbery.
Pro Tip
To refresh frozen bread, sprinkle a little water on the crust before reheating in the oven. This brings back fresh-baked texture.
Preventing Common Bread Storage Mistakes
To keep Hero Bread in peak condition, it’s important to avoid common storage errors.
Mistakes That Make Bread Stale Faster
- Storing bread in the fridge – Refrigeration removes moisture and makes bread stale quicker.
- Using plastic bags without ventilation – Traps too much moisture, causing mold.
- Leaving bread exposed – Air dries out bread within a day or two.
Mistakes That Lead to Mold Growth
- Keeping bread near moisture sources – Humidity speeds up mold formation.
- Sealing bread before it has fully cooled – Trapped steam encourages mold.
- Freezing bread without proper wrapping – Freezer burn ruins texture.
Conclusion
Storing Hero Bread properly ensures that it stays fresh, flavorful, and enjoyable for as long as possible. Whether you need short-term freshness, a week-long solution, or long-term freezing, using the right techniques will prevent staleness and waste.
Key Takeaways
- For daily use, store bread in a bread box, paper bag, or wrapped in a towel.
- For extended freshness, use a resealable bread bag with ventilation or a bread bin.
- For long-term storage, freeze sliced bread in airtight wrapping and thaw gradually.
- Avoid refrigeration, as it dries out bread faster than any other method.
Now that you know how to store Hero Bread properly, let’s explore the best ways to revive stale bread and make it fresh again.
Conclusion: Bake, Enjoy, and Share Your Hero Bread Creations
Baking Hero Bread at home is more than just a recipe—it’s an experience that brings warmth, flavor, and creativity into your kitchen. Whether you’ve mastered the perfect sub sandwich, experimented with classic variations, or discovered new ways to use Hero Bread beyond sandwiches, the possibilities are endless. With the right ingredients, techniques, and storage methods, you can enjoy fresh, delicious bread every time.
Now, we’d love to hear from you!
- Have you tried making Hero Bread at home?
- What’s your favorite sub sandwich combination?
- Have you used Hero Bread in a creative way beyond sandwiches?
Join the Community and Share Your Hero Bread Creations
We’d love to see what you’ve baked! If you try this Hero Bread recipe, be sure to snap a photo and share it on social media. Tag us using #MyHeroBread so we can celebrate your delicious creations together.
Looking for more bread-baking inspiration? Check out these related posts:
- “10 Best Sandwich Fillings for Hero Bread” – Explore the best combinations for the ultimate sub.
- “How to Make Homemade Pizza Dough” – Take your bread-making skills to the next level.
- “The Science of Bread Baking: Tips for Perfect Loaves Every Time” – Deep dive into what makes bread truly great.
There’s nothing quite like the satisfaction of baking your own bread. So, roll up your sleeves, get kneading, and enjoy every slice of your homemade Hero Bread!