
There’s something undeniably charming about a heart-shaped cake—whether it’s for Valentine’s Day, an anniversary, a birthday, or just a sweet surprise for someone special. With its romantic shape and endless decorating possibilities, a heart cake is the perfect way to show love through baking.
But here’s the best part: you don’t need a fancy heart-shaped cake pan to make one! Even with just a round and square pan, you can create a flawless heart cake with a few simple cuts. In this guide, we’ll walk you through easy, foolproof recipes, step-by-step baking instructions, and stunning decoration ideas that will make your heart cake a showstopper. Whether you’re a beginner or an experienced baker, you’ll find everything you need to create a cake that’s just as delightful to look at as it is to eat. Let’s get baking!
What You Need to Get Started
Essential Ingredients
Before you start baking, having the right ingredients is crucial for achieving a delicious, moist, and well-structured heart cake. While the base ingredients remain similar to most cakes, you can customize flavors and textures depending on the occasion. Below, we break down the essential ingredients you’ll need, along with some variations for different flavors.
1. Basic Cake Ingredients (For a Classic Heart Cake)
Whether you’re making a vanilla, chocolate, or red velvet heart cake, these core ingredients form the foundation of a perfect cake.
Flour
All-purpose flour works for most cakes, but cake flour creates a softer, more tender crumb. If making a gluten-free heart cake, use almond flour or a 1:1 gluten-free flour blend.
Sugar
Granulated sugar provides sweetness, while brown sugar can add moisture and a subtle caramel flavor.
Butter or Oil
Unsalted butter gives a rich flavor, while vegetable or coconut oil makes the cake extra moist. Some bakers even use a combination of both for the best of both worlds.
Eggs
Eggs add structure and stability. For a vegan heart cake, replace eggs with flax eggs, applesauce, or mashed bananas.
Milk or Buttermilk
Buttermilk helps create a soft, fluffy texture, especially in red velvet and chocolate cakes. Dairy-free options like almond milk, oat milk, or coconut milk work just as well.
Baking Powder & Baking Soda
These leavening agents ensure your cake rises beautifully, giving it that light and airy texture.
Vanilla Extract
A must-have for enhancing the overall flavor of any cake. Use pure vanilla extract for the best results.
2. Flavor Variations for Different Heart Cake Recipes
A heart cake doesn’t have to be just vanilla. Here are some fun variations you can try.
Chocolate Heart Cake
Add cocoa powder to the dry ingredients and swap regular milk for buttermilk to create a rich, decadent chocolate cake.
Red Velvet Heart Cake
A mix of cocoa powder, buttermilk, vinegar, and red food coloring gives this cake its iconic color and tangy-sweet flavor.
Strawberry Heart Cake
Use pureed strawberries or freeze-dried strawberry powder for a fruity, natural sweetness.
Carrot or Spiced Heart Cake
For a warm, cozy version, add cinnamon, nutmeg, and grated carrots to the batter.
Coconut Heart Cake
Use coconut milk and shredded coconut to infuse a tropical flavor.
3. Ingredients for Frosting & Decoration
The right frosting can take your heart cake to the next level. Here are some popular frosting options and toppings.
Buttercream Frosting
The classic choice for a smooth, creamy finish. Try vanilla, chocolate, or strawberry buttercream for different flavors.
Cream Cheese Frosting
Perfect for red velvet or carrot cake, adding a slight tangy sweetness.
Chocolate Ganache
A rich, glossy chocolate coating that adds decadence.
Fruit Fillings & Jams
Add layers of strawberry, raspberry, or cherry jam between cake layers for a fresh and fruity touch.
Decorations
Use piping tips, sprinkles, edible glitter, fondant cutouts, fresh berries, or gold leaf accents to create a stunning heart cake.
4. Alternative Ingredients for Dietary Restrictions
If you need to make your heart cake dairy-free, gluten-free, or egg-free, consider these substitutions.
Gluten-Free Flour Alternatives
Almond flour, oat flour, or a gluten-free 1:1 baking mix can replace all-purpose flour.
Dairy-Free Substitutes
Coconut milk, almond milk, or oat milk can replace regular milk, while vegan butter or coconut oil can substitute for dairy butter.
Egg Replacements
For a vegan cake, swap eggs for flax eggs (1 tablespoon flaxseed meal + 3 tablespoons water per egg), applesauce, mashed bananas, or commercial egg replacers.
5. Flavor Enhancements and Special Additions
Take your heart cake to the next level with these unique additions.
Extracts and Flavorings
In addition to vanilla extract, try almond extract, lemon zest, or orange blossom water for an extra depth of flavor.
Mix-Ins for Texture
Fold in chopped nuts, chocolate chips, shredded coconut, or dried fruit for a bit of crunch or chewiness.
Liquor or Espresso for Intensity
A splash of espresso can enhance chocolate cakes, while a drizzle of liqueur like Grand Marnier or Bailey’s can add richness.
6. Tips for Selecting High-Quality Ingredients
Using high-quality ingredients can make a noticeable difference in the taste and texture of your cake.
Choose Organic Dairy and Eggs
If possible, use organic butter, milk, and pasture-raised eggs for the best flavor.
Use High-Quality Cocoa Powder
For a deep, rich chocolate taste, opt for Dutch-processed cocoa powder.
Pick Pure Vanilla Extract Over Imitation Vanilla
Pure vanilla extract delivers a much better aroma and taste than artificial vanilla.
By selecting the right ingredients based on your preferred flavor and style, you’ll create a heart cake that’s not just beautiful but also irresistibly delicious. Now that you have your ingredients ready, let’s move on to the step-by-step guide for baking your perfect heart cake.
Tools & Equipment
Having the right tools can make baking a heart cake easier, whether you’re using a heart-shaped cake pan or creating the shape from standard pans. Below is a list of essential baking tools and some optional equipment to enhance your cake-making experience.
1. Essential Baking Tools
These are the must-have tools for making a heart cake successfully.
Heart-Shaped Cake Pan
If you have a heart-shaped cake pan, this will make shaping your cake effortless. They come in various sizes, from mini heart pans for personal cakes to large ones for special occasions. If you don’t have one, don’t worry—there’s an easy way to create a heart cake using square and round pans.
Round & Square Cake Pans (Alternative to Heart Pan)
If you don’t have a heart-shaped pan, you can cut and assemble a heart cake using a round cake pan and a square cake pan. You’ll bake one cake in each pan, cut the round cake in half, and place the halves next to the square cake to form a heart shape.
Mixing Bowls
A set of large and medium mixing bowls is essential for combining dry and wet ingredients separately. Stainless steel or glass bowls work best for easy mixing and cleaning.
Measuring Cups & Spoons
Precise measurements are key to baking success. Use standard measuring cups and spoons for dry and liquid ingredients to ensure accuracy.
Electric Mixer or Whisk
A hand mixer or stand mixer makes creaming butter, beating eggs, and mixing batter easier. If you don’t have one, a sturdy whisk can still do the job, though it requires more effort.
Spatula & Whisk
A rubber or silicone spatula helps with mixing and scraping the sides of the bowl to avoid wasting batter. A whisk is essential for aerating dry ingredients and mixing wet ones smoothly.
Cake Tester or Toothpick
To check if your cake is fully baked, insert a cake tester or toothpick into the center. If it comes out clean, the cake is done.
Cooling Rack
A cooling rack allows air to circulate around the cake, helping it cool evenly and preventing a soggy bottom.
2. Tools for Decorating a Heart Cake
Once your cake is baked and cooled, decorating tools will help you achieve a professional look.
Offset Spatula
An offset spatula is the best tool for spreading and smoothing frosting over the cake. A straight spatula works too, but an offset one makes it easier to cover edges and create smooth layers.
Piping Bags & Tips
If you want to add decorative frosting details, piping bags and tips are essential. Round, star, and petal tips help create different textures, from swirls and rosettes to ruffles and borders.
Bench Scraper or Cake Smoother
A bench scraper or cake smoother helps achieve smooth frosting for a polished look. It’s especially useful for buttercream and ganache finishes.
Fondant Tools (Optional)
If you’re using fondant to cover your heart cake, a rolling pin, fondant smoother, and cutters will help shape and decorate your cake.
Turntable (Optional but Helpful)
A cake turntable makes it easier to frost and decorate your cake by allowing you to rotate it while smoothing the frosting.
3. Cutting & Serving Tools
These tools make it easy to cut and serve your heart cake beautifully.
Sharp Serrated Knife
A serrated knife is ideal for leveling cake layers, cutting shapes, and slicing the finished cake cleanly without squishing it.
Cake Leveler (Optional)
A cake leveler ensures even layers when slicing a cake for filling and stacking.
Cake Stand or Serving Plate
Present your heart cake on a cake stand or decorative plate for a stunning display.
Cake Server & Forks
A cake server helps cut and lift slices neatly, while dessert forks make enjoying the cake easy.
With the right tools and equipment, making a heart cake becomes a smooth and enjoyable process. Now that you’re fully prepared, let’s move on to the step-by-step guide for baking your perfect heart cake.
Picking the Perfect Frosting & Filling
The right frosting and filling can elevate a heart cake from simple to spectacular. Whether you prefer a classic buttercream, a rich chocolate ganache, or a fruity filling, your choice will impact the cake’s texture, taste, and overall presentation. Below, we’ll explore different options and how to pair them with your cake flavor.
1. Best Frosting Options for a Heart Cake
Your choice of frosting depends on the flavor, texture, and decorating style you’re aiming for.
Buttercream Frosting (Classic & Versatile)
Buttercream is one of the most popular choices for frosting a heart cake because of its smooth texture, ease of piping, and delicious flavor. It works well for simple spreading or intricate designs like rosettes and ruffles.
- American Buttercream – Sweet and easy to make with butter, powdered sugar, and vanilla.
- Swiss Meringue Buttercream – Silkier and less sweet, made by whipping egg whites and sugar.
- Italian Meringue Buttercream – Rich and stable, made by adding hot sugar syrup to whipped egg whites.
- Flavored Buttercream – Can be infused with chocolate, coffee, fruit purees, or even caramel.
Cream Cheese Frosting (Perfect for Red Velvet & Carrot Cakes)
Cream cheese frosting adds a slightly tangy flavor that balances the sweetness of cakes like red velvet or spiced heart cakes. It’s a bit softer than buttercream, so it works best for simple frosting applications rather than heavy piping.
Chocolate Ganache (Decadent & Elegant)
Ganache is a mixture of chocolate and heavy cream, creating a glossy, rich coating. It can be poured over the cake for a drip effect or whipped to create a fluffy, spreadable frosting. Dark, milk, or white chocolate ganache can all be used depending on the cake flavor.
Whipped Cream Frosting (Light & Airy)
Whipped cream frosting is an excellent choice for lighter cakes or those that incorporate fresh fruit. Since it’s less stable than buttercream, it’s best for chilled cakes or short-term use. Adding a stabilizer like gelatin or cornstarch can help it hold its shape longer.
Fondant (For a Smooth & Professional Look)
If you want a flawless, sleek cake, fondant is the way to go. Rolled fondant creates a smooth, polished finish, while fondant cutouts can be used for decorative elements. Keep in mind that fondant-covered cakes often have a layer of buttercream underneath for adhesion and added flavor.
2. Best Fillings for a Heart Cake
Fillings add flavor, moisture, and texture between cake layers. Depending on your preference, you can use a simple frosting filling, fruit-based options, or creamy alternatives.
Fruit-Based Fillings
Fruit fillings bring a fresh, tangy contrast to sweet cakes. These pair especially well with buttercream or whipped cream frosting.
- Strawberry or Raspberry Jam – A classic choice for Valentine’s Day heart cakes
- Lemon Curd – Adds a bright, citrusy twist to vanilla cakes
- Cherry or Mixed Berry Compote – Perfect for chocolate or white cakes
Chocolate & Creamy Fillings
For an extra indulgent cake, chocolate-based and creamy fillings work beautifully.
- Chocolate Mousse – Light, airy, and pairs well with chocolate or vanilla cake
- Nutella or Hazelnut Spread – A rich, nutty layer that complements chocolate cakes
- Pastry Cream – A custard-like filling that adds a creamy texture
Whipped Cream & Cheesecake Fillings
These fillings are ideal for light and refreshing cakes but require refrigeration.
- Whipped Cream with Fresh Berries – A simple, elegant filling for spring and summer cakes
- Cream Cheese Mousse – A fluffier version of cream cheese frosting
- Mascarpone Cream – A rich, Italian-style filling that works well with coffee or chocolate flavors
3. How to Pair Frostings & Fillings with Cake Flavors
Certain frostings and fillings complement specific cake flavors better than others. Here are some ideal pairings:
- Vanilla Cake – Pairs well with buttercream, whipped cream, or fruit fillings.
- Chocolate Cake – Goes best with chocolate ganache, peanut butter frosting, or raspberry filling.
- Red Velvet Cake – Traditionally paired with cream cheese frosting.
- Strawberry Cake – Complements whipped cream, white chocolate ganache, or lemon curd.
- Coconut Cake – Works well with coconut buttercream, pineapple filling, or mascarpone cream.
4. Tips for Frosting & Filling Your Heart Cake
Once you’ve chosen the perfect frosting and filling, applying them properly ensures a professional finish.
- How to Frost a Heart Cake Smoothly
- Chill the cake before frosting to prevent crumbs from mixing into the frosting.
- Use an offset spatula or bench scraper to spread frosting evenly.
- Apply a crumb coat (a thin layer of frosting) first, then chill before adding the final layer.
- How to Add Fillings Without Spillage
- Pipe a buttercream border around the cake layer before adding the filling to prevent it from oozing out.
- Use a leveling tool or serrated knife to ensure even layers before spreading the filling.
- How to Make Your Heart Cake Look Professional
- Use piping techniques like rosettes, ruffles, or borders for a decorative touch.
- Add fresh fruit, sprinkles, edible glitter, or fondant details to enhance the cake’s design.
- If using ganache, pour it while slightly warm for an elegant, smooth drip effect.
Choosing the right frosting and filling transforms your heart cake into a delicious and visually stunning dessert. Now that you’ve selected your flavors, it’s time to move on to baking and decorating your cake.
Step-by-Step Guide: Baking & Assembling Your Cake
Mixing the Batter Like a Pro
A well-prepared cake batter is the foundation of a soft, moist, and flavorful heart cake. Whether you’re making a classic vanilla cake, a rich chocolate heart cake, or a vibrant red velvet version, the process of mixing the batter correctly is crucial. Below, we’ll walk through the essential steps to ensure your cake batter turns out light, fluffy, and perfectly textured.
1. Gather Your Ingredients
Before you start mixing, ensure you have measured and prepared all your ingredients. Having everything at room temperature helps create a smoother batter and better incorporation.
Dry Ingredients:
- All-purpose flour or cake flour for a tender crumb
- Baking powder and/or baking soda for proper leavening
- Salt to enhance the overall flavor
- Cocoa powder (if making a chocolate or red velvet cake)
Wet Ingredients:
- Unsalted butter or oil for richness and moisture
- Granulated sugar or brown sugar for sweetness
- Eggs for structure and stability
- Vanilla extract or other flavorings for depth of taste
- Milk, buttermilk, or a dairy-free alternative for a soft texture
Optional Additions:
- Food coloring for red velvet or colored heart cakes
- Espresso powder for deeper chocolate flavor
- Citrus zest or almond extract for extra flavor complexity
2. Sift and Combine Dry Ingredients
To achieve a cake with a light, airy texture, it’s essential to sift the dry ingredients together. This removes lumps and ensures an even distribution of leavening agents.
- In a large bowl, whisk together the flour, baking powder, baking soda (if using), and salt.
- If making a chocolate cake, sift in the cocoa powder to eliminate clumps.
- Set the dry ingredients aside while you work on the wet mixture.
3. Cream the Butter and Sugar (For Butter-Based Cakes)
Creaming butter and sugar together creates air pockets, leading to a fluffy cake texture.
- In a mixing bowl, beat the butter and sugar together using a hand mixer or stand mixer on medium speed. Mix until it becomes light and fluffy (about 3–5 minutes).
- Scrape down the sides of the bowl to ensure even mixing.
4. Add Eggs One at a Time
- Add the eggs one at a time, beating well after each addition. This helps incorporate air and prevent the batter from curdling.
- If using egg substitutes (flax eggs, applesauce, or mashed bananas), mix them in slowly to maintain a smooth consistency.
5. Alternate Adding Dry and Wet Ingredients
To keep the batter from becoming overmixed, alternate adding dry ingredients and wet ingredients in batches.
- Start by adding one-third of the dry ingredients to the wet mixture and mix on low speed until just combined.
- Pour in half of the liquid ingredients (milk, buttermilk, or alternative) and mix briefly.
- Continue alternating, ending with the final portion of dry ingredients.
This process ensures the batter remains smooth and well-mixed without being overworked, which can lead to a dense cake.
6. Add Special Flavors or Mix-Ins (Optional)
If you’re enhancing your heart cake with flavors or textures, now is the time to fold them in gently.
- Fold in chocolate chips, nuts, fruit zest, or sprinkles with a spatula.
- If adding food coloring for a red velvet or themed heart cake, stir it in at this stage.
7. Check the Batter’s Consistency
The final batter should be smooth and pourable but not too thin. If the batter feels too thick, add a tablespoon of milk. If it’s too runny, sift in a little extra flour.
8. Rest the Batter (Optional for Better Texture)
For even fluffier cakes, let the batter rest for 5–10 minutes before pouring it into the pans. This allows the flour to fully hydrate and improves the cake’s final structure.
Once your batter is perfectly mixed, you’re ready for the next step: baking and shaping your heart cake to perfection.
Shaping Without a Special Pan
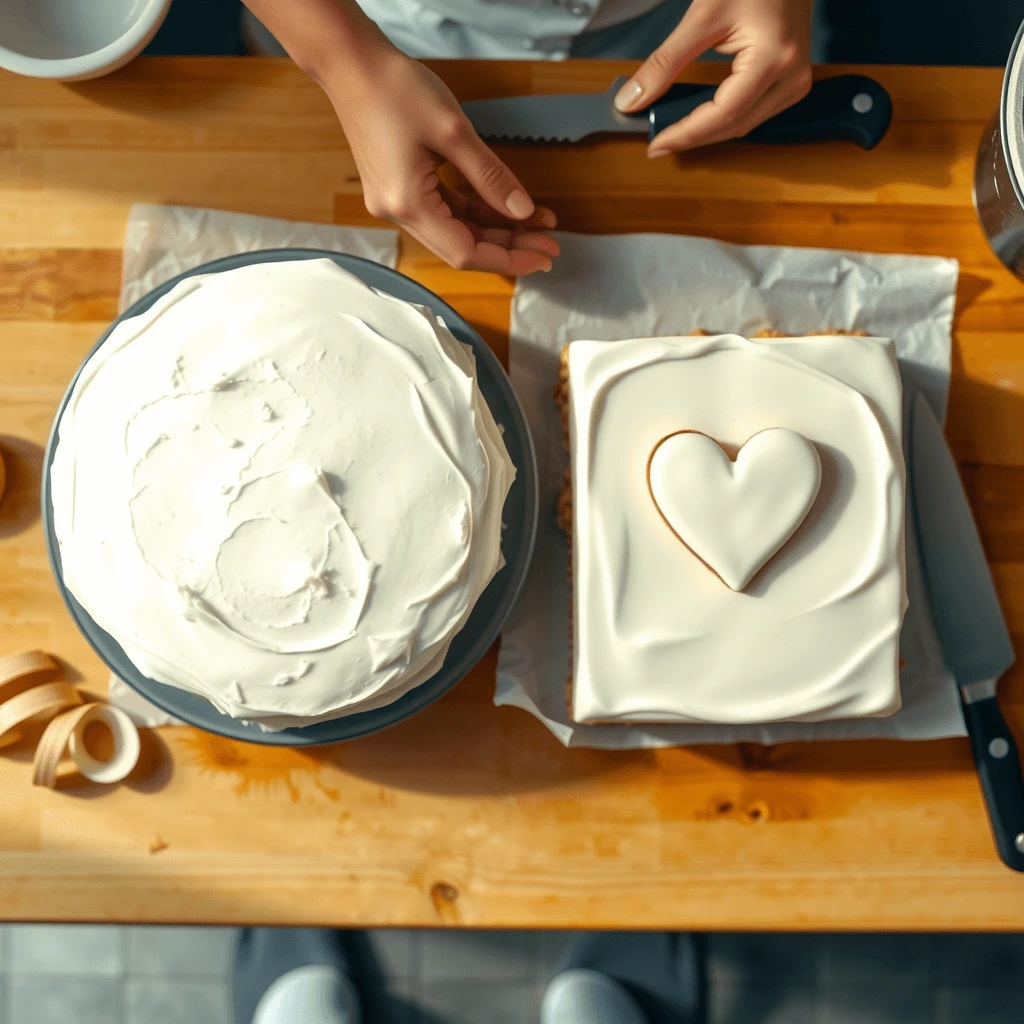
Want to make a beautiful heart cake but don’t have a heart-shaped pan? No problem! With a little creativity, you can easily shape a heart cake using a round pan and a square pan. This simple trick requires just a few basic cuts and minimal effort, giving you the perfect heart shape without needing a specialty cake pan.
1. What You’ll Need
Before you begin, gather the following:
- One round cake pan (8-inch or 9-inch)
- One square cake pan (8-inch or 9-inch)
- A sharp knife for cutting and shaping
- A cake board or serving plate for assembling the final shape
- Frosting or buttercream to help hold the pieces together
2. Bake Two Cakes (One Round & One Square)
- Prepare your cake batter as usual and divide it evenly between a round pan and a square pan.
- Bake both cakes at the same temperature, ensuring they have even thickness so they align perfectly when assembled.
- Let the cakes cool completely before cutting. A warm cake will be too soft and may break when handled.
3. Cutting & Assembling the Heart Shape
Once your cakes are cool, follow these steps to create the heart shape.
1: Slice the Round Cake in Half
- Using a sharp knife, cut the round cake straight down the middle to create two equal semicircles.
- These two halves will form the curved top of the heart.
2: Position the Square Cake Like a Diamond
- Place the square cake on your cake board or serving plate, rotating it so it looks like a diamond shape (one point facing down).
- This will form the bottom half of the heart.
3: Attach the Semicircles to the Square Cake
- Take the two semicircles from the round cake and place them on the top left and top right sides of the diamond-shaped square cake.
- Adjust the positioning until the shape resembles a heart.
4: Secure the Pieces Together
- Spread a thin layer of frosting between the cake pieces to hold them in place.
- Gently press the pieces together to form a seamless heart shape.
4. Frosting & Decorating Your Heart Cake
Once your cake is assembled, it’s time to hide the seams and create a smooth, flawless heart shape.
1: Apply a Crumb Coat
- Spread a thin layer of frosting over the entire cake to trap crumbs and create a smooth surface.
- Chill the cake for 15–20 minutes to help set the crumb coat.
2: Add the Final Layer of Frosting
- Use an offset spatula or piping bag to frost the cake evenly.
- If needed, build up the edges slightly to refine the heart shape.
3: Decorate to Enhance the Heart Shape
- Use piping techniques, edible glitter, sprinkles, or fondant accents to make the cake even more visually appealing.
- Consider adding fresh strawberries, chocolate drizzles, or edible gold dust for a special touch.
5. Why This Trick Works So Well
This method is simple, foolproof, and cost-effective because:
- No need to buy a heart-shaped pan
- Works with any cake flavor
- Creates a perfectly symmetrical heart
- Can be made in different sizes depending on pan dimensions
Now that you know this easy heart cake pan trick, you’re ready to bake and assemble a beautiful homemade heart cake for any occasion. Time to move on to baking and decorating!
Best Practices for Baking & Cooling
Baking your heart cake correctly is essential for achieving a moist, fluffy, and evenly cooked result. Following the right techniques will ensure that your cake bakes evenly, rises properly, and holds its shape once cooled. Below, we’ll go through the best practices for baking and cooling your heart cake.
1. Preparing Your Cake Pans
Before pouring your batter, it’s important to prepare your pans properly to prevent sticking and ensure easy release.
Greasing and Lining the Pans
- Use butter or non-stick spray to grease the bottom and sides of your heart-shaped, round, or square cake pans.
- Line the bottom with parchment paper to make removing the cake even easier.
- If using a heart cake pan, ensure all edges are well-greased so the intricate shape doesn’t break.
Filling the Cake Pans Evenly
- Pour the batter evenly into your prepared pans, filling them about two-thirds full to allow space for rising.
- If using multiple pans (round and square) to create a heart shape, ensure both cakes have an equal amount of batter for consistent baking.
- Smooth the batter with a spatula to create an even surface.
2. Setting the Right Baking Temperature
Baking at the correct temperature prevents overbaking, sinking, or drying out the cake.
- Preheat your oven to 325°F to 350°F (163°C to 177°C) depending on the recipe.
- A slightly lower temperature (325°F) works well for thicker cakes, ensuring even baking without over-browning the edges.
- If using dark-colored or non-stick pans, reduce the temperature by 25°F to prevent over-browning.
3. How to Ensure Even Baking
Avoid Overmixing the Batter
- Overmixing can create a dense, tough cake. Mix only until the ingredients are combined.
Tap the Pans to Release Air Bubbles
- Lightly tap the filled cake pans on the counter a few times to remove air bubbles and ensure an even crumb.
Bake on the Center Rack
- Place the cake pans in the center of the oven to ensure even heat distribution.
- If baking multiple cakes, leave space between them to allow proper air circulation.
Check for Doneness Without Opening the Oven Too Early
- Avoid opening the oven door too soon, as it can cause the cake to sink in the middle.
- Start checking for doneness 5 minutes before the recommended baking time using a toothpick or cake tester.
- Insert the toothpick into the center of the cake—if it comes out clean or with a few moist crumbs, the cake is done.
4. Cooling the Cake Properly
Proper cooling is just as important as baking to prevent the cake from collapsing or becoming soggy.
Cooling in the Pan First
- Once baked, let the cake cool in the pan for 10–15 minutes before removing it. This helps it firm up and prevents breakage.
- Run a knife around the edges to loosen the cake if needed.
Transferring to a Cooling Rack
- Carefully turn the cake out onto a wire cooling rack.
- Allow it to cool completely for at least an hour before frosting.
- If you plan to cut or shape the cake, chilling it in the refrigerator for 30–60 minutes makes slicing cleaner and prevents crumbs from sticking to the frosting.
Tips for Avoiding a Dry Cake During Cooling
- Cover the cake loosely with a clean kitchen towel while it cools to prevent drying.
- If you need to cool the cake quickly, place it on a wire rack in a cool room, but avoid placing it in the fridge too soon, as sudden cooling can cause condensation.
Now that your heart cake is perfectly baked and cooled, it’s time to decorate and bring it to life with stunning frosting and designs!
Decorating Ideas for the Perfect Heart Cake
Classic Buttercream Frosting for a Heart Cake
A smooth, creamy, and perfectly spreadable buttercream is the key to making your heart cake look and taste amazing. This frosting is not only rich and buttery but also easy to pipe and customize with colors and flavors. Whether you want a soft pastel pink buttercream for a romantic Valentine’s Day cake or a bold red frosting for a statement piece, this classic recipe will be your go-to.
1. Ingredients for Classic Buttercream
This simple yet versatile buttercream requires just a few pantry staples.
- 1 cup (2 sticks) unsalted butter, softened – Room temperature butter ensures smooth mixing.
- 4 cups powdered sugar (confectioners’ sugar), sifted – Prevents lumps and creates a silky texture.
- 2–3 tablespoons heavy cream or milk – Adjusts the consistency to be creamy and spreadable.
- 2 teaspoons pure vanilla extract – Adds classic flavor; you can also use almond or other extracts.
- ¼ teaspoon salt – Balances the sweetness and enhances flavor.
- Gel food coloring (optional) – For tinting the frosting into soft pinks, reds, or any color of your choice.
2. Step-by-Step Instructions for Making Buttercream
1: Beat the Butter Until Creamy
- In a large mixing bowl, use a hand mixer or stand mixer fitted with a paddle attachment to beat the softened butter on medium speed for 2–3 minutes.
- The butter should become light, fluffy, and pale in color.
2: Add the Powdered Sugar in Batches
- Gradually add the sifted powdered sugar one cup at a time.
- Mix on low speed at first to prevent a sugar cloud, then increase to medium speed until combined.
3: Add Vanilla and Salt
- Mix in the vanilla extract and salt for enhanced flavor.
4: Adjust the Consistency
- Add 2 tablespoons of heavy cream or milk and beat on medium-high speed until smooth.
- If the frosting is too thick, add an extra tablespoon of liquid. If it’s too thin, mix in more powdered sugar.
5: Whip Until Fluffy
- Increase the mixer speed to high and beat for another 2–3 minutes until the buttercream is light, airy, and spreadable.
3. How to Customize Your Buttercream
Coloring Buttercream for a Heart Cake
- Use gel food coloring instead of liquid food dye to maintain consistency.
- For soft pastel pink, add a tiny drop of pink gel color.
- For deep red, mix in red gel food coloring gradually, letting the color develop over time.
Flavor Variations
- Strawberry Buttercream – Add 2 tablespoons of strawberry puree or freeze-dried strawberry powder.
- Chocolate Buttercream – Mix in ¼ cup cocoa powder for a chocolatey version.
- Almond Buttercream – Substitute almond extract for vanilla for a nutty twist.
4. How to Use Buttercream for Decorating a Heart Cake
Crumb Coat for a Smooth Finish
- Apply a thin layer of buttercream to trap crumbs and create a smooth base.
- Chill the cake for 15–20 minutes before adding the final frosting layer.
Piping & Decorative Techniques
- Use a piping bag with a star tip to create rosettes, swirls, or ruffles along the edges.
- Smooth the frosting with an offset spatula or bench scraper for a polished look.
- Add sprinkles, edible glitter, or fresh fruit to enhance the design.
This classic buttercream frosting is the perfect complement to any heart cake, offering a creamy texture, rich flavor, and easy spreadability. Now that your frosting is ready, it’s time to decorate and bring your heart cake to life!
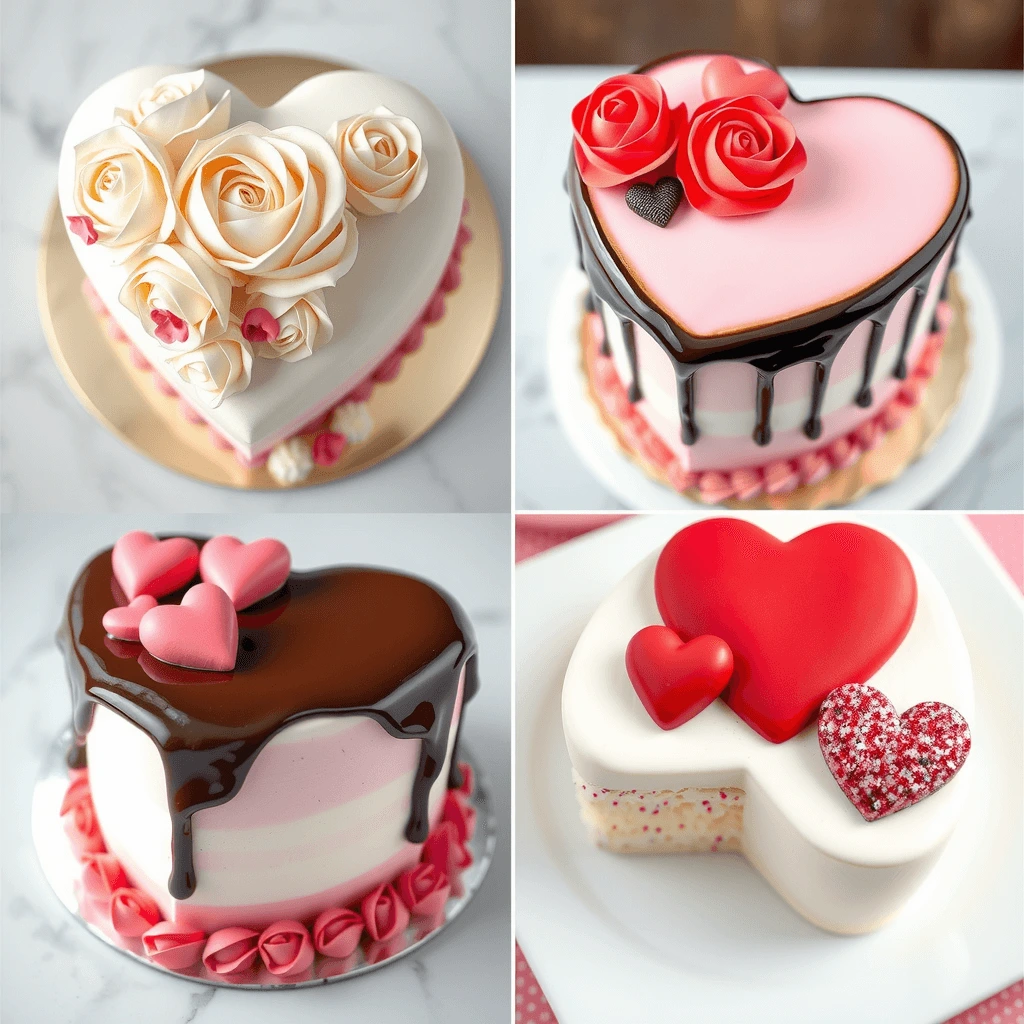
Creative Decoration Ideas for a Stunning Heart Cake
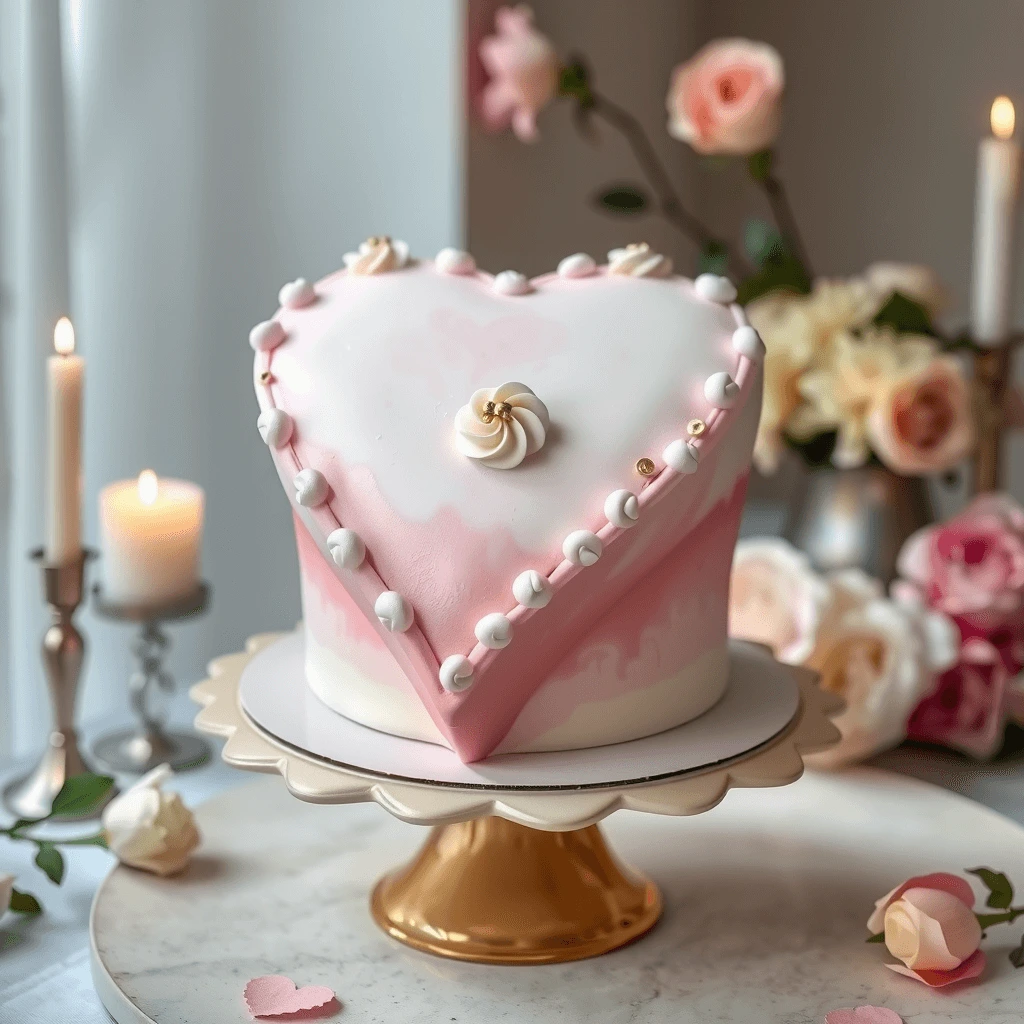
A beautifully decorated heart cake makes any occasion feel extra special. Whether you’re baking for Valentine’s Day, an anniversary, or a birthday, the right decorations can elevate your cake from simple to spectacular. Below, you’ll find a variety of creative decoration ideas, including buttercream techniques, fondant accents, and edible embellishments. With these ideas, your heart cake will not only taste amazing but also look stunning.
1. Buttercream Piping Designs for a Professional Look
Buttercream is one of the easiest and most versatile ways to decorate a heart cake. With a few simple techniques, you can achieve an elegant or playful design.
Rosette Swirls for a Romantic Look
- To create a rosette cake, use a star piping tip (like Wilton 1M or 2D) and pipe small, circular swirls of buttercream all over the cake.
- This technique works especially well for pink, red, or ombre-colored cakes, giving them a soft, floral effect.
Ruffle Borders for a Soft and Delicate Finish
- If you want a textured, delicate appearance, use a petal piping tip and create gentle ruffles around the edges of your cake.
- This method works best with pastel-colored buttercream for a dreamy, romantic effect.
Heart-Shaped Piped Designs
- For a more playful and fun look, pipe small buttercream hearts around the border of the cake using a round or star tip.
- Try using two or three different shades of pink or red for a vibrant and eye-catching design.
2. Fondant Accents for a Smooth, Elegant Finish
Fondant decorations add a polished, professional look to your heart cake. Even if you’re new to working with fondant, you can create simple yet impressive details.
Smooth Fondant Covering for a Clean Look
- Roll out a thin sheet of pre-made or homemade fondant and carefully drape it over your frosted cake.
- Use a fondant smoother to remove any air bubbles and create a sleek, flawless surface.
Fondant Hearts & Cutouts for Extra Detail
- Use small heart-shaped cookie cutters to cut out different-sized fondant hearts.
- Arrange them in a cascading pattern or layer them for a 3D effect.
- Try using gold or silver edible dust to add shimmer to your fondant accents.
Fondant Bows or Ribbons for a Gift-Like Cake
- For an elegant touch, craft a fondant ribbon and bow to place on top of the cake.
- This style works especially well for anniversary cakes or bridal shower desserts.
3. Chocolate & Ganache Drizzle for a Decadent Look
A chocolate drizzle adds richness, depth, and visual appeal to your heart cake.
Classic Chocolate Drip Cake
- Melt semi-sweet, milk, or white chocolate with a little heavy cream to make a smooth ganache.
- Using a spoon or squeeze bottle, drizzle the chocolate over the edges, allowing it to drip naturally for a drip cake effect.
White Chocolate or Colored Drizzles
- For a unique look, use tinted white chocolate in pink, red, or gold to create a vibrant drizzle effect.
- This method pairs beautifully with a lightly frosted or naked cake.
4. Fresh Fruit & Floral Arrangements for a Natural Touch
Adding fresh fruit or edible flowers enhances both the flavor and visual appeal of your heart cake.
Fresh Berries for a Vibrant Pop of Color
- Decorate the top of your cake with strawberries, raspberries, or cherries to add natural sweetness.
- Arrange the fruit in a heart shape or scatter it for a rustic, organic look.
Edible Flowers for a Delicate, Elegant Finish
- Use edible roses, violets, or pansies to create a soft, romantic effect.
- Make sure the flowers are food-safe and pesticide-free before placing them on your cake.
Sugared Fruit for a Sparkling Effect
- Lightly coat strawberries or blueberries in granulated sugar to create a frosted, sparkling look.
- This technique works especially well for winter-themed or wedding cakes.
5. Sprinkles, Pearls & Edible Glitter for Extra Glam
If you want your heart cake to have a playful or glamorous touch, consider using edible embellishments.
Classic Sprinkles for a Fun & Festive Look
- Use pink, red, or gold sprinkles to match the romantic theme of your cake.
- Try adding a sprinkle border at the base of the cake for a polished look.
Metallic Edible Pearls for a Luxurious Finish
- Place gold or silver edible pearls around the edges of the cake for an elegant, bridal-inspired design.
- Arrange pearls in a heart pattern on top of the cake for extra detail.
Edible Glitter for a Shimmering Touch
- Lightly dust edible glitter or luster dust over the frosting for a sparkling effect.
- This works especially well with fondant-covered cakes or ombre designs.
Final Tips for Decorating a Heart Cake
- Use a turntable to frost and decorate the cake evenly.
- Chill the cake before adding decorations to keep everything stable.
- Experiment with colors and designs to match the theme of your event.
With these creative decoration ideas, your heart cake will not only be delicious but also a showstopper. Now, it’s time to bring your vision to life and impress your guests with a beautifully decorated masterpiece.
Themed Heart Cakes for Special Occasions
A heart-shaped cake is perfect for celebrating love, milestones, and special moments, but customizing it for different occasions makes it even more memorable. Whether you’re baking for Valentine’s Day, an anniversary, a wedding, or a birthday, adding thoughtful decorations and themed elements will make your cake truly special. Below are some creative heart cake ideas tailored for various celebrations.
1. Valentine’s Day Heart Cake: A Sweet Celebration of Love
Valentine’s Day is all about romance, and a heart cake is the perfect way to show love through baking.
Color & Frosting Ideas
- Classic red, pink, or white buttercream with ombre or marbled effects.
- Chocolate ganache glaze for a rich and indulgent look.
- Whipped cream frosting for a light, airy texture.
Decorating Techniques
- Pipe buttercream rosettes or ruffles for a soft, romantic effect.
- Add fondant hearts, gold leaf accents, or edible glitter for a luxurious touch.
- Create a “Love You” message with piped frosting or chocolate lettering.
Topping & Garnish Ideas
- Fresh strawberries, raspberries, or cherries for a vibrant pop of color.
- Chocolate curls or white chocolate shavings for an elegant touch.
- Mini heart-shaped chocolates arranged on top for extra charm.
2. Anniversary Heart Cake: A Romantic Celebration
Anniversary cakes should feel elegant and meaningful, reflecting the couple’s journey and love story.
Color & Frosting Ideas
- Classic white or ivory fondant for a clean, sophisticated look.
- Soft pastel-colored buttercream for a vintage aesthetic.
- Dark chocolate frosting for a rich, decadent experience.
Decorating Techniques
- Pipe the couple’s initials or wedding date onto the cake.
- Decorate with edible gold or silver pearls for a timeless touch.
- Use hand-painted floral designs or watercolor buttercream for an artistic effect.
Topping & Garnish Ideas
- Fresh roses or edible flowers for a luxurious feel.
- Gold leaf accents for a celebratory shine.
- Chocolate-dipped strawberries for a sweet and romantic finish.
3. Wedding Heart Cake: A Beautiful Symbol of Love
A heart-shaped wedding cake can serve as a main cake or a complement to a larger wedding display.
Color & Frosting Ideas
- Classic white fondant with intricate lace patterns.
- Soft blush pink, champagne, or lavender buttercream for a modern look.
- Gold, silver, or metallic accents for a glamorous finish.
Decorating Techniques
- Adorn with sugar flowers that match the wedding bouquet.
- Use elegant pearl piping or lace-inspired designs.
- Add monogram initials or a cake topper with the couple’s name.
Topping & Garnish Ideas
- Candied flowers or edible pearls for a sophisticated touch.
- Macarons or truffles arranged around the cake.
- Mini heart cakes or cupcakes to complement the main design.
4. Birthday Heart Cake: A Fun & Personalized Surprise
A heart-shaped cake makes a unique and exciting birthday treat, especially when decorated in a fun and colorful way.
Color & Frosting Ideas
- Bright and bold buttercream colors like pink, blue, or rainbow.
- Drip cake style using white or colored ganache.
- Sprinkle-covered buttercream for a festive, cheerful look.
Decorating Techniques
- Pipe the birthday person’s name and age on the cake.
- Use confetti sprinkles, edible glitter, or candy decorations.
- Shape the cake into a “number” heart cake for milestone birthdays.
Topping & Garnish Ideas
- Colorful candies or cake pops for a playful touch.
- Whipped cream dollops topped with fresh fruit.
- Sparkler candles or edible gold dust for extra excitement.
5. Mother’s Day or Father’s Day Heart Cake: A Loving Tribute
A heart cake is a perfect way to show appreciation for parents on their special day.
Color & Frosting Ideas
- Pastel shades like lavender, peach, or baby pink for a soft, warm feel.
- Chocolate or mocha buttercream for a rich, comforting taste.
- Floral buttercream designs for a classic, elegant look.
Decorating Techniques
- Pipe “Best Mom” or “Best Dad” in cursive lettering.
- Decorate with buttercream flowers or edible pressed flowers.
- Use chocolate shavings or caramel drizzle for extra indulgence.
Topping & Garnish Ideas
- Fresh berries or candied nuts for a wholesome finish.
- Handmade chocolate hearts or fondant bows.
- Custom cake toppers with a heartfelt message.
Final Tips for Themed Heart Cakes
- Choose a theme that matches the occasion and complements the recipient’s personality.
- Experiment with different flavors, colors, and designs to make the cake unique.
- Incorporate meaningful details like initials, dates, or favorite flavors for a personal touch.
With these themed heart cake ideas, you can create a truly unforgettable dessert that celebrates life’s most special moments. Now, it’s time to start baking and decorating your heart cake to make your next celebration extra sweet!
Heart Cake Variations You Must Try
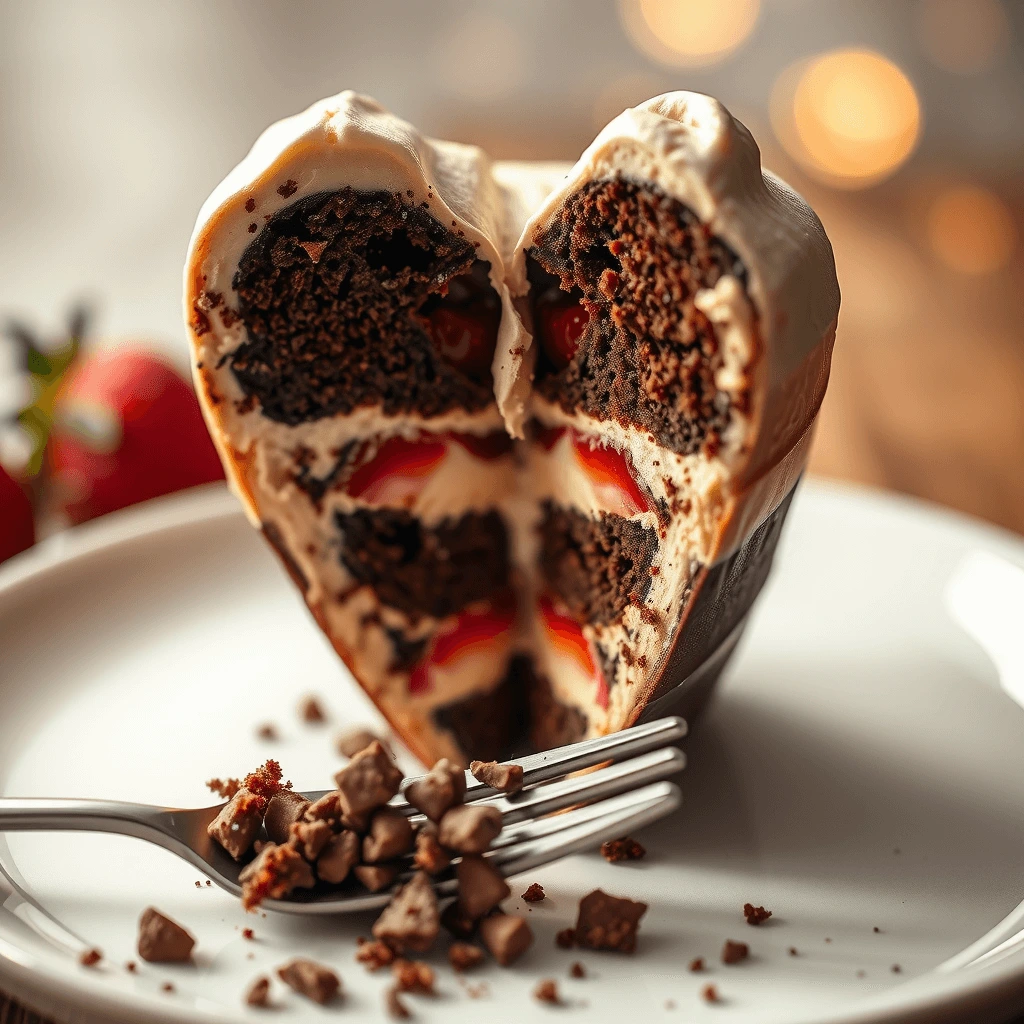
Chocolate Heart Cake Recipe: A Decadent and Romantic Dessert
A chocolate heart cake is the ultimate way to combine rich, indulgent flavor with a stunning presentation. Whether you’re making it for Valentine’s Day, an anniversary, a birthday, or just because, this recipe will ensure a moist, fluffy, and deeply chocolatey cake with a smooth, luscious frosting. Follow this step-by-step recipe to create a showstopping dessert that’s as delicious as it is beautiful.
1. Ingredients for the Chocolate Heart Cake
Before getting started, gather all the necessary ingredients. Using high-quality cocoa powder and real butter will give your cake the best flavor and texture.
For the Chocolate Cake:
- 2 cups all-purpose flour (or cake flour for a lighter texture)
- ¾ cup unsweetened cocoa powder (Dutch-process for a richer flavor)
- 1 ½ teaspoons baking powder
- 1 teaspoon baking soda
- ½ teaspoon salt
- 1 cup unsalted butter, softened
- 2 cups granulated sugar
- 4 large eggs, room temperature
- 2 teaspoons pure vanilla extract
- 1 cup buttermilk (or whole milk with 1 tablespoon vinegar as a substitute)
- ½ cup hot coffee or hot water (enhances chocolate flavor)
For the Chocolate Buttercream Frosting:
- 1 cup unsalted butter, softened
- 3 ½ cups powdered sugar, sifted
- ¾ cup unsweetened cocoa powder
- ½ teaspoon salt
- 1 teaspoon vanilla extract
- 5–6 tablespoons heavy cream or milk (adjust for desired consistency)
Optional Decorations:
- Chocolate shavings or curls
- Fresh strawberries or raspberries
- Chocolate ganache drizzle
- Edible gold dust or sprinkles
2. Step-by-Step Instructions for Baking the Cake
1: Prepare the Cake Pans
- Preheat your oven to 350°F (175°C).
- Grease and flour a heart-shaped cake pan or use the heart cake pan trick with a round and square pan.
- Line the bottom of the pan with parchment paper for easy removal.
2: Mix the Dry Ingredients
- In a large bowl, sift together the flour, cocoa powder, baking powder, baking soda, and salt.
- Whisk to combine and set aside.
3: Cream the Butter and Sugar
- In a separate large mixing bowl, beat the butter and sugar together on medium speed for 2–3 minutes until light and fluffy.
- Add the eggs, one at a time, mixing well after each addition.
- Stir in the vanilla extract.
4: Alternate Adding the Dry Ingredients and Buttermilk
- Add one-third of the dry ingredient mixture to the butter mixture and mix on low speed.
- Pour in half of the buttermilk, mixing until just combined.
- Continue alternating dry ingredients and buttermilk, ending with the dry mixture.
5: Add the Hot Coffee or Water
- Slowly pour in the hot coffee or hot water and mix until fully incorporated. The batter will be slightly thin, but this helps create a moist, tender cake.
6: Bake the Cake
- Pour the batter evenly into the prepared pan(s) and smooth the top with a spatula.
- Bake for 30–35 minutes or until a toothpick inserted in the center comes out clean.
- Let the cake cool in the pan for 10–15 minutes, then transfer it to a wire rack to cool completely before frosting.
3. Making the Chocolate Buttercream Frosting
1: Beat the Butter Until Creamy
- In a large bowl, beat the softened butter on medium-high speed for 2–3 minutes until fluffy.
2: Add the Cocoa Powder and Sugar
- Sift in the cocoa powder and powdered sugar, adding them one cup at a time while mixing on low speed.
3: Adjust Consistency with Heavy Cream
- Add vanilla extract and salt, then slowly mix in 5 tablespoons of heavy cream or milk.
- Increase to high speed and beat for 3 minutes until the frosting is light, fluffy, and spreadable.
4: Taste and Adjust
- If the frosting is too thick, add 1 more tablespoon of cream.
- If it’s too thin, mix in a little extra powdered sugar.
4. Frosting and Decorating Your Heart Cake
1: Apply a Crumb Coat
- Spread a thin layer of frosting over the entire cake to trap any loose crumbs.
- Chill the cake for 15–20 minutes to help the frosting set.
2: Apply the Final Layer of Frosting
- Use an offset spatula to apply a smooth, even layer of frosting.
- For a textured look, use a piping bag with a star tip to create swirls or rosettes.
3: Add Decorations
- Sprinkle chocolate curls over the top for an elegant touch.
- Drizzle chocolate ganache down the sides for a dramatic effect.
- Add fresh strawberries or raspberries for a fruity contrast.
- Lightly dust with edible gold dust or sprinkles for extra glamour.
5. Serving and Storing Your Chocolate Heart Cake
- For the best flavor, let the cake sit at room temperature for 30 minutes before serving.
- Store leftovers in an airtight container at room temperature for up to 2 days or in the refrigerator for up to 5 days.
- To freeze, wrap unfrosted cake layers tightly in plastic wrap and store for up to 3 months.
Final Thoughts
This decadent chocolate heart cake is rich, moist, and beautifully designed for any special occasion. With its fluffy chocolate frosting and elegant decorations, it’s sure to impress anyone who takes a bite. Now, it’s time to bake, frost, and enjoy your homemade chocolate masterpiece!
Red Velvet Heart Cake: A Classic, Romantic Dessert
A red velvet heart cake is a showstopping dessert that combines a rich, slightly tangy flavor with a soft, velvety texture. Its signature red hue and creamy cream cheese frosting make it an irresistible choice for Valentine’s Day, anniversaries, birthdays, or any romantic occasion. This recipe will guide you through baking, frosting, and decorating a stunning red velvet cake that is as delicious as it is beautiful.
1. Ingredients for the Red Velvet Heart Cake
To ensure the perfect balance of flavor and texture, gather all your ingredients before you begin. Using high-quality cocoa powder and buttermilk will enhance the cake’s signature taste.
For the Cake:
- 2 ½ cups all-purpose flour (or cake flour for a softer crumb)
- 2 tablespoons unsweetened cocoa powder (Dutch-processed for a richer color)
- 1 teaspoon baking soda
- ½ teaspoon baking powder
- ½ teaspoon salt
- 1 cup unsalted butter, softened
- 2 cups granulated sugar
- 3 large eggs, room temperature
- 1 ½ teaspoons pure vanilla extract
- 1 teaspoon white vinegar (helps enhance the red color)
- 1 cup buttermilk (adds moisture and tang)
- 2 tablespoons red food coloring (gel food color works best)
For the Cream Cheese Frosting:
- 8 ounces cream cheese, softened
- ½ cup unsalted butter, softened
- 4 cups powdered sugar, sifted
- 1 teaspoon vanilla extract
- ¼ teaspoon salt
- 2–3 tablespoons heavy cream (adjust for desired consistency)
Optional Decorations:
- Red velvet cake crumbs for a decorative effect
- White chocolate curls or sprinkles
- Fresh raspberries or strawberries
- Edible gold dust or pearl sprinkles
2. Step-by-Step Instructions for Baking the Cake
1: Preheat and Prepare the Cake Pans
- Preheat your oven to 350°F (175°C).
- Grease and flour a heart-shaped cake pan or prepare a round and square pan if using the heart cake pan trick.
- Line the bottom of the pan with parchment paper to ensure easy removal.
2: Mix the Dry Ingredients
- In a medium bowl, sift together the flour, cocoa powder, baking soda, baking powder, and salt.
- Whisk well to ensure even distribution, then set aside.
3: Cream the Butter and Sugar
- In a large mixing bowl, beat the butter and sugar together on medium speed for about 3 minutes, or until the mixture becomes light and fluffy.
- Scrape down the sides of the bowl to ensure everything is well mixed.
4: Add the Eggs and Vanilla
- Add the eggs one at a time, mixing well after each addition.
- Stir in the vanilla extract, making sure everything is fully incorporated.
5: Alternate Adding Dry Ingredients and Buttermilk
- Begin by adding one-third of the dry ingredients to the butter mixture and mix on low speed.
- Pour in half of the buttermilk, mixing until just combined.
- Repeat this process, ending with the remaining dry ingredients. Be careful not to overmix, as this can make the cake dense.
6: Add the Vinegar and Food Coloring
- In a small bowl, stir together the vinegar and red food coloring.
- Gently fold the mixture into the batter until fully incorporated, creating a vibrant red color.
7: Bake the Cake
- Pour the batter into the prepared cake pan(s), smoothing the top with a spatula.
- Bake for 30–35 minutes, or until a toothpick inserted in the center comes out clean.
- Allow the cake to cool in the pan for 10 minutes, then transfer it to a wire rack to cool completely before frosting.
3. Making the Cream Cheese Frosting
1: Beat the Cream Cheese and Butter
- In a large bowl, beat the softened cream cheese and butter together until smooth and creamy.
2: Add Powdered Sugar and Vanilla
- Gradually add the powdered sugar, beating on low speed to prevent a sugar cloud.
- Stir in the vanilla extract and salt for extra depth of flavor.
3: Adjust Consistency
- If the frosting is too thick, add 1 tablespoon of heavy cream at a time until you reach the desired consistency.
- Beat on high speed for 2–3 minutes to make the frosting light and fluffy.
4. Frosting and Decorating Your Red Velvet Heart Cake
1: Apply a Crumb Coat
- To create a smooth base, spread a thin layer of frosting over the entire cake.
- Chill the cake for 15–20 minutes to allow the crumb coat to set before applying the final frosting layer.
2: Apply the Final Frosting Layer
- Use an offset spatula or piping bag to evenly frost the cake.
- For a textured look, try piping decorative swirls or ruffles along the edges.
3: Add Decorative Finishing Touches
- Sprinkle cake crumbs around the top and sides for a classic red velvet finish.
- Garnish with white chocolate curls, edible pearls, or gold dust for a touch of elegance.
- For a fresh, fruity contrast, arrange raspberries or sliced strawberries on top.
5. Serving and Storing Your Red Velvet Heart Cake
- Let the cake sit at room temperature for 30 minutes before serving for the best flavor.
- Store leftover cake in an airtight container in the refrigerator for up to 5 days.
- To freeze, wrap the cake layers tightly in plastic wrap and store them for up to 3 months.
Final Thoughts
With its vibrant red color, soft texture, and tangy-sweet cream cheese frosting, this red velvet heart cake is the perfect way to celebrate love and special moments. Whether you’re making it for a holiday, an anniversary, or simply to treat yourself, this cake is sure to impress. Now, it’s time to bake, decorate, and enjoy every bite!
Gluten-Free & Vegan Heart Cake Options: A Delicious and Inclusive Treat
A gluten-free and vegan heart cake is the perfect way to ensure that everyone can enjoy a delicious, homemade dessert—no matter their dietary preferences or restrictions. Whether you’re baking for a special occasion, a loved one with food allergies, or simply looking for a healthier alternative, this recipe provides a moist, flavorful, and beautifully shaped cake without using gluten, dairy, or eggs. Even better, you won’t have to compromise on taste or texture.
1. Key Ingredients for a Gluten-Free & Vegan Heart Cake
To achieve a fluffy and moist cake without traditional ingredients like eggs, butter, and wheat flour, it’s important to choose high-quality substitutes. These ingredients will help you maintain structure, richness, and a soft crumb.
Gluten-Free Flour Alternatives
Gluten-free all-purpose flour blends are a great option because they are formulated to mimic traditional wheat flour. If using a blend without xanthan gum, add ½ teaspoon per cup of flour for better texture. Almond flour is another excellent choice, providing a subtle nutty flavor and extra moisture, though it works best when combined with other gluten-free flours. Oat flour offers a hearty texture and mild sweetness, but be sure to use certified gluten-free oats to avoid cross-contamination. Coconut flour, while highly absorbent, should always be mixed with other flours to prevent dryness.
Egg Replacements for Vegan Baking
Since eggs provide structure and leavening, replacing them correctly is essential. Flax eggs are one of the best options—simply mix one tablespoon of ground flaxseed with three tablespoons of water and let it sit for five minutes until it thickens. Chia eggs work the same way and create a similar binding effect. Applesauce is another alternative that not only replaces eggs but also adds moisture and a natural sweetness to the cake. Mashed bananas are perfect for chocolate-based cakes or banana-flavored desserts, though they do add a mild banana taste.
Dairy-Free Milk & Butter Alternatives
To keep the cake rich and flavorful without dairy, almond milk is a versatile option that works well in most recipes. Oat milk is another great alternative, offering a creamy texture that mimics whole milk. Coconut milk, particularly the full-fat variety, is best for cakes that need extra moisture and a hint of tropical flavor. For butter replacements, vegan butter works as a direct substitute for regular butter, while coconut oil provides richness, though refined coconut oil is best if you want to avoid a coconut aftertaste.
2. Gluten-Free & Vegan Heart Cake Recipe
Ingredients:
2 cups gluten-free all-purpose flour blend, 1 teaspoon baking soda, 1 teaspoon baking powder, ½ teaspoon salt, ¾ cup coconut sugar or organic cane sugar, ¼ cup cocoa powder (if making a chocolate heart cake), ½ cup unsweetened applesauce or 2 flax eggs, ½ cup melted coconut oil or vegan butter, 1 cup almond milk or oat milk, 1 tablespoon apple cider vinegar, and 2 teaspoons vanilla extract.
Instructions:
Step 1: Preheat & Prepare the Pan
Preheat the oven to 350°F (175°C). Grease a heart-shaped cake pan or use the heart cake pan trick with a round and square pan. Line the bottom of the pan with parchment paper to ensure easy removal and prevent sticking.
Step 2: Mix Dry Ingredients
In a large bowl, whisk together the gluten-free flour, baking soda, baking powder, salt, sugar, and cocoa powder (if using). Stir well to distribute the ingredients evenly.
Step 3: Combine Wet Ingredients
In a separate bowl, whisk together the applesauce (or flax eggs), melted coconut oil, almond milk, vinegar, and vanilla extract. Let the mixture sit for five minutes so the vinegar can react with the baking soda, helping the cake rise properly.
Step 4: Mix the Batter
Slowly pour the wet ingredients into the dry ingredients, stirring gently. Mix only until combined, as overmixing can cause the cake to become dense. If the batter seems too thick, add one to two tablespoons of almond milk to loosen it slightly.
Step 5: Bake the Cake
Pour the batter into the prepared cake pan, smoothing the top with a spatula. Bake for 30–35 minutes, or until a toothpick inserted in the center comes out clean. Once baked, let the cake cool in the pan for 10 minutes before transferring it to a wire rack to cool completely.
3. Vegan Frosting Options for a Heart Cake
Vegan Buttercream Frosting
For a smooth, creamy buttercream, beat ½ cup of softened vegan butter in a large bowl until fluffy. Slowly add two cups of powdered sugar while mixing on low speed. Stir in one teaspoon of vanilla extract and two tablespoons of almond milk. Beat the mixture for another two to three minutes until it becomes light and spreadable. If the frosting is too thick, add one more tablespoon of milk; if it’s too thin, mix in a little more powdered sugar.
Coconut Whipped Cream Frosting
To make a dairy-free whipped topping, start by chilling one can of full-fat coconut milk overnight. The next day, scoop out the solid coconut cream, leaving the liquid behind. Beat the coconut cream with ¼ cup of powdered sugar and one teaspoon of vanilla extract until light and fluffy. This frosting works best when spread over the cake and topped with fresh fruit or edible flowers.
4. Decorating Ideas for a Vegan & Gluten-Free Heart Cake
Fresh Fruit for a Natural Touch
Sliced strawberries, raspberries, and blueberries not only add color but also bring a burst of natural sweetness that pairs perfectly with chocolate or vanilla flavors. Arranging the fruit in the shape of a heart on top of the cake creates a beautiful and simple decoration.
Chocolate Drizzle for a Decadent Look
Using melted dairy-free dark chocolate, drizzle thin streams over the cake for an elegant, professional finish. Allow the chocolate to set before serving.
Coconut Flakes and Nuts for Extra Texture
To enhance the texture and flavor, sprinkle unsweetened shredded coconut or crushed nuts like almonds or pecans over the top of the cake. These add a delicious crunch without overpowering the main flavors.
5. Storing & Serving the Cake
If serving immediately, let the cake sit at room temperature for at least 30 minutes after frosting so the flavors meld together. To store leftovers, keep the cake in an airtight container at room temperature for up to two days. If refrigerated, allow it to come to room temperature before serving to restore its soft texture. For longer storage, wrap the cake tightly and freeze for up to three months.
6. Final Thoughts on Gluten-Free & Vegan Heart Cakes
Making a gluten-free and vegan heart cake is easier than it seems, especially when using the right substitutes for flour, eggs, and dairy. By choosing high-quality ingredients and experimenting with flavors, you can create a dessert that’s both indulgent and inclusive. Whether you’re celebrating a holiday, an anniversary, or just craving something sweet, this heart cake will impress your guests while being completely free of gluten and animal products. Now, it’s time to bake, decorate, and enjoy!
Final Tips for the Best Heart Cake
For the best results, start with room temperature ingredients, as this ensures a smooth batter and even baking. Using proper measuring techniques, especially for flour, will prevent a dry or dense cake—learn more about this method from Southern Living. Additionally, avoid overmixing the batter, as this can make the cake tough. Always preheat your oven before baking to ensure consistent heat distribution. Finally, grease and line your cake pans properly with parchment paper for easy removal. For more baking tips, check out Simply Recipes. Follow these steps, and your heart cake will turn out perfect every time!
How to Store & Serve Your Cake for Maximum Freshness
Once you’ve baked and decorated your heart cake, proper storage and serving techniques will ensure that it stays fresh, moist, and delicious. Whether you’re serving it immediately or saving leftovers for later, knowing how to handle your cake correctly will preserve its flavor and texture. Below, we cover the best ways to store your cake at room temperature, refrigerate or freeze it, and serve it for the best experience.
1. Storing Your Cake Properly
Room Temperature Storage (Best for Short-Term Keeping)
If you plan to serve the cake within one to two days, storing it at room temperature is ideal. Cakes with buttercream frosting or ganache can sit out safely, but those with whipped cream or fresh fruit toppings will require refrigeration.
To store your cake at room temperature:
- Place it on a cake stand with a lid or in an airtight container to prevent drying out.
- If you don’t have a container, loosely cover it with plastic wrap or foil to maintain moisture.
- Keep the cake in a cool, dry place away from direct sunlight and heat sources.
Refrigerating Your Cake (Best for Cakes with Dairy-Based Frostings or Fillings)
For cakes with cream cheese frosting, whipped cream, or custard fillings, refrigeration is necessary to prevent spoilage. However, refrigeration can also dry out cakes, so extra precautions are needed.
To refrigerate your cake without drying it out:
- Cover the cake tightly with plastic wrap or place it in an airtight container.
- If the cake is already sliced, press plastic wrap directly against the cut edges to retain moisture.
- Store in the refrigerator for up to five days, but let it sit at room temperature before serving to restore its soft texture.
Freezing Your Cake (Best for Long-Term Storage)
If you need to store the cake for more than a few days, freezing is the best option. Freezing helps maintain freshness, allowing you to prepare cakes in advance for future occasions.
To freeze an unfrosted cake:
- Wrap the completely cooled cake tightly in plastic wrap, then in aluminum foil to prevent freezer burn.
- Place it in a zip-top freezer bag or an airtight container.
- Label it with the date and freeze for up to three months.
To freeze a frosted cake:
- First, place the cake in the freezer uncovered for one to two hours until the frosting hardens.
- Once solid, wrap the cake in plastic wrap and aluminum foil, then store it in an airtight container.
- Allow the frozen cake to thaw in the refrigerator overnight before serving.
How to Thaw a Frozen Cake for the Best Texture
- For whole cakes, transfer them from the freezer to the refrigerator at least 12 hours before serving to allow for slow thawing.
- For cake slices, you can let them sit at room temperature for about 30 minutes to an hour before serving.
- Never thaw cakes in the microwave, as this can cause uneven defrosting and make the texture rubbery.
2. Best Practices for Serving Your Cake
Bringing a Chilled Cake to Room Temperature
If you’ve stored your cake in the fridge or freezer, allowing it to come to room temperature before serving will improve its flavor and texture. Cold cake can feel dense and firm, but once it warms up slightly, it becomes soft and moist.
To serve the cake at its best:
- Remove it from the refrigerator at least 30–60 minutes before serving.
- If the cake is frozen, let it thaw overnight in the fridge first, then bring it to room temperature.
- For cakes with whipped cream or fruit toppings, serve immediately after bringing them out.
Cutting the Cake Neatly Without Making a Mess
Cutting a heart-shaped cake evenly can be tricky, but using the right technique will ensure clean, precise slices.
- Use a sharp serrated knife instead of a regular knife to avoid squishing the layers.
- If the cake has a sticky or dense frosting, dip the knife in warm water and wipe it dry before slicing.
- Cut slices in a wedge or diagonal pattern rather than straight squares to maintain the heart shape.
- Serve with a cake server or spatula to lift each slice neatly.
Pairing the Cake with the Perfect Accompaniments
To enhance the flavors of your heart cake, consider serving it with complementary sides and beverages:
- Fresh berries or fruit compote for a refreshing contrast.
- Vanilla or chocolate ice cream for an extra indulgent treat.
- Whipped cream or crème fraîche for a light, airy topping.
- Coffee, tea, or a dessert wine to balance the sweetness.
Decorating Just Before Serving for Extra Freshness
If your cake includes delicate decorations like fresh fruit, edible flowers, or drizzled chocolate, add them just before serving. This prevents them from wilting or losing their vibrant appearance.
3. Troubleshooting Common Cake Storage & Serving Issues
The Cake Feels Too Dry After Refrigeration
Refrigeration can dry out cakes, but there are a few ways to restore moisture:
- Lightly brush the cake layers with simple syrup before frosting.
- Let the cake sit at room temperature for a longer period before serving.
- If the cake is already sliced, place a slice of fresh bread in the storage container to keep moisture in.
Frosting is Too Hard After Chilling
Butter-based frostings can become firm in the fridge. To fix this:
- Let the cake rest at room temperature for 30 minutes to an hour before serving.
- If needed, use a spatula to gently re-fluff the frosting before serving.
The Cake Became Too Soft After Sitting Out
If the cake was left at room temperature for too long and the frosting has softened too much:
- Place it in the fridge for 10–15 minutes before serving to firm up the buttercream or ganache.
- Avoid placing it near direct sunlight or heat sources, which can cause melting.
4. Final Thoughts on Storing & Serving Your Cake
Storing and serving your heart cake properly makes all the difference in maintaining its moisture, texture, and visual appeal. Whether you’re preparing it ahead of time or serving it fresh, following these simple techniques will keep your cake tasting just as delicious as the moment it was baked. Now that you know the best methods for storage and serving, it’s time to enjoy your beautifully crafted cake with family and friends!
Common Mistakes & How to Avoid Them When Baking a Heart Cake
Baking a heart cake can be a fun and rewarding experience, but even experienced bakers can run into issues that affect the texture, shape, or overall appearance of the final product. Whether it’s a cake that sinks in the middle, dry layers, or uneven frosting, knowing how to avoid these common mistakes will help you create a flawless, beautiful heart cake. Below, we’ll go over the most common baking and decorating mistakes and how to fix them for a perfect result.
1. Mistakes When Making the Cake Batter
Overmixing the Batter
One of the most common issues when making cake batter is overmixing. While it may seem like a good idea to ensure the batter is well combined, excessive mixing can develop too much gluten, resulting in a dense or tough cake.
How to avoid it:
- Mix the ingredients only until just combined—once you no longer see streaks of flour, stop mixing.
- If using an electric mixer, keep it on low to medium speed and avoid overbeating.
- Fold in dry ingredients gently using a spatula instead of a whisk or mixer when possible.
Using Cold Ingredients
If your ingredients—especially butter, eggs, or milk—are too cold, they won’t blend properly, leading to an uneven texture. Cold butter, in particular, does not cream well with sugar, resulting in a lumpy batter and a cake that doesn’t rise evenly.
How to avoid it:
- Bring eggs, butter, and milk to room temperature before using them. Let them sit out for 30 minutes to an hour before baking.
- If you’re short on time, place eggs in warm (not hot) water for 5 minutes and microwave butter for 10-second intervals to soften.
Incorrect Measuring of Ingredients
Baking is a science, and inaccurate measurements can throw off the balance of the cake, making it too dry, too dense, or not rise properly.
How to avoid it:
- Always use measuring cups and spoons designed for dry and liquid ingredients.
- Spoon and level flour into the measuring cup instead of scooping, which can pack it down and result in too much flour.
- Double-check that you are using the correct baking powder vs. baking soda, as they are not interchangeable.
2. Mistakes During Baking
Cake Sinks in the Middle
A sunken cake is often caused by opening the oven too early, underbaking, or incorrect oven temperature.
How to avoid it:
- Preheat the oven fully before placing the cake inside.
- Avoid opening the oven door before the cake has baked at least 75% of the total baking time.
- Use an oven thermometer to ensure your oven is properly calibrated.
- Test for doneness by inserting a toothpick into the center—if it comes out clean or with a few moist crumbs, the cake is ready.
Dry or Overbaked Cake
Baking the cake for too long or at too high of a temperature can make it dry and crumbly.
How to avoid it:
- Follow the recommended baking time and temperature in the recipe.
- Check for doneness a few minutes before the suggested baking time—if it’s done, remove it early.
- If your oven tends to run hot, lower the temperature by 10–15°F and bake for a slightly longer time.
Cake Sticks to the Pan
Nothing is worse than flipping over a cake and seeing half of it stuck to the pan.
How to avoid it:
- Grease and line the pan with parchment paper before adding the batter.
- Let the cake cool in the pan for 10–15 minutes before inverting it onto a cooling rack.
- If it still sticks, run a knife around the edges before flipping.
3. Mistakes in Frosting & Decoration
Frosting Melts or Slides Off
If the frosting is too soft or applied to a warm cake, it will melt or slide off, ruining the appearance of your cake.
How to avoid it:
- Ensure the cake is completely cool before frosting—chilling it for 30 minutes in the fridge can help.
- If the buttercream is too soft, refrigerate it for 15 minutes before applying.
- For a smooth, professional finish, apply a crumb coat (a thin layer of frosting), chill for 15 minutes, then apply the final frosting layer.
Uneven or Crumbly Frosting Application
If crumbs mix into the frosting, the cake can look messy and unprofessional.
How to avoid it:
- Use an offset spatula or bench scraper for even frosting.
- Apply a thin crumb coat first, chill the cake, then frost again.
- If frosting still pulls up crumbs, try adding a bit more frosting to the spatula to spread it more smoothly.
Overloading the Cake with Decorations
Adding too many decorations, sprinkles, or heavy toppings can make the cake look cluttered or cause it to collapse.
How to avoid it:
- Plan your decorations in advance and use a balance of colors and textures.
- If using fresh fruit or heavy toppings, apply them just before serving to keep them fresh.
- Keep the focus on the heart shape of the cake—sometimes, less is more.
4. Mistakes When Storing & Serving
Storing the Cake Incorrectly
Improper storage can make a cake go stale or dry out too quickly.
How to avoid it:
- Store the cake in an airtight container to keep it fresh.
- If refrigerating, let it sit at room temperature for 30 minutes before serving to bring back moisture.
- Freeze unfrosted cake layers for up to three months to prep ahead of time.
Messy or Uneven Cake Slices
If you struggle with cutting clean cake slices, you may be using the wrong technique.
How to avoid it:
- Use a sharp serrated knife for clean cuts.
- Wipe the blade between each slice to avoid dragging frosting.
- Cut in a gentle sawing motion rather than pressing down hard.
5. Final Thoughts on Avoiding Cake Mistakes
Baking a heart cake takes patience and attention to detail, but avoiding these common mistakes will help you achieve a beautiful, delicious result every time. By measuring ingredients properly, following baking best practices, and applying frosting carefully, you’ll create a cake that looks just as amazing as it tastes. Now, it’s time to bake with confidence and enjoy your perfect heart cake!
Where to Buy Heart Cake Pans & Decorating Tools
If you want to bake a perfect heart-shaped cake, having the right tools makes all the difference. Whether you’re looking for a heart cake pan, piping tools, or professional-grade decorating supplies, knowing where to shop can save time and ensure you get the best quality products. Below, we cover the best online and in-store options to find heart cake pans and essential decorating tools.
1. Best Places to Buy Heart Cake Pans
Amazon – Wide Variety & Fast Shipping
Amazon is one of the best places to find heart cake pans in different sizes and materials. Whether you need silicone molds, non-stick metal pans, or deep-layered cake tins, Amazon has plenty of options. Plus, with Prime shipping, you can get your pan quickly if you’re baking on short notice.
Recommended options on Amazon:
- Wilton Heart-Shaped Cake Pan – A classic, high-quality non-stick pan
- Fat Daddio’s Heart Cake Pan – Anodized aluminum for even baking
- Silicone Heart Molds – Perfect for mini heart cakes or mousse cakes
Wilton Store – Best for High-Quality Bakeware
Wilton is a trusted brand for baking pans, decorating tools, and cake accessories. If you’re looking for durable and reliable heart cake pans, Wilton’s website offers a great selection. They also have bundles that include cake pans, piping tips, and decorating supplies.
Target & Walmart – Affordable & Convenient
For those who prefer to shop in person, Target and Walmart offer budget-friendly heart cake pans, silicone molds, and baking accessories. Around Valentine’s Day, they often stock seasonal bakeware, making it a great time to grab limited-edition heart cake pans.
Michael’s & Hobby Lobby – Best for Seasonal Cake Supplies
Michael’s and Hobby Lobby carry baking tools and specialty cake pans, especially during holiday seasons. They also offer coupon discounts, so you can save on Wilton bakeware and decorating kits.
Specialty Baking Stores – Best for Professional Tools
If you’re looking for high-end bakeware or professional-quality cake pans, check out specialty stores like:
- Sur La Table – Premium-quality cake pans and decorating tools
- Williams Sonoma – Offers heavy-duty heart cake pans with even heat distribution
- Baking Supply Stores – Local shops often have unique and high-quality pans
Etsy – Handmade & Custom Cake Pans
For bakers who love unique bakeware, Etsy sellers offer handmade and vintage-style heart cake pans. You can find beautifully designed cake molds that aren’t available in mainstream stores.
2. Where to Buy Cake Decorating Tools
Amazon – One-Stop Shop for Decorating Kits
Amazon offers complete cake decorating kits, piping bags, and turntables. If you’re looking for an all-in-one set, consider purchasing a cake decorating bundle that includes:
- Piping tips (Wilton or Ateco brands)
- Offset spatula for smooth frosting
- Bench scraper for sharp edges
- Turntable for even frosting application
Wilton – Best for Specialty Decorating Tools
Wilton is the go-to brand for buttercream piping tools, fondant cutters, and food-safe stencils. Their online store has specialty decorating tools like:
- Heart-shaped fondant cutters
- Edible glitter and sprinkles
- Specialized piping tips for rosettes and swirls
Michael’s & Joann Fabrics – Great for DIY Cake Decorators
Both Michael’s and Joann Fabrics carry a range of decorating supplies, edible food colors, and sprinkles. If you enjoy making handmade decorations, you can also find modeling chocolate and edible pearls in their cake decorating sections.
Baking Supply Stores – Best for Professional-Grade Tools
Professional baking stores sell higher-end cake tools, including:
- Stainless steel piping tips for precise designs
- Airbrush kits for custom cake colors
- Heavy-duty cake turntables for smooth frosting application
Local Kitchen Supply Stores – In-Person Shopping
Many kitchen stores like Bed Bath & Beyond or The Container Store carry cake decorating essentials like spatulas, icing smoothers, and food coloring sets.
3. Best Decorating Tools for Heart Cakes
Essential Decorating Tools:
- Offset spatula – Helps smooth frosting evenly over your heart cake
- Bench scraper – Creates sharp frosting edges for a professional look
- Piping bags & tips – Allows you to add beautiful swirls, borders, and lettering
- Turntable – Makes decorating easier by allowing you to rotate the cake while frosting
Must-Have Accessories for a Stunning Cake:
- Heart sprinkles & edible glitter – Adds sparkle and texture
- Fondant heart cutters – Makes elegant cake decorations
- Gold or silver edible dust – Enhances designs with a metallic sheen
- Chocolate drizzle bottle – Helps create a smooth chocolate drip effect
4. Budget-Friendly vs. Professional-Grade Tools
Best Budget-Friendly Options:
- Amazon cake decorating sets – Great for beginners
- Walmart or Target piping bags & spatulas – Affordable and easy to find
- Michael’s or Joann’s seasonal cake kits – Ideal for quick and fun cake decorating
Best High-End Professional Tools:
- Fat Daddio’s cake pans – Used by professional bakers for even baking
- Ateco stainless steel piping tips – Durable and precise for buttercream designs
- Chefmaster airbrush kit – Great for advanced decorators who want to add gradients and shading
5. Where to Find Specialty Ingredients for Decorating
If you’re looking for high-quality food colors, edible flowers, or custom decorations, check out:
- The Sugar Art – Specializes in edible glitter and metallic dust
- Bakers’ Nook – Carries fondant, gum paste, and specialty food colors
- Whole Foods & Trader Joe’s – Great for finding organic food coloring and natural sweeteners
6. Final Thoughts on Buying Heart Cake Pans & Tools
Finding the perfect heart cake pan and decorating tools depends on your budget, skill level, and design preferences. Whether you’re shopping online for convenience or visiting a local store for hands-on selection, investing in high-quality tools will make cake decorating easier and more enjoyable. Now that you know where to buy everything you need, it’s time to start baking and decorating a heart cake that looks just as beautiful as it tastes!
Conclusion: Bake, Decorate, and Share Your Heart Cake!
Making a perfect heart cake is easier than you think when you have the right recipe, tools, and techniques. From choosing the best ingredients and using the heart cake pan trick to mastering buttercream frosting and decorating with creativity, every step plays a role in achieving a beautiful and delicious cake.
To recap, start by preparing a moist and flavorful cake batter, whether you choose classic vanilla, decadent chocolate, or vibrant red velvet. Bake your cake evenly and allow it to cool completely before applying a smooth crumb coat and adding your final decorative touches. Whether you prefer elegant buttercream swirls, rich chocolate drizzles, or fresh fruit toppings, there are endless ways to customize your heart cake to suit any occasion.
Now that you have all the knowledge you need, it’s time to get creative and experiment with different flavors, fillings, and designs! Whether you opt for a gluten-free, vegan version or a double-layered masterpiece, don’t be afraid to personalize your cake to make it truly unique.
We’d love to see your beautiful heart cake creations! Share your finished cake on social media and tag us so we can celebrate your baking success. Happy baking, and enjoy every bite of your homemade heart cake!