
Cooking during busy weeknights can feel overwhelming, but with these quick and easy Taste of Home recipes, you can enjoy comforting homemade meals without the hassle. From one-pot wonders to hearty casseroles, these dishes bring the warmth of home to your table in no time. Let’s explore delicious recipes that make weeknight cooking stress-free and enjoyable!
Busy weeknights can make it challenging to prepare a comforting, home-cooked meal. Between work, errands, and family obligations, finding the time and energy to cook may seem impossible. That’s where quick and easy recipes come to the rescue.
This collection of Taste of Home recipes is designed to simplify your evenings without sacrificing flavor or quality. From one-pot wonders to cozy casseroles, these dishes bring the warmth of home-cooked meals to your table in a fraction of the time. Whether you’re feeding picky kids, rushing after work, or just craving something hearty and satisfying, these recipes are the perfect solution for your busy schedule.
Let’s dive into these delicious, stress-free meals that will make weeknight cooking a breeze!
One-Pot Wonders for Quick and Easy Taste of Home Recipes
Cooking doesn’t have to leave you with a pile of dishes.One-pot meals are a lifesaver for busy weeknights, offering simplicity and flavor without the mess. Discover more tips and recipes for one-pot wonders in this guide by The Kitchn and explore additional one-pan dinner ideas from Food Network to keep your evenings stress-free and delicious
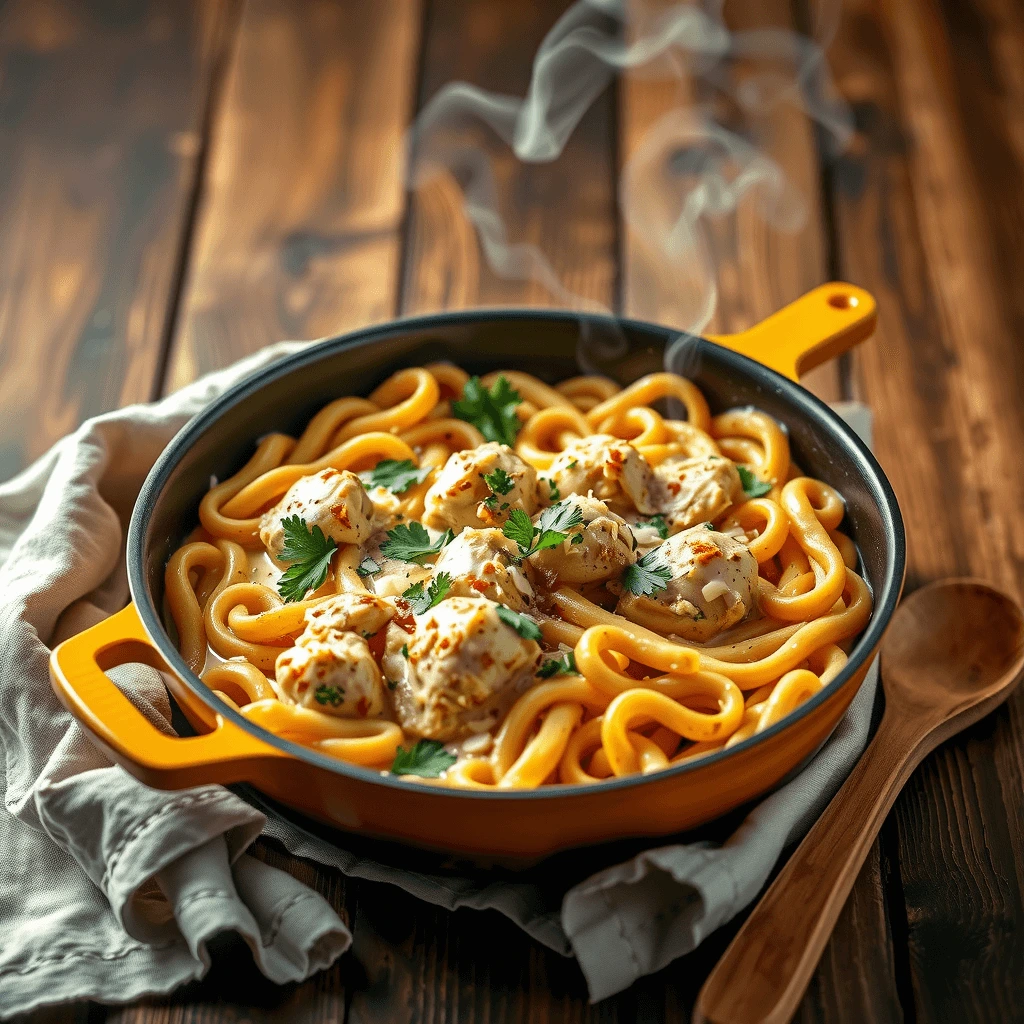
Classic Chicken and Rice Skillet: A Quick and Easy Taste of Home Recipe
Why This Dish Belongs in Your Dinner Rotation
When it comes to quick and easy taste of home recipes, few meals offer the same balance of simplicity and comfort as this classic chicken and rice skillet. Not only does it come together in just one pan, but it also delivers rich flavors that taste like they’ve been simmering all day. Even better, it requires minimal prep, making it ideal for busy weeknights when time is limited.
Additionally, this dish is highly versatile, allowing for ingredient swaps based on what you have in your kitchen. Whether you prefer a mild and creamy version or something with a spicy kick, this recipe adapts effortlessly to different flavors. Plus, the combination of protein, grains, and vegetables ensures a well-balanced meal that satisfies the whole family.
The Secret to a Perfect Chicken and Rice Skillet
Achieving the perfect chicken and rice skillet requires attention to detail. To avoid dry chicken or mushy rice, it’s essential to follow a few key steps. From choosing the right ingredients to layering flavors, every component plays a role in ensuring the best possible outcome.
1. Choosing the Right Ingredients
Not all chicken and rice dishes are created equal. The best quick and easy taste of home recipes rely on high-quality ingredients that enhance both flavor and texture.
Best Chicken Cuts for a Flavorful Skillet Meal
To guarantee tender and juicy bites, selecting the right cut of chicken is crucial. While boneless, skinless chicken breasts cook quickly, they can dry out if overcooked. On the other hand, chicken thighs retain moisture better and offer a richer flavor. If you prefer a more robust taste, bone-in, skin-on chicken can be an excellent option, though it requires a longer cooking time.
Selecting the Right Rice for a Perfect Texture
Just as important as the chicken, the rice can make or break this dish. Long-grain white rice remains the best option, as it absorbs flavors well without becoming sticky. However, if you’re looking for a heartier option, brown rice provides extra fiber and a slightly nutty flavor—though it does require additional liquid and a longer cooking time.
Building Depth of Flavor with Aromatics
Aromatic ingredients bring out the best in this dish, adding complexity to each bite. Sautéed onions, garlic, and bell peppers provide a savory base, while a handful of carrots and peas contribute color and natural sweetness. To elevate the flavor even further, consider incorporating smoked paprika, dried thyme, or a pinch of cayenne for extra depth.
2. Step-by-Step Cooking Guide
Searing the Chicken for Maximum Flavor
To start, heat a tablespoon of oil in a large skillet over medium-high heat. Once hot, add the chicken pieces and sear them for 3–4 minutes per side until golden brown. This step enhances the overall taste by locking in the juices and creating a delicious crust. After searing, remove the chicken from the pan and set it aside.
Sautéing the Aromatics to Build Flavor
Next, reduce the heat slightly and add onions, garlic, and bell peppers to the same skillet. Stirring occasionally, allow them to cook for about 5 minutes, or until they become fragrant and slightly caramelized. The goal here is to extract as much natural sweetness as possible.
Toasting the Rice for a Nutty Aroma
Before adding any liquid, stir in the rinsed rice and toast it for 1–2 minutes. This simple yet crucial step enhances the rice’s natural nuttiness and prevents it from becoming overly sticky.
Simmering Everything to Perfection
Once the rice is well-coated, pour in chicken broth and season with salt, black pepper, and paprika. Gently nestle the chicken back into the skillet, ensuring that each piece is partially submerged in the liquid. Then, bring everything to a simmer before covering and allowing it to cook on low heat for 20 minutes. Avoid stirring during this time, as it can cause the rice to break apart.
Finishing Touches for a Burst of Flavor
After the cooking time is up, turn off the heat and let the dish sit for 5 minutes. This resting period allows the rice to fully absorb any remaining liquid, resulting in a light and fluffy texture. Just before serving, garnish with fresh parsley, a squeeze of lemon juice, or grated Parmesan for an added burst of freshness.
3. Variations to Suit Different Tastes
This quick and easy taste of home recipe is incredibly adaptable. If you’re in the mood for something different, consider trying one of these variations:
Spicy Cajun Chicken and Rice
- Swap regular paprika for Cajun seasoning and cayenne pepper.
- Add sliced andouille sausage for a smoky flavor boost.
Mediterranean-Inspired Chicken and Rice
- Infuse the dish with lemon zest, oregano, and kalamata olives.
- Top with feta cheese and cherry tomatoes before serving.
Mexican-Style Chicken and Rice
- Replace half of the broth with tomato sauce or salsa.
- Stir in cumin, chili powder, and black beans for extra depth.
4. Serving Suggestions for a Complete Meal
While this dish is satisfying on its own, pairing it with complementary sides takes it to another level.
Light, Refreshing Side Salads
- A cucumber and tomato salad provides brightness and balance.
- A simple coleslaw adds crunch and texture.
Warm Breads for Extra Comfort
- Garlic bread helps soak up any extra sauce.
- Cornbread brings a subtle sweetness to the meal.
Steamed or Roasted Vegetables
- Broccoli, asparagus, or Brussels sprouts add a nutritious touch.
5. Storage and Make-Ahead Tips
This dish is not only quick to make but also stores well, making it a staple among quick and easy taste of home recipes.
Best Practices for Storing Leftovers
- Allow the dish to cool completely before transferring it to an airtight container.
- Refrigerate for up to four days to maintain freshness.
How to Reheat Without Drying Out
- Add a splash of chicken broth before reheating on the stovetop.
- If using a microwave, cover with a damp paper towel to retain moisture.
Freezing for Long-Term Meal Prep
- Portion the dish into freezer-safe containers and store for up to three months.
- Thaw overnight in the refrigerator before reheating.
6. Why This Recipe Deserves a Spot in Your Meal Plan
This classic chicken and rice skillet is more than just a meal—it’s a comforting, time-saving solution for busy nights. As part of the best quick and easy taste of home recipes, it checks every box:
- Minimal cleanup thanks to one-pan cooking.
- A well-balanced combination of protein, grains, and vegetables.
- Customizable ingredients to suit different flavor preferences.
Whether you’re looking for a simple weeknight dinner or a nostalgic home-cooked meal, this recipe delivers both flavor and convenience.
Creamy Tomato Basil Pasta: A Quick and Easy Taste of Home Meal
Why This Pasta Dish is a Must-Try
If you’re looking for quick and easy taste of home meals, this creamy tomato basil pasta is the perfect solution. Not only does it come together in under 30 minutes, but it also delivers restaurant-quality flavor with minimal effort. The combination of rich tomato sauce, fragrant basil, and velvety cream makes this dish a true comfort food favorite. Plus, with just a handful of pantry staples, you can create a meal that feels both indulgent and effortless.
Whether you need a weeknight dinner, a cozy weekend meal, or something to impress guests without spending hours in the kitchen, this quick and easy taste of home meal checks every box.
The Secret to a Perfect Creamy Tomato Basil Pasta
To achieve the best flavor and texture, it’s essential to use the right ingredients and follow a few key cooking techniques. By layering flavors and cooking everything just right, you can turn a simple pasta dish into an unforgettable quick and easy taste of home meal.
1. Choosing the Best Ingredients
The foundation of any great pasta dish starts with high-quality ingredients. Even though this is a quick and easy taste of home meal, using fresh and flavorful components will make a noticeable difference.
Best Pasta Choices for This Dish
- Penne – Holds the creamy sauce well, making each bite flavorful.
- Fettuccine – Creates a luxurious texture with its wide, flat surface.
- Spaghetti – A classic choice that pairs well with light, creamy sauces.
- Rigatoni – The ridges trap the sauce, enhancing every bite.
For the best results, penne or rigatoni are ideal because they hold onto the creamy tomato basil sauce without becoming soggy.
Selecting the Right Tomatoes
A rich, flavorful tomato base is crucial for this quick and easy taste of home meal. Consider using:
- Crushed San Marzano tomatoes – Naturally sweet and less acidic, creating a balanced sauce.
- Diced fire-roasted tomatoes – Adds a subtle smoky flavor.
- Tomato paste – Deepens the richness of the sauce with concentrated tomato flavor.
The Role of Fresh Basil
Basil brings a burst of freshness that enhances the creamy tomato sauce. While dried basil works in a pinch, fresh basil leaves provide the best flavor and aroma. Adding them at the end of cooking ensures they don’t lose their bright, herbaceous taste.
2. Step-by-Step Cooking Guide
Cooking the Pasta to Perfection
- Bring a large pot of salted water to a rolling boil.
- Add the pasta and cook 1–2 minutes less than the package instructions to keep it al dente.
- Reserve 1 cup of pasta water before draining to help bind the sauce later.
Building the Creamy Tomato Basil Sauce
- Heat olive oil in a large skillet over medium heat.
- Sauté minced garlic and diced onions until fragrant and golden, about 3–4 minutes.
- Stir in tomato paste and crushed tomatoes, letting them simmer for 5 minutes to develop depth.
Adding the Cream for a Velvety Texture
- Reduce the heat to low, then stir in heavy cream or half-and-half to create a silky texture.
- Simmer for 2–3 minutes, allowing the flavors to meld together.
Finishing the Dish with Basil and Cheese
- Toss in fresh basil leaves and stir until just wilted.
- Add grated Parmesan cheese for a nutty, salty balance.
Coating the Pasta in Sauce
- Transfer the cooked pasta into the sauce, tossing gently to coat every piece.
- If needed, add a splash of reserved pasta water to achieve the perfect consistency.
3. Variations for Different Flavor Profiles
One of the best things about this quick and easy taste of home meal is how easily it can be customized.
Spicy Arrabbiata-Style Creamy Tomato Basil Pasta
- Add red pepper flakes or a pinch of cayenne for extra heat.
- Use spicy Italian sausage for a bolder flavor.
Garlic Butter Shrimp and Tomato Basil Pasta
- Sauté shrimp in garlic butter before adding it to the creamy sauce.
- Finish with a squeeze of fresh lemon juice to brighten the flavors.
Roasted Vegetable Tomato Basil Pasta
- Toss in roasted zucchini, bell peppers, or mushrooms for added nutrition.
- Sprinkle with toasted pine nuts for an extra crunch.
4. Serving Suggestions for a Complete Meal
Pairing this dish with the right sides and accompaniments makes it feel even more like a quick and easy taste of home meal.
Crisp and Refreshing Side Salads
- A classic Caesar salad with crunchy croutons and creamy dressing.
- A simple arugula salad tossed with balsamic vinaigrette.
Warm and Buttery Garlic Bread
- Homemade garlic knots for a chewy, flavorful bite.
- Toasted ciabatta brushed with olive oil and garlic for an Italian touch.
Light, Steamed Vegetables
- Broccoli, asparagus, or green beans for a balanced plate.
- Sautéed spinach with garlic and lemon to enhance the pasta’s flavors.
5. Storage and Make-Ahead Tips
This pasta dish isn’t just delicious fresh—it’s also perfect for meal prep, making it one of the best quick and easy taste of home meals for busy days.
Best Practices for Storing Leftovers
- Let the pasta cool before transferring it to an airtight container.
- Store in the refrigerator for up to four days.
How to Reheat Without Losing Creaminess
- Warm gently on the stovetop with a splash of milk or cream to revive the sauce.
- If microwaving, cover with a damp paper towel to prevent drying out.
Freezing for Later Use
- Freeze the sauce separately in freezer-safe containers for up to three months.
- Thaw overnight in the refrigerator before reheating and tossing with fresh pasta.
6. Why This Recipe Should Be in Your Meal Plan
This creamy tomato basil pasta is more than just a meal—it’s a comforting, time-saving solution for anyone looking for quick and easy taste of home meals. From its rich, velvety sauce to its perfectly cooked pasta, every bite is packed with flavor and warmth.
If you’re searching for a go-to recipe that feels gourmet but takes minimal effort, this dish is a must-try. Not only is it quick to prepare, but it also brings a restaurant-quality experience right to your kitchen.
With its simple ingredients, easy preparation, and adaptable variations, this pasta dish deserves a permanent spot in your recipe collection. Try it today and experience why it’s one of the best quick and easy taste of home meals you’ll ever make!.
Beef and Vegetable Stir-Fry: A Quick and Easy Taste of Home Recipe
Why This Stir-Fry is a Must-Try
When it comes to quick and easy taste of home recipes, a beef and vegetable stir-fry is one of the best options for a fast, flavorful, and balanced meal. Not only does it come together in under 30 minutes, but it also delivers a delicious mix of tender beef, crisp vegetables, and savory sauce. Whether you’re cooking for a family dinner or a solo meal after a long day, this stir-fry guarantees a restaurant-quality dish without the hassle.
Moreover, stir-fry recipes are highly customizable. You can easily swap out the protein, adjust the vegetables, or modify the sauce to suit your preferences. If you’re looking for quick and easy taste of home recipes that keep things interesting, this dish is a must-have in your weekly meal plan.
The Secret to a Perfect Beef and Vegetable Stir-Fry
Mastering a great stir-fry requires more than just tossing ingredients into a pan. To achieve perfectly seared beef, crisp-tender vegetables, and a rich, well-balanced sauce, following a few essential techniques is key.
1. Choosing the Right Ingredients
As with all quick and easy taste of home recipes, ingredient selection plays a significant role in the final flavor and texture of the dish.
Best Cuts of Beef for Stir-Frying
For tender and flavorful beef, choosing the right cut is crucial. The best options include:
- Flank steak – Lean and flavorful, it absorbs marinades well and cooks quickly.
- Sirloin steak – A slightly more tender option with great beefy flavor.
- Ribeye – A fattier cut that delivers juiciness and depth.
For the best results, slice the beef thinly against the grain to ensure tenderness in every bite.
Best Vegetables for Stir-Fry
Stir-fried vegetables should be colorful, crisp, and vibrant. Some of the best choices include:
- Bell peppers – Add natural sweetness and crunch.
- Broccoli – Holds up well to high heat and absorbs the sauce beautifully.
- Carrots – Provide a slightly sweet contrast to the savory beef.
- Snow peas – Bring freshness and a subtle snap to the dish.
- Mushrooms – Add an earthy depth that enhances the umami flavors.
For a balanced stir-fry, aim for a variety of textures and colors. This makes the dish both visually appealing and nutritionally rich.
2. Preparing the Beef for Maximum Flavor
To ensure that the beef is tender and well-seasoned, a simple marinade can make all the difference.
How to Marinate the Beef
- In a bowl, combine soy sauce, cornstarch, garlic, ginger, and a splash of sesame oil.
- Toss the beef slices in the marinade and let them sit for at least 15 minutes.
- This quick marinade not only enhances flavor but also tenderizes the beef for a melt-in-your-mouth texture.
3. Step-by-Step Cooking Guide for a Foolproof Stir-Fry
As with most quick and easy taste of home recipes, cooking efficiently is key. Stir-frying happens fast, so having all ingredients prepped and ready is essential.
Searing the Beef for Perfect Texture
- Heat a large wok or skillet over high heat.
- Add a tablespoon of oil, ensuring the pan is hot before adding the beef.
- Sear the beef for 2–3 minutes, stirring occasionally, until browned.
- Remove the beef from the pan and set it aside.
Cooking the Vegetables to Crisp-Tender Perfection
- In the same pan, add another tablespoon of oil.
- Toss in carrots and bell peppers first, as they take longer to cook.
- After 2 minutes, add broccoli, snow peas, and mushrooms.
- Stir-fry for another 3 minutes, ensuring the vegetables remain crisp but tender.
Bringing It All Together with the Perfect Sauce
- In a small bowl, whisk together soy sauce, oyster sauce, honey, and cornstarch.
- Pour the sauce into the pan, stirring constantly as it thickens.
- Return the beef to the pan and toss everything together.
- Cook for another minute, allowing the sauce to coat every piece evenly.
4. Variations to Keep This Recipe Exciting
One of the best things about this quick and easy taste of home recipe is its adaptability. By switching up the ingredients, you can create entirely new flavors.
Spicy Szechuan-Style Stir-Fry
- Add crushed red pepper flakes or Szechuan peppercorns for heat.
- Use hoisin sauce instead of honey for a deeper, slightly smoky flavor.
Teriyaki Beef Stir-Fry
- Swap out soy sauce for teriyaki sauce for a sweeter, caramelized finish.
- Add pineapple chunks for a tropical twist.
Garlic Butter Steak Stir-Fry
- Replace the stir-fry sauce with garlic butter and a splash of lemon juice.
- Use zucchini and mushrooms for a steakhouse-inspired meal.
5. Serving Suggestions for a Complete Meal
Pairing this dish with complementary sides enhances its flavors and textures. Consider these options for a balanced meal:
Best Rice Options for Stir-Fry
- Steamed jasmine rice – A classic pairing that absorbs the sauce well.
- Brown rice – A healthier alternative with a slightly nutty taste.
- Fried rice – If you have leftover rice, a quick stir-fry with eggs and scallions makes a great side.
Alternative Base Options
- Rice noodles – Light and chewy, perfect for soaking up the sauce.
- Cauliflower rice – A low-carb option that keeps the meal light.
Side Dishes to Round Out the Meal
- Egg drop soup – A simple and warming appetizer.
- Steamed dumplings – A delicious addition that complements the Asian flavors.
- Crispy spring rolls – Great for extra crunch.
6. Storage and Meal Prep Tips
Like many quick and easy taste of home recipes, this dish is great for leftovers.
Best Practices for Storing Leftovers
- Allow the stir-fry to cool before transferring it to an airtight container.
- Refrigerate for up to four days.
How to Reheat Without Drying Out the Beef
- Reheat on the stovetop over medium heat with a splash of water or soy sauce.
- If using a microwave, cover with a damp paper towel to retain moisture.
Freezing for Future Meals
- Freeze the cooked beef and vegetables separately for up to three months.
- Thaw overnight in the refrigerator before reheating.
7. Why This Recipe Deserves a Spot in Your Meal Plan
This beef and vegetable stir-fry is more than just another dinner—it’s one of the most practical and delicious quick and easy taste of home recipes. It combines:
- Minimal prep with maximum flavor.
- Nutrient-rich ingredients for a balanced meal.
- A customizable base, allowing you to switch up proteins and veggies.
Whether you’re in a rush or simply craving a delicious, home-cooked stir-fry, this recipe is a foolproof option. Plus, with simple pantry staples, fresh vegetables, and tender beef, it’s a meal you can always count on.
Try it tonight and experience why it’s one of the best quick and easy taste of home recipes for busy weeknights!ily or meal-prepping for the week, this stir-fry is a versatile, delicious choice that’s sure to become a regular on your menu.

Cozy Casseroles for Comfort: Quick Taste of Home Recipes
CheeCheesy Potato and Ham Bake: A Quick and Easy Taste of Home Recipe
Why This Dish is the Ultimate Comfort Food
When it comes to quick and easy taste of home recipes, few meals deliver the same level of warmth and satisfaction as a cheesy potato and ham bake. This dish brings together layers of tender potatoes, savory ham, and gooey melted cheese, creating a meal that feels like a warm hug on a plate. Not only is it perfect for family dinners, but it also makes a great dish for potlucks, holiday gatherings, or meal prep for busy weeks.
Additionally, this recipe is incredibly versatile. You can customize it based on what you have in your kitchen, making it one of the most adaptable and budget-friendly casseroles. Whether you’re using leftover ham from a holiday feast or looking for an easy weeknight dinner, this quick and easy taste of home recipe is sure to please everyone at the table.
The Secret to a Perfect Cheesy Potato and Ham Bake
For a truly outstanding cheesy potato and ham bake, it’s important to follow a few key steps. While the ingredients are simple, the right techniques make all the difference in achieving the best texture and flavor.
1. Choosing the Best Ingredients for Maximum Flavor
Since this is one of the best quick and easy taste of home recipes, selecting high-quality ingredients will enhance the final result.
Best Potatoes for a Creamy, Tender Texture
Not all potatoes bake the same way. Choosing the right type ensures that your dish comes out perfectly soft and flavorful.
- Russet potatoes – High in starch, they become wonderfully creamy when baked.
- Yukon Gold potatoes – Naturally buttery and slightly firm, they hold their shape well while staying soft.
- Red potatoes – Less starchy, they provide a firmer texture with a slightly waxy bite.
For the creamiest texture, Yukon Gold potatoes are the best choice, but Russets work well if you prefer an ultra-soft, melt-in-your-mouth dish.
Selecting the Right Cheese for the Ultimate Melt
Since cheese plays a starring role, picking the right kind will make or break the dish.
- Sharp cheddar – Adds a bold, tangy flavor and melts beautifully.
- Gruyère – A rich, nutty cheese that enhances the creaminess.
- Monterey Jack – Mild and gooey, it creates a perfect cheese pull.
- Parmesan – Provides a salty, umami boost when sprinkled on top.
Using a combination of cheeses, such as cheddar and Gruyère, ensures the bake has both flavor and creaminess.
Picking the Best Ham for a Savory Kick
Since ham is the protein in this dish, choosing a flavorful, slightly salty variety enhances the overall taste.
- Leftover holiday ham – Perfect for repurposing after Thanksgiving or Christmas.
- Smoked ham – Adds a deep, smoky richness.
- Deli ham – A convenient option for quick preparation.
If you don’t have ham, you can substitute it with cooked bacon, turkey, or even sausage for a unique twist.
2. Step-by-Step Guide to Assembling the Dish
Since most quick and easy taste of home recipes focus on efficiency, this dish is designed to be easy to prepare while still delivering incredible flavor.
Prepping the Ingredients for Even Cooking
- Peel and thinly slice the potatoes (about ⅛ inch thick) for even cooking.
- Dice the ham into bite-sized cubes to ensure it’s well distributed throughout the bake.
- Grate the cheese fresh instead of using pre-shredded cheese, which contains additives that prevent smooth melting.
Layering the Ingredients for Maximum Creaminess
- Start by greasing a baking dish with butter to prevent sticking.
- Layer half of the potatoes on the bottom, then sprinkle with half the ham and half the cheese.
- Repeat with the remaining potatoes, ham, and cheese.
- Pour over a mixture of heavy cream, milk, and seasonings, ensuring every layer is coated.
Baking to Golden Perfection
- Cover the dish with foil and bake at 375°F for 40 minutes.
- Remove the foil, then bake uncovered for another 15–20 minutes until the cheese is golden and bubbly.
- Let the bake rest for 5–10 minutes before serving to allow the layers to set.
3. Customizing the Recipe to Suit Your Preferences
Like many quick and easy taste of home recipes, this dish can be modified to fit different dietary needs and flavor preferences.
Loaded Cheesy Potato and Ham Bake
- Add crispy bacon for extra smokiness.
- Sprinkle in chopped green onions or chives for a fresh contrast.
Healthier Alternative
- Swap out heavy cream for Greek yogurt or light sour cream.
- Use low-fat cheese to cut down on calories.
Spicy Version for Extra Heat
- Mix in diced jalapeños or crushed red pepper flakes for a kick.
- Use pepper jack cheese instead of Monterey Jack.
4. Best Side Dishes to Serve with This Bake
Although this quick and easy taste of home recipe is satisfying on its own, pairing it with the right sides elevates the meal.
Fresh, Light Salads for Balance
- Classic Caesar salad – Crisp romaine, Parmesan, and a tangy dressing contrast the richness of the bake.
- Simple garden salad – A mix of fresh greens, cucumbers, and tomatoes provides a refreshing balance.
Vegetable Sides for Extra Nutrition
- Steamed green beans – Their slight crunch complements the creamy potatoes.
- Roasted Brussels sprouts – The slight bitterness cuts through the richness of the cheese.
Bread Options for a Complete Meal
- Buttery dinner rolls – Perfect for soaking up any extra creamy sauce.
- Garlic bread – Adds a bold, garlicky crunch to the meal.
5. Storage and Meal Prep Tips
As with many quick and easy taste of home recipes, this dish is excellent for meal prepping and storing leftovers.
How to Store Leftovers
- Let the dish cool completely before transferring it to an airtight container.
- Store in the refrigerator for up to 4 days.
Reheating for the Best Texture
- Warm in the oven at 350°F for 15 minutes for the best results.
- If using a microwave, cover with a damp paper towel to prevent drying out.
Freezing for Later Use
- Wrap the baked dish tightly in plastic wrap and foil before freezing.
- When ready to eat, thaw overnight and reheat in the oven until warmed through.
6. Why This Recipe Deserves a Spot in Your Meal Plan
This cheesy potato and ham bake is more than just another casserole—it’s one of the most comforting, satisfying, and practical quick and easy taste of home recipes you can make. Not only does it provide a warm, hearty meal, but it also requires minimal ingredients and effort.
With its rich layers of cheese, potatoes, and ham, this dish brings back memories of family gatherings, home-cooked meals, and cozy nights in. Whether you’re making it for a special occasion or simply craving a delicious, fuss-free dinner, this bake is sure to become a staple in your recipe collection.
Try it tonight and see why it’s one of the best quick and easy taste of home recipes for every season!
Classic Tuna Noodle Casserole: A Quick and Easy Taste of Home Recipe
Why This Dish is a Timeless Favorite
Among quick and easy taste of home recipes, classic tuna noodle casserole stands out as a nostalgic, satisfying, and budget-friendly meal. With flaky tuna, tender egg noodles, and a creamy, cheesy sauce, this dish delivers both comfort and convenience in every bite. Whether you’re cooking for a busy weeknight, meal prepping for later, or simply craving a warm and hearty dish, this casserole is the perfect solution.
Additionally, this one-dish wonder is incredibly versatile. You can customize ingredients, adjust flavors, and even make it ahead of time for added convenience. Plus, it’s an excellent way to use up pantry staples, making it a practical option for any home cook.
The Secret to a Perfect Tuna Noodle Casserole
Although this is one of the best quick and easy taste of home recipes, achieving the perfect texture and flavor requires a few key techniques. To ensure a rich, creamy sauce and perfectly cooked noodles, follow these essential steps.
1. Choosing the Best Ingredients for Maximum Flavor
Using high-quality ingredients elevates this dish beyond the typical canned-soup version.
Selecting the Right Type of Tuna
Not all canned tuna is the same. Choosing the best variety ensures the casserole is flavorful and not overly dry.
- Solid white albacore tuna – Firm texture, mild taste, and holds up well in baking.
- Chunk light tuna – A more affordable option with a softer texture and slightly stronger flavor.
- Oil-packed tuna – Adds richness but can be too heavy for this dish.
For the best balance, solid white albacore tuna in water works well, as it blends seamlessly into the creamy sauce.
Choosing the Right Noodles for a Perfect Texture
Since overcooked pasta can ruin the dish, selecting the right type and cooking it properly is essential.
- Egg noodles – The traditional choice, offering a soft, chewy texture.
- Rotini or fusilli – Twisted shapes help trap the creamy sauce for extra flavor.
- Penne or rigatoni – Sturdier options that hold up well to baking.
For a classic tuna noodle casserole, egg noodles provide the best texture and consistency.
Best Cheese for a Creamy, Gooey Finish
Cheese adds both creaminess and depth of flavor. Choosing a mix of cheeses enhances the overall taste.
- Cheddar – Sharp and tangy, adding bold flavor.
- Monterey Jack – Smooth and creamy, melting perfectly.
- Parmesan – Nutty and slightly salty, providing balance.
A combination of cheddar and Monterey Jack ensures a rich, melty casserole with just the right amount of sharpness.
2. Step-by-Step Guide to Assembling the Casserole
Many quick and easy taste of home recipes focus on efficiency, and this dish is no exception.
Prepping the Ingredients for Even Cooking
- Drain the tuna well to prevent excess moisture from watering down the sauce.
- Cook the noodles al dente to keep them from becoming mushy during baking.
- Grate the cheese fresh for smoother melting and better texture.
Making the Creamy Sauce from Scratch
While many recipes rely on canned soup, a homemade sauce adds better flavor and texture.
- In a large saucepan, melt butter over medium heat.
- Add diced onions and minced garlic, sautéing until fragrant.
- Stir in flour and cook for 1 minute to form a roux.
- Gradually whisk in milk and chicken broth, stirring continuously to prevent lumps.
- Simmer for 3–4 minutes until thickened, then stir in cheese, salt, and black pepper.
Combining Everything for Maximum Flavor
- In a large bowl, mix cooked noodles, tuna, and sauce until well coated.
- Transfer the mixture to a buttered baking dish, spreading it evenly.
Topping for the Ultimate Crunch
A crispy, golden-brown topping adds the perfect contrast to the creamy filling.
- Sprinkle buttered breadcrumbs over the top for crunch.
- Add grated Parmesan for an extra layer of flavor.
Baking to Perfection
- Bake at 375°F for 20–25 minutes, or until the top is golden and bubbly.
- Let the casserole rest for 5 minutes before serving, allowing the flavors to meld.
3. Customizing the Recipe to Fit Different Tastes
One of the best things about this quick and easy taste of home recipe is how adaptable it is.
Healthier Tuna Noodle Casserole
- Swap out heavy cream for Greek yogurt or light sour cream.
- Use whole-wheat pasta for added fiber.
- Replace butter with olive oil for a lighter sauce.
Spicy Tuna Noodle Casserole
- Add crushed red pepper flakes for a little heat.
- Use pepper jack cheese instead of cheddar.
Vegetable-Packed Version
- Stir in peas, carrots, mushrooms, or spinach for added nutrition.
- Use cauliflower florets as a low-carb substitute for noodles.
4. Best Side Dishes to Complete the Meal
Although this quick and easy taste of home recipe is filling on its own, pairing it with the right sides makes it even better.
Fresh, Crisp Salads
- Simple green salad with lemon vinaigrette balances the richness.
- Classic Caesar salad provides a tangy contrast.
Vegetable Sides for Added Nutrition
- Steamed broccoli or asparagus adds color and crunch.
- Roasted Brussels sprouts pair well with the creamy texture.
Bread Options for Extra Comfort
- Garlic bread for a bold, crispy addition.
- Buttery dinner rolls to soak up any extra sauce.
5. Storage and Meal Prep Tips
Like most quick and easy taste of home recipes, this casserole stores well for later meals.
How to Store Leftovers
- Allow the casserole to cool completely before transferring it to an airtight container.
- Store in the refrigerator for up to 4 days.
Best Ways to Reheat Without Drying Out
- Cover with foil and warm in the oven at 350°F for 15 minutes.
- If using a microwave, add a splash of milk to maintain creaminess.
Freezing for Future Meals
- Wrap tightly in plastic wrap and foil before freezing for up to 3 months.
- Thaw overnight in the fridge before reheating.
6. Why This Recipe Should Be in Your Rotation
This classic tuna noodle casserole is more than just another weeknight meal—it’s one of the most reliable, delicious, and satisfying quick and easy taste of home recipes you can make. With simple ingredients, minimal effort, and unbeatable comfort, it’s a dish that never disappoints.
Whether you’re feeding a crowd, meal-prepping for the week, or just looking for an easy, cozy dinner, this casserole checks every box. Plus, its creamy texture, cheesy goodness, and crispy topping make it a family favorite.
Try it tonight and see why it’s one of the best quick and easy taste of home recipes you’ll keep coming back to! the week, this casserole is sure to become a household favorite!
Mexican Chicken and Rice Casserole: A Quick and Easy Taste of Home Recipe
Why This Casserole is a Must-Try
If you’re looking for quick and easy taste of home recipes, this Mexican chicken and rice casserole is a perfect choice. Packed with bold spices, tender chicken, fluffy rice, and gooey melted cheese, this dish brings all the flavors of a delicious Mexican meal into a single, hassle-free bake. Even better, it’s a one-pan meal, which means less cleanup and more time to enjoy with family.
Additionally, this dish is highly customizable. You can swap ingredients based on what’s in your pantry, adjust the spice level to suit your taste, and even make it ahead of time for busy weeknights. Whether you need a hearty dinner, a meal-prep solution, or a comforting dish that feeds a crowd, this quick and easy taste of home recipe delivers on all fronts.
The Secret to a Perfect Mexican Chicken and Rice Casserole
Even though this is one of the easiest quick and easy taste of home recipes, following a few key steps ensures that every bite is packed with flavor and the perfect texture.
1. Choosing the Best Ingredients for Maximum Flavor
Selecting the Right Type of Chicken
For the juiciest and most flavorful casserole, choosing the right cut of chicken is essential.
- Shredded rotisserie chicken – A time-saving option that adds extra flavor.
- Boneless, skinless chicken breasts – Lean and tender, perfect for baking.
- Chicken thighs – A juicier alternative that stays moist.
Using pre-cooked shredded chicken is the easiest way to keep this dish quick and effortless while still delivering bold flavors.
Choosing the Right Type of Rice
Not all rice varieties work well in a baked dish. Using the right one ensures the best texture.
- Long-grain white rice – Absorbs flavors well and stays fluffy.
- Brown rice – A healthier option but requires a longer cooking time.
- Instant rice – Works for an even quicker version but may have a softer texture.
For this quick and easy taste of home recipe, long-grain white rice is the best choice because it holds up well during baking and absorbs all the delicious flavors.
The Best Cheese for That Classic Melted Topping
Cheese brings everything together, adding richness and a satisfying gooey texture.
- Cheddar cheese – A classic choice for bold flavor.
- Monterey Jack – Smooth, creamy, and melts beautifully.
- Pepper Jack – A great option if you like a little spice.
A blend of cheddar and Monterey Jack creates the perfect balance of flavor and meltability.
2. Step-by-Step Guide to Assembling the Casserole
As with all quick and easy taste of home recipes, preparing this casserole is simple and efficient.
Prepping the Ingredients for Even Cooking
- Shred the chicken (if not using pre-cooked rotisserie chicken).
- Rinse the rice to remove excess starch and ensure a fluffy texture.
- Grate the cheese fresh for a smooth, melty topping.
Building the Layers for Maximum Flavor
- Grease a 9×13-inch baking dish to prevent sticking.
- Spread uncooked rice evenly at the bottom of the dish.
- Add the chicken, black beans, corn, and diced tomatoes, making sure everything is distributed evenly.
- In a separate bowl, mix chicken broth, taco seasoning, garlic, and lime juice. Pour this over the casserole.
Baking for the Perfect Texture
- Cover with foil and bake at 375°F for 45 minutes, or until the rice is tender and has absorbed all the liquid.
- Remove the foil, sprinkle with cheese, and return to the oven for 10 more minutes, or until the cheese is melted and bubbly.
3. Customizing the Recipe for Different Tastes
This quick and easy taste of home recipe is extremely versatile. Here are a few variations to mix things up:
Spicy Mexican Chicken and Rice Casserole
- Add diced jalapeños or hot sauce for extra heat.
- Swap cheddar for pepper jack cheese to enhance the spice.
Healthier Version
- Use brown rice instead of white for added fiber.
- Replace half the cheese with nutritional yeast for a lighter alternative.
Vegetarian Option
- Substitute chicken with extra black beans, pinto beans, or roasted sweet potatoes.
- Use vegetable broth instead of chicken broth.
4. Best Side Dishes to Serve with This Casserole
Although this dish is satisfying on its own, adding the right sides makes it even better.
Refreshing Salads for Balance
- Mexican street corn salad – A bright, creamy side that complements the flavors.
- Crisp romaine salad with avocado and lime dressing – Adds freshness and crunch.
Tortillas and Breads for Extra Comfort
- Warm flour tortillas – Great for scooping up every last bite.
- Garlic butter cornbread – A slightly sweet and buttery addition.
Simple Vegetable Sides
- Roasted zucchini or bell peppers – A healthy contrast to the rich casserole.
- Grilled corn on the cob – Adds a smoky, slightly charred flavor.
5. Storage and Meal Prep Tips
As with many quick and easy taste of home recipes, this casserole stores well, making it an excellent meal prep option.
How to Store Leftovers
- Allow the casserole to cool completely before transferring it to an airtight container.
- Store in the refrigerator for up to 4 days.
How to Reheat Without Drying Out
- Reheat in the oven at 350°F for 15 minutes, covering with foil to keep it moist.
- If microwaving, add a splash of chicken broth before heating to restore moisture.
Freezing for Later Use
- Wrap the unbaked casserole tightly in plastic wrap and aluminum foil before freezing.
- When ready to cook, thaw overnight in the fridge and bake as directed.
6. Why This Recipe Deserves a Spot in Your Meal Plan
This Mexican chicken and rice casserole is more than just another dinner—it’s one of the best quick and easy taste of home recipes for busy nights. Not only is it packed with flavor, but it also requires minimal prep and delivers a hearty, satisfying meal with very little effort.
With its bold spices, cheesy goodness, and comforting rice base, this casserole is a family favorite that works for any occasion. Whether you need a last-minute dinner solution, a meal-prep option, or a crowd-pleasing dish, this recipe will quickly become a staple in your home.
Try it tonight and discover why it’s one of the best quick and easy taste of home recipes you’ll want to make again and again!rite go-to recipes. With minimal effort and maximum flavor, it’s a dish that brings the taste of home and a touch of spice to your table!
Speedy Soups and Stews: Quick and Easy Taste of Home Recipes
Hearty Beef and Vegetable Soup: A Quick Taste of Home Recipe
The Hearty Beef and Vegetable Soup is a satisfying example of a quick and easy Taste of Home recipe. Packed with tender beef, fresh vegetables, and savory broth, it’s a comforting dish perfect for busy weeknights.
Why This Soup is a Weeknight Favorite
- One-Pot Meal: Everything cooks together in one pot, making cleanup quick and easy.
- Nutrient-Packed: The combination of beef, vegetables, and broth provides a healthy balance of protein, vitamins, and minerals.
- Make-Ahead Friendly: This soup tastes even better the next day, making it ideal for leftovers or meal prep.
- Customizable: You can easily adjust the ingredients to suit your preferences or use whatever vegetables you have on hand.
Key Ingredients
- Beef: Cubed chuck roast or stew meat works well for its tenderness and rich flavor. Ground beef can also be used for a quicker version.
- Vegetables: A mix of hearty vegetables like carrots, potatoes, celery, and green beans adds texture and nutrition.
- Tomatoes: Diced canned tomatoes or fresh tomatoes provide a tangy base that enhances the soup’s flavor.
- Broth: Beef broth creates a rich and savory foundation. For added depth, consider using a splash of red wine.
- Herbs and Spices: Bay leaves, thyme, parsley, and garlic bring warmth and complexity to the soup.
- Optional Additions: Pearl barley, pasta, or rice can be included to make the soup even more filling.
How to Make It
- Sear the Beef:
- Heat a large pot or Dutch oven over medium-high heat with a drizzle of oil. Season the beef cubes with salt and pepper, then sear them until browned on all sides. Remove and set aside.
- Sauté the Aromatics:
- In the same pot, add diced onions and minced garlic. Cook until softened and fragrant, scraping up any browned bits from the bottom of the pot for added flavor.
- Build the Soup Base:
- Add the seared beef back into the pot, along with the broth, diced tomatoes, bay leaves, and herbs. Bring to a simmer.
- Add the Vegetables:
- Stir in the chopped vegetables, starting with the heartier ones like potatoes and carrots, and then adding softer vegetables like green beans and peas later.
- Simmer and Serve:
- Cover and simmer the soup on low heat for 45 minutes to an hour, or until the beef is tender and the vegetables are cooked through. Remove the bay leaves before serving.
Customizations and Variations
- Swap the Protein: Use chicken or turkey instead of beef for a lighter version.
- Add Grains: Stir in cooked barley, quinoa, or rice for extra heartiness.
- Spicy Kick: Add a pinch of red pepper flakes or a splash of hot sauce for a bit of heat.
- Low-Carb Option: Skip the potatoes and include more low-carb vegetables like zucchini or spinach.
- Slow Cooker Version: Sear the beef and then transfer all ingredients to a slow cooker. Cook on low for 6–8 hours or high for 3–4 hours.
Serving Suggestions
- With Bread: Pair the soup with crusty bread, dinner rolls, or garlic bread for dipping.
- Toppings: Garnish with fresh parsley, grated Parmesan cheese, or a drizzle of olive oil.
- Side Salad: Serve with a light green salad for a balanced meal.
Why You’ll Love It
The Hearty Beef and Vegetable Soup is the perfect balance of comfort and nutrition. Its rich, savory broth and tender chunks of beef create a satisfying base, while the colorful medley of vegetables adds freshness and a variety of textures. This soup is not only filling but also incredibly versatile, allowing you to make adjustments based on what you have in your pantry or fridge.
Whether you’re warming up on a chilly night or looking for a simple yet wholesome dinner, this soup delivers on flavor and convenience. It’s a recipe that brings families together around the table, offering the taste of home in every spoonful. With its ease of preparation and delicious results, this soup is sure to become a staple in your weeknight dinner rotation.
15-Minute Creamy Corn Chowder
The 15-Minute Creamy Corn Chowder is a quick and satisfying dish that delivers rich flavors with minimal effort. Perfect for busy weeknights, this chowder combines the sweetness of corn, the creaminess of a velvety broth, and the comforting warmth of a classic soup. With just a few pantry staples and fresh ingredients, you can whip up a delicious meal that feels indulgent yet light.
Why This Chowder is a Weeknight Favorite
- Speedy Preparation: Ready in just 15 minutes, it’s ideal for those nights when you need a fast, hearty meal.
- Simple Ingredients: Made with common pantry staples like corn, potatoes, and milk, it’s an easy recipe to pull together.
- Kid-Friendly: The creamy texture and naturally sweet flavor of corn make it appealing to even the pickiest eaters.
- Versatile: It’s a great standalone dish but can also be served as a starter or alongside other meals.
Key Ingredients
- Corn: Fresh, canned, or frozen corn works perfectly, adding natural sweetness and texture to the chowder.
- Potatoes: Diced potatoes provide heartiness and help thicken the chowder naturally. Russets or Yukon Golds are great options.
- Onion and Garlic: These aromatics form the flavorful base of the soup.
- Chicken or Vegetable Broth: A light broth gives the chowder depth and balances the creaminess.
- Milk or Cream: Heavy cream or whole milk creates the rich, creamy consistency that defines a chowder.
- Butter and Flour: Used to make a roux, which thickens the soup without overpowering the flavors.
- Seasonings: Salt, pepper, paprika, and thyme enhance the natural flavors of the corn and potatoes.
How to Make It
- Sauté the Aromatics:
- Heat butter in a large pot over medium heat. Add diced onion and minced garlic, cooking until softened and fragrant.
- Make the Base:
- Stir in flour to create a roux, cooking for 1–2 minutes to eliminate the raw flour taste. Slowly whisk in the broth, ensuring there are no lumps.
- Add the Vegetables:
- Add diced potatoes and corn to the pot. Bring the mixture to a simmer and cook for about 8–10 minutes, or until the potatoes are tender.
- Incorporate the Cream:
- Stir in milk or heavy cream and let it heat through, but avoid boiling to prevent curdling. Adjust the seasoning with salt, pepper, and paprika.
- Finish and Serve:
- Ladle the chowder into bowls and garnish with chopped parsley, crumbled bacon, or shredded cheese if desired.
Customizations and Variations
- Add Protein: Incorporate cooked and crumbled bacon, diced ham, or shredded chicken for a heartier chowder.
- Spicy Kick: Add diced jalapeños or a pinch of cayenne pepper for a touch of heat.
- Vegetarian Option: Use vegetable broth and skip any meat-based garnishes for a vegetarian-friendly chowder.
- Thicker Chowder: Mash some of the cooked potatoes or blend a portion of the soup for a thicker consistency.
- Cheesy Upgrade: Stir in shredded cheddar or Parmesan for a cheesy corn chowder.
Serving Suggestions
- With Bread: Pair the chowder with crusty bread, dinner rolls, or cornbread for dipping.
- Toppings: Garnish with fresh herbs, crumbled bacon, shredded cheese, or a sprinkle of smoked paprika for extra flavor.
- Side Salad: Serve with a simple green salad or a light coleslaw for a balanced meal.
Why You’ll Love It
The 15-Minute Creamy Corn Chowder offers the perfect combination of speed, simplicity, and flavor. Its creamy texture and sweet, savory flavors make it a comforting choice for any time of year. This chowder is a fantastic way to use up pantry staples or fresh corn during its peak season.
Whether you’re looking for a quick dinner or a light starter, this chowder delivers on all fronts. It’s easy to customize, reheats beautifully for leftovers, and always satisfies with its comforting flavors and rich texture. Add it to your recipe rotation, and you’ll have a dependable dish for even your busiest evenings!
Chicken Tortilla Soup
Chicken Tortilla Soup is a flavorful, hearty, and vibrant dish that combines tender shredded chicken, a rich tomato-based broth, and a medley of Mexican-inspired spices. Topped with crispy tortilla strips and fresh garnishes, this soup delivers a satisfying meal that feels indulgent but is surprisingly easy to prepare. Perfect for busy weeknights or a cozy dinner, this soup is a crowd-pleaser for the whole family.
Why Chicken Tortilla Soup is a Weeknight Favorite
- Quick and Easy: This soup comes together in less than 30 minutes, making it ideal for busy schedules.
- One-Pot Meal: With everything cooked in one pot, cleanup is minimal.
- Bursting with Flavor: Packed with zesty spices, fresh ingredients, and hearty textures, it’s a flavorful meal that everyone will love.
- Customizable: Easily adjust the spice level and toppings to suit your family’s preferences.
Key Ingredients
- Chicken: Shredded rotisserie chicken or leftover cooked chicken makes this soup quick and easy to prepare.
- Tomatoes: Canned diced tomatoes or fire-roasted tomatoes form the base of the broth.
- Broth: Chicken broth or stock provides a rich, savory foundation.
- Beans: Black beans or pinto beans add protein and texture to the soup.
- Vegetables: Onion, garlic, bell peppers, and corn contribute to the soup’s hearty texture and flavor.
- Spices: Cumin, chili powder, smoked paprika, and oregano give the soup its signature Mexican-inspired flavor.
- Tortilla Strips: Crispy, homemade tortilla strips or store-bought chips add a crunchy finishing touch.
How to Make It
- Sauté the Aromatics:
- Heat a tablespoon of olive oil in a large pot over medium heat. Add diced onion and minced garlic, cooking until fragrant and softened.
- Build the Broth:
- Add canned tomatoes, chicken broth, and your spices (cumin, chili powder, smoked paprika, and oregano) to the pot. Stir to combine and bring to a simmer.
- Add the Chicken and Vegetables:
- Stir in shredded chicken, black beans, corn, and diced bell peppers. Let the soup simmer for 10–15 minutes to allow the flavors to meld together.
- Prepare the Tortilla Strips:
- While the soup simmers, slice corn tortillas into thin strips and bake or fry them until crispy. Alternatively, use store-bought tortilla chips for convenience.
- Finish and Serve:
- Taste the soup and adjust the seasoning with salt, pepper, or a dash of lime juice for brightness. Ladle the soup into bowls and garnish with tortilla strips and your favorite toppings.
Customizations and Variations
- Vegetarian Option: Replace the chicken with additional beans or diced tofu and use vegetable broth.
- Spicier Version: Add diced jalapeños, serrano peppers, or a splash of hot sauce for an extra kick.
- Creamy Twist: Stir in a dollop of sour cream or a splash of heavy cream for a richer broth.
- Cheesy Upgrade: Add shredded cheddar or Monterey Jack cheese to the soup for a gooey, cheesy element.
- Rice or Quinoa: Stir in cooked rice or quinoa for added heartiness and texture.
Toppings to Enhance the Flavor
- Fresh Garnishes: Add diced avocado, chopped cilantro, or a squeeze of fresh lime for brightness.
- Cheese: Sprinkle crumbled cotija or shredded cheddar cheese on top.
- Crunch: Use crispy tortilla strips, crushed tortilla chips, or even toasted pumpkin seeds for texture.
- Creamy Elements: Drizzle with sour cream, Greek yogurt, or crema for a smooth finish.
Serving Suggestions
- With Bread or Sides: Serve alongside warm cornbread, a crusty baguette, or a side of Mexican rice.
- As a Starter: Offer this soup as a flavorful appetizer before a larger Mexican-inspired meal.
- For Leftovers: Store the soup in the refrigerator for up to 3 days—it reheats beautifully and the flavors deepen over time.
Why You’ll Love It
The Chicken Tortilla Soup is a true weeknight hero. Its bold, comforting flavors, combined with the ease of preparation, make it a go-to dish for families and individuals alike. Whether you’re craving something warm and hearty or looking for a simple, nutritious meal, this soup delivers every time.
From the tangy tomato broth to the crunchy tortilla toppings, each spoonful offers a delightful mix of textures and tastes. It’s a versatile recipe that can be tailored to your preferences and brings the warmth of Mexican-inspired flavors to your table. Quick, satisfying, and endlessly customizable, this soup will easily become a favorite in your recipe collection.
Kid-Friendly Favorites
Quick Cheeseburger Sliders
Quick Cheeseburger Sliders are the ultimate crowd-pleasing dish, perfect for busy weeknights or casual gatherings. These mini-sized burgers are packed with flavor and easy to assemble, offering the classic taste of a cheeseburger in a bite-sized format. With soft buns, juicy patties, melted cheese, and customizable toppings, sliders make a versatile meal that can be ready in minutes.
Why Cheeseburger Sliders are Perfect for Weeknights
- Quick and Easy: Ready in under 30 minutes, they’re perfect for when you’re short on time but still want a satisfying meal.
- Kid-Friendly: Their small size and customizable toppings make them a hit with kids and adults alike.
- Versatile: You can tailor the sliders to suit your family’s preferences or turn them into a fun build-your-own meal.
- Great for Sharing: These sliders are ideal for serving a crowd or as an appetizer at parties.
Key Ingredients
- Ground Beef: Use lean ground beef for juicy patties that aren’t too greasy. Ground turkey or chicken can be used as lighter alternatives.
- Mini Slider Buns: Soft and fluffy buns, such as Hawaiian rolls, are perfect for holding the patties and toppings.
- Cheese: Classic cheddar, American, or any melting cheese like Swiss or pepper jack works well.
- Seasonings: Salt, pepper, garlic powder, and onion powder enhance the flavor of the beef.
- Toppings: Lettuce, tomato, pickles, onions, and condiments like ketchup, mustard, or mayonnaise allow for endless customization.
- Butter and Garlic (Optional): Brushing the buns with melted garlic butter before assembling adds an extra layer of flavor.
How to Make Them
- Prepare the Patties:
- In a mixing bowl, combine ground beef with seasonings like salt, pepper, garlic powder, and onion powder. Mix gently to avoid overworking the meat.
- Form the mixture into small, evenly-sized patties slightly larger than the slider buns, as they will shrink when cooked.
- Cook the Patties:
- Heat a skillet or grill over medium-high heat. Cook the patties for 2–3 minutes per side or until they’re fully cooked but still juicy.
- During the last minute of cooking, place a slice of cheese on each patty and cover the skillet to let the cheese melt.
- Toast the Buns (Optional):
- Lightly butter the insides of the slider buns and toast them in the skillet or on the grill until golden brown.
- Assemble the Sliders:
- Spread condiments like ketchup or mayonnaise on the buns. Place the cooked patties on the bottom buns, then layer with toppings like lettuce, tomato slices, pickles, and onions.
- Top with the other half of the bun and secure with a toothpick if needed.
- Serve:
- Serve the sliders immediately with your favorite sides, such as fries, coleslaw, or a simple salad.
Customizations and Variations
- Flavor Boost: Add Worcestershire sauce or grated onion to the beef mixture for extra depth of flavor.
- Spicy Sliders: Use pepper jack cheese and top with sliced jalapeños or a spicy mayo.
- Bacon Lovers: Add crispy bacon strips for a smoky, savory twist.
- Vegetarian Option: Swap the beef patties for plant-based alternatives or grilled portobello mushrooms.
- Breakfast Sliders: Use sausage patties, eggs, and cheese for a morning-friendly version.
Serving Suggestions
- Side Dishes: Pair sliders with French fries, sweet potato fries, onion rings, or tater tots.
- Dipping Sauces: Offer a variety of sauces like ranch, BBQ, or sriracha mayo for dipping.
- Party Platter: Serve sliders on a large platter with all the toppings and condiments on the side, allowing guests to build their own.
Why You’ll Love Them
Quick Cheeseburger Sliders are a fun, versatile meal that satisfies cravings for a classic burger without the hassle of a full-sized version. Their small size makes them perfect for kids, and their customizable nature allows everyone to create their ideal slider. Whether you’re hosting a casual gathering or simply looking for a quick and tasty dinner idea, these sliders are guaranteed to be a hit.
With their juicy patties, gooey melted cheese, and endless topping options, these sliders are the ultimate comfort food that you’ll want to make again and again. Ready in no time and bursting with flavor, they’re the perfect solution for busy weeknights or feeding a hungry crowd.
Baked Macaroni and Cheese
Baked Macaroni and Cheese is the ultimate comfort food—creamy, cheesy, and baked to golden perfection. This classic dish combines tender macaroni noodles with a rich, velvety cheese sauce, all topped with a crispy breadcrumb crust. Perfect for busy weeknights, family dinners, or even potlucks, this timeless recipe offers a blend of nostalgia and indulgence in every bite.
Why This Recipe is a Family Favorite
- Easy to Prepare: With simple ingredients and minimal prep time, it’s a go-to dish for both novice and experienced cooks.
- Kid-Approved: Its creamy, cheesy texture is a surefire hit with kids and adults alike.
- Versatile: This dish can be served as a main course, side dish, or even elevated with extra ingredients.
- Perfect for Leftovers: Baked macaroni and cheese reheats beautifully, making it ideal for meal prep or next-day meals.
Key Ingredients
- Macaroni: Classic elbow macaroni works best, but you can use any short pasta like penne, shells, or cavatappi.
- Cheese: A combination of cheddar and mozzarella provides both flavor and gooeyness, while Gruyère or Parmesan can add depth.
- Milk and Cream: These create the base for the creamy cheese sauce. Use whole milk or a combination of milk and heavy cream for a richer result.
- Butter and Flour: These are used to make a roux, which thickens the cheese sauce and ensures a smooth texture.
- Breadcrumbs: A crispy breadcrumb topping adds texture and contrast to the creamy pasta.
- Seasonings: Garlic powder, paprika, salt, and black pepper enhance the flavor of the dish.
How to Make It
- Cook the Pasta:
- Boil the macaroni in salted water until al dente. Drain and set aside, reserving a small amount of pasta water to loosen the sauce if needed.
- Make the Cheese Sauce:
- In a saucepan, melt butter over medium heat and whisk in flour to form a roux. Cook for 1–2 minutes to remove the raw flour taste. Gradually whisk in milk and cream, stirring constantly until the mixture thickens.
- Add shredded cheese a handful at a time, stirring until fully melted and smooth. Season with garlic powder, paprika, salt, and pepper.
- Combine Pasta and Sauce:
- In a large mixing bowl, combine the cooked macaroni with the cheese sauce, ensuring every piece of pasta is coated.
- Assemble and Bake:
- Transfer the macaroni and cheese mixture to a greased baking dish. Sprinkle breadcrumbs and additional shredded cheese on top for a golden, crispy crust.
- Bake at 375°F (190°C) for 20–25 minutes, or until the top is bubbly and lightly browned.
- Serve:
- Let the dish cool for a few minutes before serving. Garnish with fresh parsley or a sprinkle of Parmesan for added flavor.
Customizations and Variations
- Add Protein: Stir in cooked bacon, diced ham, or shredded chicken for a heartier meal.
- Vegetarian Twist: Add sautéed spinach, roasted broccoli, or caramelized onions for extra veggies.
- Spicy Kick: Mix in diced jalapeños, crushed red pepper flakes, or a splash of hot sauce for heat.
- Alternative Cheeses: Experiment with Monterey Jack, Gouda, or blue cheese for a unique flavor profile.
- Gluten-Free Option: Use gluten-free pasta and replace the breadcrumbs with crushed gluten-free crackers or seeds.
Serving Suggestions
- As a Side Dish: Pair it with roasted chicken, grilled steak, or a fresh green salad for a complete meal.
- For Potlucks: This dish travels well and is always a crowd favorite at gatherings.
- With Toppings: Add extra flavor with crispy bacon bits, scallions, or a drizzle of truffle oil.
- As Leftovers: Store in the refrigerator for up to 3 days and reheat in the oven or microwave for a creamy, cheesy meal.
Why You’ll Love It
Baked Macaroni and Cheese is the perfect balance of creamy and crunchy, offering a nostalgic dish that’s comforting and versatile. The gooey cheese sauce combined with the crispy breadcrumb topping creates an irresistible texture contrast. Whether it’s served as a main course on a weeknight or a side dish at a holiday feast, this dish never fails to impress.
With endless customization options and a simple preparation process, this baked mac and cheese will quickly become a staple in your recipe rotation. It’s more than just a dish—it’s a reminder of the warmth and joy of home-cooked meals shared with loved ones.
Mini Pepperoni Pizzas
Mini Pepperoni Pizzas are the perfect combination of fun, flavor, and convenience. These bite-sized pizzas are easy to prepare and customizable, making them a fantastic option for busy weeknights, quick snacks, or casual gatherings. With their crispy base, gooey melted cheese, and savory pepperoni topping, these mini pizzas are a guaranteed hit for both kids and adults.
Why Mini Pepperoni Pizzas are Perfect for Any Occasion
- Quick and Easy: Ready in just 20 minutes, they’re ideal for busy schedules.
- Customizable: Personalize each pizza with toppings to suit everyone’s preferences.
- Kid-Friendly: Their small size and familiar flavors make them a favorite among children.
- Versatile: Great as a main dish, snack, or appetizer for parties and family meals.
Key Ingredients
- Base Options: Mini pizza bases like English muffins, bagels, pita bread, or pre-made pizza dough.
- Pizza Sauce: Use store-bought marinara or pizza sauce, or make your own with canned tomatoes and Italian seasonings.
- Cheese: Shredded mozzarella is the classic choice, but cheddar, provolone, or a blend of cheeses also work well.
- Pepperoni: Mini pepperoni slices or regular slices cut into smaller pieces to fit the mini pizzas.
- Optional Toppings: Diced bell peppers, mushrooms, olives, or fresh basil for added flavor.
- Seasonings: Sprinkle with Italian seasoning, garlic powder, or red pepper flakes for extra flavor.
How to Make Them
- Prepare the Base:
- Preheat your oven to 375°F (190°C). Line a baking sheet with parchment paper for easy cleanup.
- Arrange your chosen mini bases, such as English muffin halves, bagel slices, or pita bread, on the baking sheet.
- Add the Sauce:
- Spread a thin layer of pizza sauce on each base, leaving a small border around the edges.
- Layer with Cheese and Toppings:
- Sprinkle shredded mozzarella over the sauce, covering it evenly. Add mini pepperoni slices on top, or arrange regular-sized pepperoni slices cut into smaller pieces.
- Bake:
- Place the baking sheet in the oven and bake for 10–12 minutes, or until the cheese is melted and bubbly, and the edges of the base are golden and crisp.
- Serve:
- Remove from the oven and let cool for a few minutes. Garnish with fresh basil or a sprinkle of Parmesan cheese, if desired. Serve warm and enjoy!
Customizations and Variations
- Vegetarian Option: Swap the pepperoni for sautéed mushrooms, diced tomatoes, or spinach.
- Meat Lovers: Add crumbled cooked sausage, bacon bits, or diced ham along with the pepperoni.
- Cheesy Twist: Use a mix of cheeses like cheddar, Parmesan, or ricotta for a unique flavor.
- Low-Carb Version: Use zucchini slices, eggplant rounds, or cauliflower crusts as the base instead of bread.
- Kid-Friendly Toppings: Let kids choose their own toppings, such as pineapple chunks, mini meatballs, or extra cheese.
Serving Suggestions
- As a Main Dish: Pair with a side salad, garlic bread, or roasted veggies for a balanced meal.
- For Snacks: Serve with dipping sauces like marinara, ranch, or garlic butter for extra fun.
- For Parties: Arrange the mini pizzas on a platter with a variety of toppings to suit all tastes.
Why You’ll Love Them
Mini Pepperoni Pizzas combine the classic flavors of pizza with the convenience of a quick and easy recipe. Their small size makes them perfect for portion control and ensures they’re great for little hands at kids’ parties or as a casual snack. The crispy base, melted cheese, and savory pepperoni create a flavor combination that’s hard to resist.
These mini pizzas are more than just a meal—they’re a fun and interactive way to get the family involved in the kitchen. With endless customization options and a prep time of less than 20 minutes, they’re a versatile recipe you’ll want to make again and again. Whether it’s a weeknight dinner, a quick snack, or a party appetizer, mini pepperoni pizzas are a guaranteed crowd-pleaser!
Make-Ahead Meals for Busy Weeknights
Slow Cooker BBQ Pulled Chicken
Slow Cooker BBQ Pulled Chicken is a flavorful and easy-to-make dish that’s perfect for busy weeknights or weekend gatherings. This recipe combines tender, juicy chicken with a smoky and tangy barbecue sauce that’s slow-cooked to perfection. The result is a versatile dish that can be served in a variety of ways, from sandwiches and tacos to rice bowls and salads.
Why This Recipe is a Go-To Favorite
- Set-It-and-Forget-It: The slow cooker does all the work, making this recipe low-effort yet high-reward.
- Crowd-Pleaser: Its bold flavors and versatility make it a hit with both kids and adults.
- Meal Prep Friendly: Cook a large batch and use it in different meals throughout the week.
- Minimal Ingredients: With just a few pantry staples, you can create a delicious, hearty dish.
Key Ingredients
- Chicken: Boneless, skinless chicken breasts or thighs are ideal for their tenderness and ability to shred easily.
- BBQ Sauce: Choose your favorite store-bought barbecue sauce or make a homemade version for a personal touch.
- Seasonings: Garlic powder, onion powder, paprika, and a touch of chili powder add depth to the dish.
- Liquid: Chicken broth or water keeps the chicken moist while cooking.
- Optional Sweeteners: Add honey, brown sugar, or maple syrup for a hint of sweetness.
- Apple Cider Vinegar (Optional): Adds tanginess to balance the sweetness of the BBQ sauce.
How to Make It
- Prepare the Chicken:
- Place the chicken breasts or thighs in the bottom of the slow cooker. Season generously with garlic powder, onion powder, paprika, salt, and pepper.
- Add the Sauce:
- Pour the BBQ sauce over the chicken, ensuring it is well-coated. If needed, add a splash of chicken broth or water to thin the sauce slightly.
- Slow Cook:
- Cover the slow cooker and cook on low for 6–8 hours or on high for 3–4 hours, until the chicken is tender and easily shredded.
- Shred the Chicken:
- Remove the chicken from the slow cooker and shred it using two forks. Return the shredded chicken to the slow cooker and mix it with the sauce.
- Finish and Serve:
- Let the chicken sit in the sauce for an additional 10–15 minutes to absorb the flavors. Serve warm with your favorite accompaniments.
Customizations and Variations
- Spicy BBQ Pulled Chicken: Add a splash of hot sauce, cayenne pepper, or diced jalapeños for a spicy kick.
- Sweet and Smoky Flavor: Incorporate liquid smoke or smoked paprika for a deeper smoky flavor.
- Tangy Twist: Add a splash of apple cider vinegar or a squeeze of fresh lime juice for extra tanginess.
- Alternative Proteins: Substitute chicken with pork shoulder or jackfruit for a different take on pulled BBQ.
- Vegan Option: Use jackfruit or tofu instead of chicken, and pair it with vegan BBQ sauce.
Serving Suggestions
1. Sandwiches:
Pile the BBQ pulled chicken onto soft hamburger buns or brioche rolls. Add coleslaw for a crunchy, tangy contrast.
2. Tacos:
Spoon the chicken into soft tortillas and top with shredded cheese, diced onions, and fresh cilantro.
3. Rice Bowls:
Serve over steamed rice with roasted vegetables and avocado slices for a balanced meal.
4. Pizza Topping:
Use the pulled chicken as a topping for homemade or store-bought pizza crust, along with red onions and mozzarella cheese.
5. Salads:
Add the BBQ chicken to a bed of mixed greens, cherry tomatoes, cucumbers, and a drizzle of ranch or BBQ dressing.
Why You’ll Love It
The Slow Cooker BBQ Pulled Chicken is not only incredibly flavorful but also incredibly convenient. It requires minimal prep, making it ideal for busy days, and its versatility allows you to enjoy it in various ways throughout the week. Whether served as a sandwich, taco, or on its own, this dish delivers bold, smoky flavors that feel like they’ve come straight from a barbecue pit.
With its tender, juicy texture and rich, tangy sauce, this recipe is a guaranteed hit for any occasion. Plus, the ease of using a slow cooker means you can focus on other tasks while it cooks to perfection. It’s the kind of recipe that brings families together and leaves everyone asking for seconds.
Freezer-Friendly Meatballs
Freezer-Friendly Meatballs are the ultimate make-ahead meal solution, offering convenience, versatility, and unbeatable flavor. Whether you’re preparing for busy weeknights, meal prepping for the week, or stocking up your freezer for quick and easy dinners, these meatballs are a lifesaver. Packed with seasoning, tender in texture, and easy to cook from frozen, they make homemade meals both simple and satisfying.
Why Freezer-Friendly Meatballs Are a Must-Have
- Time-Saving: Make a large batch ahead of time and freeze them for future meals.
- Versatile: These meatballs can be used in a variety of dishes, from spaghetti and meatballs to soups and sliders.
- Budget-Friendly: Homemade meatballs are more affordable than store-bought options and taste better, too.
- Customizable: Adjust the seasonings, meat types, and add-ins to suit your preferences or dietary needs.
Key Ingredients
- Ground Meat: Use a combination of ground beef, pork, chicken, or turkey for a blend of flavors and textures.
- Breadcrumbs: Help bind the meatballs and keep them tender. Panko, Italian-seasoned, or gluten-free breadcrumbs all work well.
- Eggs: Serve as a binder to hold the meat mixture together.
- Seasonings: Garlic powder, onion powder, salt, pepper, and Italian seasoning are classic choices.
- Fresh Herbs: Chopped parsley or basil adds a burst of freshness.
- Cheese (Optional): Parmesan cheese can be added for a rich, savory flavor.
How to Make Them
- Mix the Ingredients:
- In a large bowl, combine the ground meat, breadcrumbs, eggs, seasonings, and fresh herbs. Mix gently until just combined to avoid overworking the meat, which can make the meatballs dense.
- Shape the Meatballs:
- Use a cookie scoop or your hands to roll the mixture into evenly sized meatballs, about 1–2 inches in diameter. Place them on a baking sheet lined with parchment paper.
- Par-Bake or Flash-Freeze:
- Option 1: Par-bake the meatballs in a preheated oven at 375°F (190°C) for 10–12 minutes, until they are just cooked on the outside but not fully cooked through.
- Option 2: Flash-freeze the raw meatballs by placing the baking sheet in the freezer for 1–2 hours until the meatballs are firm.
- Store in the Freezer:
- Transfer the par-baked or frozen raw meatballs to a resealable freezer bag or airtight container. Label with the date and store for up to 3 months.
- Cook When Needed:
- Cook the frozen meatballs straight from the freezer in your favorite sauce, bake them in the oven, or pan-fry them until fully cooked.
Cooking Methods
1. Oven-Baked:
- Preheat the oven to 375°F (190°C). Place the meatballs on a baking sheet and bake for 15–20 minutes if raw, or 10 minutes if par-baked, until fully cooked.
2. Simmer in Sauce:
- Add the frozen meatballs to a pot of simmering marinara sauce, BBQ sauce, or gravy. Cover and cook for 20–25 minutes until heated through.
3. Pan-Fried:
- Heat a skillet with a little oil and cook the frozen meatballs over medium heat, turning occasionally, until browned and cooked through.
Customizations and Variations
- Spicy Meatballs: Add red pepper flakes, diced jalapeños, or hot sauce for a kick of heat.
- Cheese-Stuffed: Place a small cube of mozzarella or cheddar cheese in the center of each meatball for a gooey surprise.
- Vegetarian Option: Use plant-based ground meat or a mixture of lentils, mushrooms, and breadcrumbs for meat-free meatballs.
- Gluten-Free: Replace the breadcrumbs with almond flour or gluten-free breadcrumbs.
- Flavor Variations: Try Asian-inspired meatballs with soy sauce, ginger, and sesame oil, or Swedish meatballs with a creamy gravy.
Serving Suggestions
1. With Pasta:
- Pair with marinara sauce and spaghetti for a classic Italian meal.
2. Meatball Subs:
- Serve on toasted hoagie rolls with marinara sauce and melted cheese for a hearty sandwich.
3. Appetizers:
- Glaze the meatballs with BBQ sauce or sweet chili sauce and serve with toothpicks as party appetizers.
4. Rice Bowls:
- Add the meatballs to a bowl of rice and roasted vegetables for a quick and balanced meal.
5. Soup:
- Drop the meatballs into a simmering broth with vegetables and pasta for a comforting soup.
Why You’ll Love Them
Freezer-Friendly Meatballs are the perfect solution for busy nights when you want a homemade meal without the hassle of starting from scratch. Their tender texture, savory flavor, and versatility make them a family favorite. Whether you’re using them in a classic spaghetti dinner, adding them to soups, or serving them as a party appetizer, these meatballs deliver on taste and convenience.
With a little prep ahead of time, you’ll always have a batch of delicious meatballs ready to go, ensuring that a warm, satisfying meal is just minutes away. These make-ahead wonders are the ultimate freezer staple for any home cook!
Veggie-Packed Lasagna
Veggie-Packed Lasagna is a wholesome, delicious take on the classic Italian dish that’s loaded with vibrant vegetables, rich layers of cheese, and hearty pasta. Perfect for busy weeknights or meal prepping, this dish combines comfort food with a healthy twist. With its flavorful tomato sauce, tender vegetables, and creamy ricotta filling, veggie-packed lasagna is sure to satisfy even the most devout meat lovers.
Why Veggie-Packed Lasagna is a Winner
- Nutritious and Filling: Packed with a variety of vegetables, this lasagna provides essential nutrients while still being indulgent.
- Customizable: Use whatever vegetables are in season or on hand for a versatile, flexible dish.
- Perfect for Leftovers: Tastes even better the next day, making it ideal for meal prepping or reheating.
- Family-Friendly: The rich flavors and cheesy layers make it a hit with kids and adults alike.
Key Ingredients
- Vegetables: Zucchini, spinach, mushrooms, bell peppers, carrots, and eggplant are great options for adding color, flavor, and nutrition.
- Pasta: Use traditional lasagna noodles, no-boil noodles, or even whole-grain or gluten-free varieties to suit your preference.
- Cheese: A blend of ricotta, mozzarella, and Parmesan adds creaminess and richness to the dish.
- Tomato Sauce: Use a high-quality marinara or homemade tomato sauce as the base for the lasagna layers.
- Herbs and Spices: Garlic, oregano, basil, and red pepper flakes add depth and a hint of spice to the sauce.
- Optional Add-Ins: Ricotta mixed with fresh herbs or a layer of béchamel sauce for extra creaminess.
How to Make It
- Prepare the Vegetables:
- Dice or slice your chosen vegetables evenly to ensure they cook properly. Sauté them in olive oil with garlic, salt, and pepper until slightly softened.
- Cook the Noodles:
- If using traditional lasagna noodles, boil them until al dente. No-boil noodles can be used directly, but ensure the sauce is slightly thinner to hydrate them while baking.
- Assemble the Ricotta Mixture:
- In a mixing bowl, combine ricotta cheese with a beaten egg, grated Parmesan, chopped parsley, and a pinch of salt and pepper.
- Layer the Lasagna:
- Spread a thin layer of tomato sauce at the bottom of a greased baking dish. Add a layer of noodles, followed by the ricotta mixture, sautéed vegetables, and mozzarella cheese. Repeat the layers, finishing with a generous topping of mozzarella and Parmesan.
- Bake:
- Cover the dish with foil and bake at 375°F (190°C) for 25–30 minutes. Remove the foil and bake for an additional 10–15 minutes, or until the cheese is golden and bubbly.
- Let Rest and Serve:
- Allow the lasagna to rest for 10 minutes before slicing, so the layers can set. Garnish with fresh basil or parsley before serving.
Customizations and Variations
- Low-Carb Option: Replace the lasagna noodles with thin slices of zucchini, eggplant, or butternut squash for a lighter dish.
- Vegan Version: Use plant-based ricotta and mozzarella, and replace the egg with a flaxseed or chia seed substitute.
- Add Protein: Include a layer of lentils, chickpeas, or crumbled tofu for added protein.
- Extra Creamy: Add a layer of béchamel sauce between the vegetables and pasta for a creamier texture.
- Spicy Twist: Mix a pinch of red pepper flakes into the sauce for a subtle heat.
Serving Suggestions
- Side Dishes: Pair the lasagna with a simple green salad, garlic bread, or roasted vegetables.
- Toppings: Garnish with a sprinkle of freshly grated Parmesan cheese, chopped basil, or a drizzle of olive oil.
- Storage Tips: Store leftovers in an airtight container in the fridge for up to 3 days or freeze for up to 3 months.
Why You’ll Love It
The Veggie-Packed Lasagna is a deliciously satisfying way to incorporate more vegetables into your diet without compromising on flavor. Its creamy, cheesy layers combined with the savory tomato sauce and hearty vegetables make it a comforting and healthy meal that feels indulgent.
Whether you’re serving it as a weeknight dinner, a dish for entertaining, or meal prepping for the week ahead, this lasagna offers the perfect balance of taste and nutrition. It’s an approachable recipe that’s easy to adapt, ensuring everyone at the table can enjoy a slice of veggie-packed goodness.
Conclusion
Cooking for busy weeknights doesn’t have to mean sacrificing flavor, nutrition, or the comfort of home-cooked meals. These quick and easy Taste of Home recipes—from hearty soups and satisfying casseroles to crowd-pleasing sliders and veggie-packed lasagna—offer something for everyone. Each recipe is designed to bring ease to your kitchen while delivering the delicious, comforting flavors your family will love.
Whether you’re tackling a hectic schedule, looking for meal-prep-friendly ideas, or simply craving the warmth of homemade dishes, these recipes provide practical solutions without compromising quality. With minimal effort and maximum flavor, they’ll transform your weeknight dinners into moments of connection, nourishment, and joy.
So grab your favorite ingredients, get creative, and let these recipes bring the taste of home to your table—quickly and effortlessly. Let your kitchen be the heart of your home, even on the busiest of days!
1 thought on “Quick and Easy Taste of Home Recipes for Busy Weeknights”